mysql集群搭建及实现细节
文件下载地址:
https://download.csdn.net/download/rainyspring4540/10351695
主-从搭建
准备环境:
OS :Windows7 /10 ;环境变量里不要包含mysql配置
mysql:mysql-5.5.zip(安装后默认用户名密码为root/root)
第1步:准备mysql安装包zip
将192.168.0.56的文件夹格式的mysql复制两份,命名为mysqlM(主),mysqlS(从)
准备:
将mysqlM安装在192.168.0.19机器上,端口3307
将mysqlS安装在192.168.0.20机器上,端口3308
第2步:安装主mysql(master)
在19机器上,
修改my.ini文件
修改basedir和datadir的路径以及端口是否正确
检查是否有下列记录存在,没有就加上
log-bin=mysql-bin
binlog_format=mixed(不重要)
server-id =1
安装并添加用户
管理员身份进入命令提示符(cmd),
切换到mysql\bin目录,运行如下:
mysqld install mysqlm –defaults-file=”mysql目录/my.ini” (注册服务)
net start mysqlm (启动服务)
mysql –uroot –proot –P3307 ,回车 进入mysql命令环境
grant replication slave,reload,super on *.*to slave@'%' identified by 'fulong';(专用于复制的用户)
flush privileges
show master status\G 运行后,显示:
日志文件名file 为mysql-bin-0000112
坐标position(日志读取位置)107(写死)
类似如图的展示
第3步:安装从mysql(slave)
在20机器上,
修改my.ini文件
修改basedir和datadir的路径以及端口是否正确
检查是否有下列记录存在,没有就加上
log-bin=mysql-bin
binlog_format=mixed(不重要)
server-id =2(别和主mysql的1重复就行,只是集群中的唯一标识)
安装
管理员身份进入命令提示符(cmd),
切换到mysql\bin目录,运行如下:
mysqld install mysqlm –defaults-file=”mysql目录/my.ini” (注册服务)
net start mysqls (启动服务)
mysql –uroot –proot –P3308 ,回车 进入mysql命令环境
change master to master_host='192.168.0.19',master_user='slave',master_password='root',master_log_file='mysql-bin.000012',master_log_pos=107;
start slave;(启动ok,完毕)
经验
1. 从服务器的写操作无法同步的主服务器中
2. 只要记住主服务器的日志文件名和日志读取位置,从库只要手动同步好这个读取位置前的所有主库的内容,然后启用主-从搭建即可实现自动将主库读取位置之后的所有内容全部复制过来
3. 可以记录主库多个读取点位置和相应的日期文件名,即可实习任意节点的如同2的复制
主-主搭建
技术同主-从搭建,就是反过来在操作一遍即可,让从库当做主库,让主库当做从库
第1步:修改A、B各自的my.ini
在A内
[mysqld]
# for repl
server-id = 1
binlog_checksum=none #如果两个mysql的版本不一样则加入此行
log-bin = mysql-bin
auto-increment-increment= 2 # 应设为整个结构中服务器的总数
auto-increment-offset = 1 # 设定数据库中自动增长的起点,避免两台服务器数据同步时出现主键冲突
##binlog-ignore=mysql #忽略mysql库【我一般都不写】
##binlog-ignore=information_schema #忽略information_schema库【我一般都不写】
##replicate-do-db=aa #要同步的数据库,默认所有库
在B内
[mysqld]
# for repl
server-id = 2
log-bin = mysql-bin
auto-increment-increment= 2
auto-increment-offset = 2
第2步:mysqlA->mysqlB(A是主,B是从)
先进行mysqlA->mysqlB的主从搭建(A是主,B是从),操作完全同上
第3步:mysqlB->mysqlA(B是主,A是从)
为B建用户
在B内
创建用户复制的用户:
grant replication slave,reload,super on *.*to slave@'%' identified by 'fulong';(专用于复制的用户)
flush privileges;
show master status;
显示日志文件名file 为mysql-bin-000012 和position(日志读取位置)107(写死) ,因为2个库完全一样,所有日志也一样
为A指派master
change master to master_host='192.168.0.20',master_user='slave',master_password='root',master_log_file='mysql-bin.000012',master_log_pos=107;
start slave;(启动)
建议在配置时,AB都配置好后,最后再依次启动start slave;
常见出错点
1、两台数据库都存在db数据库,而第一台MySQL db中有tab1,第二台MySQL db中没有tab1,那肯定不能成功。
2、已经获取了数据的二进制日志名和位置,又进行了数据操作,导致POS发生变更。在配置CHANGE MASTER时还是用到之前的POS。
3、stop slave后,数据变更,再start slave。出错。
终极更正法:重新执行一遍CHANGE MASTER就好了。
整合Mysql-Router
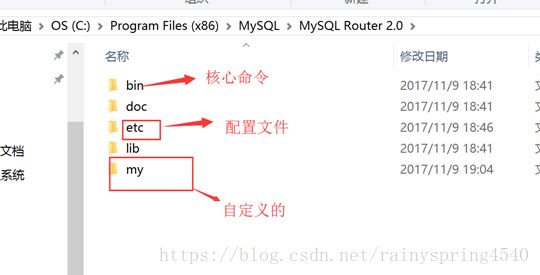
exe安装
下载如:mysql-router-2.0.4-windows-x86-32bit.msi
最好安装在c盘
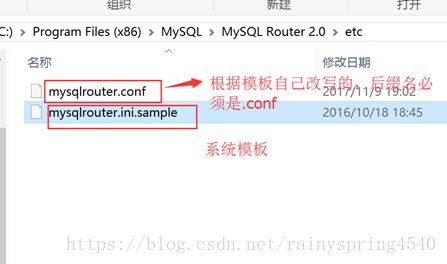
其中etc/下的配置文件需要自己创建
etc/mysqlrouter.conf的内容如下:
# Copyright (c) 2015, 2016, Oracle and/orits affiliates. All rights reserved.
#
# This program is free software; you canredistribute it and/or modify
# it under the terms of the GNU GeneralPublic License as published by
# the Free Software Foundation; version 2of the License.
#
# This program is distributed in the hopethat it will be useful,
# but WITHOUT ANY WARRANTY; without eventhe implied warranty of
# MERCHANTABILITY or FITNESS FOR APARTICULAR PURPOSE. See the
# GNU General Public License for moredetails.
#
# You should have received a copy of theGNU General Public License
# along with this program; if not, write tothe Free Software
# Foundation, Inc., 51 Franklin St, FifthFloor, Boston, MA 02110-1301 USA
#
# MySQL Router configuration file
#
# Documentation is available at
# http://dev.mysql.com/doc/mysql-router/en/
[DEFAULT]
logging_folder = C:\Program Files(x86)\MySQL\MySQL Router 2.0\my
plugin_folder = C:/Program Files(x86)/MySQL/MySQL Router 2.0/lib/
runtime_folder = C:\Program Files(x86)\MySQL\MySQL Router 2.0\my
config_folder = C:/Program Files(x86)/MySQL/MySQL Router 2.0/etc/
[logger]
level = info
# 主节点故障转移配置
[routing:basic_failover]
# 写节点地址
bind_address=0.0.0.0
# 写节点端口
bind_port = 7001
# 模式,读写
mode = read-write
# 默认情况下第一台主数据库为写主库,当第一台主数据库DOWN机后,第二台数据库被提升为主库
destinations = 192.168.0.19:3310
# 从节点负载均衡配置
[routing:balancing]
# 绑定的IP地址
bind_address=0.0.0.0
# 监听的端口
bind_port = 7002
# 连接超时时间
connect_timeout = 3
# 最大连接数
max_connections = 1024
# 后端服务器地址.默认读进行轮询
destinations =192.168.0.19:3311,192.168.0.19:3310
# 模式:读还是写
mode = read-only
# If no plugin is configured which starts aservice, keepalive
# will make sure MySQL Router will notimmediately exit. It is
# safe to remove once Router is configured.
[keepalive]
interval = 60
将你事前配置好的mysql集群(主-主或主-从)服务匹配上面的改改就行了
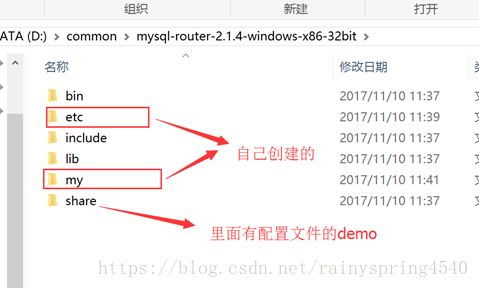
zip安装
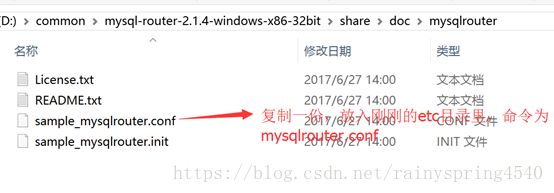
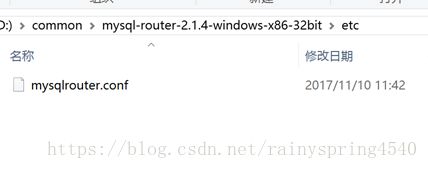
然后创建配置文件
效果如下:
内容和“exe安装”的一样,略了
启动或注册windows服务
参照“常用参数”
启动:
窗口不要关闭,这是服务哦!
输入
mysql –uroot –proot –P7001
或
mysql –uroot –proot –P7002
是能够连接上的,当然你可以在里面执行任意sql
这里需要解释下,2个mysql是在192.168.0.19的机器上的不同端口服务。
而本地ip为.0.20机器上,并没有安装mysql哦(当然要本地使用mysql命令必须有相应的包,但是无需安装mysql服务的),所以你通过上面命令是访问的19的mysql哦
细心的会发现mysqlrouter.conf中7001和7002的配置方法不同哦
7001的写入只配置了一个mysql,7002配置了2个(负载均衡,一个宕机,另一个还能用,使7002更健壮),
常用参数
无论哪个版本
运行mysqlrouter.exe --help查看参数
其中常用的如下
mysqlrouter.exe –c/--config=
mysqlrouter.exe --install-service 注册windows服务
mysqlrouter.exe --remove-service 卸载windows服务
最终方案
由于需求只有两台DB,一个主库,一个是备份库(容灾恢复用);
故采用主主复制,不使用Router
集群版安装包思路
A包:Apache一个包
B包:Tomcat1+mysql主1 一个包
C包:Tomcat2+msyql主2 一个包
B和C的安