虚拟机Centos7.6搭建LNMP平台
目录
文章目录
- 1 安装前的配置
- 1.1 VMware虚拟机网卡设置
- 1.2 Centos7.6网卡IP设置及测试PING
- 1.3 查看系统端口启动状态(查看80端口是否被占用)
- 1.4 搭建环境前的软件配置
- 2.nginx
- 2.1 安装nginx依赖包
- 2.2 创建目录并下载nginx包解压
- 2.3 nginx编译安装(/usr/local/nginx目录)
- 2.4 创建并设置nginx运行账号
- 2.5 设置nginx为系统服务
- 2.6 设置nginx开机自启动及开启服务
- 2.7 防火墙配置80端口并检测主机连接虚拟机IP
- 3.Mysql
- 3.1 安装前的检查
- 3.2 安装编译mysql需要的依赖包
- 3.3 安装mysql
- 3.4 配置mysql
- 4.PHP
- 4.1 安装PHP依赖包以及安装PHP
- 4.2 配置nginx支持php
- 4.3 设置php-fpm为系统服务
- 4.4 测试网页打开PHP
1 安装前的配置
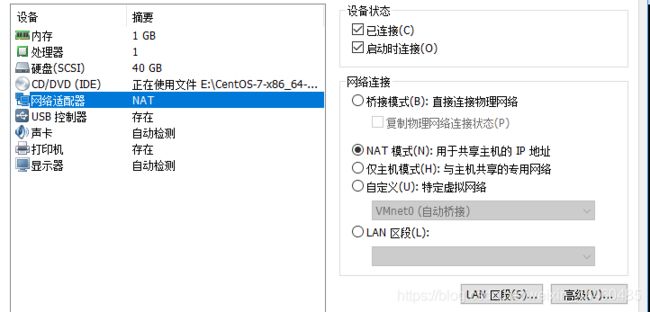
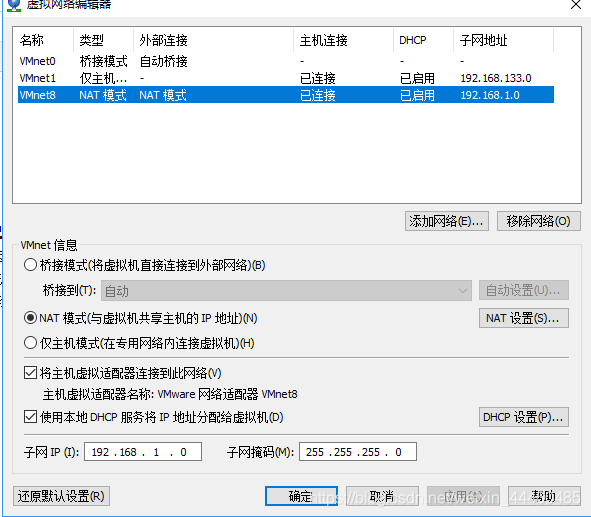
1.1 VMware虚拟机网卡设置
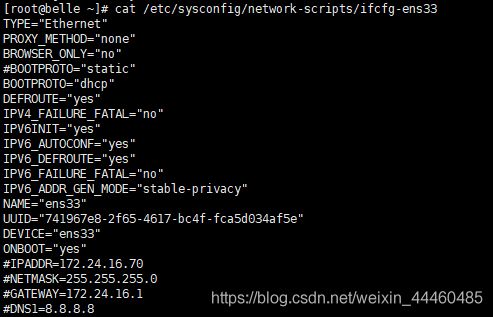
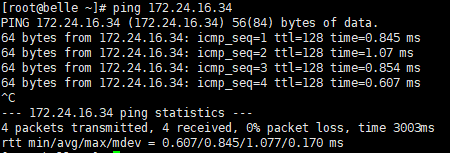
1.2 Centos7.6网卡IP设置及测试PING
1.3 查看系统端口启动状态(查看80端口是否被占用)
如80端口被HTTP占用,需要关闭服务以及httpd开机启动的服务

1.4 搭建环境前的软件配置
- 安装wget gcc gcc-c++
[root@belle ~]# yum -y install wget gcc gcc-c++
2.nginx
2.1 安装nginx依赖包
- nginx的Rewrite模块和HTTP核心模块会使用到PCRE正则表达式语法
[root@belle ~]# yum -y install pcre pcre-devel
- nginx的各种模块中需要使用gzip压缩的库
[root@belle ~]# yum -y install zlib zlib-devel
- 安全套接字层密码库
[root@belle ~]# yum -y install openssl openssl-devel
2.2 创建目录并下载nginx包解压
[root@belle /]# cd usr
[root@belle usr]# mkdir software
[root@belle usr]# cd software
[root@belle software]# wget http://nginx.org/download/nginx-1.12.2.tar.gz
[root@belle software]# tar -zxvf nginx-1.12.2.tar.gz
2.3 nginx编译安装(/usr/local/nginx目录)
[root@belle software]# cd nginx-1.12.2
[root@belle nginx-1.12.2]# ./configure --prefix=/usr/local/nginx
[root@belle nginx-1.12.2]# make && make install
2.4 创建并设置nginx运行账号
[root@belle nginx-1.12.2]# groupadd nginx
[root@belle nginx-1.12.2]# useradd -M -g nginx -s /sbin/nologin nginx
[root@belle nginx-1.12.2]# cd /usr/local/nginx/conf
[root@belle conf]# vi nginx.conf
user  nginx nginx;      #设置user为nginx
2.5 设置nginx为系统服务
[root@belle conf]# cd /lib/systemd/system/
[root@belle system]# vi nginx.service
[Unit]
Description=nginx
After=network.target
[Service]
Type=forking
ExecStart=/usr/local/nginx/sbin/nginx
ExecReload=/usr/local/nginx/sbin/nginx -s reload
ExecStop=/usr/local/nginx/sbin/nginx -s stop
PrivateTmp=true
[Install]
WantedBy=multi-user.target
2.6 设置nginx开机自启动及开启服务
- 设置开机启动和开启服务
 [root@belle ~]# systemctl enable nginx.service
 [root@belle ~]# systemctl start nginx.service
2.7 防火墙配置80端口并检测主机连接虚拟机IP
- 永久开放80端口
[root@belle ~]# firewall-cmd --zone=public --add-port=80/tcp --permanent
- 重启防火墙
[root@belle ~]# firewall-cmd --reload
- 查看防火墙开启状态
[root@belle ~]# systemctl status firewalld
● firewalld.service - firewalld - dynamic firewall daemon
   Loaded: loaded (/usr/lib/systemd/system/firewalld.service; enabled; vendor preset: enabled)
   Active: active (running) since Fri 2019-05-17 09:38:07 CST; 1h 37min ago
     Docs: man:firewalld(1)
 Main PID: 6574 (firewalld)
   CGroup: /system.slice/firewalld.service
           └─6574 /usr/bin/python -Es /usr/sbin/firewalld --nofork --nopid
May 17 09:38:05 belle systemd[1]: Starting firewalld - dynamic firewall daemon...
May 17 09:38:07 belle systemd[1]: Started firewalld - dynamic firewall daemon.
- 查看80端口是否开放成功
[root@belle ~]# firewall-cmd --zone=public --query-port=80/tcp
3.Mysql
3.1 安装前的检查
- 查看是否已安装mysql
[root@belle ~]# rpm -qa mysql
- 是否存在与mysql相关的文件或目录
[root@belle ~]# whereis mysql #有就删除
- 查看是否存在mariadb
[root@belle ~]# rpm -qa | grep mariadb
- 卸载mariadb
[root@belle ~]# rpm -e --nodeps mariadb-libs-5.5.60-1.el7_5.x86_64
- 是否存在/etc/my.cnf,有就要删除
3.2 安装编译mysql需要的依赖包
- 安装编译mysql需要的依赖包
[root@belle etc]# yum -y install libevent* libtool* autoconf* libstd* ncurse* bison* openssl*
- 安装cmake
[root@belle /]# cd /usr/software
[root@belle software]# wget http://www.cmake.org/files/v2.8/cmake-2.8.12.1.tar.gz
[root@belle software]# tar -zxvf cmake-2.8.12.1.tar.gz
[root@belle software]# cd cmake-2.8.12.1
[root@belle cmake-2.8.12.1]# ./configure
[root@belle cmake-2.8.12.1]# make && make install
[root@belle cmake-2.8.12.1]# cmake --version #查看cmake是否安装成功
3.3 安装mysql
- 下载mysql包并解压
[root@belle /]# cd /usr/software
[root@belle software]# wget http://dev.mysql.com/get/Downloads/MySQL-5.6/mysql-5.6.22.tar.gz
[root@belle software]# tar -zxvf mysql-5.6.22.tar.gz
- 编译安装mysql(/usr/local/mysql目录)
[root@belle software]# cd mysql-5.6.22
[root@belle software]# cmake -DCMAKE_INSTALL_PREFIX=/usr/local/mysql -DMYSQL_DATADIR=/usr/local/mysql/data -DSYSCONFDIR=/etc -DWITH_MYISAM_STORAGE_ENGINE=1 -DWITH_INNOBASE_STORAGE_ENGINE=1 -DWITH_MEMORY_STORAGE_ENGINE=1 -DWITH_READLINE=1 -DMYSQL_UNIX_ADDR=/var/lib/mysql/mysql.sock -DMYSQL_TCP_PORT=3306 -DENABLED_LOCAL_INFILE=1 -DWITH_PARTITION_STORAGE_ENGINE=1 -DEXTRA_CHARSETS=all -DDEFAULT_CHARSET=utf8 -DDEFAULT_COLLATION=utf8_general_ci
[root@belle software]# make && make install
3.4 配置mysql
- 为mysql指定组和用户
[root@belle ~]# groupadd mysql
[root@belle ~]# useradd -M -g mysql -s /sbin/nologin mysql
[root@belle ~]# chown -R mysql:mysql /usr/local/mysql
- 初始化配置\
[root@belle ~]# cd /usr/local/mysql/scripts/
[root@belle scripts]# ./mysql_install_db --basedir=/usr/local/mysql --datadir=/usr/local/mysql/data --user=mysql
- 设置mysql为启动系统服务并设置登入密码
[root@belle system]# cd /lib/systemd/system
[root@belle system]# vi mysql.service
[Unit]
Description=mysql
After=network.target
[Service]
Type=forking
ExecStart=/usr/local/mysql/support-files/mysql.server start
ExecStop=/usr/local/mysql/support-files/mysql.server stop
ExecRestart=/usr/local/mysql/support-files/mysql.server restart
ExecReload=/usr/local/mysql/support-files/mysql.server reload
PrivateTmp=true
[Install]
WantedBy=multi-user.target
[root@belle system]# systemctl enable mysql.service
[root@belle system]# systemctl start mysql.service
[root@belle system]# ps aux | grep mysql
- 进入mysql并设置密码为123456
[root@belle system]# /usr/local/mysql/bin/mysql -u root
mysql> set password for root@localhost = password('123456');
4.PHP
4.1 安装PHP依赖包以及安装PHP
- 安装php依赖包
[root@belle ~]# yum install libxml2 libxml2-devel openssl openssl-devel bzip2 bzip2-devel libcurl libcurl-devel libjpeg libjpeg-devel libpng libpng-devel freetype freetype-devel gmp gmp-devel libmcrypt libmcrypt-devel readline readline-devel libxslt libxslt-devel
- 依赖包里libmcrypt libmcrypt-devel会提示没有安装,是因为需要更新扩展包以及更新yum源
[root@belle system]# yum  install epel-release
[root@belle system]# yum  update
[root@belle software]#  yum install libmcrypt libmcrypt-devel
- 下载PHP解压并编译安装
[root@belle software]# wget http://php.net/get/php-7.2.4.tar.gz/from/a/mirror
- mirror改名php-7.2.4.tar.gz,并编译安装
[root@belle software]# tar -zxvf php-7.2.0.tar.gz
[root@belle software]# cd php-7.2.4
[root@belle php-7.2.4]# ./configure --prefix=/usr/local/php --disable-fileinfo --enable-fpm --with-config-file-path=/etc --with-config-file-scan-dir=/etc/php.d --with-openssl --with-zlib --with-curl --enable-ftp --with-gd --with-xmlrpc --with-jpeg-dir --with-png-dir --with-freetype-dir --enable-gd-native-ttf --enable-mbstring --with-mcrypt=/usr/local/libmcrypt --enable-zip --enable-mysqlnd --with-mysqli=mysqlnd --with-pdo-mysql=mysqlnd --with-mysql-sock=/var/lib/mysql/mysql.sock --without-pear  --enable-bcmath
[root@belle php-7.2.4]# make && make install
- 将PHP的配置文件放到指定目录(configure命令中的–with-config-file-path设置)
[root@belle php-7.2.4]# cp php.ini-development /etc/php.ini
- 创建并设置php-fpm运行账号
[root@belle etc]# groupadd www-data
[root@belle etc]# useradd -M -g www-data -s /sbin/nologin www-data
[root@belle ~]# cd /usr/local/php/etc
[root@belle etc]# cp php-fpm.conf.default php-fpm.conf
[root@belle etc]# tail -1 php-fpm.conf
include=/usr/local/php/etc/php-fpm.d/*.conf
[root@belle etc]# cd php-fpm.d
[root@belle php-fpm.d]# cp www.conf.default www.conf #匹配上面的路径*.conf
[root@belle php-fpm.d]# vi www.conf
user=www-data          #把用户名和组改成www-data
group=www-data
4.2 配置nginx支持php
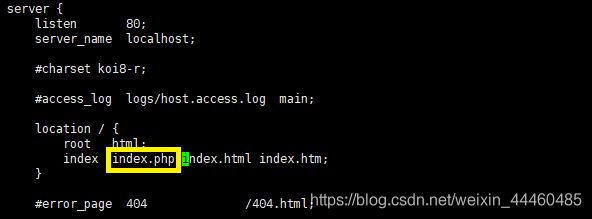
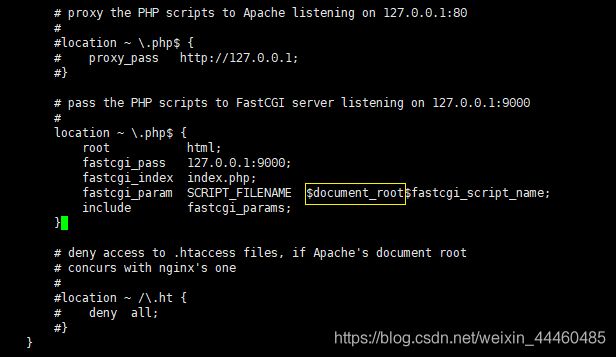
- 配置nginx支持php(nginx.conf里图1:添加index.php 图2:/scripts改成$document_root)
[root@belle ~]# cd /usr/local/nginx/conf/
[root@belle conf]# cp nginx.conf nginx.conf.bak
[root@belle conf]# vi nginx.conf
- 重启nginx服务
[root@belle conf]# systemctl restart nginx.service
4.3 设置php-fpm为系统服务
- 创建并设置php-fpm服务
[root@belle system]# vi php-fpm.service
[Unit]
Description=php-fpm
After=network.target
[Service]
Type=forking
ExecStart=/usr/local/php/sbin/php-fpm
PrivateTmp=True
[Install]
WantedBy=multi-user.target
- 设置php-fpm服务开机自启动
[root@belle system]# systemctl enable php-fpm.service
[root@belle system]# systemctl start php-fpm.service
- 查看是否启动成功
[root@belle system]# ps aux | grep php-fpm
root      30981  0.0  0.6 214200  6204 ?        Ss   13:35   0:00 php-fpm: master process (/usr/local/php/etc/php-fpm.conf)
www-data  30982  0.0  0.5 214200  5756 ?        S    13:35   0:00 php-fpm: pool www
www-data  30983  0.0  0.5 214200  5756 ?        S    13:35   0:00 php-fpm: pool www
- 在/usr/local/nginx/html添加index.php的文件
[root@belle html]# vi index.php
