1.安装nginx
在192.168.60.202上安装nginx服务,安装过程如下:

`#yum -y install epel-release lrzsz  zip unzip wget tree git dpkg  pcre pcre-devel openssl openssl-devel gd-devel  zlib-devel gcc
#wget http://nginx.org/download/nginx-1.18.0.tar.gz -O /data
#tar -xf nginx-1.18.0.tar.gz
#cd nginx-1.18.0/
#./configure --prefix=/data/nginx --with-http_ssl_module --with-http_v2_module --with-http_stub_status_module --with-pcre --with-http_gzip_static_module --with-http_dav_module --with-http_addition_module --with-http_sub_module --with-http_flv_module --with-http_mp4_module
#make && make install
#/data/nginx/sbin/nginx
#ps -ef |grep nginx
加入开机自启动
#chmod +x /etc/rc.d/rc.local
# vim /etc/rc.d/rc.local
  /data/nginx/sbin/nginx`
2.配置nginx
vi nginx.conf
#user  nobody;
worker_processes  2;
#error_log  logs/error.log;
#error_log  logs/error.log  notice;
#error_log  logs/error.log  info;
#pid        logs/nginx.pid;
worker_rlimit_nofile 65535;
events {
   use epoll;
    worker_connections  65535;
}
http {
    include       mime.types;
    default_type  application/octet-stream;
    charset utf-8;
    ######
    ## set access log format
    ######
    log_format  main  '$http_x_forwarded_for $remote_addr $remote_user [$time_local] "$request" '
                      '$status $body_bytes_sent "$http_referer" '
                      '"$http_user_agent" "$http_cookie" $host $request_time';
    #######
    ## http setting
    #######
    sendfile       on;
    tcp_nopush     on;
    tcp_nodelay    on;
    keepalive_timeout  65;
    fastcgi_connect_timeout 30000;
    fastcgi_send_timeout 30000;
    fastcgi_read_timeout 30000;
    fastcgi_buffer_size 256k;
    fastcgi_buffers 8 256k;
    fastcgi_busy_buffers_size 256k;
    fastcgi_temp_file_write_size 256k;
    fastcgi_intercept_errors on;
    ##cache##
    client_header_timeout 60s;
    client_body_timeout 60s;
    client_max_body_size 10m;
    client_body_buffer_size 1m;
    proxy_connect_timeout 5;
    proxy_read_timeout 60;
    proxy_send_timeout 5;
    proxy_buffer_size 64k;
    proxy_buffers 4 128k;
    proxy_busy_buffers_size 128k;
    proxy_temp_file_write_size 1m;
    proxy_temp_path /home/temp_dir;
    proxy_cache_path /home/cache levels=1:2 keys_zone=cache_one:200m inactive=1d max_size=30g;
    ##end##
    gzip  on;
    gzip_min_length  1k;
    gzip_buffers     4 16k;
    gzip_http_version 1.1;
    gzip_comp_level 9;
    gzip_types       text/plain application/x-javascript text/css application/xml text/javascript application/x-httpd-php;
    gzip_vary on;
    ## includes vhosts
}
配置负载均衡
```shell
#后端tomcat负载均衡
    upstream tomcat_server {
        server 192.168.60.204:8080 weight=1;
        server 192.168.60.205:8080 weight=1;
        server 192.168.60.206:8080 weight=1;
    }
    server {
        listen       80;
        server_name  192.168.60.202;
        charset utf-8;
       # access_log  logs/host.access.log  main;
        location / {
            root   html;
            index  index.html index.htm index.jsp;
            proxy_pass http://tomcat_server;
            proxy_set_header  host $host;
            proxy_set_header X-Forwarded-For $remote_addr;
        }
3.安装tomcat
在192.168.60.204,192.168.60.205和192.168.60.206三台机器上操作
首先三台服务器都要安装JDK服务
安装示例如下:
cd /usr/local
tar -xf jdk-8u71-linux-x64.tar.gz
在/etc/profile配置环境变量
export JAVA_HOME=/usr/local/jdk1.8.0_71
export PATH=$JAVA_HOME/bin:$JAVA_HOME/jre/bin:$PATH:$HOMR/bin
export CLASSPATH=$CLASSPATH:$JAVA_HOME/lib:$JAVA_HOME/jre/lib
source /etc/profile
[root@web1 local]# java -version
java version "1.8.0_71"
Java(TM) SE Runtime Environment (build 1.8.0_71-b15)
Java HotSpot(TM) 64-Bit Server VM (build 25.71-b15, mixed mode)
三台服务器都要安装tomcat服务
安装tomcat
cd /usr/local
tar -xf apache-tomcat-8.0.30.tar.gz
ln -s /usr/local/apache-tomcat-8.0.30 /usr/local/tomcat/
在/etc/profile配置环境变量
export JAVA_HOME=/usr/local/jdk1.8.0_71
export PATH=$JAVA_HOME/bin:$JAVA_HOME/jre/bin:$PATH:$HOMR/bin
export CLASSPATH=$CLASSPATH:$JAVA_HOME/lib:$JAVA_HOME/jre/lib
export TOMCAT_HOME=/usr/local/tomcat
export CATALINA_HOME=/usr/local/tomcat
source /etc/profile
创建index.jsp测试页,3台tomcat机器都要创建
web1(192168.60.204) 测试页面
cd /usr/local/tomcat/webapps/ROOT/
cp index.jsp{,.bak}
vim index.jsp
[root@web1 ROOT]# cat index.jsp
<%= request.getSession().getId() %>
192.168.60.204
port:8080
this is Tomcat-node1!
<%@ page contentType="text/html;charset=UTF-8" isELIgnored="false"%>
SessionID:<%=session.getId()%>
SessionIP:<%=request.getServerName()%>
SessionPort:<%=request.getServerPort()%>
<% out.println("This is Tomcat server 204 !"); %>
web2(192.168.60.205)测试页面
vim /usr/local/tomcat/webapps/ROOT/index.jsp
<%= request.getSession().getId() %>
192.168.60.205
port:8080
this is Tomcat-node2!
<%@ page contentType="text/html;charset=UTF-8" isELIgnored="false"%>
SessionID:<%=session.getId()%>
SessionIP:<%=request.getServerName()%>
SessionPort:<%=request.getServerPort()%>
<% out.println("This is Tomcat server 205 !"); %>
web3(192.168.60.203)测试页面
vim /usr/local/tomcat/webapps/ROOT/index.jsp
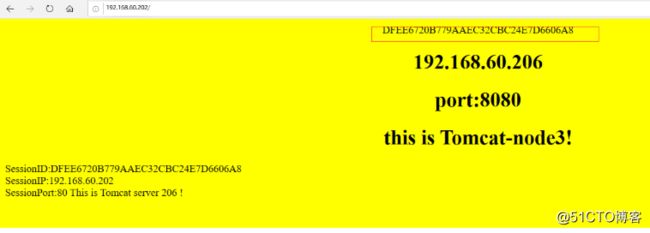
<%= request.getSession().getId() %>
192.168.60.206
port:8080
this is Tomcat-node3!
<%@ page contentType="text/html;charset=UTF-8" isELIgnored="false"%>
SessionID:<%=session.getId()%>
SessionIP:<%=request.getServerName()%>
SessionPort:<%=request.getServerPort()%>
<% out.println("This is Tomcat server 206 !"); %>
4.配置tomcat session共享
配置
其实在 tomcat 的 conf/server.xml 的配置文件中,已经有此项配置,只是被注释了,只需将注释 打开 即可,如下图
修改server.xml配置,三台tomcat机器都要修改
vim /usr/local/tomcat/conf/server.xml
另外还需要在 web应用 的 web.xml 文件里面配置
cd /usr/local/tomcat/webapps/ROOT/WEB-INF/
cp web.xml{,bak}
vim web.xml


