Nginx网站服务( Nginx统计模块、Nginx访问控制、Nginx部署虚拟主机 )
文章目录
- 一、 统计模块验证
- 二、 nginx虚拟主机的创建
- 2.1 基于不同域名
- 2.2 基于不同端口
- 2.3 基于不同IP
- 三、 Nginx 访问控制
- 3.1 基于授权的访问控制
- 1.生成密码文件
- 2.修改主配置文件对相应目录添加认证配置项
一、 统计模块验证
[root@localhost ~]# cd /opt
将软件包拷贝到当前目录
[root@localhost opt]# ls
nginx-1.12.2.tar.gz  rh
[root@localhost opt]# iptables -F   ##环比防火墙
[root@localhost opt]# setenforce 0   ##关闭增强型核心防护
[root@localhost opt]# yum install gcc gcc-c++ pcre pcre-devel zlib-devel -y    ##安装环境依赖包
[root@localhost opt]# tar xzvf nginx-1.12.2.tar.gz   ##解压到当前路径
[root@localhost opt]# cd nginx-1.12.2/
[root@localhost nginx-1.12.2]# useradd -M -s /sbin/nologin nginx    ##创建一个管理用户管理nginx
[root@localhost nginx-1.12.2]# ./configure \
  --prefix=/usr/local/nginx \
  --user=nginx \
  --group=nginx \
  --with-http_stub_status_module
[root@localhost nginx-1.12.2]# make && make install
[root@localhost nginx-1.12.2]# ln -s /usr/local/nginx/sbin/nginx /usr/local/bin/   ##创建软连接方便使用
[root@localhost nginx-1.12.2]# vim /etc/init.d/nginx   ##编辑一个管理脚本,service管理
#!/bin/bash
#chkconfig:-  99 20
#description:Nginx Service Control Script
PROG="/usr/local/nginx/sbin/nginx"
PIDF="/usr/local/nginx/logs/nginx.pid"
case "$1" in
 start)
  $PROG
 ;;
stop)
   kill -s QUIT $(cat $PIDF)
 ;;
restart)
 $0 stop
 $0 start
 ;;
reload)
 kill -s HUP $(cat $PIDF)
 ;;
 *)
   echo "Usage:$0{start|stop|restart|reload}"
   exit 1
esac
exit 0
[root@localhost nginx-1.12.2]# chmod +x /etc/init.d/nginx   ##给执行权限
[root@localhost nginx-1.12.2]# chkconfig --add /etc/init.d/nginx    ##添加到service管理
[root@localhost nginx-1.12.2]# service nginx start   ##开启服务
[root@localhost nginx-1.12.2]# cd conf/
[root@localhost conf]# vim nginx.conf
location /status {
            stub_status on;
            access_log off;
        }
[root@localhost conf]# service nginx stop
[root@localhost conf]# service nginx start
二、 nginx虚拟主机的创建
利用虚拟主机,不用为每个要运行的网站提供一台单独的 Nginx 服务器或单独运行一 组 Nginx 进程,虚拟主机提供了在同一台服务器,同一组 Nginx 进程上运行多个网站的功能。
和Apache 一样,Nginx 也可以配置多种类型的虚拟主机,分别是基于 IP 的虚拟主机、基于域名的虚拟主机、基于端口的虚拟主机。
2.1 基于不同域名
[root@localhost ~]# yum install bind -y
[root@localhost ~]# vim /etc/named.conf
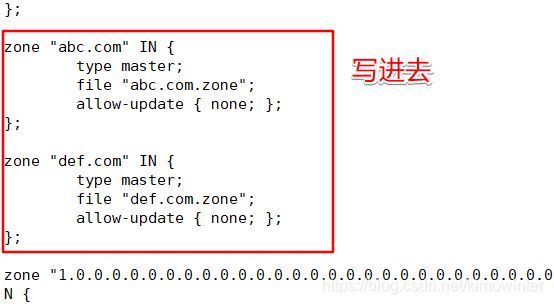
[root@localhost ~]# vim /etc/named.rfc1912.zones
zone "abc.com" IN {
        type master;
        file "abc.com.zone";
        allow-update { none; };
};

zone "def.com" IN {
        type master;
        file "def.com.zone";
        allow-update { none; };
};
[root@localhost ~]# cd /var/named/
[root@localhost named]# cp -p named.localhost abc.com.zone
[root@localhost named]# vim abc.com.zone
[root@localhost named]# cp -p abc.com.zone def.com.zone
[root@localhost named]# cd /var
[root@localhost var]# mkdir www
[root@localhost var]# cd www
[root@localhost www]# mkdir abc def
[root@localhost www]# cd abc
[root@localhost abc]# vim index.html   ##为不同域名的虚拟主机创建网页首页
<h1>this is abc web</h1>
[root@localhost abc]# cd ..
[root@localhost www]# cd def/
[root@localhost def]# vim index.html
<h1>this is def web</h1>
[root@localhost def]# systemctl start named
[root@localhost def]# vim /usr/local/nginx/conf/nginx.conf
 server {
       server_name www.abc.com;
       location / {
          root /var/www/abc;
          index index.html index.php;
       }
    }
    server {
       server_name www.def.com;
       location / {
          root /var/www/def;
          index index.html index.php;
       }
    }

到虚拟机进行验证,首先设置虚拟机的DNS为14.0.0.27


2.2 基于不同端口
[root@localhost def]# vim /usr/local/nginx/conf/nginx.conf
 server {
       listen 14.0.0.27:80;
       location / {
          root /var/www/abc;
          index index.html index.php;
       }
    }
    server {
       listen 14.0.0.27:8080;
       location / {
          root /var/www/def;
          index index.html index.php;
       }
    }
[root@localhost def]# service nginx stop
[root@localhost def]# service nginx start
2.3 基于不同IP
不同IP需要配置双网卡,第二张网卡IP为14.0.0.37
[root@localhost def]# vim /var/named/def.com.zone
三、 Nginx 访问控制
3.1 基于授权的访问控制
Nginx 与 Apahce 一样,可以实现基于用户授权的访问控制,当客户端想要访问相应网站或者目录时,要求用户输入用户名和密码才能正常访问,配置步骤与 Apache 基本一致。
概括为以下几个步骤。
- 生成用户密码认证文件。
- 修改主配置文件相对应目录,添加认证配置项。
- 重启服务,访问测试。
生成密码文件需要安装httpd服务,使用htpasswd命令
1.生成密码文件
[root@localhost www]# yum install httpd -y
[root@localhost www]# cd  /usr/local/nginx/conf/
[root@localhost conf]# htpasswd -c /usr/local/nginx/conf/passwd.db test     ##生成密码文件
New password:                            ##输入密码
Re-type new password:                    ##再次输入
Adding password for user test
[root@localhost conf]# cat passwd.db     ##查看密码文件
test:$apr1$RjOOfU48$5iz47zpE7noTIqmDrcaPX/
2.修改主配置文件对相应目录添加认证配置项
[root@localhost conf]# vim /usr/local/nginx/conf/nginx.conf   ##将密码认证配置项加入进去
          auth_basic "please input password";
          auth_basic_user_file /usr/local/nginx/conf/passwd.db;


