centos7LNMP搭建(一)
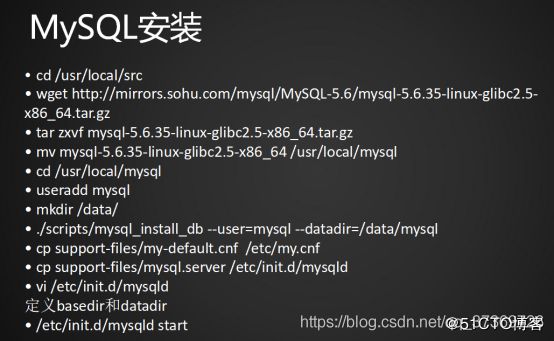
一.安装mysql:
rm -rf /data/mysql/
卸载之后下载mysql,放到/usr/local/src目录下面:
http://mirrors.sohu.com/mysql/MySQL-5.6/mysql-5.6.35-linux-glibc2.5-x86_64.tar.gz
[root@ligen nginx]# wget http://mirrors.sohu.com/mysql/MySQL-5.6/mysql-5.6.35-linux-glibc2.5-x86_64.tar.gz
解压:
tar -zxfv mysql-5.6.35-linux-glibc2.5-x86_64.tar.gz
移动:
  mv mysql-5.6.35-linux-glibc2.5-x86_64 /usr/local/mysql
  cd /usr/local/mysql
  mkdir /data/
  useradd mysql
  ./scripts/mysql_install_db --user=mysql --datadir=/data/mysql
如果出现的错误中有dumper:
yum install -y perl-Module-Install.noarch
接下来拷贝配置文件:
cp support-files/my-default.cnf /etc/my.cnf
vim /etc/my.cnf

# For advice on how to change settings please see
# http://dev.mysql.com/doc/refman/5.6/en/server-configuration-defaults.html
# *** DO NOT EDIT THIS FILE. It's a template which will be copied to the
# *** default location during install, and will be replaced if you
# *** upgrade to a newer version of MySQL.

[mysqld]

# Remove leading # and set to the amount of RAM for the most important data
# cache in MySQL. Start at 70% of total RAM for dedicated server, else 10%.
# innodb_buffer_pool_size = 128M

# Remove leading # to turn on a very important data integrity option: logging
# changes to the binary log between backups.
 log_bin

# These are commonly set, remove the # and set as required.
 basedir = /usr/local/mysql
 datadir = /data/mysql
 port = 3306
 server_id = 128
 socket = /tmp/mysql.sock

# Remove leading # to set options mainly useful for reporting servers.
# The server defaults are faster for transactions and fast SELECTs.
# Adjust sizes as needed, experiment to find the optimal values.
 join_buffer_size = 128M
 sort_buffer_size = 2M
 read_rnd_buffer_size = 2M
 key_buffer=16K
table_open_cache=4
query_cache_limit=256K
query_cache_size=4M
max_allowed_packet=1M
sort_buffer_size=64K
read_buffer_size=256K
thread_stack=64K
innodb_buffer_pool_size = 56M
sql_mode=NO_ENGINE_SUBSTITUTION,STRICT_TRANS_TABLES
拷贝启动脚本:
cp support-files/mysql.server /etc/init.d/mysqld
vim /etc/init.d/mysqld

basedir=/usr/local/mysql
datadir=/data/mysql
启动:
/etc/init.d/mysqld start
如果启动失败,有可能是内存不够的原因,比如说500M的vps:
添加配置:
vim etc/my.cnf
 key_buffer=16K
table_open_cache=4
query_cache_limit=256K
query_cache_size=4M
max_allowed_packet=1M
sort_buffer_size=64K
read_buffer_size=256K
thread_stack=64K
innodb_buffer_pool_size = 56M
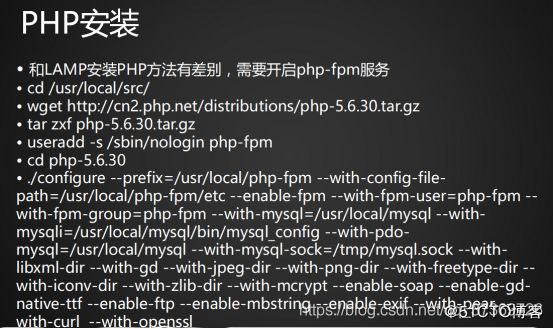
二.php-fpm的安装:
 cd /usr/local/src/php-5.6.39
 make clean
php下载地址:
http://cn2.php.net/distributions/php-5.6.30.tar.gz
解压:
tar -zxvf php-5.6.30.tar.gz
创建php-fpm用户:
useradd -s /sbin/nologin php-fpm
进入解压后的目录:
cd /usr/local/src/php-5.6.39
执行./configure检查编译环境,并配置一些参数:
./configure --prefix=/usr/local/php-fpm --with-config-file-path=/usr/local/php-fpm/etc --enable-fpm --with-fpm-user=php-fpm --with-fpm-group=php-fpm --with-mysql=/usr/local/mysql --with-mysqli=/usr/local/mysql/bin/mysql_config --with-pdo-mysql=/usr/local/mysql --with-mysql-sock=/tmp/mysql.sock --with-libxml-dir --with-gd --with-jpeg-dir --with-png-dir --with-freetype-dir --with-iconv-dir --with-zlib-dir --with-mcrypt --enable-soap --enable-gd-native-ttf --enable-ftp --enable-mbstring --enable-exif --with-pear --with-curl --with-openssl
报错curl,安装:
yum -y install libcurl-devel
之后,编译安装:
make && make install
拷贝php的配置文件:
cp /usr/local/src/php-5.6.39/php.ini-production ./etc/php.ini
创建一个php-fpm.conf文件:
vim /usr/local/php-fpm/etc/php-fpm.conf
[global]
pid = /usr/local/php-fpm/var/run/php-fpm.pid  //pid存放路径
error_log = /usr/local/php-fpm/var/log/php-fpm.log  //日志存放路径
[www]  //这是一个模块
listen = /tmp/php-fcgi.sock  //监听ip和端口,端口默认为9000
listen.mode = 666  //用来定义php-fcgi.sock文件的权限
user = php-fpm  //定义服务的所属用户
group = php-fpm  //定义服务的所属组
pm = dynamic  //后面这些都是关于进程的信息
pm.max_children = 50
pm.start_servers = 20
pm.min_spare_servers = 5
pm.max_spare_servers = 35
pm.max_requests = 500
rlimit_files = 1024
拷贝启动脚本:
cp sapi/fpm/init.d.php-fpm /etc/init.d/php-fpm
chmod 755 /etc/init.d/php-fpm
[root@ligen php-fpm]# /usr/local/php-fpm/sbin/php-fpm -t
chkconfig --add php-fpm
启动:
service php-fpm start
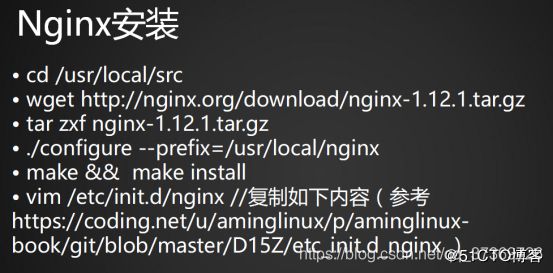
三.安装nginx:


下载地址:
http://nginx.org/download/nginx-1.12.1.tar.gz
检查编译环境:
./configure --prefix=/usr/local/nginx
编译安装:
make && make install
编辑启动脚本:
vim /etc/init.d/nginx
然后将这网址里的文件内容复制进去:
https://coding.net/u/aminglinux/p/aminglinux-book/git/blob/master/D15Z/etc_init.d_nginx
设置启动脚本:
chmod 755 /etc/init.d/nginx
配置文件:
cd /usr/local/nginx/conf
mv nginx.conf nginx.conf.bak
vim nginx.conf
复制链接里的配置https://coding.net/u/aminglinux/p/aminglinux-book/git/blob/master/D15Z/nginx.conf
四.定义虚拟主机:
首先把nginx配置里面的虚拟主机删除,再加上一行:
include vhost/*.conf;
创建目录:
mkdir /usr/local/nginx/conf/vhost
cd /usr/local/nginx/conf/vhost/default.conf
添加一下内容:
server
{
    listen 80 default_server;  // 有这个标记的就是默认虚拟主机
    server_name aaa.com;  //定义这个虚拟主机的域名
    index index.html index.htm index.php;  //定义索引页
    root /data/wwwroot/default;  //定义网站目录
}
创建default目录
mkdir /data/wwwroot/default
vim index.html


