How to Configuration Multiple MySQL/MariaDB DataSource About Druid Spring Boot Starter
本范例还包括纯注解Mybatis代码的写法(抛弃逆向工程生成mapper.xml代码文件),多数据源事务回滚,附带包括查询日志,慢查询日志,错误日志的bin_log日志的配置方式,数据库存储数据编码的设置方式,还有数据库连接数等等的设置方式
官网推荐安装包下载地址(软件包下载速度很慢,不推荐你使用官网的MariaDB.repo文件定义方式)
[root@contoso ~]# cat > /etc/yum.repos.d/MariaDB.repo
# MariaDB 10.4 CentOS repository list - created 2019-11-07 12:26 UTC
# http://downloads.mariadb.org/mariadb/repositories/
[mariadb]
name = MariaDB
baseurl = http://yum.mariadb.org/10.4/centos8-amd64
gpgkey=https://yum.mariadb.org/RPM-GPG-KEY-MariaDB
gpgcheck=1
自定义清华大学安装包下载地址(软件包下载速度非常快,这种定义MariaDB.repo文件的方式是最高效安装方式)
[root@contoso ~]# cat > /etc/yum.repos.d/MariaDB.repo
# MariaDB 10.4 CentOS repository list - created 2019-11-07 12:26 UTC
# http://downloads.mariadb.org/mariadb/repositories/
[mariadb]
name = MariaDB
baseurl = https://mirrors.tuna.tsinghua.edu.cn/mariadb/mariadb-10.4.8/yum/centos8-amd64/
gpgkey=https://yum.mariadb.org/RPM-GPG-KEY-MariaDB
gpgcheck=1
安装MariaDB的服务器端和客户端
[root@contoso ~]# yum install -y boost-program-options
[root@contoso ~]# yum install -y MariaDB-server MariaDB-client --disablerepo=AppStream
创建查询日志,错误日志,慢查询日志,二进日志保存位置以及设置它们的权限
[root@contoso ~]# mkdir -p /var/log/mariadb && touch /var/log/mariadb/queries.log && touch /var/log/mariadb/mariadb-error.log && touch /var/log/mariadb/mariadb-slow.log && touch /var/log/mariadb/mariadb-log-bin && touch /var/log/mariadb/mariadb-log-bin.index && chown -R mysql:mysql /var/log/mariadb && chmod 755 /var/log/mariadb && chmod 666 /var/log/mariadb/*配置数据库服务器存储数据的文件编码,设置表名称必须小写,以及开启二进制日志、查询日志、慢查询日志存储的位置,
设置数据库最大连接数max_connections为1000(表示同时允许1000个用户连接数据库),其默认值为151,设置数据库客
户端连接数max_user_connections为500(例如同一个用户可以在命令终端中打开很多个客户端,默认值为0表示我们可以
在终端上开启很多个客户端),如果max_user_connections超过500,那么就会抛出错误:
ERROR 1203 (42000): User root already has more than 'max_user_connections' active connections
表示这个用户已经达到最大的连接数,不能再连接拥有资源!
[root@contoso ~]# cat > /etc/my.cnf.d/server.cnf
#
# These groups are read by MariaDB server.
# Use it for options that only the server (but not clients) should see
#
# See the examples of server my.cnf files in /usr/share/mysql/
#

# this is read by the standalone daemon and embedded servers
[server]

# this is only for the mysqld standalone daemon
[mysqld]
max_connections=1000
max_user_connections=500

character-set-server=utf8
lower-case-table-names=1

log-bin=/var/log/mariadb/mariadb-log-bin
log-bin-index=/var/log/mariadb/mariadb-log-bin.index
log-error=/var/log/mariadb/mariadb-error.log

general-log=ON
general-log-file=/var/log/mariadb/queries.log
log-output=file

slow-query-log=ON
slow-query-log-file=/var/log/mariadb/mariadb-slow.log
long_query_time=1

bind-address=0.0.0.0

#
# * Galera-related settings
#
[galera]
# Mandatory settings
#wsrep_on=ON
#wsrep_provider=
#wsrep_cluster_address=
#binlog_format=row
#default_storage_engine=InnoDB
#innodb_autoinc_lock_mode=2
#
# Allow server to accept connections on all interfaces.
#
#bind-address=0.0.0.0
#
# Optional setting
#wsrep_slave_threads=1
#innodb_flush_log_at_trx_commit=0

# this is only for embedded server
[embedded]

# This group is only read by MariaDB servers, not by MySQL.
# If you use the same .cnf file for MySQL and MariaDB,
# you can put MariaDB-only options here
[mariadb]

# This group is only read by MariaDB-10.4 servers.
# If you use the same .cnf file for MariaDB of different versions,
# use this group for options that older servers don't understand
[mariadb-10.4]
启动数据库服务器,查看默认编码(默认是拉丁文编码,存储中文字符我们需要的是utf8编码)
[root@contoso ~]# service mysql start
[root@contoso ~]# mysql -uroot -h127.0.0.1 -e"show variables like 'character%'"			##安装时密码为空
+--------------------------+----------------------------+
| Variable_name            | Value                      |
+--------------------------+----------------------------+
| character_set_client     | utf8                       |
| character_set_connection | utf8                       |
| character_set_database   | utf8                       |
| character_set_filesystem | binary                     |
| character_set_results    | utf8                       |
| character_set_server     | utf8                       |
| character_set_system     | utf8                       |
| character_sets_dir       | /usr/share/mysql/charsets/ |
+--------------------------+----------------------------+
使用安全配置向导进行root密码设置,是否运行root账户远程登录,是否保留test数据库,是否删除匿名用户
[root@contoso ~]# service mysql status
[root@contoso ~]# service mysql stop
[root@contoso ~]# /usr/bin/mysql_secure_installation

NOTE: RUNNING ALL PARTS OF THIS SCRIPT IS RECOMMENDED FOR ALL MariaDB
      SERVERS IN PRODUCTION USE!  PLEASE READ EACH STEP CAREFULLY!

In order to log into MariaDB to secure it, we'll need the current
password for the root user. If you've just installed MariaDB, and
haven't set the root password yet, you should just press enter here.

Enter current password for root (enter for none): 回车
OK, successfully used password, moving on...

Setting the root password or using the unix_socket ensures that nobody
can log into the MariaDB root user without the proper authorisation.

You already have your root account protected, so you can safely answer 'n'.

Switch to unix_socket authentication [Y/n] n
 ... skipping.

You already have your root account protected, so you can safely answer 'n'.

Change the root password? [Y/n] y
New password: dbpass
Re-enter new password: dbpass
Password updated successfully!
Reloading privilege tables..
 ... Success!


By default, a MariaDB installation has an anonymous user, allowing anyone
to log into MariaDB without having to have a user account created for
them.  This is intended only for testing, and to make the installation
go a bit smoother.  You should remove them before moving into a
production environment.

Remove anonymous users? [Y/n] y
 ... Success!

Normally, root should only be allowed to connect from 'localhost'.  This
ensures that someone cannot guess at the root password from the network.

Disallow root login remotely? [Y/n] y
 ... Success!

By default, MariaDB comes with a database named 'test' that anyone can
access.  This is also intended only for testing, and should be removed
before moving into a production environment.

Remove test database and access to it? [Y/n] n
 ... skipping.

Reloading the privilege tables will ensure that all changes made so far
will take effect immediately.

Reload privilege tables now? [Y/n] y
 ... Success!

Cleaning up...

All done!  If you've completed all of the above steps, your MariaDB
installation should now be secure.

Thanks for using MariaDB!
我们已经在配置文件/etc/my.cnf.d/server.cnf里面启用了bind-address=0.0.0.0
这个绑定地址表示允许所有的IP地址都能连接数据库服务器,假如没有启用它,那么
就应该对localhost,192.168.10.10连接进行授权,否则我们将无法连接上数据库服务
[root@contoso ~]# mysql -uroot -pdbpass -h127.0.0.1
Welcome to the MariaDB monitor.  Commands end with ; or \g.
Your MariaDB connection id is 15
Server version: 10.4.8-MariaDB-log MariaDB Server

Copyright (c) 2000, 2018, Oracle, MariaDB Corporation Ab and others.

Type 'help;' or '\h' for help. Type '\c' to clear the current input statement.

MariaDB [(none)]> USE mysql;
Reading table information for completion of table and column names
You can turn off this feature to get a quicker startup with -A

Database changed
MariaDB [mysql]> SELECT host,user FROM user;
+-----------+-------+
| Host      | User  |
+-----------+-------+
| localhost | mysql |
| localhost | root  |
+-----------+-------+
2 rows in set (0.002 sec)

MariaDB [mysql]> GRANT ALL ON *.* TO 'root'@'192.168.10.10' IDENTIFIED BY 'dbpass';
Query OK, 0 rows affected (0.002 sec)

MariaDB [mysql]> GRANT ALL ON *.* TO 'root'@'localhost' IDENTIFIED BY 'dbpass';
Query OK, 0 rows affected (0.002 sec)

MariaDB [mysql]> GRANT ALL ON *.* TO 'root'@'%' IDENTIFIED BY 'dbpass';
Query OK, 0 rows affected (0.003 sec)

MariaDB [mysql]> FLUSH PRIVILEGES;
Query OK, 0 rows affected (0.001 sec)

MariaDB [mysql]> SELECT host,user FROM user;
+---------------+-------+
| Host          | User  |
+---------------+-------+
| %             | root  |
| 192.168.10.10 | root  |
| localhost     | mysql |
| localhost     | root  |
+---------------+-------+
4 rows in set (0.001 sec)

MariaDB [mysql]> quit
Bye
激活开机自启动数据库服务
[root@contoso ~]# service mysql stop

[root@contoso ~]# systemctl enable mariadb && systemctl restart mariadb && systemctl status mariadb
正式进入本篇博客的主题
创建测试数据库testdb1,测试数据表,插入测试数据
CREATE DATABASE  IF NOT EXISTS `testdb1`  DEFAULT CHARACTER SET utf8;

USE `testdb1`;

DROP TABLE IF EXISTS `sys_user`;

CREATE TABLE `sys_user` (
  `id` BIGINT(20) NOT NULL,
  `name` VARCHAR(16) DEFAULT NULL,
  PRIMARY KEY (`id`)
) ENGINE=INNODB DEFAULT CHARSET=utf8;


INSERT  INTO `sys_user`(`id`,`name`) VALUES (2,'jack'),(4,'cathy'),(6,'mark');
创建测试数据库testdb2,测试数据表,插入测试数据
CREATE DATABASE IF NOT EXISTS `testdb2` DEFAULT CHARACTER SET utf8;

USE `testdb2`;

DROP TABLE IF EXISTS `sys_user`;

CREATE TABLE `sys_user` (
  `id` BIGINT(20) NOT NULL,
  `name` VARCHAR(16) DEFAULT NULL,
  PRIMARY KEY (`id`)
) ENGINE=INNODB DEFAULT CHARSET=utf8;

INSERT  INTO `sys_user`(`id`,`name`) VALUES (1,'杨帆'),(3,'田野'),(5,'陈默');
请注意主键非自增整数,为了测试多数据源事务回滚,我们输入一个长度超过16个字符的用户姓名,
本篇博文是一个根据用户表主键取模分库很简单的范例。
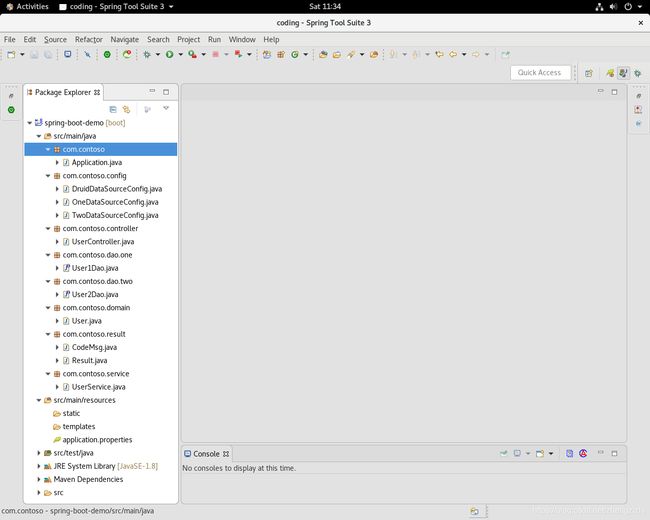
首先看看我们最终要实现的范例代码结构,如下图所示:
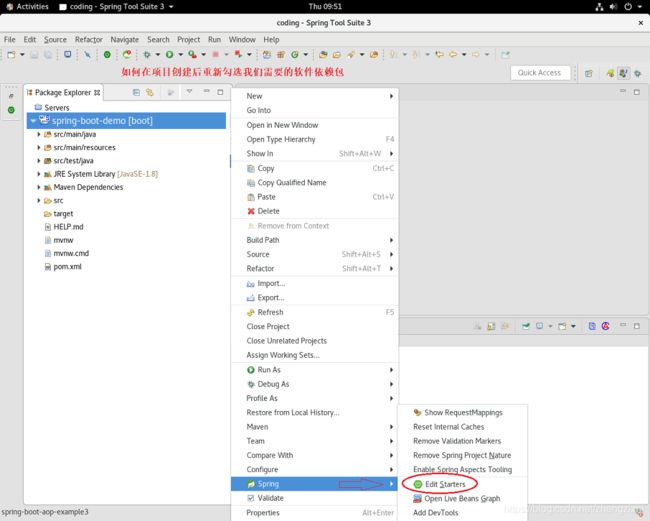
接下来看看我们使用的pom.xml内容,它里面的用到的软件包均是最新版本:
	4.0.0

		org.springframework.boot
		spring-boot-starter-parent
		2.2.1.RELEASE


	com.contoso
	spring-boot-demo
	0.0.1-SNAPSHOT
	spring-boot-demo
	Demo project for Spring Boot


		1.8


			org.springframework.boot
			spring-boot-starter-web


			org.mybatis.spring.boot
			mybatis-spring-boot-starter
			2.1.1


			mysql
			mysql-connector-java


		   com.alibaba
		   druid-spring-boot-starter
		   1.1.17


			org.springframework.boot
			spring-boot-starter-test
			test


					org.junit.vintage
					junit-vintage-engine


			org.springframework.boot
			spring-boot-configuration-processor


				org.springframework.boot
				spring-boot-maven-plugin
再看看我们定义 application.properties资源配置文件内容(注意MySQL 8.0以后的高版本驱动类为com.mysql.cj.jdbc.Driver,
并且在url=jdbc:mysql://127.0.0.1后面一长串内容里一定要包含时区设置):
#mybatis
mybatis.type-aliases-package=com.contoso.domain
mybatis.configuration.map-underscore-to-camel-case=true
mybatis.configuration.default-fetch-size=100
#ms --3000ms--->3s
mybatis.configuration.default-statement-timeout=3000
#mapperLocaitons
mybatis.mapper-locaitons=classpath:com/contoso/dao/*.xml

#druid jdbc 1 settings
spring.datasource.druid.one.db-type=com.alibaba.druid.pool.DruidDataSource
spring.datasource.druid.one.driverClassName=com.mysql.cj.jdbc.Driver
spring.datasource.druid.one.url=jdbc:mysql://127.0.0.1:3306/testdb1?characterEncoding=utf8&useSSL=false&serverTimezone=UTC&rewriteBatchedStatements=true
spring.datasource.druid.one.username=root
spring.datasource.druid.one.password=dbpass
#druid Connection pool 1 settings
spring.datasource.druid.one.initial-size=100
spring.datasource.druid.one.min-idle=500
spring.datasource.druid.one.max-active=1000
spring.datasource.druid.one.max-wait=60000
spring.datasource.druid.one.time-between-eviction-runs-millis=60000
spring.datasource.druid.one.min-evictable-idle-time-millis=30000
spring.datasource.druid.one.validation-query=SELECT 1 FROM DUAL
spring.datasource.druid.one.test-while-idle=true
spring.datasource.druid.one.test-on-borrow=false
spring.datasource.druid.one.test-on-return=false
spring.datasource.druid.one.pool-prepared-statements=true
spring.datasource.druid.one.max-pool-prepared-statement-per-connection-size=20

#druid jdbc 2 settings
spring.datasource.druid.two.db-type=com.alibaba.druid.pool.DruidDataSource
spring.datasource.druid.two.driverClassName=com.mysql.cj.jdbc.Driver
spring.datasource.druid.two.url=jdbc:mysql://127.0.0.1:3306/testdb2?characterEncoding=utf8&useSSL=false&serverTimezone=UTC&rewriteBatchedStatements=true
spring.datasource.druid.two.username=root
spring.datasource.druid.two.password=dbpass
#druid Connection pool 2 settings
spring.datasource.druid.two.initial-size=100
spring.datasource.druid.two.min-idle=500
spring.datasource.druid.two.max-active=1000
spring.datasource.druid.two.max-wait=60000
spring.datasource.druid.two.time-between-eviction-runs-millis=60000
spring.datasource.druid.two.min-evictable-idle-time-millis=30000
spring.datasource.druid.two.validation-query=SELECT 1 FROM DUAL
spring.datasource.druid.two.test-while-idle=true
spring.datasource.druid.two.test-on-borrow=false
spring.datasource.druid.two.test-on-return=false
spring.datasource.druid.two.pool-prepared-statements=true
spring.datasource.druid.two.max-pool-prepared-statement-per-connection-size=20
直接来按顺序直接贴我们定义所有软件包里面的代码:
package com.contoso;

import org.springframework.boot.SpringApplication;
import org.springframework.boot.autoconfigure.SpringBootApplication;

@SpringBootApplication
public class Application {

	public static void main(String[] args) {
		SpringApplication.run(Application.class, args);
	}

}
package com.contoso.config;

import com.alibaba.druid.spring.boot.autoconfigure.DruidDataSourceBuilder;
import org.springframework.boot.context.properties.ConfigurationProperties;
import org.springframework.context.annotation.Bean;
import org.springframework.context.annotation.Configuration;
import org.springframework.context.annotation.Primary;

import javax.sql.DataSource;


@Configuration
public class DruidDataSourceConfig {
    @Primary
    @Bean(name = "oneDatasource")
    @ConfigurationProperties("spring.datasource.druid.one")
    public DataSource dataSourceOne() {
        return DruidDataSourceBuilder.create().build();
    }

    @Bean(name = "twoDatasource")
    @ConfigurationProperties("spring.datasource.druid.two")
    public DataSource dataSourceTwo() {
        return DruidDataSourceBuilder.create().build();
    }
}
package com.contoso.config;
import org.apache.ibatis.session.SqlSessionFactory;
import org.mybatis.spring.SqlSessionFactoryBean;
import org.mybatis.spring.SqlSessionTemplate;
import org.mybatis.spring.annotation.MapperScan;
import org.springframework.beans.factory.annotation.Qualifier;
import org.springframework.context.annotation.Bean;
import org.springframework.context.annotation.Configuration;
import org.springframework.context.annotation.Primary;
//import org.springframework.core.io.support.PathMatchingResourcePatternResolver;
import org.springframework.jdbc.datasource.DataSourceTransactionManager;
import javax.sql.DataSource;
@Configuration
@MapperScan(basePackages = "com.contoso.dao.one", sqlSessionTemplateRef = "oneSqlSessionTemplate")
public class OneDataSourceConfig {
// ------------ 加载配置的数据源: ------------
// ------------ 创建的数据源构建对应的SqlSessionFactory ------------
@Bean(name = "oneSqlSessionFactory")
@Primary
public SqlSessionFactory oneSqlSessionFactory(@Qualifier("oneDatasource") DataSource dataSource) throws Exception {
SqlSessionFactoryBean bean = new SqlSessionFactoryBean();
bean.setDataSource(dataSource);
//bean.setMapperLocations(new PathMatchingResourcePatternResolver().getResources("classpath:/dao/one/*.xml"));
return bean.getObject();
}
// ------------ 配置事务 ------------
@Bean(name = "oneTransactionManager")
@Primary
public DataSourceTransactionManager oneTransactionManager(@Qualifier("oneDatasource") DataSource dataSource) {
return new DataSourceTransactionManager(dataSource);
}
// ------------ 注入SqlSessionFactory到SqlSessionTemplate中 ------------
@Bean(name = "oneSqlSessionTemplate")
@Primary
public SqlSessionTemplate oneSqlSessionTemplate(
@Qualifier("oneSqlSessionFactory") SqlSessionFactory sqlSessionFactory) throws Exception {
return new SqlSessionTemplate(sqlSessionFactory);
}
}
package com.contoso.config;

import org.apache.ibatis.session.SqlSessionFactory;
import org.mybatis.spring.SqlSessionFactoryBean;
import org.mybatis.spring.SqlSessionTemplate;
import org.mybatis.spring.annotation.MapperScan;
import org.springframework.beans.factory.annotation.Qualifier;
import org.springframework.context.annotation.Bean;
import org.springframework.context.annotation.Configuration;
//import org.springframework.core.io.support.PathMatchingResourcePatternResolver;
import org.springframework.jdbc.datasource.DataSourceTransactionManager;

import javax.sql.DataSource;

@Configuration
@MapperScan(basePackages = "com.contoso.dao.two", sqlSessionTemplateRef = "twoSqlSessionTemplate")
public class TwoDataSourceConfig {

	// ------------ 加载配置的数据源: ------------
	// ------------ 创建的数据源构建对应的SqlSessionFactory ------------
	@Bean(name = "twoSqlSessionFactory")
	public SqlSessionFactory secondSqlSessionFactory(@Qualifier("twoDatasource") DataSource dataSource)
			throws Exception {
		SqlSessionFactoryBean bean = new SqlSessionFactoryBean();
		bean.setDataSource(dataSource);
		//bean.setMapperLocations(new PathMatchingResourcePatternResolver().getResources("classpath:/dao/two/*.xml"));
		return bean.getObject();
	}

	// ------------ 配置事务 ------------
	@Bean(name = "twoTransactionManager")
	public DataSourceTransactionManager secondTransactionManager(@Qualifier("twoDatasource") DataSource dataSource) {
		return new DataSourceTransactionManager(dataSource);
	}

	// ------------ 注入SqlSessionFactory到SqlSessionTemplate中 ------------
	@Bean(name = "twoSqlSessionTemplate")
	public SqlSessionTemplate secondSqlSessionTemplate(
			@Qualifier("twoSqlSessionFactory") SqlSessionFactory sqlSessionFactory) throws Exception {
		return new SqlSessionTemplate(sqlSessionFactory);
	}

}
package com.contoso.controller;

import org.springframework.beans.factory.annotation.Autowired;
import org.springframework.stereotype.Controller;
import org.springframework.web.bind.annotation.GetMapping;
import org.springframework.web.bind.annotation.RequestMapping;
import org.springframework.web.bind.annotation.RequestParam;
import org.springframework.web.bind.annotation.ResponseBody;

import com.contoso.domain.User;
import com.contoso.result.Result;
import com.contoso.service.UserService;

@Controller
@RequestMapping("/user")
public class UserController {
	@Autowired
	UserService userService;

	@GetMapping("/get")
	@ResponseBody
	public Result getUser(@RequestParam("id") Integer id) {
		User user = userService.getById(id);
		System.out.println("res:" + user.getName());
		return Result.success(user);
	}

	@RequestMapping("/add")
	@ResponseBody
	public Result addUser() {
		User user1 = new User();
		user1.setId(8);
		user1.setName("[email protected]");
		User user2 = new User();
		user2.setId(9999);
		user2.setName("abcdefghijklmnopqrstuvwxyz");
		Result  result = userService.addUser(user1, user2);
		return result;
	}
}
package com.contoso.dao.one;
import org.apache.ibatis.annotations.Insert;
import org.apache.ibatis.annotations.Mapper;
import org.apache.ibatis.annotations.Param;
import org.apache.ibatis.annotations.Select;
import com.contoso.domain.User;
@Mapper
public interface User1Dao {
@Select("select * from sys_user where id=#{id}")
public User getById(@Param("id") int id);
@Insert("insert into sys_user(id,name) values(#{id},#{name})")
public void insert(User user);
}package com.contoso.dao.two;
import org.apache.ibatis.annotations.Insert;
import org.apache.ibatis.annotations.Mapper;
import org.apache.ibatis.annotations.Param;
import org.apache.ibatis.annotations.Select;
import com.contoso.domain.User;
@Mapper
public interface User2Dao {
@Select("select * from sys_user where id=#{id}")
public User getById(@Param("id") int id);
@Insert("insert into sys_user(id,name) values(#{id},#{name})")
public void insert(User user);
}package com.contoso.domain;
public class User {
private int id;
private String name;
public User() {
}
public User(int id, String name) {
this.id = id;
this.name = name;
}
public int getId() {
return id;
}
public void setId(int id) {
this.id = id;
}
public String getName() {
return name;
}
public void setName(String name) {
this.name = name;
}
}package com.contoso.result;
public class CodeMsg {
private int code;
private String msg;
// 通用异常
public static CodeMsg SUCCESS = new CodeMsg(0, "success");
public static CodeMsg SERVER_ERROR = new CodeMsg(500100, "服务端异常!");
public static CodeMsg BIND_ERROR = new CodeMsg(500101, "参数校验异常:%s");
public static CodeMsg REQUEST_ILLEAGAL = new CodeMsg(500102, "非法请求!");
public static CodeMsg MIAOSHA_FAIL = new CodeMsg(500103, "秒杀失败!");
public static CodeMsg ACCESS_LIMIT = new CodeMsg(500104, "达到访问限制次数,访问太频繁!");
// 登录模块异常
public static CodeMsg SESSION_ERROR = new CodeMsg(500210, "session失效!");
public static CodeMsg PASSWORD_EMPTY = new CodeMsg(500211, "密码不能为空!");
public static CodeMsg MOBILE_EMPTY = new CodeMsg(500212, "手机号不能为空!");
public static CodeMsg MOBILE_ERROR = new CodeMsg(500213, "手机号格式错误!");
public static CodeMsg MOBILE_NOTEXIST = new CodeMsg(500214, "手机号号码不存在!");
public static CodeMsg PASSWORD_ERROR = new CodeMsg(500215, "密码错误!");
// 订单模块异常
public static CodeMsg ORDER_NOT_EXIST = new CodeMsg(500410, "订单不存在!");
// 秒杀模块异常
public static CodeMsg MIAOSHA_OVER_ERROR = new CodeMsg(500500, "商品秒杀完毕,库存不足!");
public static CodeMsg REPEATE_MIAOSHA = new CodeMsg(500500, "不能重复秒杀!");
public static CodeMsg DATA_TOO_LONG = new CodeMsg(500600,"数据长度不允许超过16位");
public CodeMsg(int code, String msg) {
this.code = code;
this.msg = msg;
}
public int getCode() {
return code;
}
public void setCode(int code) {
this.code = code;
}
public String getMsg() {
return msg;
}
public void setMsg(String msg) {
this.msg = msg;
}
// 返回一个带参数的错误码
public CodeMsg fillArgs(Object... args) {// 变参
int code = this.code;
// message是填充了参数的message
String message = String.format(this.msg, args);
return new CodeMsg(code, message);
}
@Override
public String toString() {
return "CodeMsg [code=" + code + ", msg=" + msg + "]";
}
}
package com.contoso.result;

public class Result {
	private int code;
	private String msg;
	private T data;

	// success
	private Result(T data) {
		this.code = 0;
		this.msg = "success";
		this.data = data;
	}

	// error
	private Result(CodeMsg cm) {
		if (cm == null) {
			return;
		}

		this.code = cm.getCode();
		this.msg = cm.getMsg();
	}

	// 成功
	public static  Result success(T data) {
		return new Result(data);
	}

	// 失败
	public static  Result error(CodeMsg sm) {// CodeMsg包含了code和msg
		return new Result(sm);
	}

	public int getCode() {
		return code;
	}

	public void setCode(int code) {
		this.code = code;
	}

	public String getMsg() {
		return msg;
	}

	public void setMsg(String msg) {
		this.msg = msg;
	}

	public T getData() {
		return data;
	}

	public void setData(T data) {
		this.data = data;
	}
}
package com.contoso.service;
import org.springframework.beans.factory.annotation.Autowired;
import org.springframework.stereotype.Service;
import org.springframework.transaction.annotation.Transactional;
import org.springframework.transaction.interceptor.TransactionAspectSupport;
import com.contoso.dao.one.User1Dao;
import com.contoso.dao.two.User2Dao;
import com.contoso.domain.User;
import com.contoso.result.CodeMsg;
import com.contoso.result.Result;
@Service
public class UserService {
@Autowired(required = true)
User1Dao user1Dao;
@Autowired(required = true)
User2Dao user2Dao;
public User getById(int id) {
if (id % 2 == 0)
return user1Dao.getById(id);
else
return user2Dao.getById(id);
}
// 使用事务
@Transactional(rollbackFor = Exception.class)
public Result addUser(User user1, User user2) {
try {
user1Dao.insert(user1);
user2Dao.insert(user2); // 这里出问题则回滚
} catch (Exception e) {
// 失败则手动回滚
TransactionAspectSupport.currentTransactionStatus().setRollbackOnly();
return Result.error(CodeMsg.DATA_TOO_LONG);
}
return Result.success(true);
}
} 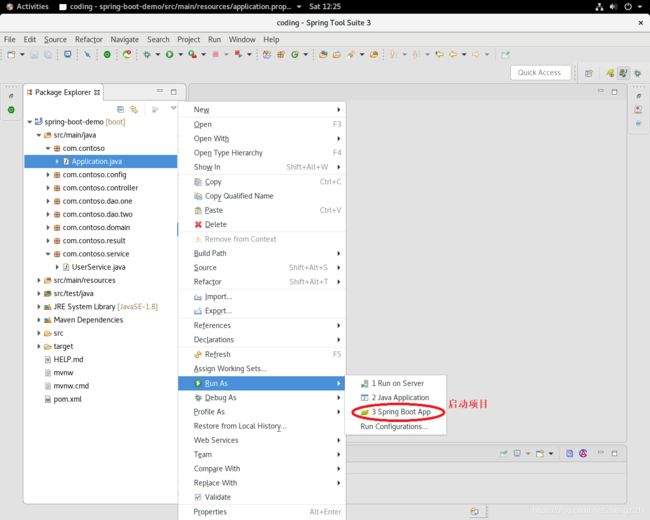
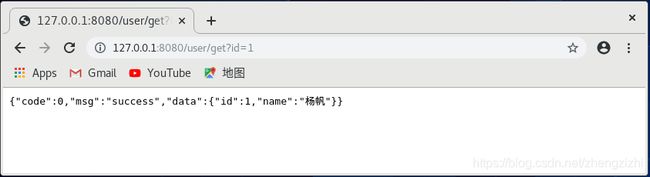
使用浏览器直接测试api接口:
http://127.0.0.1:8080/user/get?id=1
http://127.0.0.1:8080/user/get?id=2
http://127.0.0.1:8080/user/get?id=3
http://127.0.0.1:8080/user/get?id=4
http://127.0.0.1:8080/user/get?id=5
http://127.0.0.1:8080/user/get?id=6
输出效果如下:

重点测试多数据源事务回滚效果:
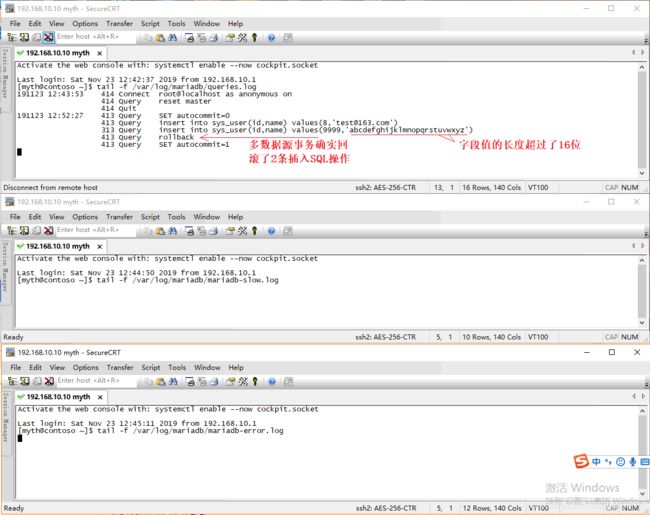
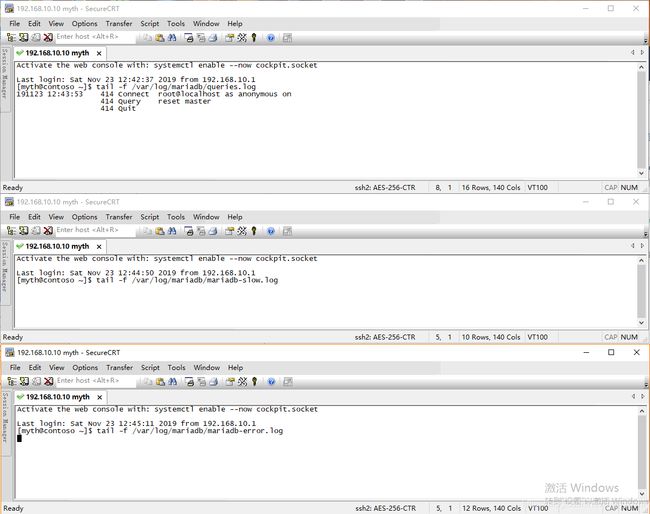
首先清空日志(包括查询日志、慢查询日志、bin_log日志还有错误日志)
[myth@contoso ~]$ cat /dev/null > /var/log/mariadb/queries.log && cat /dev/null > /var/log/mariadb/mariadb-slow.log && cat /dev/null > /var/log/mariadb/mariadb-error.log[myth@contoso ~]$ mysql -uroot -pdbpass -h127.0.0.1 -e "reset master" # 清空bin_log日志我们接下来使用同一个用户myth(这是一个管理员账户,是用来登录我的CentOS8系统的)开启3个命令行终端窗口
目的是用来实时跟踪查询日志、慢查询日志、错误日志输出
tail -f /var/log/mariadb/queries.log
tail -f /var/log/mariadb/mariadb-slow.log
tail -f /var/log/mariadb/mariadb-error.log
直接在浏览器里输入链接http://127.0.0.1:8080/user/add测试多数据源事务回滚

我们可以在实时的查询日志里看到向两个分库里各插入1条数据失败,原因是插入的内容超过数据库表字段的定义的长度16