mpvue+vant+koa2+Wafer2+Router小程序前后端开发采坑过程记录
2019年06月13日文章更新
- 添加
mpvue-entry和mpvue-router-patch实现形成一次配置入口;像普通vue项目一样进行路由转发
文章目录
- 2019年06月13日文章更新
- mpvue
- vant
- mpvue-entry & mpvue-router-patch
- koa2+Wafer2+MySQL
端午两个下午做了一个前后端都自己动手的小程序demo,用来熟悉小程序开发流程和node的开发后端开发框架Koa,过程还算比较顺利。
完成的基本功能
- mpvue+vant 搭建了一个template,可以快速开始小程序的前端开发
- 配置后端koa的server,对接到腾讯云
- 修改为本地开发环境,对接本地的MySQL等
- 数据库的增删改查
- 路由的跳转
- 读取MySQL生成Excel,返回文件到前端,微信端下载并打开Excel
- … 其他API研究测试
mpvue
- 是一个使用 Vue.js 开发小程序的前端框架 http://mpvue.com/#_1
- 上手比较容易,但是需要注意的是,一些VUE的事件和微信小程序端是有变换的,具体用到的时候需要查阅对应的文档;
- 其中src目录下有一个文件为
app.json,对应的可查阅微信小程序文档配置项进行配置新增 - src目录下有一个文件为
app.json有一个字段为pages,用于新增操作页面后在此处声明配置,想首屏显示哪一个,就把地址配置放在数组的第一位
// 一个示例
{
  "pages": [
    "pages/index/main",
    "pages/show/main"
  ],
  "window": {
    "backgroundTextStyle": "light",
    "navigationBarBackgroundColor": "#fff",
    "navigationBarTitleText": "WeChat",
    "navigationBarTextStyle": "black"
  }
}
- 其中根目录下有一个
project.config.json文件,进行微信小程序的一些配置项,包括需要去微信公众平台申请的小程序开发的appid - 项目页面代码放在src/pages 中,区别的是,每一个需要写一个main.js 用来挂载自己写的.vue 文件,用以把当前.vue文件变成小程序的可识别的js。
- 也就是说每新建一个页面都需要这样两个文件,而且main.js中的东西基本重复,显得比较冗余。于是看到网上的推荐的第三方的插件:mpvue-entry,形成一次配置入口;
vant
- 使用的UI库是有赞的解决方案,值得注意的是,用的是小程序版本,但是我们前端使用的mpvue,所以引用的方式也有所变化,需要把vant的静态包下载下来放入static中,再使用
usingComponents引入需要的控件
{
  "usingComponents": {
    "van-field": "/static/vant/field/index",
    "van-button": "/static/vant/button/index"
  }
}
- vant 的小程序版本的 input是不支持双向绑定的,如何双向绑定呢,我想了一个如下的办法
主要按钮
- 每个input 绑定一个
@change="onChange($event,'password')"并且把当前的event和字段名传入方法,在data中声明绑定的字段, - 在change方法中对数据赋值
onChange(event, type) { // 获取表单组件filed的值
      this[type] = event.mp.detail;// 更新绑定到data
    },
- 这样每次点击就都能拿到最新的password和username了
mpvue-entry & mpvue-router-patch
- 每一个页面都需要写一个main.js 用来挂载自己写的.vue 文件,冗余重复,于是使用mpvue-entry & mpvue-router-patch
- 安装依赖
npm install mpvue-entry --save-dev
npm install mpvue-router-patch --save
- 想普通的VUE项目一样,在项目src文件夹下创建router文件夹和router.js文件,用来配置路由
- src 目录main.js文件中使用
mpvue-router-patch
import MpvueRouterPatch from 'mpvue-router-patch'
Vue.use(MpvueRouterPatch)
- 修改webpack.base.conf.js配置文件
// 首先注释默认的appEntry配置,例如我之前的
// const appEntry = { app: resolve('./src/main.js') }
// const pagesEntry = getEntry(resolve('./src'), 'pages/**/main.js')
// const entry = Object.assign({}, appEntry, pagesEntry)
- 在 module.exports 添加entry 和 plugins 中使用MpvueEntry()
module.exports = {
    entry:MpvueEntry.getEntry('./src/router/router.js'),
    .......
    plugins: [
    new MpvuePlugin(),
    ....]
}
- 配置路由router.js
module.exports = [{
// path 指向pages 文件夹下的showData文件夹下的area.vue 文件
  path: 'pages/showData/area',
  name: 'area',
  config: {
  //	支持微信端的配置参数
    navigationBarTitleText: '数据查看',
    //引入UI组件
    usingComponents: {
      "van-tab": "/static/vant/tab/index",
      "van-tabs": "/static/vant/tabs/index",
    }
  }
},{
  path: 'pages/dataInput/dataInput',
  name: 'dataInput',
  config: {
    navigationBarTitleText: '信息录入',
    //引入UI组件
    usingComponents: {
      "van-button": "/static/vant/button/index",
      "van-field": "/static/vant/field/index",
    }
  }
}]
- 于是你可一任性的mpvue 中的src/下的app.json 里的文件中的配置去掉了,任性的写在这里面进行配置,组件也可以按需引入;因为它会帮我们build dist后一个新的app.json
koa2+Wafer2+MySQL
-
Wafer2 是腾讯云集成的开发解决方案,提供各种版本的quickstart,我下载的是NodeJS的demo;获取后因为小程序端页面已经使用mpvue开发了,于是这个demo我只需要拷贝server文件夹到自己的mpvue生成的项目中
-
默认使用的是腾讯云的云端开发环境,如何切换成自己本地的开发环境呢:文档在这:https://cloud.tencent.com/developer/ask/25171 各项配置修改成本地的即可
-
如果需要获取当前登录用户的openID,需要安装
npm install wafer2-client-sdk --save -
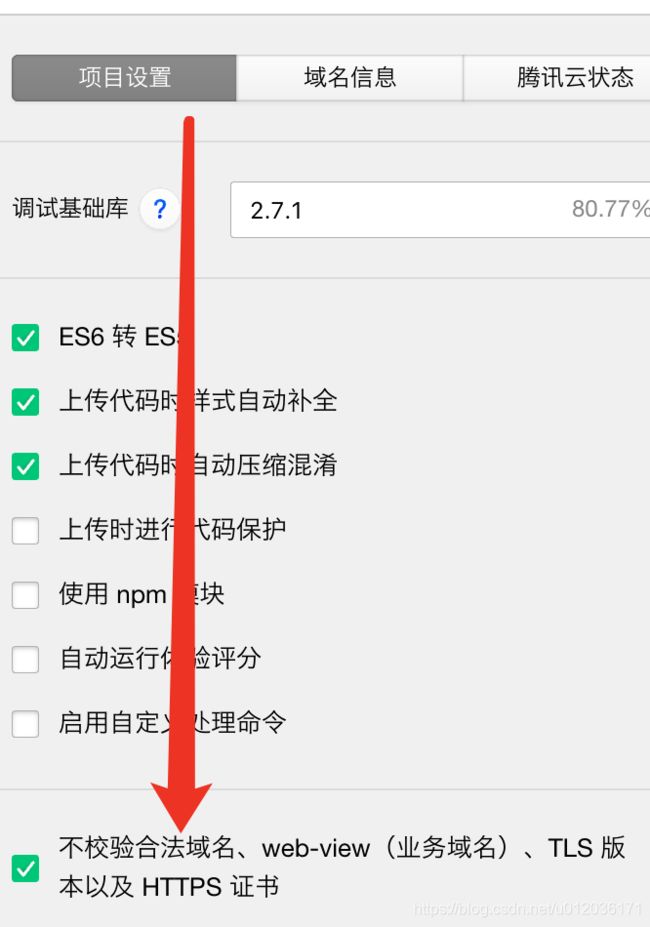
各项服务准备好了,开始发一个请求试试,结果报错,
http://localhost:5757 不在以下 request 合法域名列表中,
请参考文档:https://mp.weixin.qq.com/debug/wxadoc/dev/api/network-request.html
- 解决方法是:项目设置里–》不校验合法域名、web-view(业务域名)、TLS 版本以及 HTTPS 证书

- MPVUE 获取 wx.getUserInfo 接口后续将不再出现授权弹窗,请注意升级;按照微信的文档,现在需要用户手动点击授权,并且需要指定
open-type="getUserInfo",对应的绑定事件,也需要修改成@getuserinfo="bindgetuserinfo"来回调函数
ALTER USER 'root'@'localhost' IDENTIFIED BY 'password' PASSWORD EXPIRE NEVER; (修改加密规则 (必写))
ALTER USER 'root'@'localhost' IDENTIFIED WITH mysql_native_password BY 'password'; (更新用户密码 )
FLUSH PRIVILEGES; #刷新权限(不输入也可以)
- koa中,post请求的参数存放在
let data = ctx.request.body;;get请求的参数在let data = ctx.request.query;中 - koa操作数据MySQL数据库,因为wafer2 集成了knex.js,所以操作MySQL首先需要引入
const { mysql } = require("../qcloud"); - 查询数据kenx语法如:
const findUser = await mysql("user").select().where("name", name); - 插入数据
mysql("user").insert({ openid,name }) - 连表查询
const findUser = await mysql("user").select('user.*',"cSessionInfo.user_info").join("cSessionInfo","user.openid", "cSessionInfo.open_id");
- … 就和我们平常写SQL差不多
- node生成Excel文件,这个花了我一些时间,最后使用的是
node-xlsx包
const xlsx = require('node-xlsx')
const fs = require('fs')
.....
const data = [
    [1, 2, 3],
    [true, false, null, 'sheetjs'],
    ['foo', 'bar', new Date('2014-02-19T14:30Z'), '0.3'],
    ['baz', null, 'qux']
  ];
  var _buffer = xlsx.build([{ name: "mySheetName", data: data }]); // Returns a buffer
  fs.writeFileSync('./download/' + '文件名' + '.xlsx', _buffer);
- 生成好文件后koa如何吐给前端,使用
koa-send包
router.get('/addName',  async (ctx, next) => {
  const path = "../download/sad.xlsx";
  ctx.attachment(path);
  ctx.set('Content-Type', 'application/octet-stream');
  await send(ctx, path);
})
- 小程序端下载文件会生成一个临时路径,结合问下的openDocument 实现文件下载和打开预览
wx.downloadFile({
        url: 'http://localhost:5757/weapp/addName',
        success(res) {
          console.log(res)
          // 只要服务器有响应数据,就会把响应内容写入文件并进入 success 回调,业务需要自行判断是否下载到了想要的内容
          if (res.statusCode === 200) {
            wx.openDocument({
              fileType: 'xlsx',
              filePath: res.tempFilePath,
              success: function(res) {
                console.log('打开文档成功')
              },
              fail:function(res){
                console.log(res)
              },
            });
          }
        }
      })
目前差不多就quickstart这样;后续有坑再发上更新

