IOS开发控件视图day05:ScrollView和TableView
1、ScrollView设置图片多个图片的展示滚动
声明绑定一个UIScrollView
@property (weak, nonatomic) IBOutlet UIScrollView *scrollView1;
@property (weak, nonatomic) IBOutlet UIScrollView *scrollView2;
@property (strong, nonatomic) UIPageControl *pageControl;
(1)横向滚动
//横向滚动
for (int i = 0; i < 5; i ++) {
   CGFloat imgH = 240;
   CGFloat imgW = 380;
   CGFloat imgY = 0;
   //创建一个UIImageView对象
   UIImageView *imgView = [[UIImageView alloc]init];
   //设置UIImageView中的图片
   NSString *imgName = [NSString stringWithFormat:@"%02d",i+1];
   imgView.image = [UIImage imageNamed:imgName];
   //计算每一个UIImageView在UIScrollView中的x坐标值
   CGFloat imgX = i * (imgW+10);
   //设置imgView的frame
   imgView.frame = CGRectMake(imgX, imgY, imgW, imgH);
   //把imgView添加到UIScrollView中
   [self.scrollView1 addSubview:imgView];
}
//设置UIScrollView内容的实际大小
CGFloat maxW =( self.scrollView1.frame.size.width +10)* 5;
self.scrollView1.contentSize = CGSizeMake(maxW, 10);
(2)纵向滚动
//纵向滚动
for (int i = 0; i < 5; i ++) {
    CGFloat imgH = 240;
    CGFloat imgW = 380;
    CGFloat imgX = 0;
    //创建一个UIImageView
    UIImageView *imgView = [[UIImageView alloc]init];
    //设置UIImageView中的图片
    NSString *imgName = [NSString stringWithFormat:@"%02d",i+1];
    imgView.image = [UIImage imageNamed:imgName];
    //计算每一个UIImageView在UIScrollView中的y坐标值
    CGFloat imgY = i * (imgH+10);
    //设置imgView的frame
    imgView.frame = CGRectMake(imgX, imgY, imgW, imgH);
    //把imgView添加到UIScrollView中
    [self.scrollView2 addSubview:imgView];
}
//设置UIScrollView内容的实际大小
CGFloat maxH = (self.scrollView2.frame.size.height +10) * 5;
self.scrollView2.contentSize = CGSizeMake(10, maxH);
(3)实现ScrollView分页效果
- (void)viewDidLoad {
//隐藏水平滚动指示器
self.scrollView1.showsHorizontalScrollIndicator = NO;
//实现ScrollView分页效果
scrollView1.pagingEnabled = YES;
_pageControl = [[UIPageControl alloc]initWithFrame:CGRectMake(120, 430, 120, 40)];
_pageControl.numberOfPages = 5; //指定UIPageControl的总页数
_pageControl.currentPage = 0; //指定默认是第0页
_pageControl.pageIndicatorTintColor = [UIColor blueColor];// 设置非选中页的圆点颜色
_pageControl.currentPageIndicatorTintColor = [UIColor redColor];// 设置选中页的圆点颜色
self.scrollView1.delegate = self;//设置代理
}
//实现UIScrollView的滚动方法
-(void)scrollViewDidScroll:(UIScrollView *)scrollView
{
    //1、获取滚动方向的偏移值
    CGFloat offsetX = _scrollView1.contentOffset.x;
    //2、用x方向的偏移量的值除以一张图的宽度,取商就是当前滚动到了第几页(索引)
    int page = offsetX / _scrollView1.frame.size.width;
    //3、将页码设置给UIPageControl
    _pageControl.currentPage = page;

}
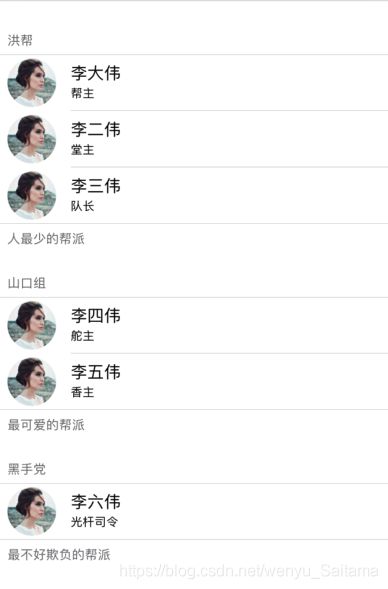
2、TableView分组展示数据
(1)声明数组设置代理
@interface TestTableViewController ()<UITableViewDataSource,UIScrollViewDelegate>
@property (strong, nonatomic) IBOutlet UITableView *tableView;
@property (nonatomic,retain)NSArray *arr0;
@property (nonatomic,retain)NSArray *arr00;
@property (nonatomic,retain)NSArray *arr1;
@property (nonatomic,retain)NSArray *arr11;
@property (nonatomic,retain)NSArray *arr2;
@property (nonatomic,retain)NSArray *arr22;
@property (nonatomic,retain)NSArray *arr3;
@end
(2)设置数组和代理
self.tableView.dataSource = self;
self.tableView.delegate=self;
//每组的数据
_arr0 = @[@"李大伟",@"李二伟",@"李三伟",];
_arr00 =@[@"帮主",@"堂主",@"队长",];

_arr1 = @[@"李四伟",@"李五伟"];
_arr11 = @[@"舵主",@"香主"];

_arr2 = @[@"李六伟"];
_arr22 = @[@"光杆司令"];

_arr3 = @[@"洪帮",@"山口组",@"黑手党"];
(3)分组
-(NSInteger)numberOfSectionsInTableView:(UITableView *)tableView
{
    return 3;
}
(4)每组几行
-(NSInteger)tableView:(UITableView *)tableView numberOfRowsInSection:(NSInteger)section
{
    if (section == 0) {
        return 3;
    }else if (section == 1) {
        return 2;
    }else{
        return 1;
    }
}
(5)每行显示的内容
-(UITableViewCell *)tableView:(UITableView *)tableView cellForRowAtIndexPath:(NSIndexPath *)indexPath
{
    //indexPath.section //表示当前是第几组
    //indexPath.row //表示当前是第几行
    //创建单元格对象并返回
    UITableViewCell *cell = [[UITableViewCell alloc]initWithStyle:UITableViewCellStyleSubtitle reuseIdentifier:nil];
    //为单元格写入数据    //cell.textLabel.text = @"!";
    //return cell;
    if (indexPath.section == 0) {
        cell.textLabel.text = _arr0[indexPath.row];
        cell.detailTextLabel.text =_arr00[indexPath.row];
    }else if (indexPath.section == 1){
        cell.textLabel.text = _arr1[indexPath.row];
        cell.detailTextLabel.text =_arr11[indexPath.row];
    }else{
        cell.textLabel.text = _arr2[indexPath.row];
        cell.detailTextLabel.text =_arr22[indexPath.row];
    }
	cell.imageView.image = [UIImage imageNamed:@"3"];
    //返回单元格
    return cell;
}
(6)每组标题
-(NSString *)tableView:(UITableView *)tableView titleForHeaderInSection:(NSInteger)section
{
    return _arr3[section];
}
(7)每组组尾
- (NSString *)tableView:(UITableView *)tableView titleForFooterInSection:(NSInteger)section
{
    //根据当前组的section,返回不同组的描述信息
    if (section == 0) {
        return @"人最少的帮派";
    }else if (section == 1){
        return @"最可爱的帮派";
    }else{
        return @"最不好欺负的帮派";
    }
}
(8)点击弹窗
-(void)tableView:(UITableView *)tableView didSelectRowAtIndexPath:(nonnull NSIndexPath *)indexPath
{
    NSString *str ;
    if (indexPath.section==0) {
        str = _arr0[indexPath.row];
    }else if(indexPath.section==1) {
        str = _arr1[indexPath.row];
    }else{
        str = _arr2[indexPath.row];
    }
//    NSString *str = [NSString stringWithFormat:@"%@",_arr3[indexPath.section]];
    UIAlertController *aler = [UIAlertController alertControllerWithTitle:@"是否拜入他的门下?" message:str preferredStyle:UIAlertControllerStyleAlert];

    UIAlertAction *sureAler = [UIAlertAction actionWithTitle:@"要么加入" style:UIAlertActionStyleCancel handler:nil];
    UIAlertAction *cancelAler = [UIAlertAction actionWithTitle:@"要么死" style:UIAlertActionStyleDestructive handler:nil];
    //添加到控制器
    [aler addAction:cancelAler];
    [aler addAction:sureAler];
    [self presentViewController:aler animated:YES completion:nil];
}

