线上定时任务quartz造成线程数量暴增,导致-bash :fork : Cannot allocate memory
一、问题描述:
上篇文章写道在部署生产产生了OOM问题,对jvm参数优化后比之前好些,但是感觉线上得了一种慢性病,突然就出现内存不足的提示,如下:
从而导致应用不能使用,第一反应就是内存满了,第二反应就是代码出现了内存泄漏,毫无疑问一般都是第二种情况造成的,于是就观察了几天生产的内存使用情况,发现还有一半的内存没用,突然就又报那个错了。这个时候感觉有点不对劲,难道内存会突发性的使用完么?好机会无奈之下只能重启服务器,具体上线内存监控也没发现什么问题,有仔细看了下那个提示:-bash :fork ,在网上看了很多运维的资料发现,这个问题的出现有两个原因:
1、服务器的系统内部进程数达到了上限,导致新的进程无法fork
2、CPU或者内存达到了峰值,这个时候可以尝试多敲几遍(正常如果反复执行10遍左右没有反应,就只能进行服务器的重启操作)
括号中的那个操作很重要,果然敲了几次,可以正常使用linux命令,那就说明是第一种情况造成的原因。
二、问题分析解决:
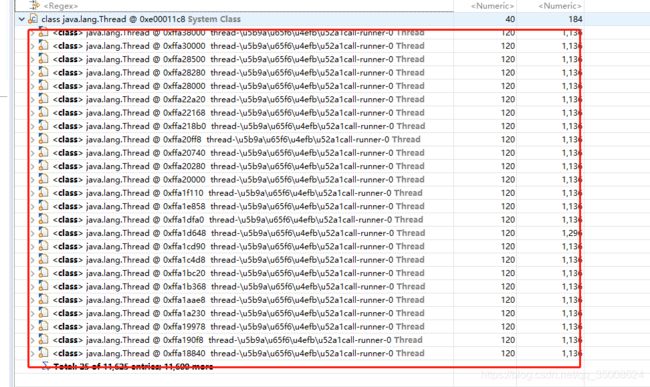
所以通过top -c 找到了占用内存最大的进程,就是部署了几个定时任务的程序,通过jmap把堆文件倒出来后,发现内存泄漏的地方提示如下:
刚开始并且每感觉到有什么问题,只能说明quartz有问题,但是为什么会引起内存泄漏呢?找到对用Job的地方,无法下手呀,重新加了SchedulerFactoryBean 中的几个关键参数,包括Job和线程池的设置等等,发现改了后还是不起什么作用。折腾来折腾去也不知道怎么解决。
无奈之前又看了下报的错,既然是线程达到最大,那就看下程序看下具体的线程情况吧:
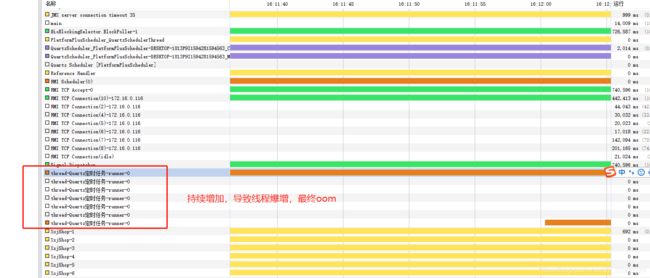
pstree -p | wc -l发现数量很大,已经接近最大线程数,3w多,一但达到这个限制就会发生-bash :fork : Cannot allocate memory,这个时候终于看到了希望,所以又在本地通过jdk的线程工具,发现定时任务中有很多线程,而这个线程恰恰是定时任务执行时用到的,任务执行完后并没有销毁,所以一直持续增加:
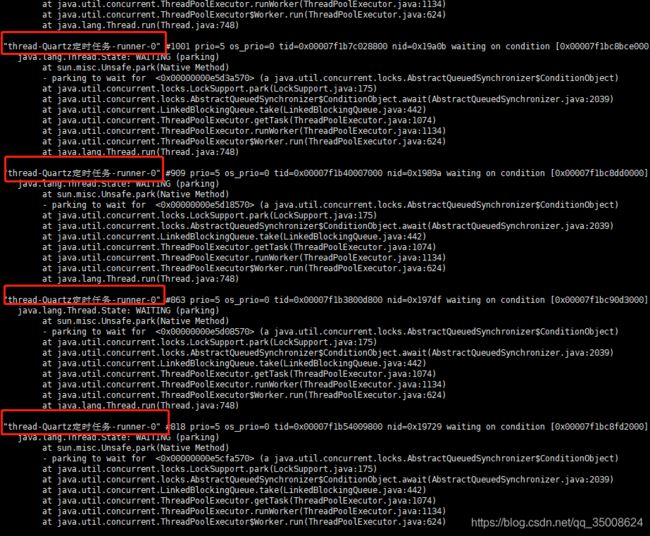
这个时候我又到线上通过jstack看了下定时任务进程的线程运行状况,果然是这个鬼东西造成的:
这个线程在代码中出现的地方为:
/*
 * 项目名称:platform-plus
 * 类名称:ScheduleJob.java
 * 包名称:com.platform.modules.job.utils
 *
 * 修改履历:
 *      日期                修正者      主要内容
 *      2019 11/21 16:04    lipf       初版完成
 *
 * Copyright (c) 2019-2019
 */
package com.platform.modules.job.utils;

import com.google.common.util.concurrent.ThreadFactoryBuilder;
import com.platform.common.utils.SpringContextUtils;
import com.platform.modules.job.entity.ScheduleJobEntity;
import com.platform.modules.job.entity.ScheduleJobLogEntity;
import com.platform.modules.job.service.ScheduleJobLogService;
import lombok.extern.slf4j.Slf4j;
import org.apache.commons.lang.StringUtils;
import org.quartz.JobExecutionContext;
import org.springframework.beans.BeanUtils;
import org.springframework.scheduling.quartz.QuartzJobBean;

import java.util.Date;
import java.util.concurrent.*;

/**
 * 定时任务
 *
 * @author lipf
 */
@Slf4j
public class ScheduleJob extends QuartzJobBean {

    private ThreadFactory namedThreadFactory = new ThreadFactoryBuilder().setNameFormat("thread-call-runner-%d").build();

    private ExecutorService service = new ThreadPoolExecutor(1, 1, 0L, TimeUnit.MILLISECONDS, new LinkedBlockingQueue(), namedThreadFactory);

    @Override
    protected void executeInternal(JobExecutionContext context) {
        ScheduleJobEntity scheduleJob = new ScheduleJobEntity();

        BeanUtils.copyProperties(context.getMergedJobDataMap().get(ScheduleJobEntity.JOB_PARAM_KEY), scheduleJob);
        //获取spring bean
        ScheduleJobLogService scheduleJobLogService = (ScheduleJobLogService) SpringContextUtils.getBean("scheduleJobLogService");

        //数据库保存执行记录
        ScheduleJobLogEntity logEntity = new ScheduleJobLogEntity();
        logEntity.setJobId(scheduleJob.getJobId());
        logEntity.setBeanName(scheduleJob.getBeanName());
        logEntity.setMethodName(scheduleJob.getMethodName());
        logEntity.setParams(scheduleJob.getParams());
        logEntity.setCreateTime(new Date());

        //任务开始时间
        long startTime = System.currentTimeMillis();

        try {
            //执行任务
            log.info("任务准备执行,任务ID:" + scheduleJob.getJobId());
            ScheduleRunnable task = new ScheduleRunnable(scheduleJob.getBeanName(),
                    scheduleJob.getMethodName(), scheduleJob.getParams());
            Future future = service.submit(task);

            future.get();

            //任务执行总时长
            long times = System.currentTimeMillis() - startTime;
            logEntity.setTimes((int) times);
            //任务状态    0:成功    1:失败
            logEntity.setStatus(0);

            log.info("任务执行完毕,任务ID:" + scheduleJob.getJobId() + "  总共耗时:" + times + "毫秒");
        } catch (Exception e) {
            log.error("任务执行失败,任务ID:" + scheduleJob.getJobId(), e);

            //任务执行总时长
            long times = System.currentTimeMillis() - startTime;
            logEntity.setTimes((int) times);

            //任务状态    0:成功    1:失败
            logEntity.setStatus(1);
            logEntity.setError(StringUtils.substring(e.toString(), 0, 2000));
        } finally {
            scheduleJobLogService.save(logEntity);
        }
    }
}
因为每次定时任务执行的时候都会走executeInternal方法,所以造成每次都会创建一个新的线程,之前的也没销毁,这个时候就知道问题了,于是就进行了改造,重新用了下spring的线程池,并发到executeInternal发放里面,这样,每次就只用那四个线程就好了。
@Slf4j
@DisallowConcurrentExecution
public class ScheduleJob extends QuartzJobBean {


    @Override
    protected void executeInternal(JobExecutionContext context) {
        ScheduleJobEntity scheduleJob = new ScheduleJobEntity();

        ThreadPoolTaskExecutor service = (ThreadPoolTaskExecutor) SpringContextUtils.getBean("quartzTaskExecutor");

        BeanUtils.copyProperties(context.getMergedJobDataMap().get(ScheduleJobEntity.JOB_PARAM_KEY), scheduleJob);
        //获取spring bean
        ScheduleJobLogService scheduleJobLogService = (ScheduleJobLogService) SpringContextUtils.getBean("scheduleJobLogService");

        //数据库保存执行记录
        ScheduleJobLogEntity logEntity = new ScheduleJobLogEntity();
        logEntity.setJobId(scheduleJob.getJobId());
        logEntity.setBeanName(scheduleJob.getBeanName());
        logEntity.setMethodName(scheduleJob.getMethodName());
        logEntity.setParams(scheduleJob.getParams());
        logEntity.setCreateTime(new Date());

        //任务开始时间
        long startTime = System.currentTimeMillis();

        try {
            //执行任务
            log.info("任务准备执行,任务ID:" + scheduleJob.getJobId());
            ScheduleRunnable task = new ScheduleRunnable(scheduleJob.getBeanName(),
                    scheduleJob.getMethodName(), scheduleJob.getParams());
            Future future = service.submit(task);

            future.get();

            //任务执行总时长
            long times = System.currentTimeMillis() - startTime;
            logEntity.setTimes((int) times);
            //任务状态    0:成功    1:失败
            logEntity.setStatus(0);

            log.info("任务执行完毕,任务ID:" + scheduleJob.getJobId() + "  总共耗时:" + times + "毫秒");
        } catch (Exception e) {
            log.error("任务执行失败,任务ID:" + scheduleJob.getJobId(), e);

            //任务执行总时长
            long times = System.currentTimeMillis() - startTime;
            logEntity.setTimes((int) times);

            //任务状态    0:成功    1:失败
            logEntity.setStatus(1);
            logEntity.setError(StringUtils.substring(e.toString(), 0, 2000));
        } finally {
            scheduleJobLogService.save(logEntity);
        }
    }
}
package com.platform.config;

import com.google.common.util.concurrent.ThreadFactoryBuilder;
import lombok.extern.slf4j.Slf4j;
import org.springframework.context.annotation.Bean;
import org.springframework.context.annotation.Configuration;
import org.springframework.scheduling.concurrent.ThreadPoolTaskExecutor;

/**
 * @auth lipf
 * @date 2020/7/9 14:16
 */
@Configuration
@Slf4j
public class ThreadPoolTaskExecutorConfig {


    @Bean(name ="quartzTaskExecutor")
    public ThreadPoolTaskExecutor threadPoolTaskExecutor(){
        log.info("启动定时任务Quartz线程池");
        ThreadPoolTaskExecutor executor = new ThreadPoolTaskExecutor();
        // 核心线程数
        executor.setCorePoolSize(4);
        // 最大线程数
        executor.setMaxPoolSize(4);
        // 任务队列大小
        executor.setQueueCapacity(100);
        // 线程前缀名
        executor.setThreadNamePrefix("XxjQuartz");
        // 线程的空闲时间
        executor.setKeepAliveSeconds(10000);
        executor.setThreadFactory(new ThreadFactoryBuilder().setNameFormat("XXJQuartz定时任务-runner-%d").build());
        // 拒绝策略
        executor.setRejectedExecutionHandler(new CustomAbortPolicy());
        // 线程初始化
        //executor.initialize();
        return executor;
    }
}
package com.platform.config;

import lombok.extern.slf4j.Slf4j;

import java.util.concurrent.RejectedExecutionHandler;
import java.util.concurrent.ThreadPoolExecutor;

/**
 * @auth lipf
 * @date 2020/7/9 14:23
 */
@Slf4j
public class CustomAbortPolicy implements RejectedExecutionHandler {

    public void AbortPolicy() { }

    @Override
    public void rejectedExecution(Runnable r, ThreadPoolExecutor executor) {
        if (!executor.isShutdown()) {
            try {
                log.error("full-->>线程池已满,执行拒绝策略");
                while (executor.getQueue().remainingCapacity() == 0);
                executor.execute(r);
            } catch (Exception e) {
                log.error("rejectedExecutionException====>>>>>"+e.toString());
            }
        }
    }
}
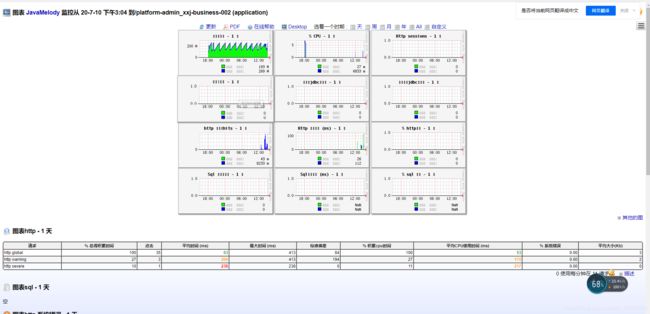
这个时候发现定时任务运行时的线程数一直是4个,最终也不会导致线程数暴增了,完美解决
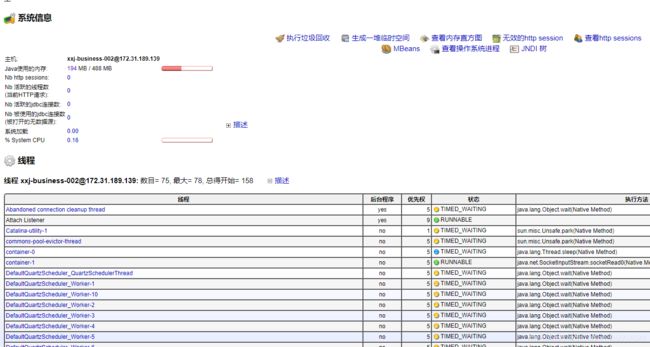
上面这个监控是javaMelody,很好用。
三、集成监控工具javaMelody
(1)加入依赖
     net.bull.javamelody
     javamelody-core
     1.60.0
(2)加入配置
package com.platform.config;

import net.bull.javamelody.MonitoringFilter;
import net.bull.javamelody.SessionListener;
import org.springframework.boot.web.servlet.FilterRegistrationBean;
import org.springframework.boot.web.servlet.ServletListenerRegistrationBean;
import org.springframework.context.annotation.Bean;
import org.springframework.context.annotation.Configuration;

/**
 * @auth lipf
 * @date 2020/7/9 16:14
 */
@Configuration
public class JavamelodyConfiguration {
        @Bean
        public FilterRegistrationBean monitorFilter(){
            FilterRegistrationBean filterRegistrationBean = new FilterRegistrationBean(new MonitoringFilter());
            filterRegistrationBean.addUrlPatterns("/*");
            return filterRegistrationBean;
        }

        @Bean
        public ServletListenerRegistrationBean sessionListener(){
            ServletListenerRegistrationBean servletListenerRegistrationBean = new ServletListenerRegistrationBean();
            servletListenerRegistrationBean.setListener(new SessionListener());
            return servletListenerRegistrationBean;
        }

}
(3)访问地址(如果有权限进行放行)
http://120.27.xx.xx:13082/platform-admin/monitoring
(4)看下帅气的界面
到此问题就解决了,虽然这个过程有点漫长,但是坚持找问题,分析问题总会解决,nice

