4、Spring Boot——整合页面模板
Spring Boot中可以支持前后端分离开发,这个时候就不需要后端页面模板,当然,Spring Boot中也支持直接页面模板,早期的Spring Boot中还支持使用Velocity作用页面模板,现在的Spring Boot已经不支持使用Velocity了,页面模板主要支持Thymeleaf和Freemarker,当然,作为Java最基本的页面模板Jsp,Spring Boot也是支持的,只是使用比较麻烦。
1、整合Thymeleaf
官网:https://www.thymeleaf.org/
相对于Freemarker、Jsp而言,Thymeleaf是一个非常新的页面模板,通常我们称之为前端页面模板因为Thymeleaf模板的后缀是html,不同于Freemarker、Jsp这一类必须服务端解析之后才能显示出来的页面模板,Thymeleay不需要经过服务端解析就能够显示出来。
由于Thymeleaf可以直接被浏览器打开,因此,预览时非常方便。
1.2 整合步骤
Spring Boot中整合Thymeleaf非常容易,只需要创建项目时添加Thymeleaf依赖即可。
 创建完成后,pom.xml依赖如下:
            org.springframework.boot
            spring-boot-starter-thymeleaf


            org.springframework.boot
            spring-boot-starter-web
当然Thymeleaf不仅仅能在Spring Boot中使用,也可以使用在其他地方,只不过Spring Boot针对Thymeleaf提供了一整套的配置方案,配置类在org.springframework.boot.autoconfigure.thymeleaf.ThymeleafProperties中。

这个类首先上面加了一个@ConfigurationProperties注解(Spring Boot中的类型安全的属性注入),将application.properties中前缀是spring.thymeleaf的配置和这个类中的属性绑定。(不会绑定在以下的static属性中)
 这三个static变量定义了默认的编码格式,视图解析器的前缀、后缀等。
从前三行配置中可以看出来,Thymeleaf模板的默认位置在resources/templates目录下,默认的后缀是html。
这些配置如果开发者不自己提供,则使用默认的,如果自己提供,则在application.properties中以spring.thymeleaf开始相关的配置。
Thymeleaf本身的自动化配置类org.springframework.boot.autoconfigure.thymeleaf.ThymeleafAutoConfiguration
@Configuration
@EnableConfigurationProperties({ThymeleafProperties.class})
@ConditionalOnClass({TemplateMode.class, SpringTemplateEngine.class})
@AutoConfigureAfter({WebMvcAutoConfiguration.class, WebFluxAutoConfiguration.class})
在自动化配置类中,首先导入ThymeleafProperties.
然后@ConditionalOnClass注解表示当前系统中存在
TemplateMode.class和SpringTemplateEngine.class类时,当前的自动化配置类才会生效(即项目中引入Thymeleaf相关依赖时这个配置就会生效)
1.2 创建Controller
@Controller
public class IndexController {

    @GetMapping("/index")
    public String index(Model model){
        List users=new ArrayList<>();
        for (int i=1;i<10;i++){
            User u=new User();
            u.setName("张三"+i);
            u.setId(i);
            u.setAddress("深圳"+i);
            users.add(u);
        }
        model.addAttribute("user",users);
    return "index";
}
}
Thymeleaf文件得后缀就是html,所以创建Thmeleaf文件直接创建html文件就好了。Thymeleaf中的循环th:each。
    Title


        编号
        姓名
        地址
启动后页面显示如下:

Thmeleaf还有一个特性:它支持再js中直接获取model中的变量
例如我在Controller中定义了一个
model.addAttribute("username","李四");
这时在页面模板中可以直接在js中获取到这个username变量


2、整合Freemarker
添加页面模板
 pom.xml文件中的依赖
            org.springframework.boot
            spring-boot-starter-freemarker


            org.springframework.boot
            spring-boot-starter-web
@Controller
public class BookController {
    @GetMapping("/book")
    public String book(Model model){
        List books=new ArrayList<>();
        for (int i=1;i<10;i++){
            Book b=new Book();
            b.setId(i);
            b.setName("三国演义"+i);
            b.setAuthor("罗贯中"+i);
            books.add(b);
        }
        model.addAttribute("books",books);
        return "book";
    }
}
创建一个book.ftl
    Title


        编号
        书名
        作者

    <#list books as book>

            ${book.id}
            ${book.name}
            ${book.author}
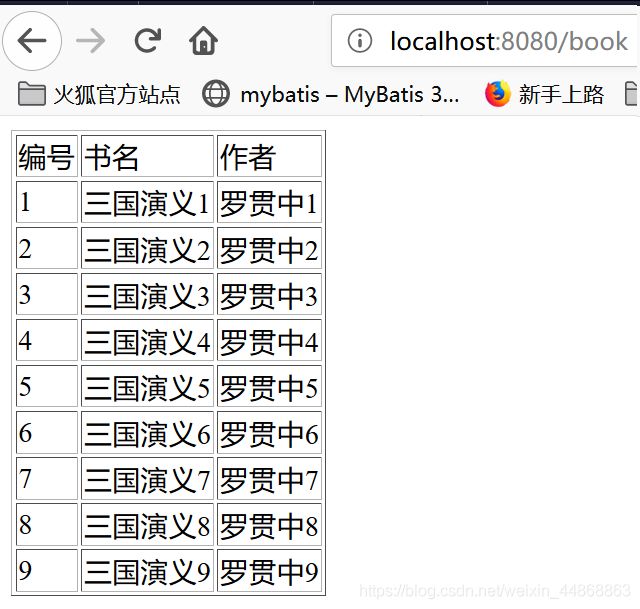
页面显示如下:

3、整合Jsp
整合Jsp相对于要比Thymeleay和Freemarker稍微复杂一点。因为那两个都可以把页面模板放在template,jsp只能放在webapp目录下,针对于jsp,Spring Boot并没有提供相关的自动化配置,jsp只能自己加依赖。
            jstl
            jstl
            1.2


            javax.servlet
            javax.servlet-api


            javax.servlet.jsp
            javax.servlet.jsp-api
            2.3.1


            org.apache.tomcat.embed
            tomcat-embed-jasper
Controller如下:
@Controller
public class UserController {
    @GetMapping("/user")
    public String user(Model model){
        List users=new ArrayList<>();
        for (int i=1;i<10;i++){
            User u=new User();
            u.setId(i);
            u.setUsername("王五"+i);
            u.setAddress("深圳"+i);
            users.add(u);
        }
        model.addAttribute("users",users);
        return "user";
    }
}
jsp需要放在webapp目录下,所以需要在resources目录下创建一个webapp目录
<%@ taglib prefix="c" uri="http://java.sun.com/jsp/jstl/core" %>
<%--
  Created by IntelliJ IDEA.
  User: 豆子
  Date: 2019/5/29
  Time: 0:47
  To change this template use File | Settings | File Templates.
--%>
<%@ page contentType="text/html;charset=UTF-8" language="java" %>


    Title


        用户编号
        用户名
        地址


                ${user.id}
                ${user.name}
                ${user.address}
这时候Spring Boot 是不知道视图在webapp目录下的,要自己创建一个WebMVCConfig配置类,但是不能继承 WebMvcConfigurationSupport类,只能实现一个接口WebMvcConfigurer。因为我现在只想要Spring Boot原来的配置不变的情况下,增加一个视图解析器就可以了,如果采用继承的方法,会导致Spring Boot已经配置好的全部失效。
@Configuration
public class WebMVCConfig implements WebMvcConfigurer {
    @Override
    public void configureViewResolvers(ViewResolverRegistry registry) {
        //前缀和后缀
        registry.jsp("/",".jsp");
    }
}
