【目标检测】使用keras-yolov3训练自己的数据集详细流程
YOLOv3的具体的概念与流程这里不再介绍,下面直接讲解实现的步骤。
计算机环境:Win10 + Python3.6 + cuda9.0
IDE:PyCharm + Anaconda
依赖:
tensorflow-gpu 1.12.0
keras-gpu 2.2.4
opencv
pillow
numpy
matplotlib
目录
- 一 制作数据集
- 1.1 LabelImg 标记图片
- 1.2 VOC 数据集格式介绍
- 1.3 转化成VOC数据集
- 1.4 生成ImageSets
- 二 代码修改
- 2.1 修改`voc_annocation.py`
- 2.2 修改`yolo3.cfg`
- 2.3 修改voc_classes.txt
- 2.4 修改train.py
- 2.5 修改yolo.py
一 制作数据集
制作数据集的工程量较为巨大,如果你有几千张图片,就要一一为这些图片做标记。如果不是做实际的工程项目或是比赛,此步骤可以跳过,在互联网上直接下载已经标记好的数据集。
著名的数据集:
1 CIFAR-10 and CIFAR-100 datasets 已经处理好的数据,无法看到原图片。
2 PASCAL VOC 可直接查看原图片,数据集采用VOC格式
本文的数据集:安全帽—百度网盘 采用VOC格式
1.1 LabelImg 标记图片
标记图片就是对图片中的待识别目标进行标记,如果识别的目标时猫、狗,那就用方块标记出猫或狗,它们的标签分别为cat、dog。标记完成后,生成与文件名相同的.xml文件。
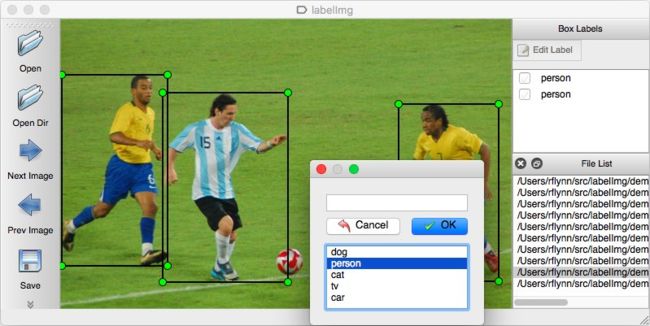
LabelImg 安装及使用
标记图片所使用的软件为LabelImg,图像标注工具labelImg安装教程及使用方法。
1.2 VOC 数据集格式介绍
深度学习所使用的数据集格式大部分采用VOC格式,。所以我们也要将自己所标记的图片转变到VOC格式。
可在PASCAL VOC 下载数据集查看VOC数据集。也可查看此文章:VOC数据集格式介绍,此文章以VOC2007为例,介绍了VOC的组成。
1.3 转化成VOC数据集
标记好所有图片后,所有的jpg和xml均在一个目录下。我们新建一个文件夹dataset,在dataset目录下新建JPEGImages、Annotations和ImageSets三个文件夹。
将所有jpg文件放入JPEGImages中;
将所有xml文件放入Annotations中;
在ImageSets文件夹内新建Main备用。
1.4 生成ImageSets
使用代码make_main_txt.py生成ImgeSets/Main目录下的train.txt, trainval.txt, val.txt, test.txt。该代码存放的目录如下图,make_main_txt.py与ImageSets同级

代码:make_main_txt.py
import os
import random

trainval_percent = 0.2 # test和val所占的比例,(1-trainval_percent)是训练集的比例
train_percent = 0.8  # 其中在train时使用的是test所占trainval的比例

xmlfilepath = 'Annotations'
txtsavepath = 'ImageSets\Main'
total_xml = os.listdir(xmlfilepath)

num = len(total_xml)     # 图片数量
list = range(num)
tv = int(num * trainval_percent)
tr = int(tv * train_percent)
trainval = random.sample(list, tv)
train = random.sample(trainval, tr)

ftrainval = open('ImageSets/Main/trainval.txt', 'w')
ftest = open('ImageSets/Main/test.txt', 'w')
ftrain = open('ImageSets/Main/train.txt', 'w')
fval = open('ImageSets/Main/val.txt', 'w')

for i in list:
    name = total_xml[i][:-4] + '\n'
    if i in trainval:
        ftrainval.write(name)
        if i in train:
            ftest.write(name)
        else:
            fval.write(name)
    else:
        ftrain.write(name)

ftrainval.close()
ftrain.close()
fval.close()
运行之后,将产生下面这些文件。

二 代码修改
代码下载:keras-yolo3
权重下载:yolov3.weights 并将权重放在keras-yolo3-master的文件夹下。
2.1 修改voc_annocation.py
该文件用于生成下图所示的文本文件,包括train.txt,test.txt,val.txt。
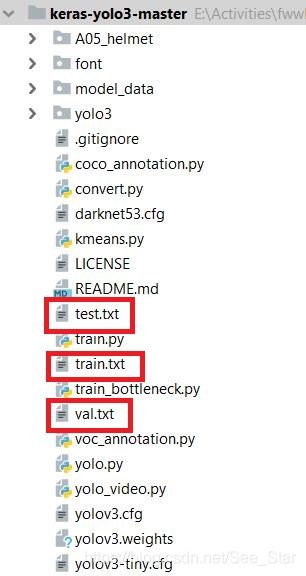
其中包含图片的目录,以及图片中标签位置数据。
对文件进行修改,修改结果如下,修改了类别(classes)、图片的打开目录和保存目录。
# -*- coding:utf-8 -*-
import xml.etree.ElementTree as ET
from os import getcwd

sets = ['train', 'val', 'test']
classes = ["person", "hat"]


def convert_annotation(image_id, list_file):
    print(image_id)
    in_file = open('A05_helmet/Annotations/%s.xml' % image_id)
    tree = ET.parse(in_file)
    root = tree.getroot()

    for obj in root.iter('object'):
        difficult = obj.find('difficult').text
        cls = obj.find('name').text
        if cls not in classes or int(difficult)==1:
            continue
        cls_id = classes.index(cls)
        xmlbox = obj.find('bndbox')
        b = (int(xmlbox.find('xmin').text), int(xmlbox.find('ymin').text), int(xmlbox.find('xmax').text), int(xmlbox.find('ymax').text))
        list_file.write(" " + ",".join([str(a) for a in b]) + ',' + str(cls_id))

wd = getcwd()

for image_set in sets:
    image_ids = open('A05_helmet/ImageSets/Main/%s.txt' % image_set).read().strip().split()
    print(image_ids)
    list_file = open('%s.txt' % image_set, 'w')

    for image_id in image_ids:
        list_file.write('A05_helmet/JPEGImages/%s.jpg' % image_id)
        convert_annotation(image_id, list_file)
        list_file.write('\n')
    list_file.close()
2.2 修改yolo3.cfg
打开yolo3.cfg,搜索yolo(共三处),每次均按下图修改。
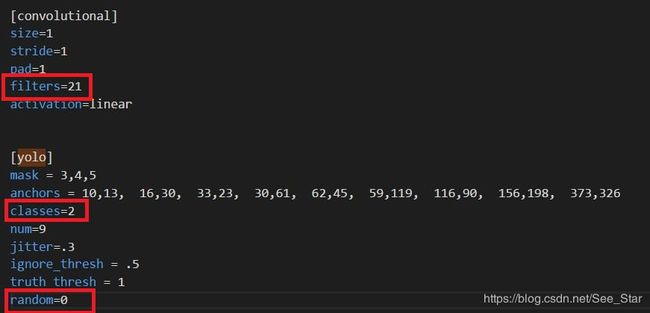
filters:3*(5+len(classes))
classes:训练的类别数
random:原来是1,显存小改为0
2.3 修改voc_classes.txt
目录如下图所示,将voc_classes.txt的内容修改为为自己训练的类别。

2.4 修改train.py
用下面代码直接替换原来的train.py代码。
"""
Retrain the YOLO model for your own dataset.
"""
import numpy as np
import keras.backend as K
from keras.layers import Input, Lambda
from keras.models import Model
from keras.callbacks import TensorBoard, ModelCheckpoint, EarlyStopping

from yolo3.model import preprocess_true_boxes, yolo_body, tiny_yolo_body, yolo_loss
from yolo3.utils import get_random_data


def _main():
    annotation_path = 'train.txt'
    log_dir = 'logs/000/'
    classes_path = 'model_data/voc_classes.txt'
    anchors_path = 'model_data/yolo_anchors.txt'
    class_names = get_classes(classes_path)
    anchors = get_anchors(anchors_path)
    input_shape = (416,416) # multiple of 32, hw
    model = create_model(input_shape, anchors, len(class_names) )
    train(model, annotation_path, input_shape, anchors, len(class_names), log_dir=log_dir)

def train(model, annotation_path, input_shape, anchors, num_classes, log_dir='logs/'):
    model.compile(optimizer='adam', loss={
        'yolo_loss': lambda y_true, y_pred: y_pred})
    logging = TensorBoard(log_dir=log_dir)
    checkpoint = ModelCheckpoint(log_dir + "ep{epoch:03d}-loss{loss:.3f}-val_loss{val_loss:.3f}.h5",
        monitor='val_loss', save_weights_only=True, save_best_only=True, period=1)
    batch_size = 10
    val_split = 0.1
    with open(annotation_path) as f:
        lines = f.readlines()
    np.random.shuffle(lines)
    num_val = int(len(lines)*val_split)
    num_train = len(lines) - num_val
    print('Train on {} samples, val on {} samples, with batch size {}.'.format(num_train, num_val, batch_size))

    model.fit_generator(data_generator_wrap(lines[:num_train], batch_size, input_shape, anchors, num_classes),
            steps_per_epoch=max(1, num_train//batch_size),
            validation_data=data_generator_wrap(lines[num_train:], batch_size, input_shape, anchors, num_classes),
            validation_steps=max(1, num_val//batch_size),
            epochs=500,
            initial_epoch=0)
    model.save_weights(log_dir + 'trained_weights.h5')

def get_classes(classes_path):
    with open(classes_path) as f:
        class_names = f.readlines()
    class_names = [c.strip() for c in class_names]
    return class_names

def get_anchors(anchors_path):
    with open(anchors_path) as f:
        anchors = f.readline()
    anchors = [float(x) for x in anchors.split(',')]
    return np.array(anchors).reshape(-1, 2)

def create_model(input_shape, anchors, num_classes, load_pretrained=False, freeze_body=False,
            weights_path='model_data/yolo_weights.h5'):
    K.clear_session() # get a new session
    image_input = Input(shape=(None, None, 3))
    h, w = input_shape
    num_anchors = len(anchors)
    y_true = [Input(shape=(h//{0:32, 1:16, 2:8}[l], w//{0:32, 1:16, 2:8}[l], \
        num_anchors//3, num_classes+5)) for l in range(3)]

    model_body = yolo_body(image_input, num_anchors//3, num_classes)
    print('Create YOLOv3 model with {} anchors and {} classes.'.format(num_anchors, num_classes))

    if load_pretrained:
        model_body.load_weights(weights_path, by_name=True, skip_mismatch=True)
        print('Load weights {}.'.format(weights_path))
        if freeze_body:
            # Do not freeze 3 output layers.
            num = len(model_body.layers)-7
            for i in range(num): model_body.layers[i].trainable = False
            print('Freeze the first {} layers of total {} layers.'.format(num, len(model_body.layers)))

    model_loss = Lambda(yolo_loss, output_shape=(1,), name='yolo_loss',
        arguments={'anchors': anchors, 'num_classes': num_classes, 'ignore_thresh': 0.5})(
        [*model_body.output, *y_true])
    model = Model([model_body.input, *y_true], model_loss)
    return model
def data_generator(annotation_lines, batch_size, input_shape, anchors, num_classes):
    n = len(annotation_lines)
    np.random.shuffle(annotation_lines)
    i = 0
    while True:
        image_data = []
        box_data = []
        for b in range(batch_size):
            i %= n
            image, box = get_random_data(annotation_lines[i], input_shape, random=True)
            image_data.append(image)
            box_data.append(box)
            i += 1
        image_data = np.array(image_data)
        box_data = np.array(box_data)
        y_true = preprocess_true_boxes(box_data, input_shape, anchors, num_classes)
        yield [image_data, *y_true], np.zeros(batch_size)

def data_generator_wrap(annotation_lines, batch_size, input_shape, anchors, num_classes):
    n = len(annotation_lines)
    if n==0 or batch_size<=0: return None
    return data_generator(annotation_lines, batch_size, input_shape, anchors, num_classes)

if __name__ == '__main__':
    _main()
替换完成后,需要创建logs/000目录。
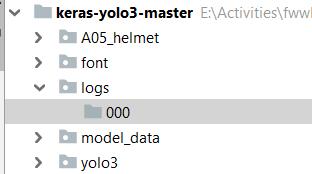
这个目录的作用就是存放自己的数据集训练得到的模型。不然程序运行到最后会因为找不到该路径而发生错误。生成的模型为trained_weights.h5。
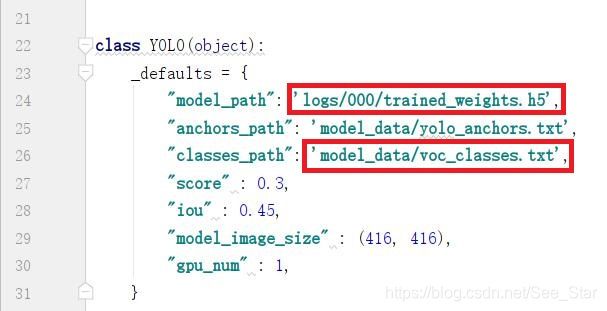
2.5 修改yolo.py
修改yolo.py文件,修改如下两行目录。
参考博客:windows10+keras下的yolov3的快速使用及自己数据集的训练