pytorch mmdetection2.0安装训练测试(coco训练集)
摘要
我是使用google的服务器colab来进行安装使用的,很方便,开就能免费使用k80显卡,冲个会员就能使用p100,基本很稳定,能够满足训练需求。如果是自己的电脑注意我安装包的版本,pytorch1.5 torchvision0.6 cuda是10.1版本
安装mmdetection2.0
服务器自带很多的安装包,十分方便,

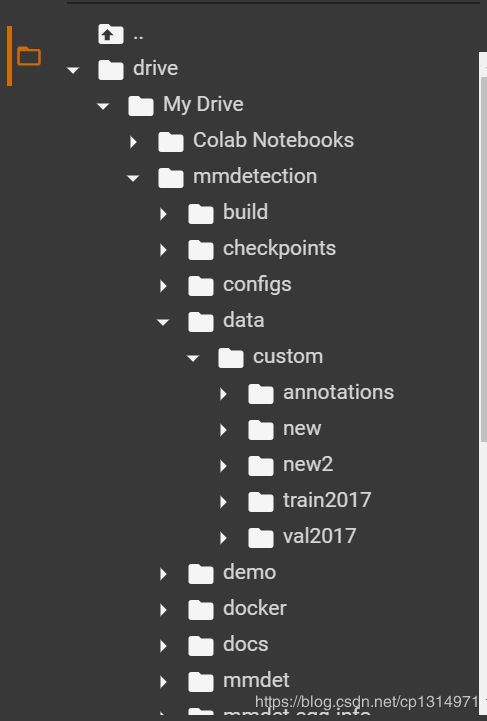
注意看我colab的整体布局,你下载文件要下载到drive My Drive下才可以保存,这个下载的东西会挂载到云盘上。然后在右边就开始输入命令即可
%cd drive/My\ Drive/
这一步是自己要下载mmdet到这个文件目录下,这样会永久保存
!git clone https://github.com/open-mmlab/mmdetection.git
这一行的命令便是在当前文件夹下下载mmdet安装包了
!pip install -r requirements/build.txt
!pip install "git+https://github.com/cocodataset/cocoapi.git#subdirectory=PythonAPI"
!pip install -v -e .
在输入三行命令下载相应包和编译一下,在colab每次关机开机都需要重新安装一下编译,不需要重新下载。每次就5分钟左右,速度很快。
!pip install mmcv
在下载mmcv就算下载完成了
from mmdet.apis import inference_detector, init_detector, show_result_pyplot
config = 'configs/cascade_rcnn/cascade_mask_rcnn_r101_fpn_1x_coco.py'
checkpoint = 'https://open-mmlab.s3.ap-northeast-2.amazonaws.com/mmdetection/v2.0/cascade_rcnn/cascade_rcnn_r101_fpn_1x_coco/cascade_rcnn_r101_fpn_1x_coco_20200317-0b6a2fbf.pth'
model = init_detector(config, checkpoint, device='cuda:0')
img = 'demo/demo.jpg'
result = inference_detector(model, img)
show_result_pyplot(model, img, result, score_thr=0.3)
运行测试,直接运行就可以了。
修改一下自带版本的包,不然测试会报错
!pip install pillow==7.1.2
!pip install -U numpy==1.17.0
每次把这二行代码也运行一下即可
训练coco训练集
修改类别mmdet core evalution class_name.py
类别需要改成你自己的
修改configs下的_bass_ models 例如cascade-rcnn

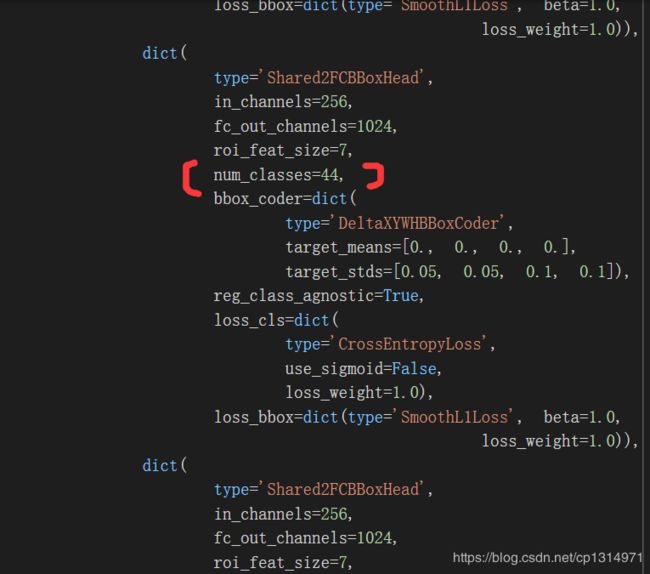
修改num_classes=你自己的类别数量,不需要加一,我的是44个类别,就是44.一共有三处num_classes 全部修改即可。
数据集还是普通的转化成coco的训练集即可,不需要segment部分
生成json文件
import os
import cv2
import json
import xml.dom.minidom
import xml.etree.ElementTree as ET

data_dir = './data' #根目录文件,其中包含image文件夹和box文件夹(根据自己的情况修改这个路径)

image_file_dir = os.path.join(data_dir, 'image')
xml_file_dir = os.path.join(data_dir, 'box')

annotations_info = {'images': [], 'annotations': [], 'categories': []}

categories_map = {'holothurian': 1, 'echinus': 2, 'scallop': 3, 'starfish': 4}

for key in categories_map:
    categoriy_info = {"id":categories_map[key], "name":key}
    annotations_info['categories'].append(categoriy_info)

file_names = [image_file_name.split('.')[0]
              for image_file_name in os.listdir(image_file_dir)]
ann_id = 1
for i, file_name in enumerate(file_names):
    print(i)
    image_file_name = file_name + '.jpg'
    xml_file_name = file_name + '.xml'
    image_file_path = os.path.join(image_file_dir, image_file_name)
    xml_file_path = os.path.join(xml_file_dir, xml_file_name)

    image_info = dict()
    image = cv2.cvtColor(cv2.imread(image_file_path), cv2.COLOR_BGR2RGB)
    height, width, _ = image.shape
    image_info = {'file_name': image_file_name, 'id': i+1,
                  'height': height, 'width': width}
    annotations_info['images'].append(image_info)

    DOMTree = xml.dom.minidom.parse(xml_file_path)
    collection = DOMTree.documentElement

    names = collection.getElementsByTagName('name')
    names = [name.firstChild.data for name in names]

    xmins = collection.getElementsByTagName('xmin')
    xmins = [xmin.firstChild.data for xmin in xmins]
    ymins = collection.getElementsByTagName('ymin')
    ymins = [ymin.firstChild.data for ymin in ymins]
    xmaxs = collection.getElementsByTagName('xmax')
    xmaxs = [xmax.firstChild.data for xmax in xmaxs]
    ymaxs = collection.getElementsByTagName('ymax')
    ymaxs = [ymax.firstChild.data for ymax in ymaxs]

    object_num = len(names)

    for j in range(object_num):
        if names[j] in categories_map:
            image_id = i + 1
            x1,y1,x2,y2 = int(xmins[j]),int(ymins[j]),int(xmaxs[j]),int(ymaxs[j])
            x1,y1,x2,y2 = x1 - 1,y1 - 1,x2 - 1,y2 - 1

            if x2 == width:
                x2 -= 1
            if y2 == height:
                y2 -= 1

            x,y = x1,y1
            w,h = x2 - x1 + 1,y2 - y1 + 1
            category_id = categories_map[names[j]]
            area = w * h
            annotation_info = {"id": ann_id, "image_id":image_id, "bbox":[x, y, w, h], "category_id": category_id, "area": area,"iscrowd": 0}
            annotations_info['annotations'].append(annotation_info)
            ann_id += 1

with  open('./data/annotations.json', 'w')  as f:
    json.dump(annotations_info, f, indent=4)

print('---整理后的标注文件---')
print('所有图片的数量:',  len(annotations_info['images']))
print('所有标注的数量:',  len(annotations_info['annotations']))
print('所有类别的数量:',  len(annotations_info['categories']))
修改mmdet datasets coco.py文件
修改mmdet core evaluation class_name.py文件

数据摆放如下就行,这里的custom你可以改成coco就不用修改加载数据的代码了
!python tools/train.py configs/cascade_rcnn/cascade_rcnn_r50_fpn_1x_coco.py --gpus 1
运行代码都差不多,
!python tools/test.py configs/cascade_rcnn/cascade_rcnn_r50_fpn_1x_coco.py checkpoints/grid.pth --eval bbox
这里的评测命令是coco训练集的评测命令,跟voc不同。
colab使用
这里是进入云盘上,这里上传自己的数据比较方便

这里到mmdetection下就可以右键上传数据。只有15个g可以在另外开会员扩充内存。
总结
使用colab的服务器就很方便了。至少能很快速的安装mmdet使用。里面的自带的包可能版本过旧和太新了,都需要调试。下载包的速度很快。我也同样在colab上训练过efficientdet网络。

