Ubuntu18通过nginx+uwsgi来部署Superset到服务器
Ubuntu18通过nginx+uwsgi来部署Superset到云服务器
- 来一张SuperSet的图验证真伪
- 大致网络路由
- 切换成pip3(pip3 command not found)
- 安装virtualenvwrapper及建立虚拟环境superset_env
- 1.安装virtualenvwrapper
- 2.创建目录用来存放虚拟环境
- 3.在~/.bashrc中添加环境变量等:
- 4.运行及生效文件
- 5.建立虚拟环境superset_env
- 虚拟环境下安装Superset
- Superset配置与初始化
- 报错一:Was unable to import superset Error: cannot import name '_maybe_box_datetimelike'
- 报错二 "Can't determine which FROM clause to join "
- 删除mysql5.7(不是必须)
- 安装mysql8(需最新的,网上其他的mysql-apt-config_0.8.10-1_all.deb是安装成5.7的了)
- 创建数据库及用户授权
- SuperSet的数据库从sqlite库切换到mysql
- mssql配置(补充)
- 重新设置SuperSet
- 安装nginx
- 配置nginx环境变量
- uwsgi安装
- uwsgi配置
- uwsgi.ini文件配置:
- 运行测试(可以跳过)
- 配置Superset的config
- 安装nginx
- 配置nginx
- 端口80被占用
- 解决办法
- 重新启动uwsgi.ini的端口占用问题(例如ctr+C后重新启动)
- 解决办法
- SuperVisor安装及配置(这部分可以跳过阅读,我仅保留记录)
- SuperVisor安装
- SuperVisor配置
- SuperVisor运行
- Web端图形化管理supervisor
- 后记
- 数据库密码独立配置
- 联动图设置
本文基于某某云服务上选择的Ubuntu18系统,其中自带了mysql5.7、python2、python3.6.8。大家安装的时候请注意环境了,不能照搬,不同系统的,有些安装后的文件路径不一致(反正我发现centos安装的有些文件跟Ubuntu18有差异)
这是我成功部署后,回顾式的记录了所做的过程。
2019年12月,由于换了服务器,又重新部署了,重新修正完善了一下。
希望给使用Superset的人员带来方便!!!
来一张SuperSet的图验证真伪

大致网络路由

前提是每个端口(8000、8009)在云服务器上需要获得安全策略通过
切换成pip3(pip3 command not found)
参考的其他文章解决方案
#强制重新用python3安装pip文件,默认会是python2。
sudo apt-get install --reinstall python3-pip
#升级pip版本
pip3 install --upgrade setuptools pip
# 后说明,在后边的安装过程中,发现pip list 和 pip3 list有少量的差异
# 所以:建议大家在虚拟环境下安装的时候还是用pip3安装。
安装virtualenvwrapper及建立虚拟环境superset_env
1.安装virtualenvwrapper
pip3 install virtualenvwrapper
2.创建目录用来存放虚拟环境
mkdir $HOME/.virtualenvs
查找virtualenvwrapper.sh、python3、virtualenv的路径,供下边文件配置使用:
#sudo  find / -name virtualenvwrapper.sh
/usr/local/bin/virtualenvwrapper.sh

#sudo  find / -name python3
/usr/bin/python3

#sudo  find / -name virtualenv
/usr/local/bin/virtualenv
3.在~/.bashrc中添加环境变量等:
export WORKON_HOME=$HOME/.virtualenvs
source /usr/local/bin/virtualenvwrapper.sh   #上边的路径
export VIRTUALENVWRAPPER_PYTHON=/usr/bin/python3
export VIRTUALENVWRAPPER_VIRTUALENV=/usr/local/bin/virtualenv
source /usr/local/bin/virtualenvwrapper.sh
4.运行及生效文件
source ~/.bashrc
运行后的结果:
virtualenvwrapper.user_scripts creating /root/.virtualenvs/premkproject
virtualenvwrapper.user_scripts creating /root/.virtualenvs/postmkproject
virtualenvwrapper.user_scripts creating /root/.virtualenvs/initialize
virtualenvwrapper.user_scripts creating /root/.virtualenvs/premkvirtualenv
virtualenvwrapper.user_scripts creating /root/.virtualenvs/postmkvirtualenv
virtualenvwrapper.user_scripts creating /root/.virtualenvs/prermvirtualenv
virtualenvwrapper.user_scripts creating /root/.virtualenvs/postrmvirtualenv
virtualenvwrapper.user_scripts creating /root/.virtualenvs/predeactivate
virtualenvwrapper.user_scripts creating /root/.virtualenvs/postdeactivate
virtualenvwrapper.user_scripts creating /root/.virtualenvs/preactivate
virtualenvwrapper.user_scripts creating /root/.virtualenvs/postactivate
virtualenvwrapper.user_scripts creating /root/.virtualenvs/get_env_details
5.建立虚拟环境superset_env
mkvirtualenv superset_env
结果如下:
virtualenvwrapper.user_scripts creating /root/.virtualenvs/superset_env/bin/predeactivate
virtualenvwrapper.user_scripts creating /root/.virtualenvs/superset_env/bin/postdeactivate
virtualenvwrapper.user_scripts creating /root/.virtualenvs/superset_env/bin/preactivate
virtualenvwrapper.user_scripts creating /root/.virtualenvs/superset_env/bin/postactivate
virtualenvwrapper.user_scripts creating /root/.virtualenvs/superset_env/bin/get_env_details
虚拟环境下安装Superset
由于superset的机密机制是引用第三方库cryptography,先安装其依赖:
# 参照官网,如果是unbuntu系统的安装依赖选项,python3.6版本
sudo apt-get install build-essential libssl-dev libffi-dev python3.6-dev python-pip libsasl2-dev libldap2-dev

# 红帽系统和RHEL-derivatives系统
sudo yum upgrade python-setuptools
sudo yum install gcc gcc-c++ libffi-devel python-devel python-pip python-wheel openssl-devel cyrus-sasl-devel openldap-devel

# window不是官方支持的系统
# 先在https://bootstrap.pypa.io/get-pip.py下载  get-pip.py文件
pip3 install cryptography
根据上边的虚拟路径,先切换路径到bin:
cd /root/.virtualenvs/superset_env/bin
pip3 install superset

# 后期升级superset
pip3 install apache-superset --upgrade
superset db upgrade
superset init
如果安装出现这个错误:Failed building wheel for sasl。
执行以下命令解决:
sudo apt-get install libsasl2-dev
Superset配置与初始化
如果安装通畅,可以忽略如下的报错。
fabmanager create-admin --app superset
报错一:Was unable to import superset Error: cannot import name ‘_maybe_box_datetimelike’
解决办法:
pip install pandas==0.23.4
报错二 "Can’t determine which FROM clause to join "
sqlalchemy.exc.InvalidRequestError: Can’t determine which FROM clause to join from, there are multiple FROMS which can join to this entity. Try adding an explicit ON clause to help resolve the ambiguity.
pip install SQLAlchemy==1.2.18
删除mysql5.7(不是必须)
由于系统自带的mysql5.7.26,又不知道密码,试了各种办法查找密码,不行,干脆粗暴点重装
#首先在系统终端中查看MySQL的依赖项,运行命令:dpkg --list|grep mysql
卸载命令:sudo apt-get remove mysql-common
卸载命令:sudo apt-get autoremove --purge mysql-server-5.7
清除残留数据,运行命令:dpkg -l|grep ^rc|awk '{print$2}'|sudo xargs dpkg -P
再次查看MySQL的剩余依赖项,运行命令:dpkg --list|grep mysql
继续删除剩余依赖项,如:sudo apt-get autoremove --purge mysql-apt-config
如果再次查看剩余依赖项还有没有删除的,继续上一步
具体参考彻底删除mysql5.7
安装mysql8(需最新的,网上其他的mysql-apt-config_0.8.10-1_all.deb是安装成5.7的了)
通过https://dev.mysql.com/downloads/file/?id=487007,下载最新的mysql8.0。
或者:wget -c https://dev.mysql.com/get/mysql-apt-config_0.8.13-1_all.deb
(后边语句的这个没验证)
接下来在命令窗口依次输入:
sudo dpkg -i mysql-apt-config_0.8.13-1_all.deb
sudo apt update
sudo apt-get install mysql-server
输入密码后提示(为了更好的兼容5.7的,加密方式选择第二种(5.x版本的):)
创建数据库及用户授权
参考设置mysql5.7文章
如果版本是5.7的话,这里有个开启远程3306端口问题:
仅仅通过语句授权不能实现远程登录,需要在配置文件中注释掉本地绑定。
1. 查看3306端口是否正常
root@node1:~# netstat -an | grep 3306
tcp        0      0 127.0.0.1:3306          0.0.0.0:*               LISTEN
注意:现在的3306端口绑定的IP地址是本地的127.0.0.1

2. 修改Mysql配置文件(注意路径,跟之前网上的很多版本位置都不一样)
root@node1:~# vim /etc/mysql/mysql.conf.d/mysqld.cnf
找到
bind-address            = 127.0.0.1
前面加#注释掉上一行
create database news character set utf8;
# 'news':用户名; '123news':密码
create user 'news'@'39.15.16.14' identified by '123news';
# 给用户授权,仅此授权还不够
grant all privileges on news.* to 'news'@'39.15.16.14';
# 刷新权限
flush privileges;
SuperSet的数据库从sqlite库切换到mysql
vim /root/.virtualenvs/superset_env/lib/python3.6/site-packages/superset/config.py
修改一下文件中的SQLALCHEMY_DATABASE_URI :
SQLALCHEMY_DATABASE_URI =‘mysql://账号:密码@IP地址或者hostname/数据库名?charset=utf8’
mssql配置(补充)
SQLALCHEMY_DATABASE_URI = mssql+pymssql://数据库登录名:登录密码@数据库地址:端口号/数据库
# 先升级库
sudo apt-get install python3 python-dev python3-dev build-essential libssl-dev libffi-dev libxml2-dev libxslt1-dev zlib1g-dev python-pip
sudo apt install libmysqlclient-dev
# 安装 mysqlclient 、pymysql
pip install mysqlclient
pip install pymysql
重新设置SuperSet
# 重新初始化密码,注意邮箱设置的唯一性
fabmanager create-admin --app superset
# 初始化数据库
superset db upgrade
# 加载examples
superset load_examples
#初始化
superset init
# 启动服务器,以前的runserver作废了
superset  run
安装nginx
注意安装路径:/home/software/nginx(后边配置文件需要用到)
wget http://nginx.org/download/nginx-1.16.0.tar.gz
tar zxvf nginx-1.16.0.tar.gz
mv nginx-1.16.0 nginx
cd nginx
./configure --prefix=/home/software/nginx --with-http_stub_status_module --with-http_gzip_static_module
make
make install
配置nginx环境变量
vi ~/.bashrc
#打开文档添加:
alias nginx='/home/software/nginx/sbin/nginx'
# 保存并退出后生效更改
source ~/.bashrc
uwsgi安装
pip install uwsgi
uwsgi配置
在 /root/.virtualenvs/superset_env/lib/python3.6/site-packages/superset路径下新建一个uwsgi的入口文件:run.py(类似django的uwsgi文件)。
touch run.py
在文件中添加内容:
from superset import app
if __name__ == '__main__':
    app.run(host='0.0.0.0')
uwsgi.ini文件配置:
注意新建文件位置为/home/uwsgi_conf:这个路径可以自由设置
mkdir -p /home/uwsgi_conf
cd /home/uwsgi_conf
vi uwsgi.ini
文件具体的设置内容:
[uwsgi]
# 指定项目名所在的路径(superset类似flask的一个工程,chdir是指定根目录。只是我们安装superset直接到了Python安装包的位置下,其中/root/.virtualenvs/superset_env是我的虚拟环境的路径,其后就是安装superset的包的路径)
chdir=/root/.virtualenvs/superset_env/lib/python3.6/site-packages/superset/
# 指定uwsgi协议入口文件(也就是刚才我们新建的文件,由于前边指定功能根目录了,所以不许前缀路径)
wsgi-file=run.py
# 指定入口文件中调用run方法的变量名
callable=app
#指定http(由于我们用Ngnix代理,所有用Socket)
#http=127.0.0.1:8000
# 指定sock的文件路径(端口8009自主设定)
socket= 127.0.0.1:8009
# 指定静态文件(static-map=网页地址=本地文件位置,静态文件一般在nginx中配置)
#static-map=/static=/home/myproject/static
# 设置日志目录
#daemonize= /home/uwsgi_conf/uwsgi.log
# pid文件位置(这行最好注释,反正我不注释会报错)
#pidfile= /home/uwsgi_conf/uwsgi.pid(这行最好注释,反正我不注释会报错)
# 进程个数(我的服务器是4核的)
workers=8
# 启动uwsgi的用户名和用户组(都用root启动,是出于权限的考虑,其他权限可能会启动失败)
#uid=root(这行最好注释,反正我不注释会报错)
#gid=root(这行最好注释,反正我不注释会报错)
# 启用主进程
master=true
# 自动移除unix Socket和pid文件当服务停止的时候(默认)
vacuum=true
# 序列化接受的内容,如果可能的话(默认)
thunder-lock=true
# 启用线程(默认)
enable-threads=true
# 设置自中断时间(默认)
harakiri=30
# 设置缓冲(默认)
post-buffering=4096
# 设置代码改动后自动加载(默认)
py-autoreload = 1
运行测试(可以跳过)
说明:根据Superset的说明文档,如果不是使用默认的gunicorn,得在Superset的设置文档中将ENABLE_FLASK_COMPRESS 设置成False
原话为:
If not using gunicorn, you may want to disable the use of flask-compress by setting ENABLE_FLASK_COMPRESS = False in your superset_config.py
如果设定成了socket,就不要这样设置了,(直接跳过下边的测试,最终按nginx来运行)
uwsgi --ini /home/uwsgi_conf/uwsgi.ini
# 另一种指定文件的测试方式
# uwsgi --http :8000--wsgi-file test.py
打开浏览器,访问127.0.0.1:8088。
如果正常访问,则说明配置没有问题
配置Superset的config
cd /root/.virtualenvs/superset_env/lib/python3.6/site-packages/superset/

vi config.py
在打开的配置文件中,找到ENABLE_FLASK_COMPRESS=True所在位置
同时修改成下边的
ENABLE_FLASK_COMPRESS = False
安装nginx
sudo apt-get update
sudo apt-get install nginx
配置nginx
修改用户及增加server配置项(头尾部分需修改,其他的都按默认的处理):
# nginx路径:
cd /etc/nginx
vi nginx.conf
启动nginx后会有警告提示:正在使用root账户。
建议使用其他账户,具体怎么配置等以后再调试。先跑通再说。
#修改用户名root(这个需要修改原文件)
user root;
worker_processes auto;
pid /run/nginx.pid;
include /etc/nginx/modules-enabled/*.conf;

events {
        worker_connections 768;
        # multi_accept on;
}

http {

        ##
        # Basic Settings
        ##

        sendfile on;
        tcp_nopush on;
        tcp_nodelay on;
        keepalive_timeout 65;
        types_hash_max_size 2048;
        # server_tokens off;

        # server_names_hash_bucket_size 64;
        # server_name_in_redirect off;

        include /etc/nginx/mime.types;
        default_type application/octet-stream;

        ##
        # SSL Settings
        ##

        ssl_protocols TLSv1 TLSv1.1 TLSv1.2; # Dropping SSLv3, ref: POODLE
        ssl_prefer_server_ciphers on;

        ##
        # Logging Settings
        ##

        access_log /var/log/nginx/access.log;
        error_log /var/log/nginx/error.log;
		 ##
        # Gzip Settings
        ##

        gzip on;

        # gzip_vary on;
        # gzip_proxied any;
        # gzip_comp_level 6;
        # gzip_buffers 16 8k;
        # gzip_http_version 1.1;
        # gzip_types text/plain text/css application/json application/javascript text/xml application/xml application/xml+rss text/javascript;

        ##
        # Virtual Host Configs
        ##

		#关键的增加部分及下边的server
		# upstream就类似把server 127.0.0.1:8009绑定到一个名词superset
		        upstream superset {
		            server 127.0.0.1:8009;
		        }

		        server {
		            listen       8000 default_server;
		            listen       [::]:8000 default_server;
		            server_name  49.4.0.0;       #公网IP,建议把行后边的注释移到上头,以免运行错误 ,我这只是方便你理解
		            root          /root/.virtualenvs/superset_env/lib/python3.6/site-packages/superset;  # 指定项目根目录

		            location / {
		                include  uwsgi_params;
		                uwsgi_pass superset;    #上边upstream绑定的名称superset
		                }
		        }
				include /etc/nginx/conf.d/*.conf;
		        include /etc/nginx/sites-enabled/*;
	}
端口80被占用
设置保存后,最好检查一下nginx服务是否正常启动,有时由于端口80被占用( bind() to 0.0.0.0:80 failed),导致无法正常启动,会报错如下:
#  查询nginx的连接状态
systemctl status nginx.service
nginx.service - A high performance web server and a reverse proxy server
   Loaded: loaded (/lib/systemd/system/nginx.service; disabled; vendor preset: enabled)
   Active: failed (Result: exit-code) since Sat 2019-07-13 13:59:24 CST; 43s ago
     Docs: man:nginx(8)
  Process: 3137 ExecStart=/usr/sbin/nginx -g daemon on; master_process on; (code=exited, status=1/FAILURE)
  Process: 3126 ExecStartPre=/usr/sbin/nginx -t -q -g daemon on; master_process on; (code=exited, status=0/SUCCESS)

Jul 13 13:59:21 ecs-f316-0001 systemd[1]: Starting A high performance web server and a reverse proxy server...
Jul 13 13:59:21 ecs-f316-0001 nginx[3137]: nginx: [emerg] bind() to 0.0.0.0:80 failed (98: Address already in use)
Jul 13 13:59:22 ecs-f316-0001 nginx[3137]: nginx: [emerg] bind() to 0.0.0.0:80 failed (98: Address already in use)
Jul 13 13:59:22 ecs-f316-0001 nginx[3137]: nginx: [emerg] bind() to 0.0.0.0:80 failed (98: Address already in use)
Jul 13 13:59:23 ecs-f316-0001 nginx[3137]: nginx: [emerg] bind() to 0.0.0.0:80 failed (98: Address already in use)
Jul 13 13:59:23 ecs-f316-0001 nginx[3137]: nginx: [emerg] bind() to 0.0.0.0:80 failed (98: Address already in use)
Jul 13 13:59:24 ecs-f316-0001 nginx[3137]: nginx: [emerg] still could not bind()
Jul 13 13:59:24 ecs-f316-0001 systemd[1]: nginx.service: Control process exited, code=exited status=1
Jul 13 13:59:24 ecs-f316-0001 systemd[1]: nginx.service: Failed with result 'exit-code'.
Jul 13 13:59:24 ecs-f316-0001 systemd[1]: Failed to start A high performance web server and a reverse proxy server.
解决办法
# 杀死nginx进程
killall -9 nginx
# 重新启动服务
systemctl restart nginx.service
重新启动uwsgi.ini的端口占用问题(例如ctr+C后重新启动)
问题:probably another instance of uWSGI is running on the same address (127.0.0.1:8009)
[uWSGI] getting INI configuration from uwsgi.ini
(superset_env) root@ecs-f316-0001:/home/uwsgi_conf# *** Starting uWSGI 2.0.18 (64bit) on [Sat Jul 13 16:03:51 2019] ***
compiled with version: 7.4.0 on 09 July 2019 13:10:40
os: Linux-4.15.0-54-generic #58-Ubuntu SMP Mon Jun 24 10:55:24 UTC 2019
nodename: ecs-f316-0001
machine: x86_64
clock source: unix
detected number of CPU cores: 4
current working directory: /home/uwsgi_conf
detected binary path: /root/.virtualenvs/superset_env/bin/uwsgi
!!! no internal routing support, rebuild with pcre support !!!
uWSGI running as root, you can use --uid/--gid/--chroot options
*** WARNING: you are running uWSGI as root !!! (use the --uid flag) ***
chdir() to /root/.virtualenvs/superset_env/lib/python3.6/site-packages/superset/
your processes number limit is 31645
your memory page size is 4096 bytes
detected max file descriptor number: 65535
lock engine: pthread robust mutexes
thunder lock: enabled
probably another instance of uWSGI is running on the same address (127.0.0.1:8009).
bind(): Address already in use [core/socket.c line 769]
解决办法
sudo fuser -k 8009/tcp     #8009就是配置中设置的端口号,自行修正

uwsgi --ini uwsgi.ini   #重新启动
SuperVisor安装及配置(这部分可以跳过阅读,我仅保留记录)
SuperVisor安装
# 先切换到虚环境
pip install supervisor
SuperVisor配置
安装好supervisor之后,默认是没有生成配置文件的。可以通过以下命令生成配置文件.
参考–使用Supervisor守护Uwsgi进程
SuperVisor监视uwsgi
但是现在SuperVisor不可以监视后端程序了,否则status报backoff:

echo_supervisord_conf > /etc/supervisord.conf
vim /etc/supervisord.conf
在supervisord.conf文档的后边修改include的配置文件路径
[include]
files = /etc/supervisor/*.conf

# 在文档的前边修改下边三处,改成与下边uwsgi.conf对应路径/var/run/或/var/log/
/tmp/supervisor.sock 改成 /var/run/supervisor.sock,
/tmp/supervisord.log 改成 /var/log/supervisor.log,
/tmp/supervisord.pid 改成 /var/run/supervisor.pid

[inet_http_server]
port=9001    ;端口自定义
username=user
password=123
/etc/supervisor/目录下创建一个uwsgi.conf文件,也就是上边设置的include路径,此处文件会被supervisord监视其内容的执行。
cd /etc/supervisor
touch uwsgi.conf
vim /etc/supervisor/uwsgi.conf
修改uwsgi.conf
; supervisor的程序名字
[program:supervisor_uwsgi]
; supervisor执行的命令,注意uwsgi的安装路径
command=/root/.virtualenvs/superset_env/bin/uwsgi --ini /home/uwsgi_conf/uwsgi.ini
; 项目的目录
directory = /root/.virtualenvs/superset_env/lib/python3.6/site-packages/superset
; 开始的时候等待多少秒
startsecs=0
; 停止的时候等待多少秒
stopwaitsecs=0
; 自动开始
autostart=true
; 程序挂了后自动重启
autorestart=true
; 输出的log文件
stdout_logfile=/var/log/supervisord.log
; 输出的错误文件
stderr_logfile=/var/log/supervisord.err

[supervisord]
; log的级别
loglevel=info
SuperVisor运行
#编辑退出后运行命令,在supervisor.conf路径
supervisorctl -c supervisord.conf
# 如果已经启动,停止原有的supervisord
sudo pkill supervisord
进入到管理控制台,然后执行相关的命令进行管理:
status      # 查看状态`在这里插入代码片`
start program_name      #启动程序supervisor
restart program_name   #重新启动程序
stop program_name      #关闭程序
reload                           # 重新加载配置文件
quit                             #退出控制台
Web端图形化管理supervisor
据据前边supervisor设置文件的地址:IP:9001,就可以方便的管理
后记
数据库密码独立配置
def example_password_as_env_var(url):
    # assuming the uri looks like
    # mysql://localhost?superset_user:{SUPERSET_PASSWORD}
    return url.password.format(os.environ)

SQLALCHEMY_CUSTOM_PASSWORD_STORE = example_password_as_env_var
自己建立一个环境变量:SUPERSET_PASSWORD;试了一下,没成功。
其中设置如下:
SQLALCHEMY_DATABASE_URI = ‘mssql+pymssql://sa:{}@localhost:1433/reports’
def lookup_password(url):
    return url.format(os.environ.get('SUPERSET_PASSWORD'))
SQLALCHEMY_CUSTOM_PASSWORD_STORE = lookup_password
没办法,先放弃系统自带的格式SQLALCHEMY_CUSTOM_PASSWORD_STORE ,做了如下修改成功:
SQLALCHEMY_DATABASE_URI = 'mssql+pymssql://sa:{}@localhost:1433/reports'
# 结合环境变量值来重新赋值
SQLALCHEMY_DATABASE_URI=SQLALCHEMY_DATABASE_URI.format(os.environ.get('SUPERSET_PASSWORD'))
更进一步的可以把账号也添加进环境变量,这个请您自己测试。
联动图设置
看下示例中的一个联动效果图:
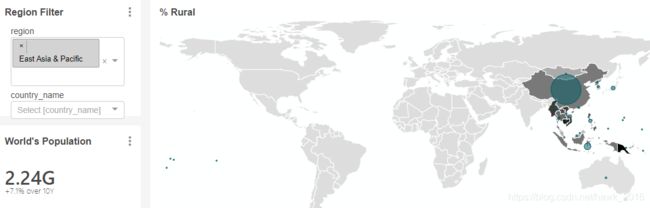
1、设置筛选项框
建立一个图(filter-box):

注意绿色的Metric字段,这个字段跟待联动图的Metric字段关联的
2、设置待联动图的Metric
