深度学习入门之pytorch——Resnet
ResNet
当大家还在惊叹 GoogLeNet 的 inception 结构的时候,微软亚洲研究院的研究员已经在设计更深但结构更加简单的网络 ResNet,并且凭借这个网络子在 2015 年 ImageNet 比赛上大获全胜。
ResNet 有效地解决了深度神经网络难以训练的问题,可以训练高达 1000 层的卷积网络。网络之所以难以训练,是因为存在着梯度消失的问题,离 loss 函数越远的层,在反向传播的时候,梯度越小,就越难以更新,随着层数的增加,这个现象越严重。之前有两种常见的方案来解决这个问题:
1.按层训练,先训练比较浅的层,然后在不断增加层数,但是这种方法效果不是特别好,而且比较麻烦
2.使用更宽的层,或者增加输出通道,而不加深网络的层数,这种结构往往得到的效果又不好
ResNet 通过引入了跨层链接解决了梯度回传消失的问题。
这就普通的网络连接跟跨层残差连接的对比图,使用普通的连接,上层的梯度必须要一层一层传回来,而是用残差连接,相当于中间有了一条更短的路,梯度能够从这条更短的路传回来,避免了梯度过小的情况。
假设某层的输入是 x,期望输出是 H(x), 如果我们直接把输入 x 传到输出作为初始结果,这就是一个更浅层的网络,更容易训练,而这个网络没有学会的部分,我们可以使用更深的网络 F(x) 去训练它,使得训练更加容易,最后希望拟合的结果就是 F(x) = H(x) - x,这就是一个残差的结构
残差网络的结构就是上面这种残差块的堆叠,下面让我们来实现一个 residual block
import sys
sys.path.append('..')

import numpy as np
import torch
from torch import nn
import torch.nn.functional as F
from torch.autograd import Variable
from torchvision.datasets import CIFAR10
def conv3x3(in_channel, out_channel, stride=1):
    return nn.Conv2d(in_channel, out_channel, 3, stride=stride, padding=1, bias=False)
class residual_block(nn.Module):
    def __init__(self, in_channel, out_channel, same_shape=True):
        super(residual_block, self).__init__()
        self.same_shape = same_shape
        stride=1 if self.same_shape else 2

        self.conv1 = conv3x3(in_channel, out_channel, stride=stride)
        self.bn1 = nn.BatchNorm2d(out_channel)

        self.conv2 = conv3x3(out_channel, out_channel)
        self.bn2 = nn.BatchNorm2d(out_channel)
        if not self.same_shape:
            self.conv3 = nn.Conv2d(in_channel, out_channel, 1, stride=stride)

    def forward(self, x):
        out = self.conv1(x)
        out = F.relu(self.bn1(out), True)
        out = self.conv2(out)
        out = F.relu(self.bn2(out), True)

        if not self.same_shape:
            x = self.conv3(x)
        return F.relu(x+out, True)
# 输入输出形状相同
test_net = residual_block(32, 32)
test_x = Variable(torch.zeros(1, 32, 96, 96))
print('input: {}'.format(test_x.shape))
test_y = test_net(test_x)
print('output: {}'.format(test_y.shape))
# 输入输出形状不同
test_net = residual_block(3, 32, False)
test_x = Variable(torch.zeros(1, 3, 96, 96))
print('input: {}'.format(test_x.shape))
test_y = test_net(test_x)
print('output: {}'.format(test_y.shape))
class resnet(nn.Module):
    def __init__(self, in_channel, num_classes, verbose=False):
        super(resnet, self).__init__()
        self.verbose = verbose

        self.block1 = nn.Conv2d(in_channel, 64, 7, 2)

        self.block2 = nn.Sequential(
            nn.MaxPool2d(3, 2),
            residual_block(64, 64),
            residual_block(64, 64)
        )

        self.block3 = nn.Sequential(
            residual_block(64, 128, False),
            residual_block(128, 128)
        )

        self.block4 = nn.Sequential(
            residual_block(128, 256, False),
            residual_block(256, 256)
        )

        self.block5 = nn.Sequential(
            residual_block(256, 512, False),
            residual_block(512, 512),
            nn.AvgPool2d(3)
        )

        self.classifier = nn.Linear(512, num_classes)

    def forward(self, x):
        x = self.block1(x)
        if self.verbose:
            print('block 1 output: {}'.format(x.shape))
        x = self.block2(x)
        if self.verbose:
            print('block 2 output: {}'.format(x.shape))
        x = self.block3(x)
        if self.verbose:
            print('block 3 output: {}'.format(x.shape))
        x = self.block4(x)
        if self.verbose:
            print('block 4 output: {}'.format(x.shape))
        x = self.block5(x)
        if self.verbose:
            print('block 5 output: {}'.format(x.shape))
        x = x.view(x.shape[0], -1)
        x = self.classifier(x)
        return x

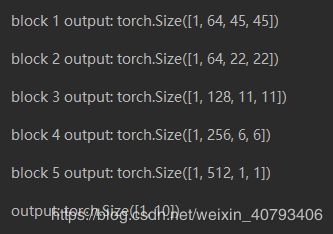
test_net = resnet(3, 10, True)
test_x = Variable(torch.zeros(1, 3, 96, 96))
test_y = test_net(test_x)
print('output: {}'.format(test_y.shape))

下面使用CIFAR10的数据集进行训练和测试,函数data_tf()使得数据格式符合输出方式,而训练函数在utils.py文件里面,下面是utils.py文件的下载链接:https://pan.baidu.com/s/1ATI5neNLZbLXCNJeV9ZqXQ 提取码:khqb
然后在工作文件夹中添加以上文件。
注意batch_size的调节,显存不够的把数值调小一点。
from utils import train

def data_tf(x):
    x = x.resize((96, 96), 2) # 将图片放大到 96 x 96
    x = np.array(x, dtype='float32') / 255
    x = (x - 0.5) / 0.5 # 标准化,这个技巧之后会讲到
    x = x.transpose((2, 0, 1)) # 将 channel 放到第一维,只是 pytorch 要求的输入方式
    x = torch.from_numpy(x)
    return x

train_set = CIFAR10('./data', train=True, transform=data_tf)
train_data = torch.utils.data.DataLoader(train_set, batch_size=64, shuffle=True)
test_set = CIFAR10('./data', train=False, transform=data_tf)
test_data = torch.utils.data.DataLoader(test_set, batch_size=128, shuffle=False)

net = resnet(3, 10)
optimizer = torch.optim.SGD(net.parameters(), lr=0.01)
criterion = nn.CrossEntropyLoss()

train(net, train_data, test_data, 20, optimizer, criterion)
Epoch 0. Train Loss: 1.437317, Train Acc: 0.476662, Valid Loss: 1.928288, Valid Acc: 0.384691, Time 00:00:44
Epoch 1. Train Loss: 0.992832, Train Acc: 0.648198, Valid Loss: 1.009847, Valid Acc: 0.642405, Time 00:00:48
Epoch 2. Train Loss: 0.767309, Train Acc: 0.732617, Valid Loss: 1.827319, Valid Acc: 0.430380, Time 00:00:47
Epoch 3. Train Loss: 0.606737, Train Acc: 0.788043, Valid Loss: 1.304808, Valid Acc: 0.585245, Time 00:00:46
Epoch 4. Train Loss: 0.484436, Train Acc: 0.834499, Valid Loss: 1.335749, Valid Acc: 0.617089, Time 00:00:47
Epoch 5. Train Loss: 0.374320, Train Acc: 0.872922, Valid Loss: 0.878519, Valid Acc: 0.724288, Time 00:00:47
Epoch 6. Train Loss: 0.280981, Train Acc: 0.904212, Valid Loss: 0.931616, Valid Acc: 0.716871, Time 00:00:48
Epoch 7. Train Loss: 0.210800, Train Acc: 0.929747, Valid Loss: 1.448870, Valid Acc: 0.638548, Time 00:00:48
Epoch 8. Train Loss: 0.147873, Train Acc: 0.951427, Valid Loss: 1.356992, Valid Acc: 0.657536, Time 00:00:47
Epoch 9. Train Loss: 0.112824, Train Acc: 0.963895, Valid Loss: 1.630560, Valid Acc: 0.627769, Time 00:00:47
Epoch 10. Train Loss: 0.082685, Train Acc: 0.973905, Valid Loss: 0.982882, Valid Acc: 0.744264, Time 00:00:44
Epoch 11. Train Loss: 0.065325, Train Acc: 0.979680, Valid Loss: 0.911631, Valid Acc: 0.767009, Time 00:00:47
Epoch 12. Train Loss: 0.041401, Train Acc: 0.987952, Valid Loss: 1.167992, Valid Acc: 0.729826, Time 00:00:48
Epoch 13. Train Loss: 0.037516, Train Acc: 0.989011, Valid Loss: 1.081807, Valid Acc: 0.746737, Time 00:00:47
Epoch 14. Train Loss: 0.030674, Train Acc: 0.991468, Valid Loss: 0.935292, Valid Acc: 0.774031, Time 00:00:45
Epoch 15. Train Loss: 0.021743, Train Acc: 0.994565, Valid Loss: 0.879348, Valid Acc: 0.790150, Time 00:00:47
Epoch 16. Train Loss: 0.014642, Train Acc: 0.996463, Valid Loss: 1.328587, Valid Acc: 0.724387, Time 00:00:47
Epoch 17. Train Loss: 0.011072, Train Acc: 0.997363, Valid Loss: 0.909065, Valid Acc: 0.792919, Time 00:00:47
Epoch 18. Train Loss: 0.006870, Train Acc: 0.998561, Valid Loss: 0.923746, Valid Acc: 0.794403, Time 00:00:46
Epoch 19. Train Loss: 0.004240, Train Acc: 0.999500, Valid Loss: 0.877908, Valid Acc: 0.802314, Time 00:00:46

