Linux下编译ffmpeg-3-3,arm,arm64,x86
目录
目标
结论
编译arm, arm64
编译arm, arm64 遇到的问题
编译x86版本
编译x86最后遇到的问题
成果展示
编译参考链接:
目标
在 Linux上编译一套ffmpeg,arm32/arm64和x86版本,基于ffmpeg4.2.3版本源码编译。
结论
ffmpeg的版本,一定要跟android-ndk-rxx版本对应,否则,后果不堪设想。永远不要追新版本。实践证明:ffmpeg4.2.3只编译成功了arm32位的,arm64位的根本不会生成。使用的android-ndk-r
- ffmpeg4.2.3 + android-ndk-r21b 会出现的问题
- ffmpeg4.2.3 + android-ndk-r14b 会出现的问题
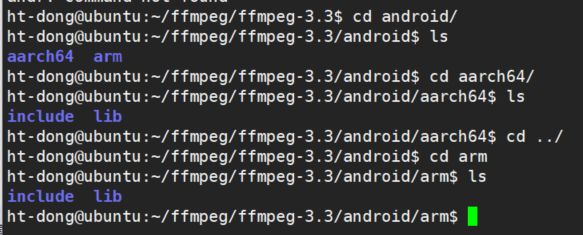
- ffmpeg3.3 + android-ndk-r14b 会出现的问题
最终还是采用方案三实现。
编译arm, arm64
ffmpeg4.2.3源码地址:http://ffmpeg.org/releases/
android编译器地址:https://developer.android.google.cn/ndk/downloads/older_releases
我这里用的ffmpeg4.2.3 和android-ndk-r14b版本
# 下载
wget http://ffmpeg.org/releases/ffmpeg-4.2.3.tar.bz2

# 解压
tar xvf ffmpeg-4.2.3.tar.bz2
下载编译器:版本选择的是14b, 尽管官网显示不再支持维护,但是还是用它了。读者也可以下载别的版本,因为版本不同,坑不同。
# 下载
wget https://dl.google.com/android/repository/android-ndk-r14b-linux-x86_64.zip

# 解压
unzip android-ndk-r21b-linux-x86_64.zip
新建一个build.sh文件, vim build.sh vim build64.sh 一个编译32位库,一个编译64位库。
将两个文件放在解压好的ffmpeg-3.3(就是需要编译的ffmpeg)文件目录下。
#build.sh
#!/bin/bash
#modify those veriable based on your env
#===========================
NDK=/home/ht-dong/ffmpeg/android-ndk-r14b
#32 or 64
archbit=32

echo "build for 32bit"
abi='armeabi'
cpu='arm'
arch='arm'
android='androideabi'

SYSROOT=$NDK/platforms/android-24/arch-$arch/
TOOLCHAIN=$NDK/toolchains/$cpu-linux-$android-4.9/prebuilt/linux-x86_64


PREFIX=$(pwd)/android/$cpu
#ADDI_CFLAGS="-marm"

function build_one
{
    ./configure \
    --prefix=$PREFIX \
    --enable-shared \
    --disable-static \
    --disable-doc \
    --disable-ffmpeg \
    --disable-ffplay \
    --disable-ffprobe \
    --disable-ffserver \
    --disable-avdevice \
    --disable-doc \
    --disable-symver \
    --enable-yasm \
    --cross-prefix=$TOOLCHAIN/bin/$cpu-linux-$android- \
    --target-os=linux \
    --arch=$cpu \
    --enable-cross-compile \
    --sysroot=$SYSROOT \
    --extra-cflags="-Os -fpic -DANDROID" \
    --extra-ldflags="$ADDI_LDFLAGS" \
    $ADDITIONAL_CONFIGURE_FLAG
    make clean
    make
    make install
}

build_one
#build64.sh
#!/bin/bash
#modify those veriable based on your env
#===========================
NDK=/home/ht-dong/ffmpeg/android-ndk-r14b
#32 or 64
archbit=64
echo "build for 64bit"
abi='arm64-v8a'
cpu='aarch64'
arch='arm64'
android='android'
SYSROOT=$NDK/platforms/android-24/arch-$arch/
TOOLCHAIN=$NDK/toolchains/$cpu-linux-$android-4.9/prebuilt/linux-x86_64
PREFIX=$(pwd)/android/$cpu
#ADDI_CFLAGS="-marm"
function build_one
{
./configure \
--prefix=$PREFIX \
--enable-shared \
--disable-static \
--disable-doc \
--disable-ffmpeg \
--disable-ffplay \
--disable-ffprobe \
--disable-ffserver \
--disable-avdevice \
--disable-doc \
--disable-symver \
--enable-yasm \
--cross-prefix=$TOOLCHAIN/bin/$cpu-linux-$android- \
--target-os=linux \
--arch=$cpu \
--enable-cross-compile \
--sysroot=$SYSROOT \
--extra-cflags="-Os -fpic -DANDROID" \
--extra-ldflags="$ADDI_LDFLAGS" \
$ADDITIONAL_CONFIGURE_FLAG
make clean
make
make install
}
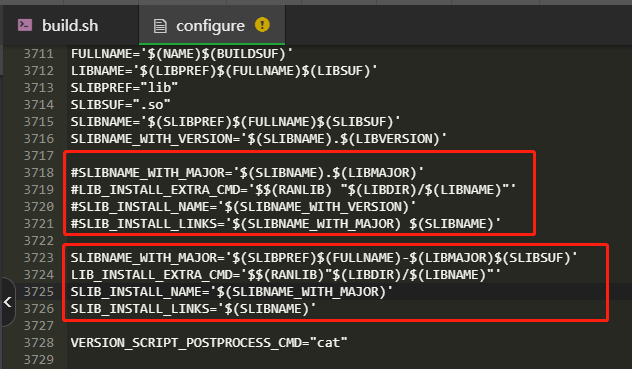
build_oneffmpeg解压的根目录下,找到configure文件,下图中,上红框注释带,添加下红框
# 将该文件中的如下四行:

SLIBNAME_WITH_MAJOR='$(SLIBNAME).$(LIBMAJOR)'
LIB_INSTALL_EXTRA_CMD='$$(RANLIB)" $(LIBDIR)/$(LIBNAME)"'
SLIB_INSTALL_NAME='$(SLIBNAME_WITH_VERSION)'
SLIB_INSTALL_LINKS='$(SLIBNAME_WITH_MAJOR) $(SLIBNAME)'

# 替换为:

SLIBNAME_WITH_MAJOR='$(SLIBPREF)$(FULLNAME)-$(LIBMAJOR)$(SLIBSUF)'
LIB_INSTALL_EXTRA_CMD='$$(RANLIB) "$(LIBDIR)/$(LIBNAME)"'
SLIB_INSTALL_NAME='$(SLIBNAME_WITH_MAJOR)'
SLIB_INSTALL_LINKS='$(SLIBNAME)'
然后就分别执行下面的命令了。
# 为build.sh 文件 授权
chmod 777 build.sh

# 运行
./build.sh

#===================================================================

# 为build64.sh 文件 授权
chmod 777 build64.sh

# 运行
./build64.sh


#===================================================================
#  两个文件一定要分开执行。等待一个执行完,看看lib没问题了,再执行下一个。
如果担心编译出错,又不好定位,可以将 *.sh 代码一行一行复制到终端执行,这样容易发现错误。
编译arm, arm64 遇到的问题
1、 build.sh执行config那一行,报错如下:
License: GPL version 2 or later

WARNING: The --disable-yasm option is only provided for compatibility and will be
 removed in the future. Use --enable-x86asm / --disable-x86asm instead.
WARNING: /home/ht-dong/ffmpeg/android-ndk-r14b/toolchains/arm-linux-androideabi-
4.9/prebuilt/linux-x86_64/bin/arm-linux-androideabi-pkg-config not found, library detection may fail.
原因: android-ndk-r14b 被我改路径了,所以找不到文件。 也就是指定的编译器路径与实际路径不符,改正确就可以了。
2、makefile文件错误: 这个错误还没有解决。 4.2.3版本 + r21b 版本,执行,就出这个错误。无从下手。
ht-dong@ubuntu:~/ffmpeg/ffmpeg-4.2.4$ ./run.sh
build for 32bit
Unknown option "--disable-ffserver".
See ./configure --help for available options.
Makefile:2: ffbuild/config.mak: No such file or directory
Makefile:40: /tools/Makefile: No such file or directory
Makefile:41: /ffbuild/common.mak: No such file or directory
Makefile:94: /libavutil/Makefile: No such file or directory
Makefile:94: /ffbuild/library.mak: No such file or directory
Makefile:96: /fftools/Makefile: No such file or directory
Makefile:97: /doc/Makefile: No such file or directory
Makefile:98: /doc/examples/Makefile: No such file or directory
Makefile:163: /tests/Makefile: No such file or directory
make: *** No rule to make target '/tests/Makefile'. Stop.
3、4.2.3版本 + r24b版本, 编译到最后,库出问题了?奇怪? 这个错误,我就直接注释掉那几行代码了。参考后面的链接。
libavformat/udp.c: In function 'udp_set_multicast_sources':
libavformat/udp.c:290:28: error: request for member 's_addr' in something not a structure or union
         mreqs.imr_multiaddr.s_addr = ((struct sockaddr_in *)addr)->sin_addr.s_addr;
                            ^
libavformat/udp.c:292:32: error: incompatible types when assigning to type '__u32' from type 'struct in_addr'
             mreqs.imr_interface= ((struct sockaddr_in *)local_addr)->sin_addr;
                                ^
libavformat/udp.c:294:32: error: request for member 's_addr' in something not a structure or union
             mreqs.imr_interface.s_addr= INADDR_ANY;
                                ^
libavformat/udp.c:295:29: error: request for member 's_addr' in something not a structure or union
         mreqs.imr_sourceaddr.s_addr = ((struct sockaddr_in *)&sources[i])->sin_addr.s_addr;
                             ^
ffbuild/common.mak:59: recipe for target 'libavformat/udp.o' failed
make: *** [libavformat/udp.o] Error 1
4、linux 启动脚本时报错:-bash: ./bin/start.sh: /bin/bash^M: bad interpreter: No such file or directory
解决方案:https://blog.csdn.net/qq_35626763/article/details/89963163
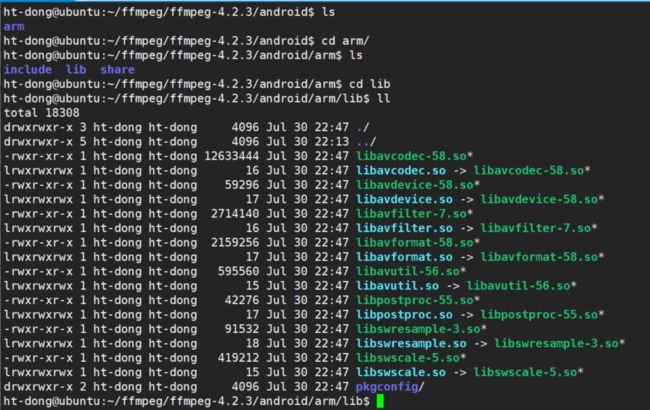
编译通过,没报错(还不能确定是不是真的对了,毕竟库还得拿去实践一下)。文件如下:
编译x86版本
// 这个路径,就直接生成在根目录下了,根据自己情况酌情添加。

./configure --enable-shared --prefix=/ffmpeg_x86

make

sudo make install
编译x86最后遇到的问题
1、下面这个报错,忘记怎么解决的了。好像是修改了配置文件。
License: LGPL version 2.1 or later
Creating configuration files ...
libavutil/avconfig.h is unchanged
libavcodec/bsf_list.c is unchanged
libavformat/protocol_list.c is unchanged
2、问题。 原因:因为这个3.3这个库之前编译过arm库,可能有各种痕迹导致的错误。所以重新复制了一份干净的源文件,然后重新编译,就通过了。
LD libavutil/libavutil-55.so
/usr/bin/ld: libavutil/log2_tab.o: Relocations in generic ELF (EM: 40)
/usr/bin/ld: libavutil/log2_tab.o: Relocations in generic ELF (EM: 40)
libavutil/log2_tab.o: error adding symbols: File in wrong format
collect2: error: ld returned 1 exit status
library.mak:93: recipe for target 'libavutil/libavutil-55.so' failed
make: *** [libavutil/libavutil-55.so] Error 1
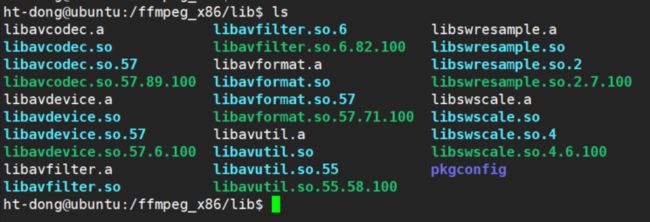
成果展示
编译参考链接:
http://ffmpeg.org/releases/ // 官方源码安装包地址
https://www.johnvansickle.com/ffmpeg/old-releases/ // 看着像是编译好的android版本的库
https://www.jianshu.com/p/5c8528432c6c // ffmpeg编译arm64动态包。可能版本跟他的对上的话,就真的那么简单吧
https://blog.csdn.net/bobcat_kay/article/details/88843778 // 编译arm,arm64,详细记录,且有libx264编译进去
https://blog.csdn.net/coloriy/article/details/72842316?utm_medium=distribute.pc_relevant.none-task-blog-BlogCommendFromMachineLearnPai2-5.channel_param&depth_1-utm_source=distribute.pc_relevant.none-task-blog-BlogCommendFromMachineLearnPai2-5.channel_param (我的脚本是参考这个的,简单能看懂)
4.1版本编译,以及遇到的坑
https://www.cnblogs.com/jimodetiantang/p/9160183.html // 这里有x264, x265, lib-aac的融入。
https://www.cnblogs.com/boonya/p/8571934.html // 参考这个编译的x86
https://blog.csdn.net/zhangpengzp/article/details/82289224 // 记录比较详细吧
https://www.kanzhun.com/jiaocheng/217313.html // 参考这个连接,注释掉的udp.c中的代码,如果没有参考,我可不敢动源码
https://blog.csdn.net/will130/article/details/53326740/ // sockaddr和sockaddr_in详解, 有兴趣的可以参考,然后自己改udp.c
https://github.com/kewlbear/FFmpeg-iOS-build-script // 后续再编译一套ios的


