Nginx + LAMP 动静分离 仅用一台主机
文章目录
- 为什么Nginx要动静分离
- 来吧!展示!
- 构建 LAMP 架构
- 安装APACHE
- 安装 mariaDB
- 安装 PHP
- 配置 HTTPD
- 安装 Nginx
- 修改Nginx主配置文件
- 编辑 静态主页
- 验证动静分离
为什么Nginx要动静分离
Nginx的静态处理能力很强,但是动态处理能力不足,因此,在企业中常用动静分离技术
针对PHP的动静分离
静态页面交给 Nginx处理
动态页面交给 PHP-FPM模块或 Apache处理
在 Nginx的配置中,是通过 ocation配置段配合正则匹配实现静态与动态页面的不同处理方式
在服务器资源紧缺时,尝试用一台主机,一张网卡,两个端口去实现
来吧!展示!
构建 LAMP 架构
安装APACHE
[root@5centos ~]# yum -y install httpd httpd-devel  ##安装apache
已安装:
  httpd.x86_64 0:2.4.6-93.el7.centos
  httpd-devel.x86_64 0:2.4.6-93.el7.centos

作为依赖被安装:
  apr-devel.x86_64 0:1.4.8-5.el7
  apr-util-devel.x86_64 0:1.5.2-6.el7
  cyrus-sasl-devel.x86_64 0:2.1.26-23.el7
  expat-devel.x86_64 0:2.1.0-11.el7
  httpd-tools.x86_64 0:2.4.6-93.el7.centos
  libdb-devel.x86_64 0:5.3.21-25.el7
  mailcap.noarch 0:2.1.41-2.el7
  openldap-devel.x86_64 0:2.4.44-21.el7_6

作为依赖被升级:
  apr.x86_64 0:1.4.8-5.el7           expat.x86_64 0:2.1.0-11.el7
  libdb.x86_64 0:5.3.21-25.el7       libdb-utils.x86_64 0:5.3.21-25.el7
  openldap.x86_64 0:2.4.44-21.el7_6

完毕!
安装 mariaDB
mariaDB介绍
MariaDB数据库管理系统是MySQL的一个分支,主要由开源社区在维护,采用GPL授权许可 MariaDB的目的是完全兼容MySQL,包括API和命令行,使之能轻松成为MySQL的代替品。在存储引擎方面,使用XtraDB(英语:XtraDB)来代替MySQL的InnoDB。 MariaDB由MySQL的创始人Michael Widenius(英语:Michael Widenius)主导开发,他早前曾以10亿美元的价格,将自己创建的公司MySQL AB卖给了SUN,此后,随着SUN被甲骨文收购,MySQL的所有权也落入Oracle的手中。MariaDB名称来自Michael Widenius的女儿Maria的名字。
MariaDB基于事务的Maria存储引擎,替换了MySQL的MyISAM存储引擎,它使用了Percona的 XtraDB,InnoDB的变体,分支的开发者希望提供访问即将到来的MySQL 5.4 InnoDB性能。这个版本还包括了 PrimeBase XT (PBXT) 和 FederatedX存储引擎。
[root@5centos ~]# yum install mariadb mariadb-server mariadb-libs mariadb-devel -y
更新完毕:
  mariadb-libs.x86_64 1:5.5.65-1.el7

作为依赖被升级:
  e2fsprogs.x86_64 0:1.42.9-17.el7
  e2fsprogs-libs.x86_64 0:1.42.9-17.el7
  krb5-libs.x86_64 0:1.15.1-46.el7
  krb5-workstation.x86_64 0:1.15.1-46.el7
  libcom_err.x86_64 0:1.42.9-17.el7
  libkadm5.x86_64 0:1.15.1-46.el7
  libselinux.x86_64 0:2.5-15.el7
  libselinux-python.x86_64 0:2.5-15.el7
  libselinux-utils.x86_64 0:2.5-15.el7
  libss.x86_64 0:1.42.9-17.el7
  openssl.x86_64 1:1.0.2k-19.el7
  openssl-libs.x86_64 1:1.0.2k-19.el7

完毕!
[root@5centos ~]# systemctl start mariadb
[root@5centos ~]# mysql_secure_installation  ##自动设置数据库信息
NOTE: RUNNING ALL PARTS OF THIS SCRIPT IS RECOMMENDED FOR ALL MariaDB
      SERVERS IN PRODUCTION USE!  PLEASE READ EACH STEP CAREFULLY!

In order to log into MariaDB to secure it, we'll need the current
password for the root user.  If you've just installed MariaDB, and
you haven't set the root password yet, the password will be blank,
so you should just press enter here.

Enter current password for root (enter for none):
OK, successfully used password, moving on...

Setting the root password ensures that nobody can log into the MariaDB
root user without the proper authorisation.

Set root password? [Y/n] y
New password:
Re-enter new password:
Password updated successfully!
Reloading privilege tables..
 ... Success!


By default, a MariaDB installation has an anonymous user, allowing anyone
to log into MariaDB without having to have a user account created for
them.  This is intended only for testing, and to make the installation
go a bit smoother.  You should remove them before moving into a
production environment.

Remove anonymous users? [Y/n] y
 ... Success!

Normally, root should only be allowed to connect from 'localhost'.  This
ensures that someone cannot guess at the root password from the network.

Disallow root login remotely? [Y/n] y
 ... Success!

By default, MariaDB comes with a database named 'test' that anyone can
access.  This is also intended only for testing, and should be removed
before moving into a production environment.

Remove test database and access to it? [Y/n] y
 - Dropping test database...
 ... Success!
 - Removing privileges on test database...
 ... Success!

Reloading the privilege tables will ensure that all changes made so far
will take effect immediately.

Reload privilege tables now? [Y/n] y
 ... Success!

Cleaning up...

All done!  If you've completed all of the above steps, your MariaDB
installation should now be secure.

Thanks for using MariaDB!
安装 PHP
[root@5centos ~]# yum -y install php
[root@5centos ~]# yum -y install php-mysql  ##建立 PHP 与 mysql关联
[root@5centos ~]# yum install -y php-gd php-ldap php-odbc php-pear php-xml php-xmlrpc php-mbstring php-snmp php-soap curl curl-devel php-bcmath  ##安装 php插件
配置 HTTPD
[root@5centos ~]# vim /etc/httpd/conf/httpd.conf
Listen 20.0.0.5:8080   ##更改 HTTP 端口为 8080
#Listen 80             ##关闭 IPv6 监听
<IfModule dir_module>
    DirectoryIndex index.php
</IfModule>
[root@5centos ~]# cd /var/www/html/
[root@5centos html]# ls
[root@5centos html]# vim index.php
<?php
phpinfo();
?>
[root@5centos ~]# systemctl start httpd
安装 Nginx
[root@5centos /]# cd /
[root@5centos /]# rpm -Uvh http://nginx.org/packages/centos/7/noarch/RPMS/nginx-release-centos-7-0.el7.ngx.noarch.rpm
[root@5centos /]# yum -y install nginx
查看 yum 安装的 nginx 路径
[root@5centos /]# rpm -qc nginx
/etc/logrotate.d/nginx
/etc/nginx/conf.d/default.conf   ##主配置文件
/etc/nginx/fastcgi_params
/etc/nginx/koi-utf
/etc/nginx/koi-win
/etc/nginx/mime.types
/etc/nginx/nginx.conf
/etc/nginx/scgi_params
/etc/nginx/uwsgi_params
/etc/nginx/win-utf
/etc/sysconfig/nginx
/etc/sysconfig/nginx-debug
修改Nginx主配置文件
[root@5centos /]# vim /etc/nginx/conf.d/default.conf
server {
    listen       80;
    server_name  20.0.0.5;
    ##下面 location 字段需要手敲
    location ~ \.php$ {
        proxy_pass http://20.0.0.5:8080;
        }
[root@5centos /]# systemctl start nginx
 ##查看两个服务的端口是否正常开启
[root@5centos /]# netstat -ntap |grep http
tcp        0      0 20.0.0.5:8080           0.0.0.0:*               LISTEN      21652/httpd
[root@5centos /]# netstat -ntap |grep nginx
tcp        0      0 0.0.0.0:80              0.0.0.0:*               LISTEN      22290/nginx: master
编辑 静态主页
[root@5centos /]# cd /usr/share/nginx/html/
[root@5centos html]# ls
50x.html  index.html
[root@5centos html]# vim index.html
<!DOCTYPE html>
<html>
<head>
<title>JINT TAI</title>
<style>
    body {
        width: 35em;
        margin: 0 auto;
        font-family: Tahoma, Verdana, Arial, sans-serif;
    }
</style>
</head>
<body>
<h1>Welcome to jingtaiyemian!</h1>
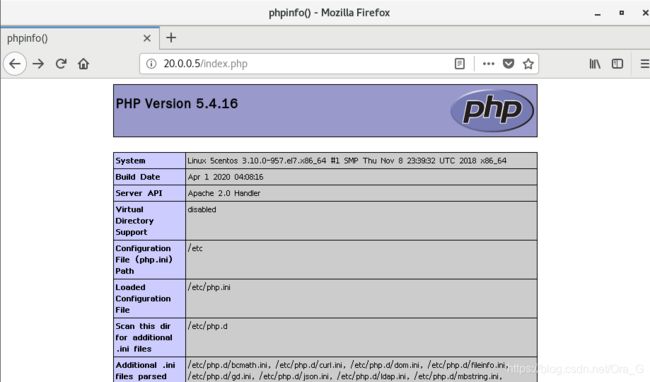
验证动静分离
[root@5centos html]# systemctl stop firewalld
[root@5centos html]# setenforce 0
[root@5centos html]# iptables -F


