Python+Behave+Allure Web UI自动化测试
基于BDD模式的Web UI自动化测试体验,集成了python,behave,allure,非主流的一个路线,可以一起玩玩。
1. 概念解释
Python: 大家都懂,3以上版本
Behave:行为驱动开发(behavior driven development)是一种敏捷的软件开发技术,该框架可以实现UI自动化,也可以实现接口自动化,我们已经开发过接口自动化工具,这个主要用来做主要功能的UI检查。
Behave官方文档
Allure:Allure Framework是一种灵活的轻量级多语言测试报告工具,它不仅可以以简洁的Web报告形式非常简洁地显示已测试的内容,而且还允许参与开发过程的每个人从日常执行中提取最大程度的有用信息。
Allure官方文档
2. 安装命令
pip install behave(我用的是pip3)
pip install allure-behave
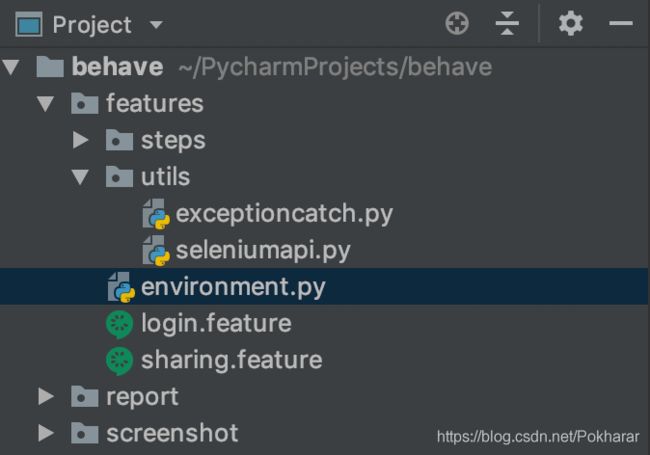
3. 工程目录
一个基本的behave至少需要构建以下目录,以下我会基于一个最简单的登录场景描述。
features/
features/login.feature
features/steps/
features/steps/login.py
工程目录下包含features,features文件夹里包含目标执行的.feature文件和step文件夹里存放对应的.py
mkdir 文件夹
touch 文件
A--login.feature文件如下:场景描述写在这里,这类文件可以由测试,产品或其他相关人员完成,使用的是自然语言,支持中文。
feature: 功能名称/scenario:场景名称/given:给出测试的前提条件/when:测试步骤/then:预期结果
Feature: UI测试

   Scenario Outline: 登录后台系统
      Given 打开后台登录页面并且通过后台验证
      When 输入和并点击登录
      Then 正确跳转进入系统后台

      Examples: userinfo
         |username       |password|
|admin |111111| 【知识点】这里对应given, when, then都有一个以step_命名的方法来对应实现,为什么以step开头命名,官方文档就是这样给的,未深究;传递的参数应使用{}来指明,同时参数名和元素名不要重名
B--steps文件下,是feature文件对应的要执行的python文件
#encoding: utf-8
from behave import *
from features.utils.seleniumapi import SeleniumApi
import time


@given('打开后台登录页面并且通过后台验证')
def step_open(self):
    SeleniumApi.step_startup(self)


@when('输入{username}和{password}并点击登录')
def step_login(self, username, password):
    time.sleep(1)
    SeleniumApi.step_send_keys(self, "//*[@placeholder='邮箱']", username)
    time.sleep(1)
    SeleniumApi.step_send_keys(self, "//*[@placeholder='密码']", password)
    SeleniumApi.step_click(self, "//*[@type='button']")
    time.sleep(3)


@then('正确跳转进入系统后台')
def step_forward_top(self):
    if '用户名' in SeleniumApi.step_text_cssselector(self, "hidden-sm"):
        assert True
    else:
        assert False
    SeleniumApi.step_quit(self)
C--utils文件下我单独建了一个seleniumapi.py 封装了一些常用的selenuim操作,如下图
from selenium.webdriver.common.alert import Alert
from selenium.webdriver.support.ui import WebDriverWait
from selenium.webdriver.support import expected_conditions
from selenium.webdriver.common.by import By
from selenium.webdriver.common.keys import Keys


class SeleniumApi:
    def step_click(self, xpath):
        self.driver.find_element_by_xpath(xpath).click()

    def step_send_keys(self, xpath, xpath_value):
        self.driver.find_element_by_xpath(xpath).send_keys(xpath_value)

    def step_text_cssselector(self, cssselector):
        result = self.driver.find_element_by_css_selector(cssselector).text
        return result

    def step_text_xpath(self, xpath):
        result = self.driver.find_element_by_xpath(xpath).text
D--environment.py 可以定义一些测试执行前后的操作,如启动退出浏览器,类似于selenium测试里的setUp和tearDown,后面我的启动浏览器,登陆系统都放在了environment.py 注意函数命名
【知识点】我们系统后台每次需要输入账号和密码作为动态验证,尝试switchto.alert未果后,使用url直接这样访问http://username:password@url即可解决浏览器弹窗问题,其他弹窗结局比较简单,搜索即可查看

# encoding: utf-8
from selenium import webdriver
from features.utils.seleniumapi import SeleniumApi
from features.utils.exceptioncatch import ExceptionCatch
import time
import os
import shutil


def before_feature(content, feature):
    content.driver = webdriver.Chrome()
    content.driver.get("https://tz:[email protected]")
    content.driver.implicitly_wait(10)
    content.driver.maximize_window()
    time.sleep(1)
    SeleniumApi.step_send_keys(content, "//*[@placeholder='邮箱']", '[email protected]')
    SeleniumApi.step_send_keys(content, "//*[@placeholder='密码']", 'admin')
    SeleniumApi.step_click(content, "//*[@type='button']")
    if '后台系统' == SeleniumApi.step_text_cssselector(content, ".navBarTitle"):
        assert True
    else:
        ExceptionCatch.catch_exception(content)
        assert False


def after_feature(content, feature):
    content.driver.quit()
E--其他文件如report是后面生成报告的,需要建立,screenshot我后面用到了截图,非必要文件夹
多场景,多功能,可以继续添加多个scenario,多个feature文件,feature文件下的given when then 但不是必须条件,可以直接运行 .feature文件,也可以在cmd里工程目录下,我的例子就是behave文件夹下执行behave命令就可以看到执行结果。以上,一个简单的behave demo完成。
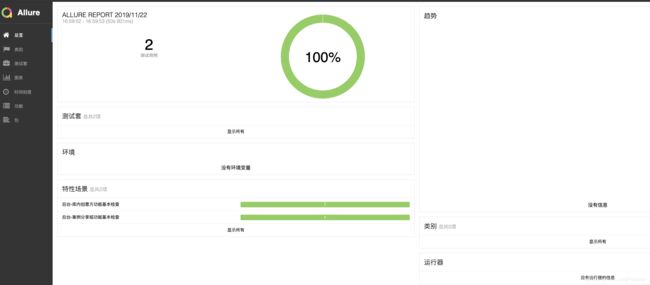
这是能看到输出的结果非常的不美观,也不容易让其他人浏览你的测试结果,于是我找了好久找到了allure可以帮助生成一个html测试报告。
4. 如何产生测试报告
基于mac
$ pip install allure-behave
$ behave -f allure_behave.formatter:AllureFormatter -o report ./features
$ allure serve report
两点解释:
1. 第二步是为了生成JSon报告,在用allure commandline就可以查看html报告
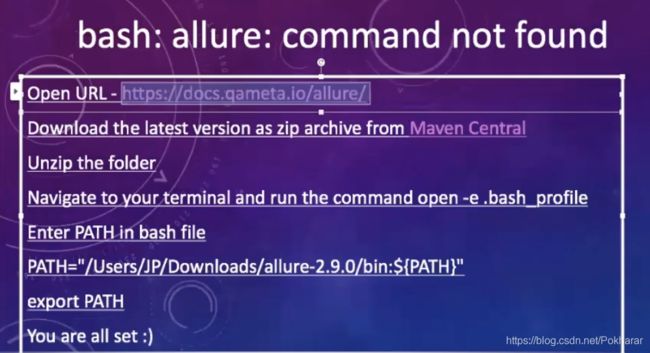
2. 执行时一般会报错allure command not found, 需要执行以下步骤
How To Fix -bash: allure: command not found, OS - Mac, PyTest, Python, Report By QA COACH
新窗口打开工程,重新执行allure serve report即可生成html report
基于windows,未实践,仅供参考:
1. pip install allure-behave
2. 在工程根目录下新建一个文件夹reports
3. 根目录下,cmd > behave -f allure_behave.formatter:AllureFormatter -o D:\path....\reports features\first_selenium.feature" 在reports文件夹下会产生json报告
4. allure generate --clean -o "E:\path..\reports" "E:\path...\reports-JsonFiles"
第四步还是会遇到allure命令不识别的问题,https://docs.qameta.io/allure/ 在这里找到windows对应的压缩包,解压,将解压后的bin路径配置到环境变量里,再次执行就可以了。
~后续可能在优化下,目前在本地配合接口自动化测试去做一些常用功能的UI自动化足够,测试报告也很好看,还有报错提示~