Unity使用摇杆触屏控制
参考来源
此例的目标:将一个游戏项目中操控由键盘wasd移动鼠标左键射击,转为摇杆触屏移动,点击button射击。
-------------------------------------------------------
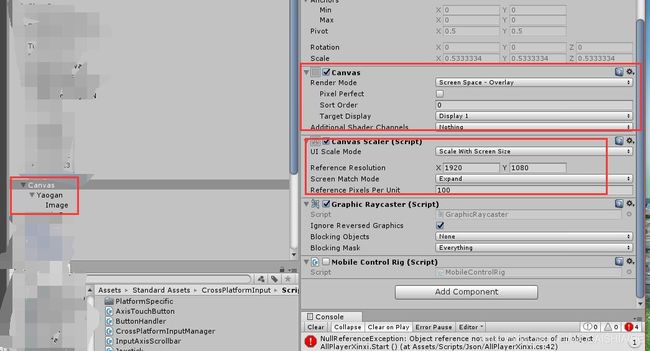
注意:如果摇杆在某个canvas下记得该canvas用screen space - overlay模式(否则摇杆中心点不会随着屏幕走)。canvas scaler选择scale with screen size,screen match mode选择expand。(为了屏幕分辨率自适应)
首先导入Unity的Standard Assets包,然后在CrossPlatformInput文件夹→Prefabs下找到MobileSingleStickControl预制,拖入场景,它包含了一个左部的摇杆,一个右部的button。
如果拖到场景里不显示的话,在build setting里把platform转换成ios或者Android,然后在Mobile Input选项卡下点击Enable显示就好了。
上面的默认摇杆是没有背景的,通常我们熟知的摇杆有一个圆框,中间一个点状摇杆。所以现在我们给默认摇杆添加背景。
MobileSingleStickControl下新建图片,把摇杆的背景图放上去,然后把摇杆调整到背景图的中心,最后把背景放在最上部以最先渲染。
摇杆资源做好了,现在我们把摇杆和人物操纵联系起来。
修改好之后运行就可以移动摇杆来控制对象了。(我目前测的是鼠标操纵摇杆,还未在xcode上真机触屏测试)
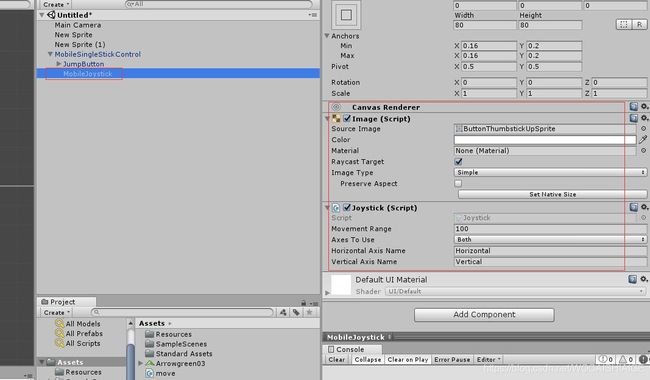
其实标准资产里的摇杆包含一个image组件和joystick脚本,如下。
joystick脚本内容如下
using System;
using UnityEngine;
using UnityEngine.EventSystems;

namespace UnityStandardAssets.CrossPlatformInput
{
	public class Joystick : MonoBehaviour, IPointerDownHandler, IPointerUpHandler, IDragHandler
	{
		public enum AxisOption
		{
			// Options for which axes to use
			Both, // Use both
			OnlyHorizontal, // Only horizontal
			OnlyVertical // Only vertical
		}

		public int MovementRange = 100;
		public AxisOption axesToUse = AxisOption.Both; // The options for the axes that the still will use
		public string horizontalAxisName = "Horizontal"; // The name given to the horizontal axis for the cross platform input
		public string verticalAxisName = "Vertical"; // The name given to the vertical axis for the cross platform input

		Vector3 m_StartPos;
		bool m_UseX; // Toggle for using the x axis
		bool m_UseY; // Toggle for using the Y axis
		CrossPlatformInputManager.VirtualAxis m_HorizontalVirtualAxis; // Reference to the joystick in the cross platform input
		CrossPlatformInputManager.VirtualAxis m_VerticalVirtualAxis; // Reference to the joystick in the cross platform input

		void OnEnable()
		{
			CreateVirtualAxes();
		}

        void Start()
        {
            m_StartPos = transform.position;
        }

		void UpdateVirtualAxes(Vector3 value)
		{
			var delta = m_StartPos - value;
			delta.y = -delta.y;
			delta /= MovementRange;
			if (m_UseX)
			{
				m_HorizontalVirtualAxis.Update(-delta.x);
			}

			if (m_UseY)
			{
				m_VerticalVirtualAxis.Update(delta.y);
			}
		}

		void CreateVirtualAxes()
		{
			// set axes to use
			m_UseX = (axesToUse == AxisOption.Both || axesToUse == AxisOption.OnlyHorizontal);
			m_UseY = (axesToUse == AxisOption.Both || axesToUse == AxisOption.OnlyVertical);

			// create new axes based on axes to use
			if (m_UseX)
			{
				m_HorizontalVirtualAxis = new CrossPlatformInputManager.VirtualAxis(horizontalAxisName);
				CrossPlatformInputManager.RegisterVirtualAxis(m_HorizontalVirtualAxis);
			}
			if (m_UseY)
			{
				m_VerticalVirtualAxis = new CrossPlatformInputManager.VirtualAxis(verticalAxisName);
				CrossPlatformInputManager.RegisterVirtualAxis(m_VerticalVirtualAxis);
			}
		}


		public void OnDrag(PointerEventData data)
		{
			Vector3 newPos = Vector3.zero;

			if (m_UseX)
			{
				int delta = (int)(data.position.x - m_StartPos.x);
				delta = Mathf.Clamp(delta, - MovementRange, MovementRange);
				newPos.x = delta;
			}

			if (m_UseY)
			{
				int delta = (int)(data.position.y - m_StartPos.y);
				delta = Mathf.Clamp(delta, -MovementRange, MovementRange);
				newPos.y = delta;
			}
			transform.position = new Vector3(m_StartPos.x + newPos.x, m_StartPos.y + newPos.y, m_StartPos.z + newPos.z);
			UpdateVirtualAxes(transform.position);
		}


		public void OnPointerUp(PointerEventData data)
		{
			transform.position = m_StartPos;
			UpdateVirtualAxes(m_StartPos);
		}


		public void OnPointerDown(PointerEventData data) { }

		void OnDisable()
		{
			// remove the joysticks from the cross platform input
			if (m_UseX)
			{
				m_HorizontalVirtualAxis.Remove();
			}
			if (m_UseY)
			{
				m_VerticalVirtualAxis.Remove();
			}
		}
	}
}
接下来把鼠标左键开火改为触屏button开火。
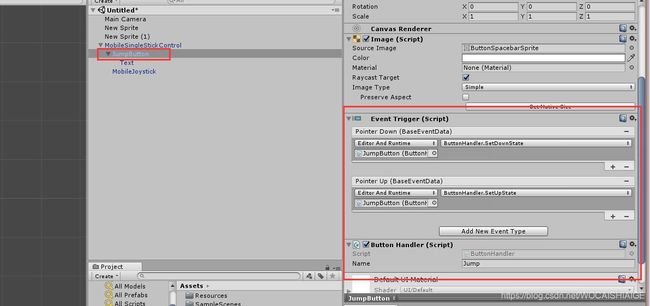
首先JumpButton下新建image设为button摁下的image(由原来黑色的图变为红色的图)。然后把该image设为摁下显示,不摁不显示。且与fire键(可以按需命名,即buttonhandler的,和射击脚本内的button名一样就行)关联。
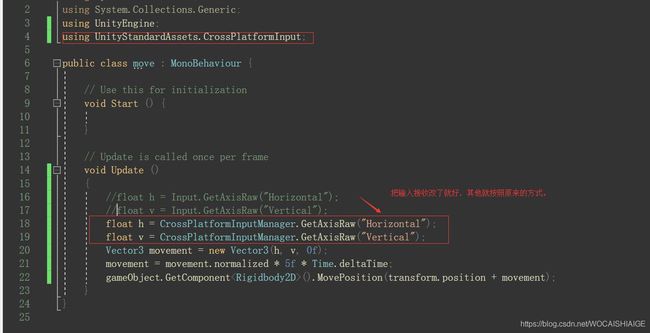
修改脚本内输入接收关联
原脚本:
改为:
jumpbutton上由image,buttonhandler脚本,及event trigger组成,如下:
buttonhandler脚本如下:
using System;
using UnityEngine;

namespace UnityStandardAssets.CrossPlatformInput
{
    public class ButtonHandler : MonoBehaviour
    {

        public string Name;

        void OnEnable()
        {

        }

        public void SetDownState()
        {
            CrossPlatformInputManager.SetButtonDown(Name);
        }


        public void SetUpState()
        {
            CrossPlatformInputManager.SetButtonUp(Name);
        }


        public void SetAxisPositiveState()
        {
            CrossPlatformInputManager.SetAxisPositive(Name);
        }


        public void SetAxisNeutralState()
        {
            CrossPlatformInputManager.SetAxisZero(Name);
        }


        public void SetAxisNegativeState()
        {
            CrossPlatformInputManager.SetAxisNegative(Name);
        }

        public void Update()
        {

        }
    }
}
注意如果仅使用以上脚本的话记得导入CrossPlatformInputManager,如下:
using System;
using UnityEngine;
using UnityStandardAssets.CrossPlatformInput.PlatformSpecific;

namespace UnityStandardAssets.CrossPlatformInput
{
	public static class CrossPlatformInputManager
	{
		public enum ActiveInputMethod
		{
			Hardware,
			Touch
		}


		private static VirtualInput activeInput;

		private static VirtualInput s_TouchInput;
		private static VirtualInput s_HardwareInput;


		static CrossPlatformInputManager()
		{
			s_TouchInput = new MobileInput();
			s_HardwareInput = new StandaloneInput();
#if MOBILE_INPUT
            activeInput = s_TouchInput;
#else
			activeInput = s_HardwareInput;
#endif
		}

		public static void SwitchActiveInputMethod(ActiveInputMethod activeInputMethod)
		{
			switch (activeInputMethod)
			{
				case ActiveInputMethod.Hardware:
					activeInput = s_HardwareInput;
					break;

				case ActiveInputMethod.Touch:
					activeInput = s_TouchInput;
					break;
			}
		}

		public static bool AxisExists(string name)
		{
			return activeInput.AxisExists(name);
		}

		public static bool ButtonExists(string name)
		{
			return activeInput.ButtonExists(name);
		}

		public static void RegisterVirtualAxis(VirtualAxis axis)
		{
			activeInput.RegisterVirtualAxis(axis);
		}


		public static void RegisterVirtualButton(VirtualButton button)
		{
			activeInput.RegisterVirtualButton(button);
		}


		public static void UnRegisterVirtualAxis(string name)
		{
			if (name == null)
			{
				throw new ArgumentNullException("name");
			}
			activeInput.UnRegisterVirtualAxis(name);
		}


		public static void UnRegisterVirtualButton(string name)
		{
			activeInput.UnRegisterVirtualButton(name);
		}


		// returns a reference to a named virtual axis if it exists otherwise null
		public static VirtualAxis VirtualAxisReference(string name)
		{
			return activeInput.VirtualAxisReference(name);
		}


		// returns the platform appropriate axis for the given name
		public static float GetAxis(string name)
		{
			return GetAxis(name, false);
		}


		public static float GetAxisRaw(string name)
		{
			return GetAxis(name, true);
		}


		// private function handles both types of axis (raw and not raw)
		private static float GetAxis(string name, bool raw)
		{
			return activeInput.GetAxis(name, raw);
		}


		// -- Button handling --
		public static bool GetButton(string name)
		{
			return activeInput.GetButton(name);
		}


		public static bool GetButtonDown(string name)
		{
			return activeInput.GetButtonDown(name);
		}


		public static bool GetButtonUp(string name)
		{
			return activeInput.GetButtonUp(name);
		}


		public static void SetButtonDown(string name)
		{
			activeInput.SetButtonDown(name);
		}


		public static void SetButtonUp(string name)
		{
			activeInput.SetButtonUp(name);
		}


		public static void SetAxisPositive(string name)
		{
			activeInput.SetAxisPositive(name);
		}


		public static void SetAxisNegative(string name)
		{
			activeInput.SetAxisNegative(name);
		}


		public static void SetAxisZero(string name)
		{
			activeInput.SetAxisZero(name);
		}


		public static void SetAxis(string name, float value)
		{
			activeInput.SetAxis(name, value);
		}


		public static Vector3 mousePosition
		{
			get { return activeInput.MousePosition(); }
		}


		public static void SetVirtualMousePositionX(float f)
		{
			activeInput.SetVirtualMousePositionX(f);
		}


		public static void SetVirtualMousePositionY(float f)
		{
			activeInput.SetVirtualMousePositionY(f);
		}


		public static void SetVirtualMousePositionZ(float f)
		{
			activeInput.SetVirtualMousePositionZ(f);
		}


		// virtual axis and button classes - applies to mobile input
		// Can be mapped to touch joysticks, tilt, gyro, etc, depending on desired implementation.
		// Could also be implemented by other input devices - kinect, electronic sensors, etc
		public class VirtualAxis
		{
			public string name { get; private set; }
			private float m_Value;
			public bool matchWithInputManager { get; private set; }


			public VirtualAxis(string name)
				: this(name, true)
			{
			}


			public VirtualAxis(string name, bool matchToInputSettings)
			{
				this.name = name;
				matchWithInputManager = matchToInputSettings;
			}


			// removes an axes from the cross platform input system
			public void Remove()
			{
				UnRegisterVirtualAxis(name);
			}


			// a controller gameobject (eg. a virtual thumbstick) should update this class
			public void Update(float value)
			{
				m_Value = value;
			}


			public float GetValue
			{
				get { return m_Value; }
			}


			public float GetValueRaw
			{
				get { return m_Value; }
			}
		}

		// a controller gameobject (eg. a virtual GUI button) should call the
		// 'pressed' function of this class. Other objects can then read the
		// Get/Down/Up state of this button.
		public class VirtualButton
		{
			public string name { get; private set; }
			public bool matchWithInputManager { get; private set; }

			private int m_LastPressedFrame = -5;
			private int m_ReleasedFrame = -5;
			private bool m_Pressed;


			public VirtualButton(string name)
				: this(name, true)
			{
			}


			public VirtualButton(string name, bool matchToInputSettings)
			{
				this.name = name;
				matchWithInputManager = matchToInputSettings;
			}


			// A controller gameobject should call this function when the button is pressed down
			public void Pressed()
			{
				if (m_Pressed)
				{
					return;
				}
				m_Pressed = true;
				m_LastPressedFrame = Time.frameCount;
			}


			// A controller gameobject should call this function when the button is released
			public void Released()
			{
				m_Pressed = false;
				m_ReleasedFrame = Time.frameCount;
			}


			// the controller gameobject should call Remove when the button is destroyed or disabled
			public void Remove()
			{
				UnRegisterVirtualButton(name);
			}


			// these are the states of the button which can be read via the cross platform input system
			public bool GetButton
			{
				get { return m_Pressed; }
			}


			public bool GetButtonDown
			{
				get
				{
					return m_LastPressedFrame - Time.frameCount == -1;
				}
			}


			public bool GetButtonUp
			{
				get
				{
					return (m_ReleasedFrame == Time.frameCount - 1);
				}
			}
		}
	}
}
完毕。


