一、安装
rhel,centos
1、检查内核版本: 使用docker需要在64微系统上,内核版本3.8.13以上,之前的版本也可以使用,但是兼容性可能不是很好
#查看内核版本

uname -a
uname -r
2:检查device Mapper
我们这里使用Device Mapper 作为Docker的存储启动。
[root@centos-linux ~]# grep device-mapper /proc/devices
253 device-mapper
如果没有就安装
[root@centos-linux ~]# yum install device-mapper
*我有,但是我还是可以安装上。
安装完以后还需要加载dm_mod内核模块
[root@centos-linux ~]# modprobe dm_mod
[root@centos-linux ~]# lsmod | grep dm_mod
dm_mod                113292  8 dm_log,dm_mirror

[root@centos-linux ~]# ls /sys/class/misc/device-mapper/
dev power subsystem uevent
3、安装
centos 7
[root@centos-linux yum.repos.d]# yum install subscription-manager
[root@centos-linux ~]# subscription-manager repos --enable=rhel-7-server-extras-rpms
想要访问red hat 的 docker 软件包和万当,必须是red hat的客户,并且拥有rhel服务器订阅权限(RHEL Server
sybscription entitlement)
不用上面一步也可安装
root@centos-linux ~]# yum install -y docker
4、启动
[root@centos-linux ~]# service docker start .  or
[root@centos-linux ~]# systemctl start docker
开机启动
[root@centos-linux ~]# systemctl enable docker
[root@centos-linux ~]# systemctl list-dependencies docker 查看开机启动状
查看docker状态
[root@centos-linux ~]# docker info
Containers: 0
 Running: 0
 Paused: 0
 Stopped: 0
Images: 0
Server Version: 1.10.3
Storage Driver: devicemapper
 Pool Name: docker-253:0-67389343-pool
 Pool Blocksize: 65.54 kB
 Base Device Size: 10.74 GB
 Backing Filesystem: xfs
 Data file: /dev/loop0
 Metadata file: /dev/loop1
 Data Space Used: 11.8 MB
 Data Space Total: 107.4 GB
 Data Space Available: 17.86 GB
 Metadata Space Used: 581.6 kB
 Metadata Space Total: 2.147 GB
 Metadata Space Available: 2.147 GB
 Udev Sync Supported: true
 Deferred Removal Enabled: false
 Deferred Deletion Enabled: false
 Deferred Deleted Device Count: 0
 Data loop file: /var/lib/docker/devicemapper/devicemapper/data
 WARNING: Usage of loopback devices is strongly discouraged for production use. Either use `--storage-opt dm.thinpooldev` or use `--storage-opt dm.no_warn_on_loop_devices=true` to suppress this warning.
 Metadata loop file: /var/lib/docker/devicemapper/devicemapper/metadata
 Library Version: 1.02.135-RHEL7 (2016-09-28)
Execution Driver: native-0.2
Logging Driver: journald
Plugins:
 Volume: local
 Network: host bridge null
Kernel Version: 3.10.0-327.el7.x86_64
Operating System: CentOS Linux 7 (Core)
OSType: linux
Architecture: x86_64
Number of Docker Hooks: 2
CPUs: 2
Total Memory: 989.3 MiB
Name: centos-linux.shared
ID: WYHC:VVGT:BZN6:ONIH:DHIG:HCXK:67FB:AJST:NV3E:DC3R:XPCY:BINE
WARNING: bridge-nf-call-iptables is disabled
WARNING: bridge-nf-call-ip6tables is disabled
Registries: docker.io (secure)
https://get.docker.com/
#!/bin/sh
set -e
#
# This script is meant for quick & easy install via:
#   'curl -sSL https://get.docker.com/ | sh'
# or:
#   'wget -qO- https://get.docker.com/ | sh'
#
# For test builds (ie. release candidates):
#   'curl -fsSL https://test.docker.com/ | sh'
# or:
#   'wget -qO- https://test.docker.com/ | sh'
#
# For experimental builds:
#   'curl -fsSL https://experimental.docker.com/ | sh'
# or:
#   'wget -qO- https://experimental.docker.com/ | sh'
#
# Docker Maintainers:
#   To update this script on https://get.docker.com,
#   use hack/release.sh during a normal release,
#   or the following one-liner for script hotfixes:
#     aws s3 cp --acl public-read hack/install.sh s3://get.docker.com/index
#

url="https://get.docker.com/"
apt_url="https://apt.dockerproject.org"
yum_url="https://yum.dockerproject.org"
gpg_fingerprint="58118E89F3A912897C070ADBF76221572C52609D"

key_servers="
ha.pool.sks-keyservers.net
pgp.mit.edu
keyserver.ubuntu.com
"

command_exists() {
    command -v "$@" > /dev/null 2>&1
}

echo_docker_as_nonroot() {
    if command_exists docker && [ -e /var/run/docker.sock ]; then
        (
            set -x
            $sh_c 'docker version'
        ) || true
    fi
    your_user=your-user
    [ "$user" != 'root' ] && your_user="$user"
    # intentionally mixed spaces and tabs here -- tabs are stripped by "<<-EOF", spaces are kept in the output
    cat <<-EOF

    If you would like to use Docker as a non-root user, you should now consider
    adding your user to the "docker" group with something like:

      sudo usermod -aG docker $your_user

    Remember that you will have to log out and back in for this to take effect!

    EOF
}

# Check if this is a forked Linux distro
check_forked() {

    # Check for lsb_release command existence, it usually exists in forked distros
    if command_exists lsb_release; then
        # Check if the `-u` option is supported
        set +e
        lsb_release -a -u > /dev/null 2>&1
        lsb_release_exit_code=$?
        set -e

        # Check if the command has exited successfully, it means we're in a forked distro
        if [ "$lsb_release_exit_code" = "0" ]; then
            # Print info about current distro
            cat <<-EOF
            You're using '$lsb_dist' version '$dist_version'.
            EOF

            # Get the upstream release info
            lsb_dist=$(lsb_release -a -u 2>&1 | tr '[:upper:]' '[:lower:]' | grep -E 'id' | cut -d ':' -f 2 | tr -d '[[:space:]]')
            dist_version=$(lsb_release -a -u 2>&1 | tr '[:upper:]' '[:lower:]' | grep -E 'codename' | cut -d ':' -f 2 | tr -d '[[:space:]]')

            # Print info about upstream distro
            cat <<-EOF
            Upstream release is '$lsb_dist' version '$dist_version'.
            EOF
        else
            if [ -r /etc/debian_version ] && [ "$lsb_dist" != "ubuntu" ] && [ "$lsb_dist" != "raspbian" ]; then
                # We're Debian and don't even know it!
                lsb_dist=debian
                dist_version="$(cat /etc/debian_version | sed 's/\/.*//' | sed 's/\..*//')"
                case "$dist_version" in
                    8|'Kali Linux 2')
                        dist_version="jessie"
                    ;;
                    7)
                        dist_version="wheezy"
                    ;;
                esac
            fi
        fi
    fi
}

rpm_import_repository_key() {
    local key=$1; shift
    local tmpdir=$(mktemp -d)
    chmod 600 "$tmpdir"
    for key_server in $key_servers ; do
        gpg --homedir "$tmpdir" --keyserver "$key_server" --recv-keys "$key" && break
    done
    gpg --homedir "$tmpdir" -k "$key" >/dev/null
    gpg --homedir "$tmpdir" --export --armor "$key" > "$tmpdir"/repo.key
    rpm --import "$tmpdir"/repo.key
    rm -rf "$tmpdir"
}

semverParse() {
    major="${1%%.*}"
    minor="${1#$major.}"
    minor="${minor%%.*}"
    patch="${1#$major.$minor.}"
    patch="${patch%%[-.]*}"
}

do_install() {
    case "$(uname -m)" in
        *64)
            ;;
        armv6l|armv7l)
            ;;
        *)
            cat >&2 <<-'EOF'
            Error: you are not using a 64bit platform or a Raspberry Pi (armv6l/armv7l).
            Docker currently only supports 64bit platforms or a Raspberry Pi (armv6l/armv7l).
            EOF
            exit 1
            ;;
    esac

    if command_exists docker; then
        version="$(docker -v | awk -F '[ ,]+' '{ print $3 }')"
        MAJOR_W=1
        MINOR_W=10

        semverParse $version

        shouldWarn=0
        if [ $major -lt $MAJOR_W ]; then
            shouldWarn=1
        fi

        if [ $major -le $MAJOR_W ] && [ $minor -lt $MINOR_W ]; then
            shouldWarn=1
        fi

        cat >&2 <<-'EOF'
            Warning: the "docker" command appears to already exist on this system.

            If you already have Docker installed, this script can cause trouble, which is
            why we're displaying this warning and provide the opportunity to cancel the
            installation.

            If you installed the current Docker package using this script and are using it
        EOF

        if [ $shouldWarn -eq 1 ]; then
            cat >&2 <<-'EOF'
            again to update Docker, we urge you to migrate your image store before upgrading
            to v1.10+.

            You can find instructions for this here:
            https://github.com/docker/docker/wiki/Engine-v1.10.0-content-addressability-migration
            EOF
        else
            cat >&2 <<-'EOF'
            again to update Docker, you can safely ignore this message.
            EOF
        fi

        cat >&2 <<-'EOF'

            You may press Ctrl+C now to abort this script.
        EOF
        ( set -x; sleep 20 )
    fi

    user="$(id -un 2>/dev/null || true)"

    sh_c='sh -c'
    if [ "$user" != 'root' ]; then
        if command_exists sudo; then
            sh_c='sudo -E sh -c'
        elif command_exists su; then
            sh_c='su -c'
        else
            cat >&2 <<-'EOF'
            Error: this installer needs the ability to run commands as root.
            We are unable to find either "sudo" or "su" available to make this happen.
            EOF
            exit 1
        fi
    fi

    curl=''
    if command_exists curl; then
        curl='curl -sSL'
    elif command_exists wget; then
        curl='wget -qO-'
    elif command_exists busybox && busybox --list-modules | grep -q wget; then
        curl='busybox wget -qO-'
    fi

    # check to see which repo they are trying to install from
    if [ -z "$repo" ]; then
        repo='main'
        if [ "https://test.docker.com/" = "$url" ]; then
            repo='testing'
        elif [ "https://experimental.docker.com/" = "$url" ]; then
            repo='experimental'
        fi
    fi

    # perform some very rudimentary platform detection
    lsb_dist=''
    dist_version=''
    if command_exists lsb_release; then
        lsb_dist="$(lsb_release -si)"
    fi
    if [ -z "$lsb_dist" ] && [ -r /etc/lsb-release ]; then
        lsb_dist="$(. /etc/lsb-release && echo "$DISTRIB_ID")"
    fi
    if [ -z "$lsb_dist" ] && [ -r /etc/debian_version ]; then
        lsb_dist='debian'
    fi
    if [ -z "$lsb_dist" ] && [ -r /etc/fedora-release ]; then
        lsb_dist='fedora'
    fi
    if [ -z "$lsb_dist" ] && [ -r /etc/oracle-release ]; then
        lsb_dist='oracleserver'
    fi
    if [ -z "$lsb_dist" ] && [ -r /etc/centos-release ]; then
        lsb_dist='centos'
    fi
    if [ -z "$lsb_dist" ] && [ -r /etc/redhat-release ]; then
        lsb_dist='redhat'
    fi
    if [ -z "$lsb_dist" ] && [ -r /etc/os-release ]; then
        lsb_dist="$(. /etc/os-release && echo "$ID")"
    fi

    lsb_dist="$(echo "$lsb_dist" | tr '[:upper:]' '[:lower:]')"

    # Special case redhatenterpriseserver
    if [ "${lsb_dist}" = "redhatenterpriseserver" ]; then
            # Set it to redhat, it will be changed to centos below anyways
            lsb_dist='redhat'
    fi

    case "$lsb_dist" in

        ubuntu)
            if command_exists lsb_release; then
                dist_version="$(lsb_release --codename | cut -f2)"
            fi
            if [ -z "$dist_version" ] && [ -r /etc/lsb-release ]; then
                dist_version="$(. /etc/lsb-release && echo "$DISTRIB_CODENAME")"
            fi
        ;;

        debian|raspbian)
            dist_version="$(cat /etc/debian_version | sed 's/\/.*//' | sed 's/\..*//')"
            case "$dist_version" in
                8)
                    dist_version="jessie"
                ;;
                7)
                    dist_version="wheezy"
                ;;
            esac
        ;;

        oracleserver)
            # need to switch lsb_dist to match yum repo URL
            lsb_dist="oraclelinux"
            dist_version="$(rpm -q --whatprovides redhat-release --queryformat "%{VERSION}\n" | sed 's/\/.*//' | sed 's/\..*//' | sed 's/Server*//')"
        ;;

        fedora|centos|redhat)
            dist_version="$(rpm -q --whatprovides ${lsb_dist}-release --queryformat "%{VERSION}\n" | sed 's/\/.*//' | sed 's/\..*//' | sed 's/Server*//' | sort | tail -1)"
        ;;

        *)
            if command_exists lsb_release; then
                dist_version="$(lsb_release --codename | cut -f2)"
            fi
            if [ -z "$dist_version" ] && [ -r /etc/os-release ]; then
                dist_version="$(. /etc/os-release && echo "$VERSION_ID")"
            fi
        ;;


    esac

    # Check if this is a forked Linux distro
    check_forked

    # Run setup for each distro accordingly
    case "$lsb_dist" in
        amzn)
            (
            set -x
            $sh_c 'sleep 3; yum -y -q install docker'
            )
            echo_docker_as_nonroot
            exit 0
            ;;

        'opensuse project'|opensuse)
            echo 'Going to perform the following operations:'
            if [ "$repo" != 'main' ]; then
                echo '  * add repository obs://Virtualization:containers'
            fi
            echo '  * install Docker'
            $sh_c 'echo "Press CTRL-C to abort"; sleep 3'

            if [ "$repo" != 'main' ]; then
                # install experimental packages from OBS://Virtualization:containers
                (
                    set -x
                    zypper -n ar -f obs://Virtualization:containers Virtualization:containers
                    rpm_import_repository_key 55A0B34D49501BB7CA474F5AA193FBB572174FC2
                )
            fi
            (
                set -x
                zypper -n install docker
            )
            echo_docker_as_nonroot
            exit 0
            ;;
        'suse linux'|sle[sd])
            echo 'Going to perform the following operations:'
            if [ "$repo" != 'main' ]; then
                echo '  * add repository obs://Virtualization:containers'
                echo '  * install experimental Docker using packages NOT supported by SUSE'
            else
                echo '  * add the "Containers" module'
                echo '  * install Docker using packages supported by SUSE'
            fi
            $sh_c 'echo "Press CTRL-C to abort"; sleep 3'

            if [ "$repo" != 'main' ]; then
                # install experimental packages from OBS://Virtualization:containers
                echo >&2 'Warning: installing experimental packages from OBS, these packages are NOT supported by SUSE'
                (
                    set -x
                    zypper -n ar -f obs://Virtualization:containers/SLE_12 Virtualization:containers
                    rpm_import_repository_key 55A0B34D49501BB7CA474F5AA193FBB572174FC2
                )
            else
                # Add the containers module
                # Note well-1: the SLE machine must already be registered against SUSE Customer Center
                # Note well-2: the `-r ""` is required to workaround a known issue of SUSEConnect
                (
                    set -x
                    SUSEConnect -p sle-module-containers/12/x86_64 -r ""
                )
            fi
            (
                set -x
                zypper -n install docker
            )
            echo_docker_as_nonroot
            exit 0
            ;;

        ubuntu|debian|raspbian)
            export DEBIAN_FRONTEND=noninteractive

            did_apt_get_update=
            apt_get_update() {
                if [ -z "$did_apt_get_update" ]; then
                    ( set -x; $sh_c 'sleep 3; apt-get update' )
                    did_apt_get_update=1
                fi
            }

            if [ "$lsb_dist" = "raspbian" ]; then
                # Create Raspbian specific systemd drop-in file, use overlay by default
                ( set -x; $sh_c "mkdir -p /etc/systemd/system/docker.service.d" )
                ( set -x; $sh_c "echo '[Service]\nExecStart=\nExecStart=/usr/bin/dockerd --storage-driver overlay -H fd://' > /etc/systemd/system/docker.service.d/overlay.conf" )
            else
                # aufs is preferred over devicemapper; try to ensure the driver is available.
                if ! grep -q aufs /proc/filesystems && ! $sh_c 'modprobe aufs'; then
                    if uname -r | grep -q -- '-generic' && dpkg -l 'linux-image-*-generic' | grep -qE '^ii|^hi' 2>/dev/null; then
                        kern_extras="linux-image-extra-$(uname -r) linux-image-extra-virtual"

                        apt_get_update
                        ( set -x; $sh_c 'sleep 3; apt-get install -y -q '"$kern_extras" ) || true

                        if ! grep -q aufs /proc/filesystems && ! $sh_c 'modprobe aufs'; then
                            echo >&2 'Warning: tried to install '"$kern_extras"' (for AUFS)'
                            echo >&2 ' but we still have no AUFS.  Docker may not work. Proceeding anyways!'
                            ( set -x; sleep 10 )
                        fi
                    else
                        echo >&2 'Warning: current kernel is not supported by the linux-image-extra-virtual'
                        echo >&2 ' package.  We have no AUFS support.  Consider installing the packages'
                        echo >&2 ' linux-image-virtual kernel and linux-image-extra-virtual for AUFS support.'
                        ( set -x; sleep 10 )
                    fi
                fi
            fi

            # install apparmor utils if they're missing and apparmor is enabled in the kernel
            # otherwise Docker will fail to start
            if [ "$(cat /sys/module/apparmor/parameters/enabled 2>/dev/null)" = 'Y' ]; then
                if command -v apparmor_parser >/dev/null 2>&1; then
                    echo 'apparmor is enabled in the kernel and apparmor utils were already installed'
                else
                    echo 'apparmor is enabled in the kernel, but apparmor_parser is missing. Trying to install it..'
                    apt_get_update
                    ( set -x; $sh_c 'sleep 3; apt-get install -y -q apparmor' )
                fi
            fi

            if [ ! -e /usr/lib/apt/methods/https ]; then
                apt_get_update
                ( set -x; $sh_c 'sleep 3; apt-get install -y -q apt-transport-https ca-certificates' )
            fi
            if [ -z "$curl" ]; then
                apt_get_update
                ( set -x; $sh_c 'sleep 3; apt-get install -y -q curl ca-certificates' )
                curl='curl -sSL'
            fi
            if [ ! -e /usr/bin/gpg ]; then
                apt_get_update
                ( set -x; $sh_c 'sleep 3; apt-get install -y -q gnupg2 || apt-get install -y -q gnupg' )
            fi

            (
            set -x
            for key_server in $key_servers ; do
                $sh_c "apt-key adv --keyserver hkp://${key_server}:80 --recv-keys ${gpg_fingerprint}" && break
            done
            $sh_c "apt-key adv -k ${gpg_fingerprint} >/dev/null"
            $sh_c "mkdir -p /etc/apt/sources.list.d"
            $sh_c "echo deb \[arch=$(dpkg --print-architecture)\] ${apt_url}/repo ${lsb_dist}-${dist_version} ${repo} > /etc/apt/sources.list.d/docker.list"
            $sh_c 'sleep 3; apt-get update; apt-get install -y -q docker-engine'
            )
            echo_docker_as_nonroot
            exit 0
            ;;

        fedora|centos|redhat|oraclelinux)
            if [ "${lsb_dist}" = "redhat" ]; then
                # we use the centos repository for both redhat and centos releases
                lsb_dist='centos'
            fi
            $sh_c "cat >/etc/yum.repos.d/docker-${repo}.repo" <<-EOF
            [docker-${repo}-repo]
            name=Docker ${repo} Repository
            baseurl=${yum_url}/repo/${repo}/${lsb_dist}/${dist_version}
            enabled=1
            gpgcheck=1
            gpgkey=${yum_url}/gpg
            EOF
            if [ "$lsb_dist" = "fedora" ] && [ "$dist_version" -ge "22" ]; then
                (
                    set -x
                    $sh_c 'sleep 3; dnf -y -q install docker-engine'
                )
            else
                (
                    set -x
                    $sh_c 'sleep 3; yum -y -q install docker-engine'
                )
            fi
            echo_docker_as_nonroot
            exit 0
            ;;
        gentoo)
            if [ "$url" = "https://test.docker.com/" ]; then
                # intentionally mixed spaces and tabs here -- tabs are stripped by "<<-'EOF'", spaces are kept in the output
                cat >&2 <<-'EOF'

                  You appear to be trying to install the latest nightly build in Gentoo.'
                  The portage tree should contain the latest stable release of Docker, but'
                  if you want something more recent, you can always use the live ebuild'
                  provided in the "docker" overlay available via layman.  For more'
                  instructions, please see the following URL:'

                    https://github.com/tianon/docker-overlay#using-this-overlay'

                  After adding the "docker" overlay, you should be able to:'

                    emerge -av =app-emulation/docker-9999'

                EOF
                exit 1
            fi

            (
                set -x
                $sh_c 'sleep 3; emerge app-emulation/docker'
            )
            exit 0
            ;;
    esac

    # intentionally mixed spaces and tabs here -- tabs are stripped by "<<-'EOF'", spaces are kept in the output
    cat >&2 <<-'EOF'

      Either your platform is not easily detectable, is not supported by this
      installer script (yet - PRs welcome! [hack/install.sh]), or does not yet have
      a package for Docker.  Please visit the following URL for more detailed
      installation instructions:

        https://docs.docker.com/engine/installation/

    EOF
    exit 1
}

# wrapped up in a function so that we have some protection against only getting
# half the file during "curl | sh"
do_install
docker守护进程
装完docker,我们需要确认docker的守护进程是否运行,docker以root权限运行他的守护进程,来处理普通用户无法完成的操作。docker程序是Docker守护进程的客户端程序,同样也是需要root身份运行。
当docker安装后默认会立即启动守护进程,并监听/var/run/docker.sock这个Unix套接字文件,获取来自客户端的Docker请求。如果系统中存在名为docker的用户组的话,Docker则会将该套接字文件的所有者设置为该用户组,这样docker用胡子的所有用户都可以直接运行Docker,无需再私用sudo命令了。
将hx添加到dockerroot组中
usermod -a -G dockerroot hx
在没有启动docker的时候可以指定绑定端口启动。
[hx@centos-linux ~]$ sudo docker daemon -H tcp://0.0.0.0:2345
启动后显示内容大概就是绑定在任意ip端口上不安全
WARN[0000] /!\ DON'T BIND ON ANY IP ADDRESS WITHOUT setting -tlsverify IF YOU DON'T KNOW WHAT YOU'RE DOING /!\
WARN[0000] devmapper: Usage of loopback devices is strongly discouraged for production use. Please use `--storage-opt dm.thinpooldev` or use `man docker` to refer to dm.thinpooldev section.
WARN[0000] devmapper: Base device already exists and has filesystem xfs on it. User specified filesystem  will be ignored.
INFO[0000] [graphdriver] using prior storage driver "devicemapper"
INFO[0000] Graph migration to content-addressability took 0.00 seconds
INFO[0000] Firewalld running: true
INFO[0000] Default bridge (docker0) is assigned with an IP address 172.17.0.0/16. Daemon option --bip can be used to set a preferred IP address
INFO[0000] Loading containers: start.

INFO[0000] Loading containers: done.
INFO[0000] Daemon has completed initialization
INFO[0000] Docker daemon                                 commit=3999ccb-unsupported execdriver=native-0.2 graphdriver=devicemapper version=1.10.3
INFO[0000] API listen on [::]:2345
也可以指定Unix套接字路径,或者同时指定多个绑定地址:
[hx@centos-linux ~]$ sudo docker daemon -H tcp://0.0.0.0:2345 -H unix:///var/run/docker.socket
显示docker守护进程的更详细的信息
sudo docker daemon -D
如果想让这些参数成为默认,不用每次启动时都输入可以修改
[hx@centos-linux ~]$ sudo vim /usr/lib/systemd/system/docker.service
vim /etc/sysconfig/docker 增加下面也可以
OPTIONS='--selinux-enabled -H tcp://0.0.0.0:2345 -H unix:///dev/shm/docker.sock'
重新加载配置文件
[hx@centos-linux ~]$ systemctl daemon-reload
此时配置没有生效,然后在重启docker
[hx@centos-linux ~]$ service docker restart
Docker用户界面
Shipyard 提供了通过管理界面来管理各种docker资源(包括容器,镜像,宿主机等)
源代码:https://github.com/ehazlett/shipyard
wget https://github.com/ehazlett/shipyard/archive/master.zip
docker的基本使用
1、查看状态
sudo docker info
**配置上面自定义内容后 使用 docker info 命令失败
2、查看docker镜像
[hx@centos-linux src]$ sudo docker search centos
centos 是镜像的名字,只要是有就会搜索出来docker镜像源上匹配的镜像
你可以下载这些镜像也可以直接运行,直接运行的话docker会在本地先查找,如果没有就会链接镜像源去下载
[hx@centos-linux src]$ sudo docker run -i -t centos /bin/bash
-i 保证容器中STDIN是开启的,尽管我们灭有附着到容器中。持久的标准输入时交互式shell的半边天。
-t 告诉docker为要撞见的容器分配一个伪TTY终端,这样新创建的容器才能提供一个交互式shell。如果要在命令行下在创建一个我们能预知进行交互的容器,而不是一个运行后台服务的容器,这两个参数是最基本的参数了。
当容器创建完毕以后,docker就会执行容器中的/bin/bash的命令,这是就可以看到容器内的shell了。
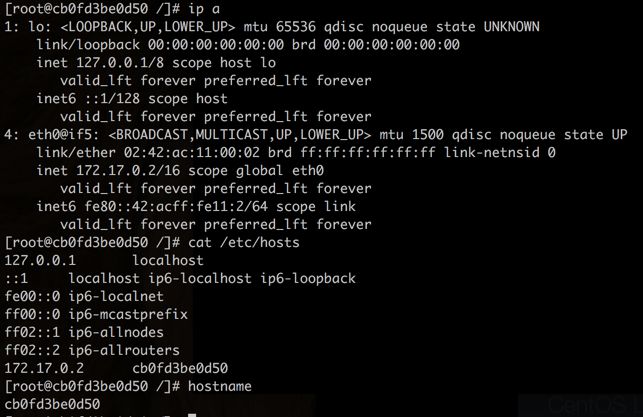
此时我们就身在docker的容器中这个容器就相当于一个小的centos环境
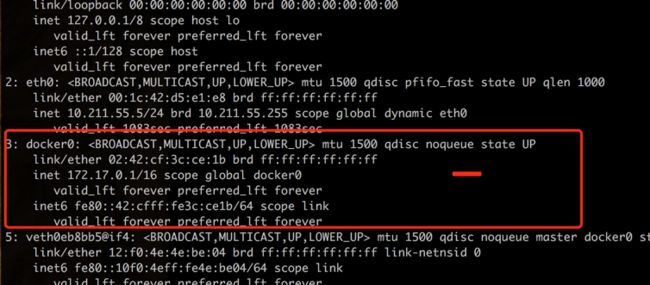
此时你的宿主机上也多了一个网卡
3、列出容器
查看当前系统中所有的容器列表
[root@centos-linux ~]# docker ps -a
只查看当前正在运行的容器
[root@centos-linux ~]# docker ps
只查看最后一个运行的容器
[hx@centos-linux src]$ docker ps -l
查看左后X个docker容器,不管是启动还是停止的
[hx@centos-linux ~]$ docker ps -n 1
如果你想退出容器就输入 exit
此时就退出了这个容器,退出状态是0
4、容器的名字
IMAGE 镜像的名字
CONTAINER 容器的名字
NAMES 别名
有三种方式可以为之指代容器
短UUID:(cb0fd3be0d50)
别名:focused_shirley
长UUID:这个也不知道是在哪,但是应该不会经常用的
下面我们会自定义docker的别名,好来辨别大量的docker容器的功能
5、删除镜像
可以同时删除多个镜像,这是就要使用CONTAINER ID 来删除了
[hx@centos-linux src]$ docker rm 519c2870ce20 73e84f664e75
6、重新进入容器
如果此时我们还想进入刚才的那个容器中,再运行 docker run -i -t centos /bin/bash 这个命令是不成的,这样会再生成一个新的centos镜像的容器。
那么我们怎么才能进入之前的那个镜像那?
重新附着到容器上
[hx@centos-linux src]$ docker attach 4dff86f3dd71
You cannot attach to a stopped container, start it first
7、启动容器
但是此时让我先启动
[hx@centos-linux src]$ sudo docker start 4dff86f3dd71
也可以使用restart重启这个容器
启动以后我们就可以使用attach重新附着到这个容器上了
启动后我们再看一下docker的进程,就不难发现为什么说docker是有客户端和服务器端的模式了,我们最先安装的那个就是docker的服务器端,后来启动的容器相当于客户端
此时是不是觉得老是使用这个一串字符有点不方便?我们也可以在生成镜像的时候提前命好名字
[hx@centos-linux src]$ docker run --name test1 -i -t centos /bin/bash
-name 就是指定新生成的镜像名字
容器的命名必须是唯一的。如果试图创建两个同名的容器,命令会失败。如果想创建已经有的名字,那只能删除之前的容器了。
8、创建守护式容器
除了bash这类交互式容器(interactive container) ,也可以创建长期运行的容器。守护式容器(daemonized container) 没有交互式回话,非常适合运行应用程序和服务。大多数时候我们都需要以守护式来运行我们的容器。下面就来启动一个守护式容器。
[hx@centos-linux src]$ docker run --name daemon1 -d centos /bin/bash -c "a=0; while [ $a -le 100 ]; do echo hello world $a;sleep 1;((a=$a+1));done"
-d参数就是讲docker容器放到后台运行
-c 执行命令
查看容器中都干什么了
[hx@centos-linux src]$ docker logs -f daemon1
此时我们可以看到这个容器正在运行
[hx@centos-linux src]$ docker stop daemon1
此时我们可以停止这个daemon1 然后再启动后查看日志这个程序还是在继续的执行-c定义的脚本
此时如果再使用 docker logs -f daemon1 这个命令查看日志还会从最开始查看,我们也可以自动以从那块开始查看log
[hx@centos-linux src]$ docker logs --tail 0 -f daemon1
而且还可以加上-t 来显示时间戳
[hx@centos-linux src]$ docker logs --tail 0 -tf daemon1
9 Docker日志驱动
Docker1.6开始,也可以控制Docker守护进程和容器所用的日志驱动,可以通过--log-driver 选项实现。也可以在启动Docker守护进程或者执行docker run命令是使用这个选项。
其他的选项是json-file,这个选项为我们的docker logs命令提供了基础。
默认的是 journald
还有就是none
其他可用的选项还包括syslog,该选项将禁用docker logs命令,将所有的容器的日志输出都重定向到Syslog,或者通过docker run对个别的容器进行日志重定向输出
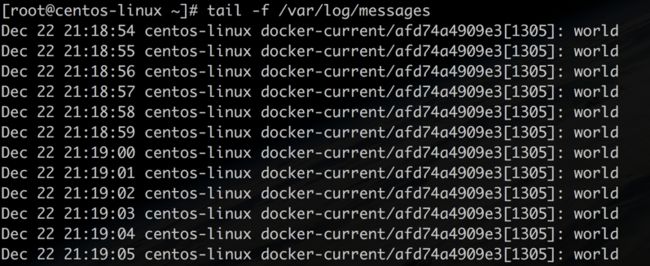
[hx@centos-linux ~]$ docker run --log-driver="syslog" --name daemon_syslog -d centos /bin/bash -c "while true;do echo world;sleep 1;done"
syslog会将所有的日志输出到Syslog,导致docker logs 命令不输出任何东西,输出到哪里了?
日志被输出到了宿主机的syslog日志中了。
none这个选项会禁用所有容器中的日志,导致docker logs命令也被禁用
10 查看守护式容器中的进程
[hx@centos-linux ~]$ docker top daemon_syslog
[hx@centos-linux ~]$ docker stats daemon_syslog restarta restartf
可以查看一个或者多个,是Docker1.5中引入的命令
CPU使用率,内存的使用/限制,网络IO,存储IO
11 在容器内部运行进程
在Docker1.3以后,也可以通过docker exec 命令在容器内部额外启动新进程。可以在容器内运行的进程有两种
1.后台任务:在容器内运行并没有交互需求
2.交互式任务:保持在前台运行,对于需要在容器内部打开shell的任务,交互式很实用
1.后台任务
[hx@centos-linux ~]$ docker exec -d daemon_syslog touch /tmp/test1
[hx@centos-linux ~]$ docker exec -d daemon_syslog useradd hx
[hx@centos-linux ~]$ docker exec -u hx -d daemon_syslog touch /tmp/test2
Docker 1.7开始可以对docker exec 启动的进程使用-u标志为新启动的进程指定一个用户属主
2.交互式任务
[hx@centos-linux ~]$ docker exec -t -i daemon_syslog /bin/bash
12 停止守护式容器
[hx@centos-linux ~]$ docker stop daemon_syslog
docker stop 会向Docker容器进程发送SIGTERM信号,如果想快速停止某个容器,也可以使用docker kill 命令来想容器发送SIGKILL信号
13自动重启容器 Docker 1.2后引入
由于某种错误导致容器停止运行,可以用--restart 让Docker自动重启该容器。它会检查容器的退出代码,并据此来决定是否要重启容器。默认行为是Docker不会重启容器
[hx@centos-linux ~]$ docker run --restart=always --name daemon_always -d centos /bin/bash -c "while true; do echo hello world; sleep 1 ;done"
always参数:无论容器退出代码是什么,Docker都会自动重启该容器
on-failure :只有当退出代码为非0时,Docker才会重启该容器
on-failure:5 还可以接受一个可选的重启次数参数,:5代表最多重启5次
14.深入容器
除了 docker ps命令获取容器信息,还可以用 docker inspect 来获取更多的容器信息
[hx@centos-linux ~]$ docker inspect daemon_always | more
[
{
"Id": "e26c04639f37cd4a317286d71c5a5555d37f6576ad858464e6f5f3ffa3c4e35a",
"Created": "2016-12-22T13:32:55.860826446Z",
"Path": "/bin/bash",
"Args": [
"-c",
"while true; do echo hello world; sleep 1 ;done"
],
"State": {
"Status": "running",
"Running": true,
"Paused": false,
"Restarting": false,
"OOMKilled": false,
"Dead": false,
"Pid": 3901,
"ExitCode": 0,
"Error": "",
"StartedAt": "2016-12-22T13:32:56.334254201Z",
"FinishedAt": "0001-01-01T00:00:00Z"
},
"Image": "sha256:67591570dd29de0e124ee89d50458b098dbd83b12d73e5fdaf8b4dcbd4ea50f8",
"ResolvConfPath": "/var/lib/docker/containers/e26c04639f37cd4a317286d71c5a5555d37f6576ad858464e6f5f3ffa3c4e35a/resolv.conf",
"HostnamePath": "/var/lib/docker/containers/e26c04639f37cd4a317286d71c5a5555d37f6576ad858464e6f5f3ffa3c4e35a/hostname",
"HostsPath": "/var/lib/docker/containers/e26c04639f37cd4a317286d71c5a5555d37f6576ad858464e6f5f3ffa3c4e35a/hosts",
"LogPath": "",
"Name": "/daemon_always",
"RestartCount": 0,
"Driver": "devicemapper",
"MountLabel": "system_u:object_r:svirt_sandbox_file_t:s0:c443,c854",
"ProcessLabel": "system_u:system_r:svirt_lxc_net_t:s0:c443,c854",
"AppArmorProfile": "",
"ExecIDs": null,
"HostConfig": {
"Binds": null,
"ContainerIDFile": "",
"LogConfig": {
"Type": "journald",
"Config": {}
},
"NetworkMode": "default",
"PortBindings": {},
"RestartPolicy": {
"Name": "always",
"MaximumRetryCount": 0
},
"VolumeDriver": "",
"VolumesFrom": null,
"CapAdd": null,
"CapDrop": null,
"Dns": [],
"DnsOptions": [],
"DnsSearch": [],
"ExtraHosts": null,
"GroupAdd": null,
"IpcMode": "",
"Links": null,
"OomScoreAdj": 0,
"PidMode": "",
"Privileged": false,
"PublishAllPorts": false,
"ReadonlyRootfs": false,
"SecurityOpt": null,
"UTSMode": "",
"ShmSize": 67108864,
"ConsoleSize": [
0,
0
],
"Isolation": "",
"CpuShares": 0,
"CgroupParent": "",
"BlkioWeight": 0,
"BlkioWeightDevice": null,
"BlkioDeviceReadBps": null,
"BlkioDeviceWriteBps": null,
"BlkioDeviceReadIOps": null,
"BlkioDeviceWriteIOps": null,
"CpuPeriod": 0,
"CpuQuota": 0,
"CpusetCpus": "",
"CpusetMems": "",
"Devices": [],
"KernelMemory": 0,
"Memory": 0,
"MemoryReservation": 0,
"MemorySwap": 0,
"MemorySwappiness": -1,
"OomKillDisable": false,
"PidsLimit": 0,
"Ulimits": null
},
"GraphDriver": {
"Name": "devicemapper",
"Data": {
"DeviceId": "20",
"DeviceName": "docker-253:0-67389343-56ad8a38c2ad1747b936a70a6e4faa51cea4719a455015efc8dc1824d55f9f79",
"DeviceSize": "10737418240"
}
},
"Mounts": [],
"Config": {
"Hostname": "e26c04639f37",
"Domainname": "",
"User": "",
"AttachStdin": false,
"AttachStdout": false,
"AttachStderr": false,
"Tty": false,
"OpenStdin": false,
"StdinOnce": false,
"Env": [
"PATH=/usr/local/sbin:/usr/local/bin:/usr/sbin:/usr/bin:/sbin:/bin"
],
"Cmd": [
"/bin/bash",
"-c",
"while true; do echo hello world; sleep 1 ;done"
],
"Image": "centos",
"Volumes": null,
"WorkingDir": "",
"Entrypoint": null,
"OnBuild": null,
"Labels": {
"build-date": "20161214",
"license": "GPLv2",
"name": "CentOS Base Image",
"vendor": "CentOS"
}
},
"NetworkSettings": {
"Bridge": "",
"SandboxID": "86a9e878d328d2f571e3dc97e860ab3e89963877492e24349d349317007d6e55",
"HairpinMode": false,
"LinkLocalIPv6Address": "",
"LinkLocalIPv6PrefixLen": 0,
"Ports": {},
"SandboxKey": "/var/run/docker/netns/86a9e878d328",
"SecondaryIPAddresses": null,
"SecondaryIPv6Addresses": null,
"EndpointID": "4706ceff3b4f3a04d718423c63d12c39618d0ba3a915f7c462d48ac000ef8b80",
"Gateway": "172.17.0.1",
"GlobalIPv6Address": "",
"GlobalIPv6PrefixLen": 0,
"IPAddress": "172.17.0.2",
"IPPrefixLen": 16,
"IPv6Gateway": "",
"MacAddress": "02:42:ac:11:00:02",
"Networks": {
"bridge": {
"IPAMConfig": null,
"Links": null,
"Aliases": null,
"NetworkID": "31f89a07ff75df59394ddf8cb2a8ab283044ed0c7c10acf586feffc561c175bf",
"EndpointID": "4706ceff3b4f3a04d718423c63d12c39618d0ba3a915f7c462d48ac000ef8b80",
"Gateway": "172.17.0.1",
"IPAddress": "172.17.0.2",
"IPPrefixLen": 16,
"IPv6Gateway": "",
"GlobalIPv6Address": "",
"GlobalIPv6PrefixLen": 0,
"MacAddress": "02:42:ac:11:00:02"
}
}
}
}
]
也可以使用-f or --format 定义查看的结果
[hx@centos-linux ~]$ docker inspect --format '{{ .NetworkSettings.Gateway }}' daemon_always
*格式类似方法的调用
也支持查询多个
[hx@centos-linux ~]$ docker inspect --format '{{ .NetworkSettings.Gateway }} {{ .NetworkSettings.IPAddress}}' daemon_always
支持Go语言模板
除了查看容器,还可以通过浏览 /var/lib/docker 目录来深入了解Docker的工作原理,该目录存放着Docker镜像、容器,以及容器的配置。
所有容器都保存在/var/lib/docker/containers目录下
15. Docker 镜像
Docker Hub 中有很多镜像,比如Ubuntu镜像中包含了很多版本的镜像
1.下载镜像
[hx@centos-linux ~]$ docker pull ubuntu:12.04
2.查看镜像
[hx@centos-linux ~]$ docker images
每个镜像都有TAG标签,作为这个镜像的状态
3.构建镜像
docker commit
docker bulid 和Dockerfile
**建议使用Dockerfile命令更灵活
使用docker commit命令
a、先创建Docker Hub账号
然后本地服务器就可以登录这个账号
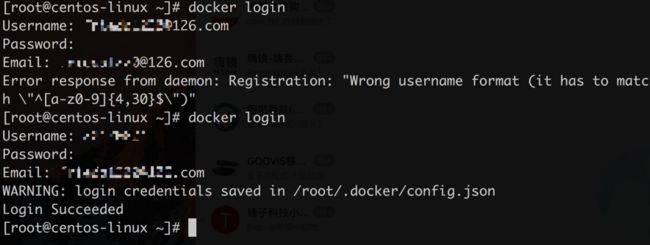
[root@centos-linux ~]# docker login
然后填写注册时的用户名邮箱密码,就注册登录成功,个人认证信息保存至提示路径。
提交修改后的镜像
[root@centos-linux ~]# docker commit 596b103debac hanxu/centos6_tomcat
查看镜像,就可以看到我们刚才修改后commit的自定义镜像
查看镜像详细信息
提交时还可以制定更详细的信息
[root@centos-linux ~]# docker commit -m "create tomcat server" -a "centos_tocmat" 596b103debac hanxu/centos6:tomcat
-m message:信息
hanxu/centos6 镜像名称
:tomcat 镜像TAG
** 如果在创建镜像的时候重复了名称(REPOSITORY),则原镜像的名称和TAG就都变成
如果想运行这个刚创建的镜像可以使用 docker run命令
[root@centos-linux ~]# docker run -i -t hanxu/centos6:tomcat /bin/bash
WARNING: IPv4 forwarding is disabled. Networking will not work.
使用Dokerfile命令


