Airflow安装说明
1、airflow安装
为了后期安装其它软件的需要,在此先安装必要的依赖包(我曾经跨过山和大海,也穿过人山人海...),重要的事情只说一遍哦
yum -y groupinstall "Development tools"
yum -y install zlib-devel bzip2-devel openssl-devel ncurses-devel sqlite-devel readline-devel tk-devel gdbm-devel xz-devel libffi-devel

# airflow needs a home, ~/airflow is the default,
# but you can lay foundation somewhere else if you prefer
# (optional)
export AIRFLOW_HOME=~/airflow

# install from pypi using pip
pip3 install apache-airflow

# initialize the database
airflow initdb

# start the web server, default port is 8080
airflow webserver -p 8080

# start the scheduler
airflow scheduler

# visit localhost:8080 in the browser and enable the example dag in the home page
2、设置防火墙(如果不是本地访问airflow)
直接拉取firewall-cmd:
yum install firewalld systemd -y

查看服务器上是否安装了firewall
systemctl status firewalld

开启防火墙
systemctl start firewalld.service

关闭防火墙
systemctl stop firewalld.service

设置开机自启
systemctl enable firewalld.service

设置关闭开机自启动
systemctl disable firewalld.service

在不改变状态的条件下重新加载防火墙
firewall-cmd --reload

查看已开放的端口
netstat -anp

查询指定8080端口是否开放
firewall-cmd --query-port=8080/tcp

yes 表示开放 no表示不开放
3、访问airflow
ip:8080
4、配置CeleryExecutor
1)安装MariaDB10.3
vim /etc/yum.repos.d/MariaDB.repo
添加如下内容:
[mariadb]
name = MariaDB
baseurl = http://yum.mariadb.org/10.3/centos7-amd64
gpgkey=https://yum.mariadb.org/RPM-GPG-KEY-MariaDB
gpgcheck=1

yum clean all
yum makecache

Importing the MariaDB GPG Public Key
rpm --import https://yum.mariadb.org/RPM-GPG-KEY-MariaDB

安卓MariaDB10.3
yum install MariaDB-server galera MariaDB-client MariaDB-shared MariaDB-backup MariaDB-common

启动、添加开机自启、检查状态
systemctl start mariadb.service
systemctl enable mariadb.service
systemctl status mariadb.service

mariadb的初始化
/usr/bin/mysql_secure_installation

一般建议按以下进行配置:
Enter current password for root (enter for none): Just press the Enter button
Set root password? [Y/n]: Y
New password: your-MariaDB-root-password
Re-enter new password: your-MariaDB-root-password
Remove anonymous users? [Y/n]: Y
Disallow root login remotely? [Y/n]: n
Remove test database and access to it? [Y/n]: Y
Reload privilege tables now? [Y/n]: Y

登录mysql
mysql -u root -p

至此,MariaDB10.3已安装完毕。
2)因为rabbitmq是用erlang语言开发的,所以先安装erlang
vim /etc/yum.repos.d/rabbitmq-erlang.repo
添加如下内容:
# In /etc/yum.repos.d/rabbitmq-erlang.repo
[rabbitmq-erlang]
name=rabbitmq-erlang
baseurl=https://dl.bintray.com/rabbitmq-erlang/rpm/erlang/22/el/7
gpgcheck=1
gpgkey=https://dl.bintray.com/rabbitmq/Keys/rabbitmq-release-signing-key.asc
repo_gpgcheck=0
enabled=1

安装erlang
yum install erlang
3)安装rabbitmq
vim /etc/yum.repos.d/rabbitmq-server.repo
添加如下内容:
[bintray-rabbitmq-server]
name=bintray-rabbitmq-rpm
baseurl=https://dl.bintray.com/rabbitmq/rpm/rabbitmq-server/v3.8.x/el/7/
gpgcheck=0
repo_gpgcheck=0
enabled=1

安装密钥
rpm --import https://github.com/rabbitmq/signing-keys/releases/download/2.0/rabbitmq-release-signing-key.asc

安装rabbitmq
yum install rabbitmq-server

启动rabbitmq
systemctl start rabbitmq-server.service
查看状态
systemctl status rabbitmq-server.service
设置开机自启
systemctl enable rabbitmq-server.service
设置关闭开机自启动
systemctl disable rabbitmq-server.service

配置rabbitmq(设置用户名root,密码rabbitmq,创建虚拟主机airflow-rabbitmq)
rabbitmqctl add_user root rabbitmq
rabbitmqctl add_vhost airflow-rabbitmq
rabbitmqctl set_user_tags root airflow-rabbitmq
rabbitmqctl set_permissions -p airflow-rabbitmq root ".*" ".*" ".*"
rabbitmq-plugins enable rabbitmq_management

4)安装celery、rabbitmq、mysql组件
pip3 install apache-airflow[celery]
pip3 install apache-airflow[rabbitmq]

pip3 install apache-airflow[mysql]
报错如下:
ERROR: Command errored out with exit status 1:
     command: /usr/local/bin/python3.7 -c 'import sys, setuptools, tokenize; sys.argv[0] = '"'"'/tmp/pip-install-j00jm48a/mysqlclient/setup.py'"'"'; __file__='"'"'/tmp/pip-install-j00jm48a/mysqlclient/setup.py'"'"';f=getattr(tokenize, '"'"'open'"'"', open)(__file__);code=f.read().replace('"'"'\r\n'"'"', '"'"'\n'"'"');f.close();exec(compile(code, __file__, '"'"'exec'"'"'))' egg_info --egg-base /tmp/pip-install-j00jm48a/mysqlclient/pip-egg-info
         cwd: /tmp/pip-install-j00jm48a/mysqlclient/
    Complete output (10 lines):
    /bin/sh: mysql_config: command not found
    Traceback (most recent call last):
      File "", line 1, in
      File "/tmp/pip-install-j00jm48a/mysqlclient/setup.py", line 16, in
        metadata, options = get_config()
      File "/tmp/pip-install-j00jm48a/mysqlclient/setup_posix.py", line 53, in get_config
        libs = mysql_config("libs_r")
      File "/tmp/pip-install-j00jm48a/mysqlclient/setup_posix.py", line 28, in mysql_config
        raise EnvironmentError("%s not found" % (mysql_config.path,))
    OSError: mysql_config not found
    ----------------------------------------
ERROR: Command errored out with exit status 1: python setup.py egg_info Check the logs for full command output.
原因:
缺少以下包之一,
MariaDB-devel指的是包含开发首要的文件和一些静态库。
MariaDB-shared指的是包含一些动态客户端的库。指的是包含开发首要的文件和一些静态库。
MariaDB-shared指的是包含一些动态客户端的库。
解决:
yum install MariaDB-devel
5)CeleryExecutor配置
1、配置mariadb
创建user-airflow用户,创建airflow数据库并给出所有权限给次用户
mysql -u root -p
create database airflow;
create user 'user-airflow'@'localhost' identified by '123456';
create user 'user-airflow'@'%' identified by '123456';
GRANT all privileges on airflow.* TO 'user-airflow'@'%'  IDENTIFIED BY '123456';
flush privileges;

修改配置文件添加参数,之后初始化数据库
vim /etc/my.cnf
添加如下内容:
[mysqld]
explicit_defaults_for_timestamp = 1

重启mariadb服务
systemctl restart mariadb.service

2、修改airflow配置文件
vim /root/airflow/airflow.cfg
修改如下内容:
# The executor class that airflow should use. Choices include
# SequentialExecutor, LocalExecutor, CeleryExecutor, DaskExecutor, KubernetesExecutor
# executor = SequentialExecutor
executor = CeleryExecutor

# The Celery broker URL. Celery supports RabbitMQ, Redis and experimentally
# a sqlalchemy database. Refer to the Celery documentation for more
# information.
# http://docs.celeryproject.org/en/latest/userguide/configuration.html#broker-settings
# broker_url = sqla+mysql://airflow:airflow@localhost:3306/airflow
broker_url = amqp://root:rabbitmq@localhost:5672/airflow-rabbitmq

# The Celery result_backend. When a job finishes, it needs to update the
# metadata of the job. Therefore it will post a message on a message bus,
# or insert it into a database (depending of the backend)
# This status is used by the scheduler to update the state of the task
# The use of a database is highly recommended
# http://docs.celeryproject.org/en/latest/userguide/configuration.html#task-result-backend-settings
# result_backend = db+mysql://airflow:airflow@localhost:3306/airflow
# result_backend = amqp://root:rabbitmq@localhost:5672/airflow-rabbitmq
result_backend = db+mysql://user-airflow:123456@localhost:3306/airflow

保存退出。
6)airflow常用命令
以下命令都是单独开启一个窗口来启动,便于观察日志(也可以在后台启动)
注意:celery worker启动尽量不要用root用户启动,如果要用root用户启动则添加环境变量。
用其他用户启动则airflow启动命令也对应用用户启动,并更改项目目录权限属于此用户,否则日志记录时没有权限会影响worker运行。
echo export C_FORCE_ROOT= true >> /etc/profile
source /etc/profile
这是一种错误的方法,导致后面woker启动失败,导致任务不执行

正确以root用户启动worker的方式有两种,
方法一:暂时解决问题
在服务器输入以下命令
export C_FORCE_ROOT="true"

方法二:永久解决问题
from celery import Celery,platforms #导入platforms
app = Celery('celery_tasks.tasks', broker='redis://127.0.0.1:6379/1')
platforms.C_FORCE_ROOT = True #加上这一行
@app.task
def test():
	pass

airflow webserver #启动airflow web页面
airflow scheduler #启动调度器,执行任务调度,不过任务默认是关闭的,需要在页面手动开启
airflow worker #启动celery workd
airflow flower #启动flower监控页面

airflow pause dag_id  暂停任务
airflow unpause dag_id  取消暂停,等同于在管理界面打开off按钮
airflow list_tasks dag_id  查看task列表
airflow clear dag_id  清空任务实例
airflow trigger_dag dag_id -r RUN_ID -e EXEC_DATE  运行整个dag文件
airflow run dag_id task_id execution_date  运行task

linux添加用户、用户组、密码
groupadd airflow #添加用户组airflow
useradd -g airflow airflow #添加用airflow到用户组airflow
passwd airflow #设置密码

更改项目目录权限为启动用户(airflow)权限
chowm -R airflow:airflow /root/airflow

杀死airflow进程
ps -ef|egrep 'scheduler|airflow-webserver'|grep -v grep|awk '{print $2}'|xargs kill -9
rm -rf /root/airflow/airflow-webserver.pid
rm -rf /root/airflow/airflow-scheduler.pid

重新启动airflow worker报错
Traceback (most recent call last):
  File "/usr/local/bin/airflow", line 37, in
    args.func(args)
  File "/usr/local/lib/python3.7/site-packages/airflow/utils/cli.py", line 75, in wrapper
    return f(*args, **kwargs)
  File "/usr/local/lib/python3.7/site-packages/airflow/bin/cli.py", line 1059, in serve_logs
    flask_app.run(host='0.0.0.0', port=worker_log_server_port)
  File "/usr/local/lib/python3.7/site-packages/flask/app.py", line 990, in run
    run_simple(host, port, self, **options)
  File "/usr/local/lib/python3.7/site-packages/werkzeug/serving.py", line 1012, in run_simple
    inner()
  File "/usr/local/lib/python3.7/site-packages/werkzeug/serving.py", line 965, in inner
    fd=fd,
  File "/usr/local/lib/python3.7/site-packages/werkzeug/serving.py", line 808, in make_server
    host, port, app, request_handler, passthrough_errors, ssl_context, fd=fd
  File "/usr/local/lib/python3.7/site-packages/werkzeug/serving.py", line 701, in __init__
    HTTPServer.__init__(self, server_address, handler)
  File "/usr/local/lib/python3.7/socketserver.py", line 452, in __init__
    self.server_bind()
  File "/usr/local/lib/python3.7/http/server.py", line 137, in server_bind
    socketserver.TCPServer.server_bind(self)
  File "/usr/local/lib/python3.7/socketserver.py", line 466, in server_bind
    self.socket.bind(self.server_address)
OSError: [Errno 98] Address already in use

解决
[root@localhost airflow]# yum install net-tools
[root@localhost airflow]# netstat -apn | grep 8793
tcp        0      0 0.0.0.0:8793            0.0.0.0:*               LISTEN      2227/airflow serve_
[root@localhost airflow]# ps -ef|grep 2227
root       2227      1  0 12:34 pts/2    00:00:02 /usr/local/bin/python3.7 /usr/local/bin/airflow serve_logs
root      11756   8110  0 14:10 pts/10   00:00:00 grep --color=auto 2227
[root@localhost airflow]# kill 2227

同样启动airflow flower报错同样错误
解决
[root@localhost dags]# netstat -apn | grep 5555
tcp        0      0 0.0.0.0:5555            0.0.0.0:*               LISTEN      2260/airflow-rabbit
[root@localhost dags]# ps -ef|grep 2260
root       2260   2112  0 12:34 pts/3    00:00:07 /usr/local/bin/python3.7 /usr/local/bin/flower -b amqp://root:rabbitmq@localhost:5672/airflow-rabbitmq --address=0.0.0.0 --port=5555
root      13750   8110  0 14:47 pts/10   00:00:00 grep --color=auto 2260
[root@localhost dags]# kill -9 2260

airflow worker报错
shell-init: error retrieving current directory: getcwd: cannot access parent directories: No such file or directory
解决
该错误表示 getcwd 命令无法定位到当前工作目录。一般来说是因为你 cd 到了某个目录之后 rm 了这个目录,这时去执行某些 service 脚本的时候就会报 getcwd 错误。
只需要 cd 到任何一个实际存在的目录下在执行命令即可。
cd /root/airflow
airflow worker
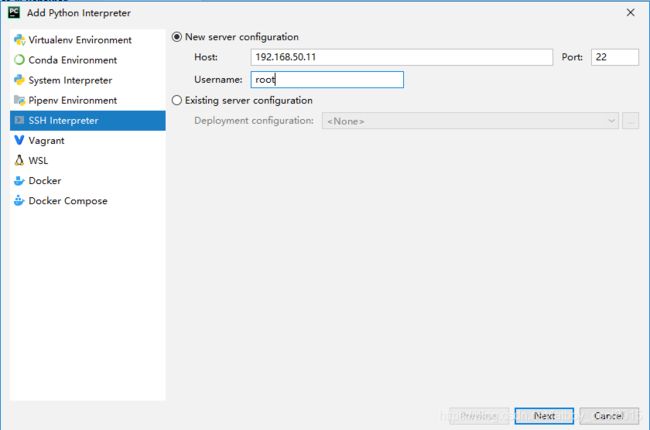
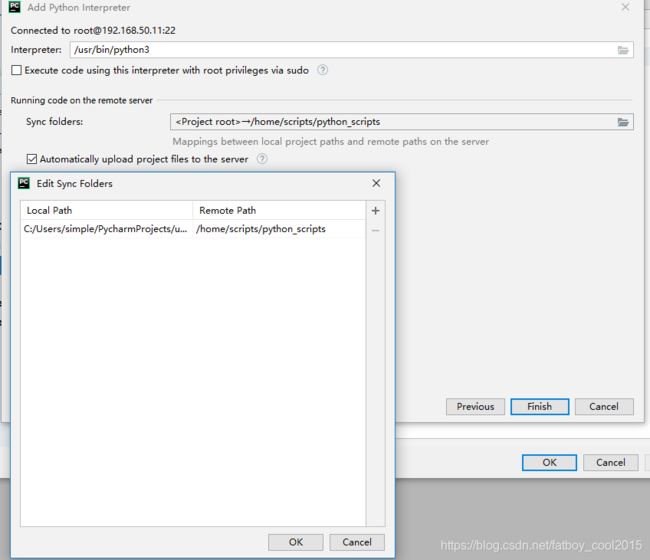
7)Pycharm配置本地调用远程python
脚本已自动同步,至此,pycharm远程调用python已配置完成。
8)修改airflow时区(建议不修改)
cd /root/airflow
vi airflow.cfg
将
default_timezone = utc
修改为
default_timezone = Asia/Bangkok

cd /usr/local/lib/python3.7/site-packages/airflow
vi utils/timezone.py
在 utc = pendulum.timezone(‘UTC’) 这行(第27行)代码下添加,
from airflow import configuration as conf
try:
	tz = conf.get("core", "default_timezone")
	if tz == "system":
		utc = pendulum.local_timezone()
	else:
		utc = pendulum.timezone(tz)
except Exception:
	pass

修改utcnow()函数 (在第69行)
原代码 d = dt.datetime.utcnow()
修改为 d = dt.datetime.now()

vi utils/sqlalchemy.py
在utc = pendulum.timezone(‘UTC’) 这行(第37行)代码下添加
from airflow import configuration as conf
try:
	tz = conf.get("core", "default_timezone")
	if tz == "system":
		utc = pendulum.local_timezone()
	else:
		utc = pendulum.timezone(tz)
except Exception:
	pass

vi www/templates/admin/master.html
修改www/templates/admin/master.html(第31行)
把代码 var UTCseconds = (x.getTime() + x.getTimezoneOffset()*60*1000);
改为 var UTCseconds = x.getTime();

把代码 "timeFormat":"H:i:s %UTC%",
改为  "timeFormat":"H:i:s",

最后重启airflow-webserver即可
9)SequentialExecutor、CeleryExecutor例子和作业流程
SequentialExecutor例子(只能执行整体作业流程,不能单独执行某个作业):
1、默认配置
vim /root/airflow/airflow.cfg
修改如下内容:
# The executor class that airflow should use. Choices include
# SequentialExecutor, LocalExecutor, CeleryExecutor, DaskExecutor, KubernetesExecutor
executor = SequentialExecutor

# The SqlAlchemy connection string to the metadata database.
# SqlAlchemy supports many different database engine, more information
# their website
sql_alchemy_conn = sqlite:////root/airflow/airflow.db

保存退出。

启动
airflow webserver
airflow scheduler

2、配置mysql元数据库
vim /root/airflow/airflow.cfg
修改如下内容:
# The executor class that airflow should use. Choices include
# SequentialExecutor, LocalExecutor, CeleryExecutor, DaskExecutor, KubernetesExecutor
executor = SequentialExecutor

# The SqlAlchemy connection string to the metadata database.
# SqlAlchemy supports many different database engine, more information
# their website
sql_alchemy_conn = mysql://user-airflow:123456@localhost:3306/airflow

保存退出。

初始化mysql数据库
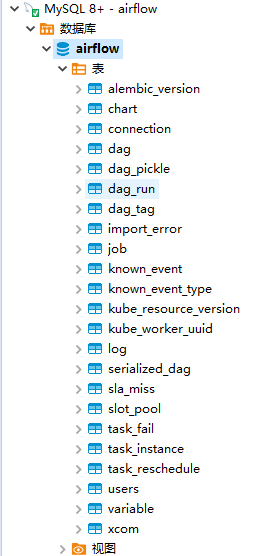
airflow initdb
初始化后会在airflow数据库生成一些表,如下图:
启动
airflow webserver
airflow scheduler
CeleryExecutor例子(可以单独执行某个作业):
vim /root/airflow/airflow.cfg
修改如下内容:
# The executor class that airflow should use. Choices include
# SequentialExecutor, LocalExecutor, CeleryExecutor, DaskExecutor, KubernetesExecutor
executor = CeleryExecutor

# The SqlAlchemy connection string to the metadata database.
# SqlAlchemy supports many different database engine, more information
# their website
sql_alchemy_conn = mysql://user-airflow:123456@localhost:3306/airflow

# Whether to load the examples that ship with Airflow. It's good to
# get started, but you probably want to set this to False in a production
# environment
load_examples = False

# The Celery broker URL. Celery supports RabbitMQ, Redis and experimentally
# a sqlalchemy database. Refer to the Celery documentation for more
# information.
# http://docs.celeryproject.org/en/latest/userguide/configuration.html#broker-settings
# broker_url = sqla+mysql://airflow:airflow@localhost:3306/airflow
broker_url = amqp://root:rabbitmq@localhost:5672/airflow-rabbitmq

# The Celery result_backend. When a job finishes, it needs to update the
# metadata of the job. Therefore it will post a message on a message bus,
# or insert it into a database (depending of the backend)
# This status is used by the scheduler to update the state of the task
# The use of a database is highly recommended
# http://docs.celeryproject.org/en/latest/userguide/configuration.html#task-result-backend-settings
# result_backend = db+mysql://airflow:airflow@localhost:3306/airflow
# result_backend = amqp://root:rabbitmq@localhost:5672/airflow-rabbitmq
result_backend = db+mysql://user-airflow:123456@localhost:3306/airflow

保存退出。

先删除airflow数据库,
然受重新执行
创建user-airflow用户,创建airflow数据库并给出所有权限给次用户
mysql -u root -p
create database airflow;
GRANT all privileges on airflow.* TO 'user-airflow'@'%'  IDENTIFIED BY '123456';
flush privileges;

删除airflow文件夹初始化airflow
rm -rf /root/airflow
airflow initdb

启动
以下命令都是单独开启一个窗口来启动,便于观察日志(也可以在后台启动)
注意:celery worker启动尽量不要用root用户启动,如果要用root用户启动则添加环境变量。
用其他用户启动则airflow启动命令也对应用用户启动,并更改项目目录权限属于此用户,否则日志记录时没有权限会影响worker运行。
echo export C_FORCE_ROOT= true >> /etc/profile
source /etc/profile

这是一种错误的方法,导致后面woker启动失败,导致任务不执行

正确以root用户启动worker的方式有两种,
方法一:暂时解决问题
在服务器输入以下命令
export C_FORCE_ROOT="true"

airflow webserver #启动airflow web页面
airflow scheduler #启动调度器,执行任务调度,不过任务默认是关闭的,需要在页面手动开启
airflow worker #启动celery workd
airflow flower #启动flower监控页面
核查是否启动成功
airflow flower貌似失败
查找网上结果如下:
I am not sure I understood, but are you running both flower and the worker together? Flower does not process tasks. You must run both, then Flower can be used as a monitoring tool.
Run celery:
celery -A tasks worker --loglevel=info

Open another shell and run flower:
celery -A tasks flower --loglevel=info

Then go to http://localhost:5555 and see your worker. Of course you must run some task if you want to see something.
那就试试呗,
pip3 install -U Celery
Run celery:
celery -A tasks worker --loglevel=info
Open another shell and run flower:
celery -A tasks flower --loglevel=info
结果:
这个airflow worker启动失败的原因和解决方法下面有。
作业流程:
airflow会有一些自带的python脚本例子存放在
/usr/local/lib/python3.7/site-packages/airflow/example_dags
这个目录下,在airflow启动时候自动会加载,当然可以通过airflow.cfg
配置文件进行设置不加载。
以下做一个作业调度流程开发例子
cd /root/airflow/dags
vim hellow_world.py
添加内容如下:

# -*- coding: utf-8 -*-
import airflow
from airflow import DAG
from airflow.utils.trigger_rule import TriggerRule
from airflow.operators.bash_operator import BashOperator
from airflow.operators.python_operator import PythonOperator
from airflow.operators.email_operator import EmailOperator
import datetime
from datetime import timedelta

# these args will get passed on to each operator
# you can override them on a per-task basis during operator initialization
default_args = {
    'owner': 'xxx',
    'depends_on_past': False,
    # 'start_date': airflow.utils.dates.days_ago(2),
    'start_date': datetime.datetime(2020,3,28),
    # 'email': ['[email protected]'],
    # 'email_on_failure': True,
    # 'email_on_retry': True,
    'retries': 1,
    'retry_delay': timedelta(minutes=5),
    # 'queue': 'bash_queue',
    # 'pool': 'backfill',
    # 'priority_weight': 10,
    # 'end_date': datetime(2016, 1, 1),
    # 'wait_for_downstream': False,
    # 'dag': dag,
    # 'adhoc':False,
    # 'sla': timedelta(hours=2),
    # 'execution_timeout': timedelta(seconds=300),
    # 'on_failure_callback': some_function,
    # 'on_success_callback': some_other_function,
    # 'on_retry_callback': another_function,
    # 'trigger_rule': u'all_success'
}

dag = DAG(
    'example_hello_world_dag',
    default_args=default_args,
    description='my first DAG',
    # schedule_interval=timedelta(days=1)
    schedule_interval='50 07 * * *')

# first operator
date_operator = BashOperator(
    task_id='date_task',
    bash_command='date',
    dag=dag)

# second operator
sleep_operator = BashOperator(
    task_id='sleep_task',
    depends_on_past=False,
    bash_command='sleep 5',
    dag=dag)

# third operator
def print_hello():
    return 'Hello world!'
hello_operator = PythonOperator(
    task_id='hello_task',
    python_callable=print_hello,
    dag=dag)

# dependencies
# sleep_operator.set_upstream(date_operator)
# hello_operator.set_upstream(date_operator)

sleep_operator << date_operator
hello_operator << date_operator

测试脚本是否运行成功
python3 /home/scripts/python_scripts/test/hello_world.py

部署脚本到airflow
mkdir -p /root/airflow/dags
cp /home/scripts/python_scripts/test/hello_world.py /root/airflow/dags

vim /root/airflow/airflow.cfg
修改如下:
# Whether to load the examples that ship with Airflow. It's good to
# get started, but you probably want to set this to False in a production
# environment
load_examples = False

启动
airflow webserver
airflow scheduler
airflow worker
airflow flower
脚本已上传airflow
未运行的状态
一直处于queue状态,有问题
查询了2天(实际玩了1.5天哈),终于找到问题存在的原因了,
过程:
开始转为用bi用户启动worker,在/home/bi/airflow目录下,
修改airflow.cfg配置文件与root用户保持一致
启动airflow worker报错:
SystemError:
解决:
安装rabbitmq时,安装了librabbitmq依赖,导致报错
解决方法:
删除掉这个依赖就行了
pip3 uninstall librabbitmq
然后重新airflow worker,果然task不再是queue状态了,
但是一直处于黄色圈圈(up_for_retry)状态,估计和权限有关,毕竟是以
root用户启动其它程序的,于是改为使用root用户启动worker。
因为用root启动worker,前面设置是错的,
echo export C_FORCE_ROOT= true >> /etc/profile
source /etc/profile
正确如下,每次运行woker时
export C_FORCE_ROOT="true"
以下是正确启动worker的画面
错误启动flower的画面
正确启动flower的画面
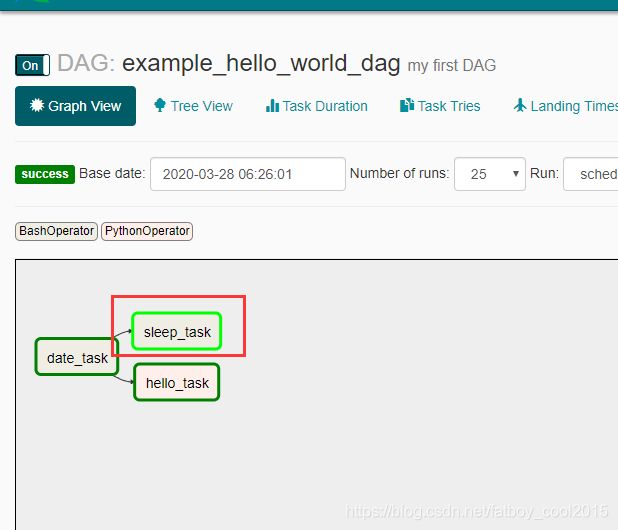
一直没执行的task终于执行成功了!!!
celeryexecutor的好处
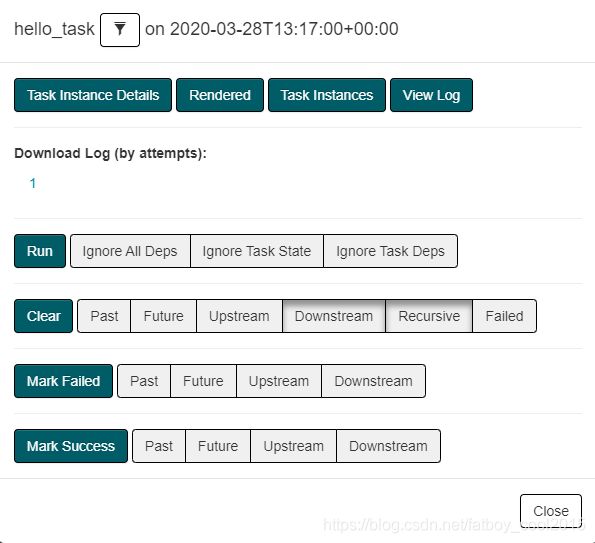
如上图,可以单独重新执行某个task。
10)配置CeleryExcutor、Redis模式
yum install redis

1、检查是否有redis yum 源
yum install redis

2、下载fedora的epel仓库
yum install epel-release

3、安装redis数据库
yum install redis

vim /etc/redis.conf
添加如下内容:
# bind 127.0.0.1     // 注释掉,使redis允许远程访问
# protected-mode no   //去除保护模式

安装完毕后,使用下面的命令启动redis服务
# 启动redis
systemctl start redis
# 停止redis
systemctl stop redis
# 查看redis运行状态
systemctl status redis
# 查看redis进程
ps -ef | grep redis

设置redis为开机自动启动
chkconfig redis on

进入redis服务
# 进入本机redis
redis-cli
# 列出所有key
keys *

pip3 install redis
pip3 install apache-airflow[redis]

vim /root/airflow/airflow.cfg
修改如下内容:
# The executor class that airflow should use. Choices include
# SequentialExecutor, LocalExecutor, CeleryExecutor, DaskExecutor, KubernetesExecutor
executor = CeleryExecutor

# The SqlAlchemy connection string to the metadata database.
# SqlAlchemy supports many different database engine, more information
# their website
sql_alchemy_conn = mysql://user-airflow:123456@localhost:3306/airflow

# Whether to load the examples that ship with Airflow. It's good to
# get started, but you probably want to set this to False in a production
# environment
load_examples = False

# The Celery broker URL. Celery supports RabbitMQ, Redis and experimentally
# a sqlalchemy database. Refer to the Celery documentation for more
# information.
# http://docs.celeryproject.org/en/latest/userguide/configuration.html#broker-settings
# broker_url = sqla+mysql://airflow:airflow@localhost:3306/airflow
broker_url = redis://localhost:6379/0

# The Celery result_backend. When a job finishes, it needs to update the
# metadata of the job. Therefore it will post a message on a message bus,
# or insert it into a database (depending of the backend)
# This status is used by the scheduler to update the state of the task
# The use of a database is highly recommended
# http://docs.celeryproject.org/en/latest/userguide/configuration.html#task-result-backend-settings
result_backend = redis://localhost:6379/0
# 个人建议此处统一修改为用mysql
# result_backend = db+mysql://user-airflow:123456@localhost:3306/airflow

以root用户启动airflow
airflow webserver
airflow scheduler
export C_FORCE_ROOT="true"
airflow worker
airflow flower
worker正常启动
flower正常启动
调度成功
运行成功
单独重跑hello_task成功
11) smtp设置
vim /root/airflow/airflow.cfg
修改如下内容:
[smtp]

# If you want airflow to send emails on retries, failure, and you want to use
# the airflow.utils.email.send_email_smtp function, you have to configure an
# smtp server here
smtp_host = smtp.qq.com
smtp_starttls = True
smtp_ssl = False
# Example: smtp_user = airflow
# smtp_user =
# Example: smtp_password = airflow
# smtp_password =
smtp_port = 25
smtp_mail_from = [email protected]

在dag里添加以下内容:
'email': ['email_address'],
'email_on_failure': True,
'email_on_retry': True,
12)定义一些airflow进程监控
可以设置一下airflow进程监控脚本airflow_monitor.sh,并开启了crontab的定时调度。
vim airflow_monitor.sh
添加如下内容:
#!/bin/bash
source /etc/profile
count=`ps aux| grep 'airflow-webserver'|grep -v "grep" | wc -l`
echo ${count}
if [ ${count} -eq 0 ]
then
   nohup airflow webserver &
else
   date
   echo "airflow-webserve is running..."
fi

count1=`ps aux| grep 'airflow scheduler'|grep -v "grep" | wc -l`
echo ${count1}

if [ ${count1} -eq 0 ]
then
   nohup airflow scheduler &
else
   date
   echo "airflow-scheduler is running..."
fi


