(八)spring-cloud入门学习:高可用配置中心
上面都是客户端都是直接调用配置中心的server端来获取配置文件信息,这样就存在了一个问题,客户端和服务端的耦合性太高,如果server端要做集群,客户端只能通过原始的方式来路由,server端改变IP地址的时候,客户端也需要修改配置,不符合springcloud服务治理的理念。springcloud提供了这样的解决方案,我们只需要将server端当做一个服务注册到eureka中,client端去eureka中去获取配置中心server端的服务即可,而配置中心也可以集群化,从而达到高可用。

一、Config Server改造
1. pom.xml引入eureka-client
	org.springframework.cloud
	spring-cloud-starter-netflix-eureka-client
2. application.properties配置eureka地址
eureka.client.serviceUrl.defaultZone=http://localhost:9101/eureka/
3. Application.java启动eureka
@SpringBootApplication
@EnableConfigServer
@EnableDiscoveryClient
public class Application {

    public static void main( String[] args ) {
    	SpringApplication.run(Application.class, args);
    }
}
4. 启动config_server,eureka注册中心可查看

二、Config Client改造(eureka_ribbon),使eureka_ribbon通过eureka发现config server
1. bootstrap.properties
spring.cloud.config.name=eurekaRibbon
spring.cloud.config.profile=dev
#去掉config server直连
#spring.cloud.config.uri=http://127.0.0.1:9111
spring.cloud.config.label=master

# 开启config服务发现
spring.cloud.config.discovery.enabled=true
# 指定config server端的name
spring.cloud.config.discovery.serviceId=configServer
# eureka server地址配置
eureka.client.serviceUrl.defaultZone=http://localhost:9101/eureka/
注意:上面的三个配置必须放在bootstrap.properties中
2. application.properties
spring.application.name=eurekaRibbon
server.port=9201

eureka.client.healthcheck.enabled=true
如果需要开启healthcheck,则必须放在application.properties中,否则注册服务后状态会为unknown

3. 启动

访问http://127.0.0.1:9201/getHelloName正常

三、动态刷新配置文件(手动刷新)
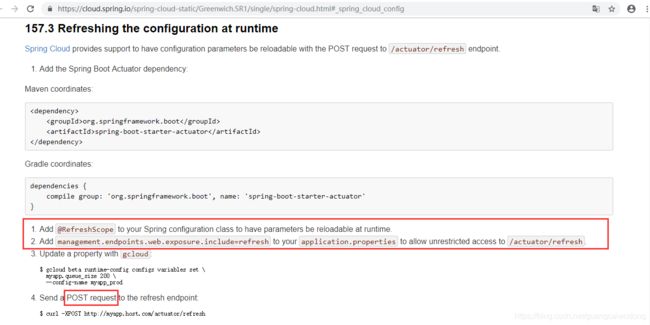
当配置文件进行修改,希望在服务不停止/不重启的情况下加载最新的配置文件,actuator提供相应的监控接口/actuator/refresh

1. 在application中加入监控端点refresh,其中info,health是默认暴露的
#actuator默认路径
management.endpoints.web.base-path=/actuator
management.endpoints.web.exposure.include=info,health,refresh
2. 加入@RefreshScope表示配置参数需要重新加载
@RestController
@RefreshScope
public class HelloController {

	@Value("${hello.name}")
    private String helloName;

	@RequestMapping("/getHelloName")
	public String getHelloName() {
		return this.helloName;
	}
}
3. 测试
1)初始访问config client(eureka_ribbon)的配置参数:

2)修改github上的配置文件

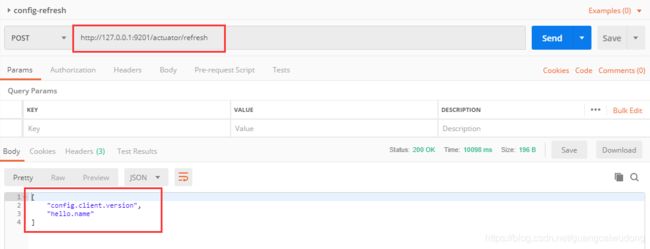
3)使用Postman工具以POST方式访问http://127.0.0.1:9201/actuator/refresh进行配置刷新

4)再次访问config client(eureka_ribbon)的配置参数:

四、config-server集群测试
1、新启动一个config-server,端口91112,此时eureka中存在两个config server

2. 使用Postman工具以POST方式访问http://127.0.0.1:9201/actuator/refresh进行多次刷新,观察日志打印会发现,config client会从不同的config server来获取配置:
Fetching config from server at : http://LAPTOP-PJ83H98E:9111/
Fetching config from server at : http://LAPTOP-PJ83H98E:9112/
当停止其中一个config server,调用config client刷新时就会从另一个config server中加载,从而实现config server集群,达到高可用。
五、自动刷新
如果修改配置文件后都需要手动刷新每一台client,工作量大而且容易出错,github提供webhook功能,当某个事件(push)发生时,通过发送http post请求的方式来通知信息接收方。这样就实现了配置文件修改后,触发webhook监听主动调用client刷新。

缺陷:当client越来越多时,hook就不够优雅了,特别是每增一个client都要修改hook。spring cloud提供spring cloud bus解决这一问题。
参考:
https://cloud.spring.io/spring-cloud-static/Greenwich.SR1/single/spring-cloud.html#_spring_cloud_config
http://www.ityouknow.com/springcloud/2017/05/22/springcloud-config-git.html