firewalld的配置
一、防火墙
1.概述
动态防火墙后台程序 FireWalld提供了一个动态管理的防火墙,用以支持网络的zones,以分配对一个网络及相关连接和界面一定程度的信任;它支持以太网桥,并有分离运行时间和永久行配置选择。
2.域
home(家庭):用于家庭网络,仅接受dhcpv6-client、ipp-client、mdns、samba-client、ssh服务
internal(内部):用于内部网络,仅接受dhcpv6-client、ipp-client、mdns、samba-client、ssh服务
public(公共):用于公共区域使用,仅接受dhcpv6-client、ssh服务
trusted(信任):接受所有网络连接
work(工作):用于工作区,仅接受dhcpv6-client、ipp-client、ssh服务
block(限制):拒绝所有网络连接
dmz(非军事区):仅接受ssh服务连接
drop(丢弃):任何接收的网络数据包都被丢弃,没有任何回复
external(外部):出去的ipv4网络连接通过此区域伪装和转发,仅接受ssh服务连接
二、防火墙相关命令
1.开启防火墙及查看状态
[root@localhost ~]#systemctl start firewalld
[root@localhost ~]#systemctl status firewalld
Loaded: loaded (/usr/lib/systemd/system/firewalld.service; disabled)
Active: active (running) since Mon 2018-05-07 22:45:47 EDT; 5s ago
Main PID: 477 (firewalld)
CGroup: /system.slice/firewalld.service
└─477 /usr/bin/python -Es /usr/sbin/firewalld –nofork –nopid

2.查看火墙状态
[root@localhost ~]# firewall-cmd –state
running
3.查看火墙正在使用的域
[root@localhost ~]# firewall-cmd –get-active-zones
ROL
sources:
public
interfaces: eth0 eth1
4.查看火墙的默认域
[root@localhost ~]# firewall-cmd –get-default-zone
public
5.查看火墙所有的域
[root@localhost ~]# firewall-cmd –get-zones
ROL block dmz drop external home internal public trusted work
6.查看public域的信息
[root@localhost ~]# firewall-cmd –zone=public –list-all
public (default, active)
interfaces: eth0 eth1
sources:
services: dhcpv6-client ssh
ports:
masquerade: no
forward-ports:
icmp-blocks:
rich rules:

7.查看不同通过火墙的服务
[root@localhost ~]# firewall-cmd –get-services
amanda-client bacula bacula-client dhcp dhcpv6 dhcpv6-client dns ftp high-availability http https imaps ipp ipp-client ipsec kerberos kpasswd ldap ldaps libvirt libvirt-tls mdns mountd ms-wbt mysql nfs ntp open pmcd pmproxy pmwebapi pmwebapis pop3s postgresql proxy-dhcp radius rpc-bind samba samba-client smtp ssh telnet tftp tftp-client transmission-client vnc-server wbem-https
8.修改火墙的默认域
[root@localhost ~]# firewall-cmd –set-default-zone=trusted
success
[root@localhost ~]# firewall-cmd –get-default-zone
trusted

9.火墙的图形化配置工具
[root@localhost ~]# firewall-config
* (firewall-config:1057): WARNING *: Couldn’t connect to accessibility bus: Failed to connect to socket /tmp/dbus-wRF0eGMIT4: Connection refused

三、接口控制
1.接口访问控制
eth0 = 172.25.254.214
eth1 = 172.25.0.214
[root@localhost ~]# firewall-cmd –permanent –change-interface=eth0 –zone=block
[root@localhost ~]# firewall-cmd –permanent –change-interface=eth1 –zone=public
此时实验(连接/访问/ping均可)
214不通
114正常

2.8080接口
[root@localhost ~]# firewall-cmd –add-port=8080/tcp
success
[root@localhost ~]# firewall-cmd –list-all
public (default, active)
interfaces: eth0
sources:
services: dhcpv6-client http ssh
ports: 8080/tcp
masquerade: no
forward-ports:
icmp-blocks:
rich rules:

[root@localhost services]# vim /etc/httpd/conf/httpd.conf

[root@localhost services]# systemctl restart httpd.service
[root@localhost services]# firefox


3.实验:禁止14主机连接
[root@localhost ~]# firewall-cmd –add-source=172.25.254.14 –zone=block
Success

8主机
[root@foundation14 ~]# ping 172.25.254.114
PING 172.25.254.114 (172.25.254.108) 56(84) bytes of data.
From 172.25.254.114 icmp_seq=1 Destination Host Prohibited
From 172.25.254.114 icmp_seq=2 Destination Host Prohibited

服务端永久变更
[root@localhost ~]# firewall-cmd –permanent –add-source=172.25.254.14 –zone=block
Success
[root@localhost ~]# firewall-cmd –reload
Success

已连接的8主机不会断开
[root@localhost ~]# ls
anaconda-ks.cfg Documents Music Public Videos
Desktop Downloads Pictures Templates
但是complete-reload之后,14主机立即断开,无法操作
[root@localhost ~]# firewall-cmd –complete-reload
success
四、防火墙访问控制
内核3个表,5个链
filter:经过本机内核的数据,input,forward,ouput
nat:不经过本机内核的数据,input,ouput,prerouting,postrouting
mangle:所有经过主机上的数据,prerouting,input,forward,ouput,postrouting
Direct Rules
1.接口eth0不允许http服务
[root@localhost ~]# firewall-cmd –list-all
public (default, active)
interfaces: eth0
sources:
services: dhcpv6-client ssh
ports: 8080/tcp
masquerade: no
forward-ports:
icmp-blocks:
rich rules:

2.设置规则,允许8主机访问本机
[root@localhost ~]# firewall-cmd –direct –add-rule ipv4 filter INPUT 2 -p tcp –dport 8080 -s 172.25.254.14 -j ACCEPT
success
[root@localhost ~]# firewall-cmd –direct –get-all-rules ipv4 filter INPUT 2 -p tcp –dport 8080 -s 172.25.254.14 -j ACCEP
Rich Rules


1.地址转换
[root@localhost~]#firewall-cmd –add-forward-port=port=22:proto=tcp:toport=22:toaddr=172.25.254.14
success
[root@localhost ~]# firewall-cmd –add-masquerade
success
2.连接主机,将直接跳转到9主机

[kiosk@foundation8 Desktop]$ ssh [email protected] -X
[email protected]’s password: ##主机14的root密码
Last login: Tue May 8 13:34:43 2018 from foundation0.ilt.example.com
[root@station ~]# ifconfig
br0: flags=4163
注意:net.ipv4.ip_forward
[root@localhost ~]# sysctl -a | grep ip_forward
net.ipv4.ip_forward = 1
若net.ipv4.ip_forward = 0,编辑配置文件,重启服务即可
[root@localhost ~]# vim /etc/sysctl.conf
[root@localhost ~]# systemctl restart systemd-sysctl.service
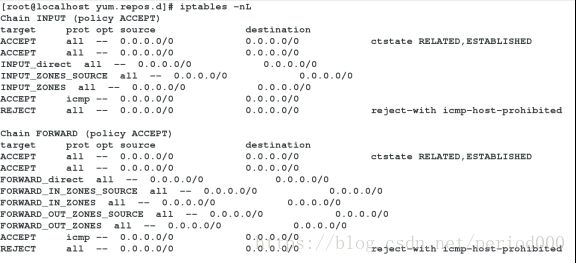
1.显示内核三张表的信息
iptables -nL ##默认为filter表
Chain INPUT (policy ACCEPT)
Chain FORWARD (policy ACCEPT)
Chain OUTPUT (policy ACCEPT)
iptables -nL -t nat ##显示nat表
Chain PREROUTING (policy ACCEPT)
Chain INPUT (policy ACCEPT)
Chain OUTPUT (policy ACCEPT)
Chain POSTROUTING (policy ACCEPT)
iptables -nL -t mangle ##显示mangle表,备用
Chain PREROUTING (policy ACCEPT)
Chain INPUT (policy ACCEPT)
Chain FORWARD (policy ACCEPT)
Chain OUTPUT (policy ACCEPT)
Chain POSTROUTING (policy ACCEPT)
2.表格命令编辑 ##默认filter表
iptables -A INPUT -s 172.25.254.114 -j REJECT ##添加

iptables -D INPUT 6 ##删除INPUT链的第6条
iptables -I INPUT -s 172.25.254.114 -j REJECT ##插入至第1条
iptables -R INPUT 1 -j ACCEPT ##将INPUT第1条规则改为ACCEPT
【iptables -F ##刷新(类似删除)配置,但是重启后配置依然存在
systemctl restart iptables.service】
【iptables -F ##刷新后保存,重启后配置为空
service iptables save
systemctl restart iptables.service】

iptables -P FORWARD DROP ##将FORWARD链规则改为DROP
iptables -N redhat ##新建redhat自定义链
iptables -E redhat REDHAt ##修改自定义链的名称
iptables -X REDHAt ##删除自定义链
3.服务管理
[root@localhost ~]# iptables -A INPUT -p tcp –dport 22 -j ACCEPT
###允许所有主机链接ssh(22)
[root@localhost ~]# iptables -A INPUT -s 172.25.254.8 -p tcp –dport 80 -j ACCEPT
###只允许主机8链接http(80)
[root@localhost ~]# iptables -A INPUT ! -s 172.25.254.8 -p tcp –dport 53 -j REJECT
###除了主机8都拒链接DNS(53)
[root@localhost ~]# iptables -A INPUT -j REJECT
###读取以上规则后,其他所有访问拒绝 (从前到后,逐条读取)
[root@localhost ~]# iptables -nL
##将修改后的配置保存在文件/etc/sysconfig/iptables中
六.Iptables地址转换
注意:
1.一定要刷新filter表
[root@localhost ~]# iptables -F
2.打开内核路由
[root@localhost ~]# vim /etc/sysctl.conf
[root@localhost ~]# sysctl -a | grep ip_forward
net.ipv4.ip_forward = 0
[root@localhost ~]# sysctl -p ##和重启服务效果一样
net.ipv4.ip_forward = 1
[root@localhost ~]# systemctl restart systemd-sysctl.service

3.0.208主机配置网络
IPADDR = 172.25.0.208
GATEWAY = 172.25.0.108 (两块网卡主机)
4.设定策略
[root@localhost ~]# iptables -t nat -A POSTROUTING -o eth0 -j SNAT –to-source 172.25.254.181
[root@localhost ~]# iptables -t nat -A PREROUTING -i eth0 -j DNAT –to-dest 172.25.0.181
[root@localhost ~]# iptables -nL -t nat
Chain PREROUTING (policy ACCEPT)
target prot opt source destination
DNAT all – 0.0.0.0/0 0.0.0.0/0 to:172.25.77.181
Chain INPUT (policy ACCEPT)
target prot opt source destination
Chain OUTPUT (policy ACCEPT)
target prot opt source destination
Chain POSTROUTING (policy ACCEPT)
target prot opt source destination
SNAT all – 0.0.0.0/0 0.0.0.0/0 to:172.25.254.181

5.当主机77访问链接181主机时,转换到77.181主机上
[kiosk@foundation14 Desktop]$ ssh [email protected]
[email protected]’s password:
Last login: Tue May 8 20:36:21 2018
[root@108local ~]# ifconfig
eth0: flags=4163

