Linux + Memcache安装与配置
个人基本信息:
它可以应对任意多个连接,使用非阻塞的网络 IO 。由于它的工作机制是在内存中开辟一块空间,然后建立一个 HashTable , Memcached 自管理这些 HashTable
其实 Memcache 是这个项目的名称,而 memcached 是它服务器端的主程序文件名,知道我的意思了把 ~~~~ 。一个是项目名称,一个是主程序文件名,在网上看到了很多人不明白,于是混用了。
1 、调用settings_init()设定初始化参数
2 、从启动命令中读取参数来设置setting值
3 、设定LIMIT 参数
4 、开始网络socket 监听(如果非socketpath存在)( 1.2之后支持UDP方式)
5 、检查用户身份(Memcached不允许 root身份启动)
6 、如果有socketpath存在,开启 UNIX本地连接(Sock管道)
7 、如果以 -d 方式启动,创建守护进程(如上调用daemon函数)
8 、初始化 item、event、状态信息、 hash、连接、slab
9 、如设置中managed 生效,创建bucket 数组
10 、检查是否需要锁定内存页
11 、初始化信号、连接、删除队列
12 、如果daemon 方式,处理进程ID
13 、event开始,启动过程结束, main函数进入循环。
1> memcached-1.4.5.tar.gz
2> libevent-1.4.11-stable.tar.gz
说明:libevent是安装memcached的唯一前提条件。它是memcached所依赖的异步事件通知库。您可以在monkey.org上找到关于libevent的源文件
Memcached安装
# cd/tmp
# wget http://www.danga.com/memcached/dist/memcached-1.2.0.tar.gz
# wget http://www.monkey.org/~provos/libevent-1.2.tar.gz
#tar zxvflibevent-1.2.tar.gz
#cd libevent-1.2
#./configure –-prefix=/usr
#make
#make install
#ls -al/usr/lib|greplibevent
lrwxrwxrwx 1root root 2111?? 12 17:38 libevent-1.2.so.1 -> libevent-1.2.so.1.0.3
-rwxr-xr-x 1rootroot263546 11?? 12 17:38 libevent-1.2.so.1.0.3
-rw-r–r–1 rootroot454156 11?? 12 17:38libevent.a
-rwxr-xr-x 1rootroot 81111?? 12 17:38 libevent.la
lrwxrwxrwx 1root root 2111?? 12 17:38 libevent.so -> libevent-1.2.so.1.0.3
#cd /tmp
#tar zxvfmemcached-1.2.0.tar.gz
#cd memcached-1.2.0
#./configure –-with-libevent=/usr
#make
#make install
#ls -al/usr/local/bin/mem*
-rwxr-xr-x 1rootroot137986 11?? 12 17:39 /usr/local/bin/memcached
memcached的基本设置:
# /usr/local/bin/memcached -d -m 100 -u root -l 192.168.204.30 -p12000 -c 64 -P /tmp/memcached.pid
参数说明:
-d选项是启动一个守护进程,
-m是分配给Memcache使用的内存数量,单位是MB,我这里是10MB,
-u是运行Memcache的用户,我这里是root,
-l是监听的服务器IP地址,如果有多个地址的话,我这里指定了服务器的IP地址192.168.204.30,
-p是设置Memcache监听的端口,我这里设置了12000,最好是1024以上的端口,
-c选项是最大运行的并发连接数,默认是1024,我这里设置了64,按照你服务器的负载量来设定,
-P是设置保存Memcache的pid文件,我这里是保存在/tmp/memcached.pid
Memcache状态说明
pid
memcache服务器的进程ID
uptime
服务器已经运行的秒数
time
服务器当前的unix时间戳
version
memcache版本
pointer_size
当前操作系统的指针大小(32位系统一般是32bit)
rusage_user
进程的累计用户时间
rusage_system
进程的累计系统时间
curr_items
服务器当前存储的items数量
total_items
从服务器启动以后存储的items总数量
bytes
当前服务器存储items占用的字节数
curr_connections
当前打开着的连接数
total_connections
从服务器启动以后曾经打开过的连接数
connection_structures
服务器分配的连接构造数
cmd_get
get命令(获取)总请求次数
cmd_set
set命令(保存)总请求次数
get_hits
总命中次数
get_misses
总未命中次数
evictions
为获取空闲内存而删除的items数(分配给memcache的空间用满后需要删除旧的items来得到空间分配给新的items)
bytes_read
总读取字节数(请求字节数)
bytes_written
总发送字节数(结果字节数)
limit_maxbytes
分配给memcache的内存大小(字节)
threads
当前线程数
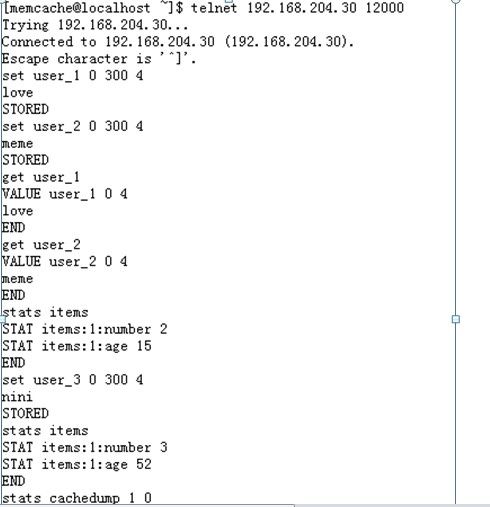
本地cmd打开命令窗口,telnet192.168.204.3012000连接到memcache,然后直接输入stats就可以看到当前memcache的状态了,状态说明详见备注。
查看启动状态:
查看memcache进程号:psaux |grepmemcached
安装php(从http://php.net/releases/index.php下载php-5.2.0.tar.bz2)
# cd /usr/local
# tar -jxvfphp-5.2.0.tar.bz2
# cd php-5.2.0
####./configure--prefix=[php安装目录] --with-config-file-path=[php安装目录] --with-apxs2=[apache安装目录]/bin/apxs###
#./configure --prefix=/usr/local/php--with-config-file-path=/usr/local/php--with-apxs2=/usr/local/apache/bin/apxs
#make
# make install
---------------------------------------------------------------------------------
mv/home/loveme23/apache_1.3.20.tar.gz /usr/local/
mv /home/loveme23/php-4.4.6.tar.gz /usr/local/
接下来解压:
tar -zxvfphp-4.4.6.tar.gz
tar -zxvfapache_1.3.20.tar.gz
下来就比较重要了,先编译安装apache:
./configure--prefix=/usr/local/apache--enable-module=so
make;makeinstall
然后再编译安装php:
./configure--prefix=/usr/local/php--with-apxs=/usr/local/apache/bin/apxs--with-config-file-path=/usr/local/lib--with-php-config=/usr/local/php/bin/php-config
make;makeinstall
OK,现在已经完成50%了,下来就是修改httpd.conf和php.ini文件了
首先我们用命令:
cp /usr/local/php-4.4.6/php.ini-dist /usr/local/lib/php.ini
vi /usr/local/lib/php.ini
修改下面的内容为On
register-golbals =On
然后修改httpd.conf文件
vi /usr/local/apache/conf/httpd.conf
修改为下面的内容:
#将ServerAdmin[email protected]一行改为您的邮箱地址#DocumentRoot"/home/httpd/html/"此处为html文件主目录
#同上
#OptionsFollowSymLinksMultiViews为安全起见,去掉"Indexes"
#
# DirectoryIndexdefault.phpdefault.phtml default.php3 default.html default.htm
#
#设置apache的默认文件名次序(注意:以下两部分不能注释掉,否则无效)
AddTypeapplication/x-httpd-php .php .phtml.php3 .inc
AddTypeapplication/x-httpd-php-source.phps
#设置php文件后缀
OK!现在已经完成98%了,下面启动apache服务
/usr/local/apache/bin/apachectlstart
自己制作一个test.php文件放到主目录中测试apache
phpinfo();
?>
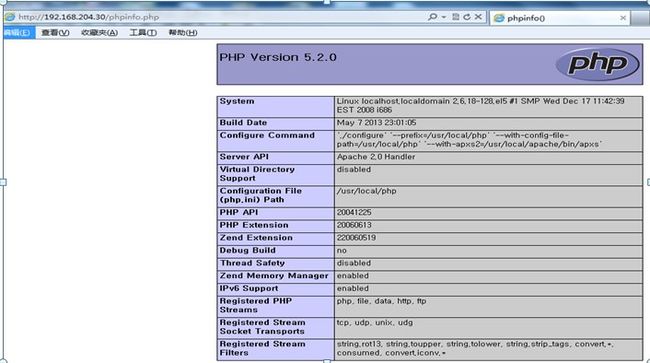
看到了吧!如果成功的话,会显示你的phpinfo界面
cd memcache-2.2.3
/ usr /local/ php /bin/ phpize
./configure--prefix=/usr/local/php--with-apxs=/usr/local/apache/bin/apxs--with-config-file-path=/usr/local/lib--with-php-config=/usr/local/php/bin/php-config --enable-mbstring--with-libxml-dir=/usr/local/libxml2--enable-memcache
make
makeinstall
Installingshared extensions: / usr /local/ php /lib/ php /extensions/no-debug-non-zts-20060613/
extension_dir = " / usr /local/ php /lib/ php /extensions/no-debug-non-zts-20060613/ “
PHP-Memcache安装参考:http://bbs.chinaunix.net/thread-1016121-1-1.html
Memcache环境测试
输入:http://192.168.204.30/phpinfo.php
Memached中应用(Linux命令实战)
telnet请求命令格式
1,
“set”表示按照相应的
“add”表示按照相应的
“replace”表示按照相应的
2,
3,
该标志将和需要存储的数据一起存储,并在客户端get数据时返回。
客户可以将此标志用做特殊用途,此标志对服务器来说是不透明的。
4,<exptime>过期的时间。
若为0表示存储的数据永远不过时(但可被服务器算法:LRU等替换)。
如果非0(unix时间或者距离此时的秒数),当过期后,服务器可以保证用户得不到该数据(以服务器时间为标准)。
5,
6,“STORED\r\n”:表示存储成功.“NOT_STORED\r\n”:表示存储失败,但是该失败不是由于错误。
7. 例:set key 0 8 4
输入:zhao
说明:键是key,0 为flags, 8 为过期时间8秒,4 为值的长度 ,zhao为键的值
8.stats items 列出所有的items
9.stats cachedump 1 0//列出所有的key,1为items:1,这个值,0为所有,也可指定列出多少条
stats cachedump 10
ITEM key1 [8 b; 1331609364 s]
ITEM key2 [8 b; 1331609364 s]
10. get key 列出key的值
getkey1
VALUE key1 0 8
zhangyan
Memcache安装详细介绍:
http://www.ccvita.com/257.html
官方文档:
http://www.danga.com/memcached
Memcached在JAVA中的应用
package com.memcache;
import java.util.Date;
import com.danga.MemCached.MemCachedClient;
import com.danga.MemCached.SockIOPool;
@SuppressWarnings("deprecation")
public class MemCached {
// 创建全局的唯一实例
protected static MemCachedClient mcc = new MemCachedClient();
protected static MemCached memCached = new MemCached();
// 设置与缓存服务器的连接池
static {
// 服务器列表和其权重
String[] servers = { "192.168.204.30:12000" };
Integer[] weights = { 3 };
// 获取socke连接池的实例对象
SockIOPool pool = SockIOPool.getInstance();
// 设置服务器信息
pool.setServers(servers);
pool.setWeights(weights);
// 设置初始连接数、最小和最大连接数以及最大处理时间
pool.setInitConn(5);
pool.setMinConn(5);
pool.setMaxConn(250);
pool.setMaxIdle(1000 * 60 * 60 * 6);
// 设置主线程的睡眠时间
pool.setMaintSleep(30);
// 设置TCP的参数,连接超时等
pool.setNagle(false);
pool.setSocketTO(3000);
pool.setSocketConnectTO(0);
// 初始化连接池
pool.initialize();
// 压缩设置,超过指定大小(单位为K)的数据都会被压缩
mcc.setCompressEnable(true);
mcc.setCompressThreshold(64 * 1024);
}
/**
* 保护型构造方法,不允许实例化!
*
*/
private MemCached() {
}
/**
* 获取唯一实例.
*
* @return
*/
public static MemCached getInstance() {
return memCached;
}
/**
* 添加一个指定的值到缓存中.
*
* @param key
* @param value
* @return
*/
public boolean add(String key, Object value) {
return mcc.add(key, value);
}
public boolean add(String key, Object value, Date expiry) {
return mcc.add(key, value, expiry);
}
public boolean replace(String key, Object value) {
return mcc.replace(key, value);
}
public boolean replace(String key, Object value, Date expiry) {
return mcc.replace(key, value, expiry);
}
/**
* 根据指定的关键字获取对象.
*
* @param key
* @return
*/
public Object get(String key) {
return mcc.get(key);
}
}
package com.ctoall.core;
import org.junit.Test;
import com.memcache.MemCached;
import com.memcache.StudentDO;
public class MemCachedTest {
@Test
public void testMemcached() {
MemCached cache = MemCached.getInstance();
StudentDO stuDO = new StudentDO();
stuDO.setId(10);
stuDO.setAge(28);
stuDO.setName("sunney");
stuDO.setAddress("北京市西城区西直门xxx号");
cache.add("stu", stuDO);
StudentDO stuDO1 = (StudentDO) cache.get("stu");
System.out.println("id:" + stuDO1.getId());
System.out.println("name:" + stuDO1.getName());
System.out.println("age:" + stuDO1.getAge());
System.out.println("adress:" + stuDO1.getAddress());
System.out.println("+++++++++++++++++++++++ok++++++++++++++++++++++++");
}
}

