SpringBoot学习笔记之HelloWorld篇
0. 前言
最近在学习Java,在微服务这一领域,SpringBoot可算是王牌。因此,just do it!
1. SpringBoot相关
1.1 SpringBoot简介
学习任何一门新技术,新知识,从其官网着手,从其官方文档入手,定是无误的。
官网上对于pringBoot的介绍,简而言之,即SpringBoot可以使得人们快速创建基于spring的应用程序,无需繁琐的spring配置
其特点有很多,只要知道其不需要XML配置,自带Tomact即可,至于说简单的spring配置可在后面体验到。
1.2 web端编写
根据官网的文档和其他优秀博客的指导,开始Springboot的helloworld之旅吧。
官网上是通过maven去编写整个项目,也可以通过IDE去操作。以下分别从这两个方向去进行介绍。
1.2.1 IDE版本
1.2.1.1 web开发
相较来说,IDE版本较为简便,Springboot官网提供了相关的帮助,可以使开发者进行快速开发。
打开网页https://start.spring.io/,得到如下界面
依次选择适合自己的版本即可。以下为一参考
点击generate project按钮即可得到项目压缩包
解压之,使用IDE导入项目即可
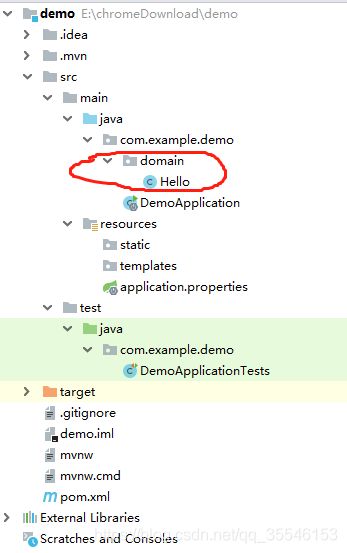
得到如下图所示的项目结构图,其中红线圈出的是后面创建的,一上来是没有的
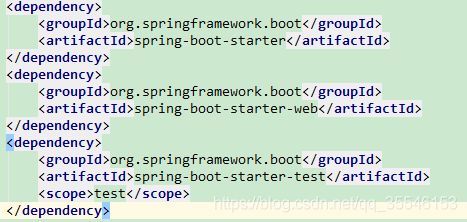
打开pom.xml文件即可看到所有依赖性及版本号等信息,因为在创建项目时选择了web依赖,所以其中的依赖有:
其中,DemoApplication的内容如下:
package com.example.demo;

import org.springframework.boot.SpringApplication;
import org.springframework.boot.autoconfigure.SpringBootApplication;
import org.springframework.boot.autoconfigure.jdbc.DataSourceAutoConfiguration;


@SpringBootApplication(exclude = {DataSourceAutoConfiguration.class})
public class DemoApplication {

	public static void main(String[] args) {
		SpringApplication.run(DemoApplication.class, args);
	}

}
注解SoringBootApplication中的排除项时后面加的,因此在程序启动后,出现了关于数据库的相关警告信息,为屏蔽掉,故去除了自动的数据配置。
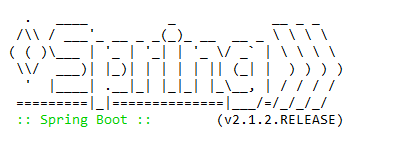
以上配置即可正常启动程序,输出台会出现spring的字样。
为完成helloworld任务,编写程序hello.java如下:
package com.example.demo.domain;

import org.springframework.web.bind.annotation.RequestMapping;
import org.springframework.web.bind.annotation.RestController;

@RestController

public class Hello {
    @RequestMapping("/hello")
    public String hi()
    {
        return "hi";
    }
}
启动项目,打开浏览器,输入“http://localhost:8080/hello”即可得到如下界面
1.2.1.2 单元测试
初始状态下的测试文件如下:
package com.example.demo;

import org.junit.Test;
import org.junit.runner.RunWith;
import org.springframework.boot.test.context.SpringBootTest;
import org.springframework.test.context.junit4.SpringRunner;

@RunWith(SpringRunner.class)
@SpringBootTest
public class DemoApplicationTests {

	@Test
	public void contextLoads() {
	}

}
通过mockmvc进行http请求的测试,代码如下:
package com.example.demo;

import com.example.demo.domain.Hello;
import org.junit.Before;
import org.junit.Test;
import org.junit.runner.RunWith;
import org.springframework.beans.factory.annotation.Autowired;
import org.springframework.boot.test.autoconfigure.web.servlet.AutoConfigureMockMvc;
import org.springframework.boot.test.context.SpringBootTest;
import org.springframework.http.MediaType;
import org.springframework.test.context.junit4.SpringRunner;
import org.springframework.test.web.servlet.MockMvc;
import org.springframework.test.web.servlet.request.MockMvcRequestBuilders;
import org.springframework.test.web.servlet.result.MockMvcResultHandlers;
import org.springframework.test.web.servlet.result.MockMvcResultMatchers;
import org.springframework.test.web.servlet.setup.MockMvcBuilders;

@AutoConfigureMockMvc
@RunWith(SpringRunner.class)
@SpringBootTest
public class DemoApplicationTests {
    @Autowired
    private MockMvc mMvc;

    @Before
    public void setUp() throws Exception{
        mMvc = MockMvcBuilders.standaloneSetup(new Hello()).build();
    }
	@Test
	public void getHello() throws Exception{
        String rs = mMvc.perform(MockMvcRequestBuilders.get("/hello").accept(MediaType.APPLICATION_JSON))
                        .andExpect(MockMvcResultMatchers.status().isOk())
                        .andExpect(MockMvcResultMatchers.content().string(("hi")))
                        .andDo(MockMvcResultHandlers.print())
                        .andReturn().getResponse().getContentAsString();
        System.out.println("the result is "+ rs);
    }

}
测试结果如下图所示
将测试代码中的hi改为his得到以下结果,说明单元测试起作用了。
1.2.2 maven版本
看官网文档即可
2. 穿插maven说明
2.1 maven说明
主要参考https://www.cnblogs.com/whgk/p/7112560.html这个博主的
Maven是基于项目对象模型(POM project object model),可以通过一小段描述信息(配置)来管理项目的构建,报告和文档的软件项目管理工具
准确的说,maven就是负责项目间的依赖关系,和pom.xml文件息息相关。pom.xml文件通过groupId、artifactId、version三个属性定位具体的jar包进行下载。
2.2 maven安装
从http://maven.apache.org/download.cgi下载所需要的版本,解压到某一路径即可。将解压后的bin路径添加到path环境变量即可。
在cmd中输入mvn -v测试即可,显示版本号即成功
2.3 仓库
pom.xml文件中的jar包从仓库中获得,仓库分为:本地仓库、第三方仓库(私服)、中央仓库。
本地仓库就是:maven会将项目中所依赖的jar包从远程下载到本机,默认本地仓库地址是:$user.home/.m2/repository;
在$MAVEN_HOME/conf/setting.xml文件中修改默认的本地仓库地址,如下图所示:
localrepository标签中修改为自己设置的本地仓库路径。
=
第三方仓库:就是在局域网下的公共仓库,大家都从里面拿,,保证版本一致。此仓库需要单独配置。
=
中央仓库:Maven内置了远程公用仓库:http://repo1.maven.org/maven2,工程依赖的jar包如果本地仓库没有,默认从中央仓库下载
2.4 jar包在哪儿拿?
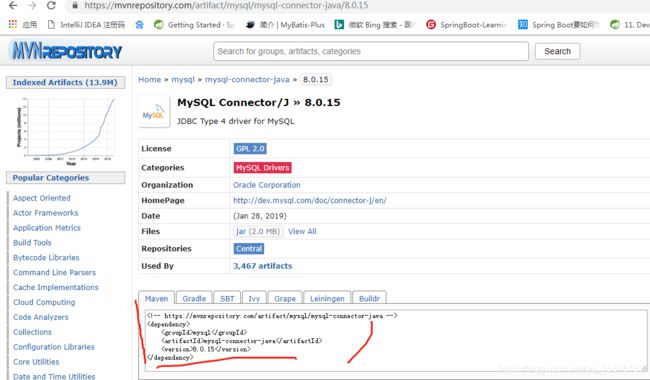
搜索maven repository,在其官网中搜索具体jar包获得三个属性。
以MySQL的jar包为例,如下图所示,复制粘贴红线框中的三个属性到pom.xml中即可
3. 总结
Springboot 很强大,接下来以具体项目为例进行学习。


