springboot集成阿里OSS上传文件
开发前的准备:
自己在阿里云上申请免费的Oss对象存储,新建Bucket---读写权限选择公共读,我开始这里忘了导致后来踩了小坑
接下来是代码中的一些配置:我用的是springboot
1》添加pom依赖:
            com.aliyun.oss
            aliyun-sdk-oss
            2.8.3
2》yml配置:
oss:
  endpoint: http://oss-cn-hangzhou.aliyuncs.com
  accessKeyId: 你自己的---阿里云右上角头像点击选择可以获取
  accessKeySecret: 你自己的---阿里云右上角头像点击选择可以获取
  bucketName: tao11140------你自己创建的bucket节点
  key: group1/pic-----------目录前缀
  webserver: https://tao11140.oss-cn-hangzhou.aliyuncs.com
3》添加配置类:
OssProperties:@Data
@ConfigurationProperties(prefix = "oss")
public class OssProperties {
private String endpoint;
private String accessKeyId;
private String accessKeySecret;
private String bucketName;
private String key;
private String webserver;
}OssConfig:Configuration
@EnableConfigurationProperties(OssProperties.class)
public class OssConfig {
@Autowired
private OssProperties ossProperties;
@Bean
public OSSClient getOSSClient(){
ClientConfiguration conf=new ClientConfiguration();
// Set the maximum number of allowed open HTTP connections
conf.setMaxConnections(1000);
conf.setConnectionTimeout(600000);
conf.setSocketTimeout(600000);
OSSClient client = new OSSClient(ossProperties.getEndpoint(),ossProperties.getAccessKeyId(),ossProperties.getAccessKeySecret(),conf);
return client;
}
}
OssClientUtils:@Component
public class OssClientUtils {
@Autowired
private OssConfig ossConfig;
@Autowired
private OssProperties ossProperties;
/**
* 上传图片
* @param file
* @param nfixName
* @param schoolId
* @return
*/
public String uploadPic(MultipartFile file, String nfixName, Long schoolId, String module){
String result=""; //返回图片路径
OSSClient ossClient =null;
String key=assembleOssPath(schoolId,module,nfixName); //目标oss文件路径
try {
ossClient=ossConfig.getOSSClient();
PutObjectResult tip=ossClient.putObject(ossProperties.getBucketName(), key, new ByteArrayInputStream(file.getBytes()));
if(tip!=null && !"".equals(tip.getETag())) {
// result = key;
result = ossProperties.getWebserver() + "/" + key;
}
}catch (Exception ex){
ex.printStackTrace();
}
return result;
}
public String uploadPic(MultipartFile file, String nfixName, String module){
String result=""; //返回图片路径
OSSClient ossClient =null;
String key=assembleOssPath(module,nfixName); //目标oss文件路径
try {
ossClient=ossConfig.getOSSClient();
PutObjectResult tip=ossClient.putObject(ossProperties.getBucketName(), key, new ByteArrayInputStream(file.getBytes()));
if(tip!=null && !"".equals(tip.getETag())) {
// result = key;
result = ossProperties.getWebserver() + "/" + key;
}
}catch (Exception ex){
ex.printStackTrace();
}
return result;
}
private List getFileList(HttpServletRequest request, String key){
//创建一个通用的多部分解析器
CommonsMultipartResolver multipartResovler = new CommonsMultipartResolver();
//判断 request 是否有文件上传,即多部分请求
if (!multipartResovler.isMultipart(request)) {
//无附件上传
return null;
}
// 转型为MultipartHttpRequest:
MultipartHttpServletRequest multipartRequest = (MultipartHttpServletRequest) request;
// 获得文件:
List files = multipartRequest.getFiles(key);
System.out.println(files.size());
return files;
}
public String uploadImage(HttpServletRequest request, String module) {
Map files = this.getFileMap(request);
String result = "";
if (files == null || files.keySet().size() <=0) {
return result;
}
for(String key : files.keySet()){
MultipartFile file = files.get(key);
// 获取文件名
String uploadFileName = file.getOriginalFilename();
if(StringUtils.isBlank(uploadFileName)){
return result;
}
//不带.的后缀
String nfixName = uploadFileName.substring(uploadFileName.lastIndexOf(".")+1);
result = this.uploadPic(file, nfixName, module);
return result;
}
return null;
}
public Map getFileMap(HttpServletRequest request){
//创建一个通用的多部分解析器
CommonsMultipartResolver multipartResovler = new CommonsMultipartResolver();
//判断 request 是否有文件上传,即多部分请求
if (!multipartResovler.isMultipart(request)) {
//无附件上传
return null;
}
// 转型为MultipartHttpRequest:
MultipartHttpServletRequest multipartRequest = (MultipartHttpServletRequest) request;
// 获得文件:
Map files = multipartRequest.getFileMap();
return files;
}
//组装上传路径
private String assembleOssPath(Long schoolId,String ossConstant,String suffix){
return ossProperties.getKey()+schoolId+ossConstant+ UUID.randomUUID().toString().replace("-", "")+"."+suffix;
}
private String assembleOssPath(String ossConstant,String suffix){
return ossProperties.getKey()+ossConstant+ UUID.randomUUID().toString().replace("-", "")+"."+suffix;
}
}
4》测试Controller:
@Api(value="OssController",description="oss上传文件测试",tags={"oss上传文件测试"})
@RestController
@RequestMapping("oss")
public class OssController {

    @Autowired
    private OssClientUtils ossClientUtils;

    @RequestMapping(value = "uploadPic",method = RequestMethod.POST)
    public String uploadOss(HttpServletRequest request,String path) {
        return ossClientUtils.uploadImage(request, path);
    }
}
至此,代码已经准备完毕,接下来postman本地模拟上传图片看看:
postman需要这么传:
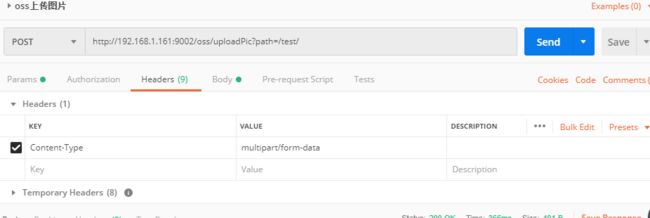
首先传参需要传递需要自定义保存的路径,我这里是test

设置Headers:
选择上传文件:
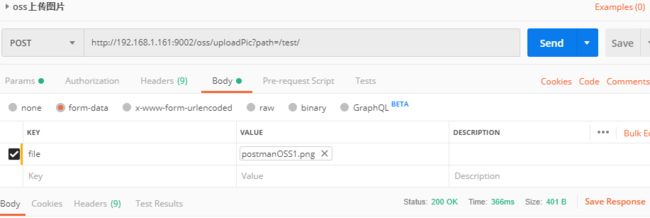
发送请求后,报错:
Caused by: java.lang.NoClassDefFoundError: org/apache/commons/fileupload/disk/DiskFileItemFactory
解决:
缺少pom依赖:
            commons-fileupload
            commons-fileupload
            1.2.2


            net.sf.staccatocommons
            commons-io
            1.2
再次发送请求:

OK图片上传成功,返回图片路径
浏览器中访问显示:
AccessDenied
You do not have read permission on this object.
5D78AA96EBEC9441BEB05BA1
tao11140.oss-cn-hangzhou.aliyuncs.com
神码,竟然没有权限???赶紧去阿里云后台看了下,图片确实是上传成功了
那么可能是要设置一个全局的读取权限
在oss后台的基础设置中找到读写权限,更改为公共读即可
接下来我尝试上传一个apk文件到oss,大概一兆多的大小,结果报错:
The field file exceeds its maximum permitted size of 1048576 bytes.
查看文档之后,原因可能是springboot限制了单次请求的文件大小
解决:
Spring Boot1.4版本后配置更改为:
spring.http.multipart.maxFileSize = 10Mb
spring.http.multipart.maxRequestSize=100Mb
Spring Boot2.0之后的版本配置修改为:
spring.servlet.multipart.max-file-size = 10MB
spring.servlet.multipart.max-request-size=100MB
我的yml添加配置如下:如果是想要不限制文件上传的大小,那么就把两个值都设置为-1就行
spring:
  servlet:
   multipart:
    max-file-size: 10MB
    max-request-size: 100MB
之后重新请求上传apk,上传成功
至此,springboot集成oss文件上传圆满成功