MySQL高可用--HAProxy+Keepalived+Mycat+MHA集群
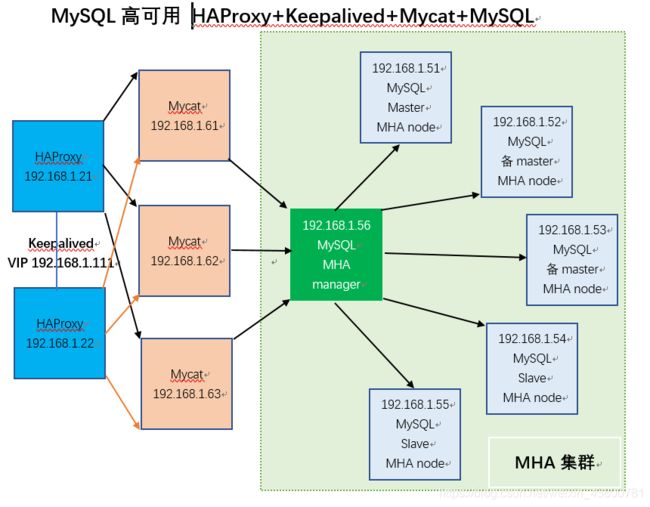
在华为云上搭建MySQL高可用集群
需解决的关键点有:
MySQL主从同步及半同步复制
SSH免密登录
MHA集群的搭建
Mycat分片服务
HAProxy负载均衡
Keepalived的高可用
拓扑图如下
环境:华为云主机--CentOS 7.5 64bit
软件: mysql-5.7.25-1.el7.x86_64.rpm-bundle.tar 下载地址:https://dev.mysql.com/downloads/mysql/
java-1.8.0-openjdk-1.8.0.181-7.b13.el7.x86_64 Mycat-server-1.6-RELEASE-20161028204710-linux.tar.gz
haproxy.x86_64
部署MySQL服务器
在链接公网IP的服务器(跳板机)进行域名解析
[root@ecs-jumper ~]# vim /etc/hosts
192.168.1.51    mysql51
192.168.1.52    mysql52
192.168.1.53    mysql53
192.168.1.54    mysql54
192.168.1.55    mysql55
192.168.1.56    mhamanager
192.168.1.61    mycat61
192.168.1.62    mycat62
192.168.1.63    mycat63
192.168.1.21    haproxy1
192.168.1.22    haproxy2
将mysql-community-* 做成yum源
[root@ecs-jumper ~]# tar -xf mysql-5.7.25-1.el7.x86_64.rpm-bundle.tar
[root@ecs-jumper ~]# ls
mysql-community-client-5.7.25-1.el7.x86_64.rpm
mysql-community-common-5.7.25-1.el7.x86_64.rpm
mysql-community-devel-5.7.25-1.el7.x86_64.rpm
mysql-community-embedded-5.7.25-1.el7.x86_64.rpm
mysql-community-embedded-compat-5.7.25-1.el7.x86_64.rpm
mysql-community-embedded-devel-5.7.25-1.el7.x86_64.rpm
mysql-community-libs-5.7.25-1.el7.x86_64.rpm
mysql-community-libs-compat-5.7.25-1.el7.x86_64.rpm
mysql-community-server-5.7.25-1.el7.x86_64.rpm
mysql-community-test-5.7.25-1.el7.x86_64.rpm
[root@ecs-jumper ~]# mv mysql-*  /var/ftp/default
[root@ecs-jumper ~]# cd /var/ftp/default
[root@ecs-jumper default]# createrepo --update .
在51-56主机上部署私钥
[root@ecs-jumper ~]# ansible mha -m copy -a 'src=/root/.ssh/id_rsa  dest=/root/.ssh/'
[root@ecs-jumper ~]# ansible mha -m shell -a 'chmod 0400 /root/.ssh/id_rsa'    //私钥的权限必须为这个,拷贝过去的私钥一般为0644,不能用
在51~55上安装mysql
[root@ecs-jumper ~]# ansible mysql --list
  hosts (5):
    mysql51
    mysql52
    mysql53
    mysql54
    mysql55
[root@ecs-jumper ~]# ansible mysql -m shell -a 'yum -y install mysql-community-*'
在51上修改MySQL密码,并同步到其他MySQL主机
[root@mysql51 ~]# ansible mysql -m shell -a 'systemctl start mysqld'
[root@mysql51 ~]# ansible mysql -m shell -a 'ss -pntul | grep 3306'
tcp    LISTEN     0      80       :::3306                 :::*                   users:(("mysqld",pid=3287,fd=22))
[root@mysql51 ~]# grep password /var/log/mysqld.log
2019-01-30T06:32:54.930325Z 1 [Note] A temporary password is generated for root@localhost:
=KX5aPxTm%+r
[root@mysql51 ~]# mysql -uroot -p=KX5aPxTm%+r
mysql> alter user root identified by "123_adcD";
mysql> show global variables like "%password%";
mysql> set global  validate_password_policy=0;
mysql> set global  validate_password_length=6;
mysql> alter user root@localhost identified by "123456";
[root@mysql51 ~]# for i in 192.168.1.{52..55}           //同步的时候看一下其他主机下的/var/lib/mysql/auto.cnf  这个是放UUID的地方,一样需要改动或者删除
> do
> rsync -aSH --delete  /var/lib/mysql/  root@$i:/var/lib/mysql/
> done
配置MHA集群
安装集群依赖包和节点包
[root@ecs-jumper ~]# mv perl-* /var/ftp/default/
[root@ecs-jumper ~]# mv mha4mysql-node-0.56-0.el6.noarch.rpm /var/ftp/default/
[root@ecs-jumper ~]# cd /var/ftp/default/
[root@ecs-jumper default]# createrepo --update .
[root@ecs-jumper ~]# ansible mha -m shell -a 'yum -y install perl-*'
[root@ecs-jumper ~]# ansible mha -m shell -a 'yum -y install mha4*'
部署mha-manager节点在56上操作
[root@ecs-jumper ~]# scp mha4mysql-manager-0.56.tar.gz  app1.cnf  master_ip_failover [email protected]:/root
[root@mhamanager mha4mysql-manager-0.56]# perl Makefile.PL

[root@mhamanager mha4mysql-manager-0.56]# make
[root@mhamanager mha4mysql-manager-0.56]# make install
...
[Core Features]
- DBI                   ...loaded. (1.627)
- DBD::mysql            ...loaded. (4.023)
- Time::HiRes           ...loaded. (1.9725)
- Config::Tiny          ...loaded. (2.14)
- Log::Dispatch         ...loaded. (2.41)
- Parallel::ForkManager ...loaded. (1.18)
- MHA::NodeConst        ...loaded. (0.56)
*** Module::AutoInstall configuration finished.
...
配置主节点mysql51
[root@mysql51 ~]# vim /etc/my.cnf
[mysqld]
...
validate_password_policy=0
validate_password_length=6
plugin-load="rpl_semi_sync_master=semisync_master.so;rpl_semi_sync_slave=semisync_slave.so"
rpl-semi-sync-master-enabled = 1
rpl-semi-sync-slave-enabled = 1
server_id=51
log_bin=master51
binlog_format="mixed"
relay_log_purge=off
...
[root@mysql51 ~]# systemctl restart mysqld
[root@mysql51 ~]# mysql -uroot -p123456
mysql> show master status;
+-----------------+----------+--------------+------------------+-------------------+
| File            | Position | Binlog_Do_DB | Binlog_Ignore_DB | Executed_Gtid_Set |
+-----------------+----------+--------------+------------------+-------------------+
| master51.000003 |      154 |              |                  |                   |
+-----------------+----------+--------------+------------------+-------------------+
mysql> grant all on *.* to root@"%" identified by "123456";
在51的主机上做root的授权,其他的会同步(如果不做,在验证数据节点的主从同步配置时会出错)
mysql> grant replication slave,replication client on *.* to repluser@"%" identified byy "123456";
配置备用节点52和53(操作基本一致,只要把id 改了就可以)
[root@mysql51 ~]# rsync -aSH --delete /etc/my.cnf  192.168.1.52:/etc/     //同步到52和53上
[root@mysql51 ~]# ssh 192.168.1.52
[root@mysql52 ~]# vim /etc/my.cnf
...
server_id=52
log_bin=master52
...
[root@mysql52 ~]# mysql -uroot -p123456
mysql> change master to
    -> master_host="192.168.1.51",
    -> master_user="repluser",
    -> master_password="123456",
    -> master_log_file="master51.000003",
    -> master_log_pos=154;
mysql> start slave;
mysql> show slave status\G;
...
            Slave_IO_Running: Yes
            Slave_SQL_Running: Yes
mysql> select user from mysql.user;
+---------------+
| user          |
+---------------+
| repluser      |
| root          |
| mysql.session |
| mysql.sys     |
| root          |
+---------------+
配置从节点slave 54和55(配置一样,改动id就可以)
[root@mysql54 ~]# vim /etc/my.cnf
[mysqld]
server_id=54
[root@mysql54 ~]# systemctl  restart  mysqld
mysql> change master to master_host="192.168.1.51",master_user="repluser",master_password="123456",master_log_file="master51.000003",master_log_pos=154;
mysql> start slave;
mysql> show slave status\G;
...
            Slave_IO_Running: Yes
            Slave_SQL_Running: Yes
...
配置主节点56
[root@ecs-jumper ~]# ssh mhamanager
[root@mhamanager ~]# cd mha4mysql-manager-0.56
[root@mhamanager mha4mysql-manager-0.56]# cp bin/* /usr/local/bin/
[root@mhamanager mha4mysql-manager-0.56]# mkdir /etc/mha_manager       //创建工作目录
[root@mhamanager mha4mysql-manager-0.56]# cp samples/conf/app1.cnf  /etc/mha_manager/
[root@mhamanager mha4mysql-manager-0.56]# vim /etc/mha_manager/app1.cnf
[server default]
manager_workdir=/etc/mha_manager
manager_log=/etc/mha_manager/manager.log
master_ip_failover_script=/usr/local/bin/master_ip_failover

ssh_user=root
ssh_port=22
repl_user=repluser
repl_password=123456
user=root
password=123456

[server1]
hostname=192.168.1.51
port=3306

[server2]
hostname=192.168.1.52
port=3306
candidate_master=1

[server3]
hostname=192.168.1.53
port=3306
candidate_master=1

[server4]
hostname=192.168.1.54
no_master=1

[server5]
hostname=192.168.1.55
no_master=1
[root@mhamanager mha4mysql-manager-0.56]# cp samples/scripts/master_ip_failover /usr/local/bin/
//创建故障切换脚本
验证ssh免密登陆数据节点主机
[root@mhamanager ~]# cd /usr/local/bin/
[root@mhamanager bin]# masterha_check_ssh --conf=/etc/mha_manager/app1.cnf
Fri Feb  8 17:25:54 2019 - [info] All SSH connection tests passed successfully.  //这个为配置成功
验证数据节点的主从同步配置
[root@mhamanager bin]# vim /etc/mha_manager/app1.cnf
...
# master_ip_failover_script=/usr/local/bin/master_ip_failover  //添加注释测试
...
[root@mhamanager bin]# masterha_check_repl  --conf=/etc/mha_manager/app1.cnf
MySQL Replication Health is OK.
启动mha集群
[root@mhamanager bin]# masterha_manager --conf=/etc/mha_manager/app1.cnf  --remove_dead_master_conf  --ignore_last_failover
//删除宕机主库配置,忽略xxx.health文件
Fri Feb  8 17:44:39 2019 - [warning] Global configuration file /etc/masterha_default.cnf not found. Skipping.
Fri Feb  8 17:44:39 2019 - [info] Reading application default configuration from /etc/mha_manager/app1.cnf..
Fri Feb  8 17:44:39 2019 - [info] Reading server configuration from /etc/mha_manager/app1.cnf..
查看状态(需另开一个终端)
[root@mhamanager bin]# masterha_check_status  --conf=/etc/mha_manager/app1.cnf
app1 (pid:32081) is running(0:PING_OK), master:192.168.1.51
[root@mhamanager bin]# masterha_stop --conf=/etc/mha_manager/app1.cnf
Stopped app1 successfully.
添加vip在mhamanager上
[root@mhamanager bin]# vim master_ip_failover
 ...
 34
 35 my $vip = '192.168.1.150/24';  # Virtual IP
 36 my $key = "1";
 37 my $ssh_start_vip = "/sbin/ifconfig eth0:$key $vip";
 38 my $ssh_stop_vip = "/sbin/ifconfig eth0:$key down";
 39
 ...
 65      &stop_vip();                                      //添加
 ...
 95 FIXME_xxx_create_user( $new_master_handler->{dbh} );   //删除此行
 ...
 99       FIXME_xxx;                                       //删除行
 99       &start_vip();                                    //添加
120 sub start_vip() {
121     `ssh $ssh_user\@$new_master_host \" $ssh_start_vip \"`;
122 }
123 sub stop_vip() {
124     return 0 unless ($ssh_user);
125     `ssh $ssh_user\@$orig_master_host \" $ssh_stop_vip \"`;
126 }
 ...

[root@mhamanager bin]# vim /etc/mha_manager/app1.cnf
[server default]
...
master_ip_failover_script=/usr/local/bin/master_ip_failover     //去掉注释,添加自动failover脚本
[root@mhamanager bin]# chmod 755 /etc/mha_manager/app1.cnf
临时设置vip在51上
[root@mysql51 ~]# ifconfig eth0:1 192.168.1.150/24        //临时配置vip在51上
[root@mysql51 ~]# ifconfig eth0:1
eth0:1: flags=4163  mtu 1500
        inet 192.168.4.100  netmask 255.255.255.0  broadcast 192.168.4.255
        ether 52:54:00:0d:20:84  txqueuelen 1000  (Ethernet)
再次启动mha集群
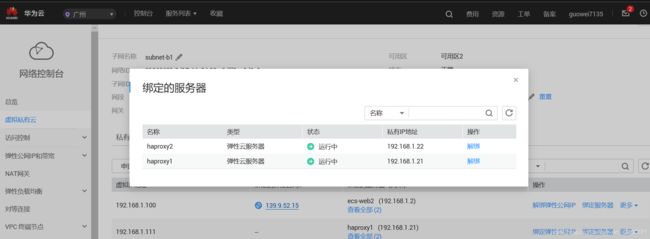
[root@mhamanager ~]# masterha_manager --conf=/etc/mha_manager/app1.cnf --remove_dead_master_conf --ignore_last_failover 华为云需要申请vip并且需要绑定服务器ip地址
配置mycat集群
在主库51上创建一个用于查询的用户
mysql> grant select,insert on *.* to admin@"%" identified by "123456";
编辑ansible文件hosts
[root@ecs-jumper ~]# ansible mycat --list
  hosts (3):
    mycat61
    mycat62
    mycat63
mycat服务器上安装 java-1.8.0-openjdk-devel
[root@ecs-jumper ~]# ansible mycat -m shell -a 'yum -y install java-1.8.0-openjdk-devel'
安装mycat
[root@ecs-jumper ~]# for i in 192.168.1.{61..63}
> do
> scp Mycat-server-1.6-RELEASE-20161028204710-linux.tar.gz  $i:/root
> done
[root@ecs-jumper ~]# ansible mycat -m shell -a 'tar -zxf  Mycat-server-1.6-RELEASE-20161028204710-linux.tar.gz'
[root@ecs-jumper ~]# ansible mycat -m shell -a 'mv mycat/  /usr/local/'
在61上修改配置文件server.xml
[root@mycat61 ~]# cd /usr/local/mycat/
[root@mycat61 mycat]# cd conf/
[root@mycat61 conf]# vim server.xml

                123456
                TESTDB
...

                123456
                TESTDB
                true
...
在61上修改配置文件schema.xml
[root@mycat61 conf]# vim schema.xml


                select user()
启动mycat
[root@mycat61 conf]# /usr/local/mycat/bin/mycat start
Starting Mycat-server...
[root@mycat61 conf]# ss -pntul | grep 066
tcp    LISTEN     0      100      :::8066                 :::*                   users:(("java",pid=2545,fd=78))
tcp    LISTEN     0      100      :::9066                 :::*                   users:(("java",pid=2545,fd=74))
在装有mysql的数据库服务器上测试,这里用其中的一台数据库服务器测试
[root@mysql53 ~]# mysql -uroot -p123456 -h192.168.1.61 -P 8066 -e 'select @@hostname'
mysql: [Warning] Using a password on the command line interface can be insecure.
+------------+
| @@hostname |
+------------+
| mysql54    |
+------------+
[root@mysql53 ~]# mysql -uroot -p123456 -h192.168.1.61 -P 8066 -e 'select @@hostname'
mysql: [Warning] Using a password on the command line interface can be insecure.
+------------+
| @@hostname |
+------------+
| mysql55    |
+------------+
拷贝文件server.xml和schema.xml文件到另外两台mycat62和63上
[root@ecs-jumper ~]# scp /root/.ssh/id_rsa  192.168.1.61:/root/.ssh/
id_rsa                                                                     100% 1706     4.5MB/s   00:00
[root@mycat61 conf]# for i in 192.168.1.{62,63}; do scp schema.xml  server.xml  $i:/usr/local/mycat/conf/; done
schema.xml                                                                 100%  862     2.6MB/s   00:00
server.xml                                                                 100% 3720    12.7MB/s   00:00
schema.xml                                                                 100%  862     2.8MB/s   00:00
server.xml                                                                 100% 3720    11.2MB/s   00:00
启动两台mycat62和63
[root@ecs-jumper ~]# ansible mycat  -m shell -a '/usr/local/mycat/bin/mycat  start'
[root@ecs-jumper ~]# ansible mycat  -m shell -a 'ss -pntul | grep 066'
部署HAProxy负载均衡+Keepalived实现高可用
安装haproxy和keepalived
[root@ecs-jumper ~]# ansible haproxy --list
  hosts (2):
    haproxy1
    haproxy2
[root@ecs-jumper ~]# ansible haproxy -m shell -a 'yum -y install haproxy keepalived'
修改haproxy配置文件(保留global和defaults 剩下的frontend backend 删除就可以 添加如下配置)
[root@haproxy1 ~]# vim /etc/haproxy/haproxy.cfg
...
listen mycat_3306 *:3306
    mode    tcp        # mysql 得使用 tcp 协议
    option  tcpka      # 使用长连接
    balance leastconn  # 最小连接调度算法
    server  mycat61 192.168.1.61:8066 check inter 3000 rise 1 maxconn 1000 fall 3
    server  mycat62 192.168.1.62:8066 check inter 3000 rise 1 maxconn 1000 fall 3
    server  mycat63 192.168.1.63:8066 check inter 3000 rise 1 maxconn 1000 fall 3
[root@haproxy2 ~]# vim /etc/haproxy/haproxy.cfg
...
listen mycat_3306 *:3306
mode tcp # mysql 得使用 tcp 协议
option tcpka # 使用长连接
balance leastconn # 最小连接调度算法
server mycat61 192.168.1.61:8066 check inter 3000 rise 1 maxconn 1000 fall 3
server mycat62 192.168.1.62:8066 check inter 3000 rise 1 maxconn 1000 fall 3
server mycat63 192.168.1.63:8066 check inter 3000 rise 1 maxconn 1000 fall 3启动haproxy
[root@ecs-jumper ~]# ansible haproxy -m shell -a 'systemctl start haproxy'
测试haproxy
[root@ecs-jumper ~]# mysql -uroot -p123456 -h192.168.1.21  -e 'select @@hostname'
mysql: [Warning] Using a password on the command line interface can be insecure.
+------------+
| @@hostname |
+------------+
| mysql54    |
+------------+
[root@ecs-jumper ~]# mysql -uroot -p123456 -h192.168.1.21  -e 'select @@hostname'
mysql: [Warning] Using a password on the command line interface can be insecure.
+------------+
| @@hostname |
+------------+
| mysql55    |
+------------+

[root@ecs-jumper ~]# mysql -uroot -p123456 -h192.168.1.22  -e 'select @@hostname'
mysql: [Warning] Using a password on the command line interface can be insecure.
+------------+
| @@hostname |
+------------+
| mysql55    |
+------------+
[root@ecs-jumper ~]# mysql -uroot -p123456 -h192.168.1.22  -e 'select @@hostname'
mysql: [Warning] Using a password on the command line interface can be insecure.
+------------+
| @@hostname |
+------------+
| mysql55    |
+------------+
[root@ecs-jumper ~]# mysql -uroot -p123456 -h192.168.1.22  -e 'select @@hostname'
mysql: [Warning] Using a password on the command line interface can be insecure.
+------------+
| @@hostname |
+------------+
| mysql54    |
+------------+
修改keepalived配置文件
[root@haproxy1 ~]# vim /etc/keepalived/keepalived.conf
! Configuration File for keepalived

global_defs {
   router_id haproxy1
}
   vrrp_strict  chk_haproxy {
   script "killall -0 haproxy"     # cheaper than pidof
   interval 2                      # check every 2 seconds
}

vrrp_instance mycat1 {
    state BACKUP
    interface eth0
    virtual_router_id 51
    priority 200
    nopreempt
    advert_int 2
    authentication {
        auth_type PASS
        auth_pass 1111
    }
    virtual_ipaddress {
        192.168.1.111/24  brd 192.168.1.255 dev eth0 label eth0:1
    }
    track_script {
       chk_haproxy weight=0    # +2 if process is present
    }
}
global_defs {
   router_id haproxy2
}
   vrrp_strict  chk_haproxy {
   script "killall -0 haproxy"
   interval 2
}

vrrp_instance mycat1 {
    state BACKUP
    interface eth0
    virtual_router_id 51
    priority 100
    ! nopreempt
    advert_int 2
    authentication {
        auth_type PASS
        auth_pass 1111
    }
    virtual_ipaddress {
        192.168.1.111/24  brd 192.168.1.255 dev eth0 label eth0:1
    }
    track_script {
       chk_haproxy weight=0
    }
启动keepalived
[root@ecs-jumper ~]# ansible haproxy  -m shell -a 'systemctl start keepalived'
haproxy1 | CHANGED | rc=0 >>

haproxy2 | CHANGED | rc=0 >>
在华为云上配置虚拟ip,绑定haproxy服务器21和22
访问集群
[root@ecs-jumper nsd1809]# mysql -uroot -p123456 -h192.168.1.111

mysql> select @@hostname;
+------------+
| @@hostname |
+------------+
| mysql54    |
+------------+
1 row in set (0.01 sec)

mysql> select @@hostname;
+------------+
| @@hostname |
+------------+
| mysql55    |
+------------+
1 row in set (0.00 sec)


