用Java和C++实现微信机器人
前言
首先说一下业务流程:C++监听微信,将监听到的消息通过Socket发送给Java服务器,服务器接收后进行相应的处理。
GitHub地址:https://github.com/shenshaoming/WeChat2Java,目前来说问题还是挺多的,大家借鉴就好,直接用是不太可能了。
具体实现
1.首先是通过C++获取微信的信息,我是用的鬼手大佬的开源项目,项目的注释写的非常清楚,但是没有一定的C++功底连改都不知道该怎么改。
2.通过C++中的Socket编程,将数据发送到服务器,为了方便发送数据,我进行了封装,具体如下:
函数头文件:Socket2Java.h
#pragma once
#include
#pragma comment(lib,"ws2_32.lib")

using namespace std;

void sendMessageBySocket(string message);

void sendMessageBySocket(wstring message);

string wstring2string(wstring wstr);
源文件:Socket2Java.cpp
#include "stdafx.h"
#include
#include
#include
#pragma comment(lib,"ws2_32.lib")

#define SERVER_ADDRESS "127.0.0.1" //服务器端IP地址
#define PORT           8080         //服务器的端口号
#define MSGSIZE        1024         //收发缓冲区的大小

using namespace std;


void sendMessageBySocket(string message)
{
	WSADATA wsaData;
	//连接所用套节字
	SOCKET sClient;
	//保存远程服务器的地址信息
	SOCKADDR_IN server;
	//收发缓冲区
	char szMessage[MSGSIZE];
	//成功接收字节的个数
	int ret;

	// Initialize Windows socket library
	WSAStartup(0x0202, &wsaData);

	// 创建客户端套节字
	sClient = socket(AF_INET, SOCK_STREAM, IPPROTO_TCP); //AF_INET指明使用TCP/IP协议族;
														 //SOCK_STREAM, IPPROTO_TCP具体指明使用TCP协议
	// 指明远程服务器的地址信息(端口号、IP地址等)
	memset(&server, 0, sizeof(SOCKADDR_IN)); //先将保存地址的server置为全0

	//声明地址格式是TCP/IP地址格式
	server.sin_family = PF_INET;
	//指明连接服务器的端口号,htons()用于 converts values between the host and network byte order
	server.sin_port = htons(PORT);
	//指明连接服务器的IP地址
	server.sin_addr.s_addr = inet_addr(SERVER_ADDRESS);

	//结构SOCKADDR_IN的sin_addr字段用于保存IP地址,sin_addr字段也是一个结构体,sin_addr.s_addr用于最终保存IP地址
	//inet_addr()用于将 形如的"127.0.0.1"字符串转换为IP地址格式
	//连到刚才指明的服务器上
	//连接后可以用sClient来使用这个连接
	connect(sClient, (struct sockaddr*) & server, sizeof(SOCKADDR_IN));

	//server保存了远程服务器的地址信息
	// 发送数据
	//sClient指明用哪个连接发送; szMessage指明待发送数据的保存地址 ;strlen(szMessage)指明数据长度
	send(sClient, message.data(), strlen(message.data()), 0);

	// 释放连接和进行结束工作
	closesocket(sClient);
	WSACleanup();
}
/*
	将wstring转为string
*/
string wstring2string(wstring wstr) {
	string result;
	//获取缓冲区大小,并申请空间,缓冲区大小事按字节计算的
	int len = WideCharToMultiByte(CP_UTF8, 0, wstr.c_str(), wstr.size(), NULL, 0, NULL, NULL);
	char* buffer = new char[len + 1];
	//宽字节编码转换成多字节编码
	WideCharToMultiByte(CP_UTF8, 0, wstr.c_str(), wstr.size(), buffer, len, NULL, NULL);
	buffer[len] = '\0';
	//删除缓冲区并返回值
	result.append(buffer);
	delete[] buffer;
	return result;
}
//重载方法
void sendMessageBySocket(wstring message) {
	sendMessageBySocket(wstring2string(message));
} 3.发送数据到服务器,我采用的JSON进行数据交互,本来想用cJsonObject,不过总是报错,所以就自己硬拼了。
    //拼接JSON字符串
    wstring wst = L"{\"messageType\": \"";
	wst .append(msg->type)
		.append(L"\",")
		.append(L"\"source\" : \"")
		.append(msg->source)
		.append(L"\",")
		.append(L"\"userId\" : \"")
		.append(msg->wxid)
		.append(L"\",")
		.append(L"\"messageSender\" : \"")
		.append(msg->msgSender)
		.append(L"\",")
		.append(L"\"content\" : \"")
		.append(msg->content)
		.append(L"\",")
		.append(L"\"isMoney \" : \"");
	if (msg->isMoney) {
		wst.append(L"true");
	}
	else {
		wst.append(L"false");
	}
	wst.append(L"\"}");

	//发送信息到服务器
sendMessageBySocket(wst.data());4.服务器接收数据。为了方便以后扩展,扛的住高并发,我采用了netty进行消息的接收。
package tomcat.core;

import io.netty.bootstrap.ServerBootstrap;
import io.netty.channel.ChannelFuture;
import io.netty.channel.ChannelInitializer;
import io.netty.channel.EventLoopGroup;
import io.netty.channel.nio.NioEventLoopGroup;
import io.netty.channel.socket.SocketChannel;
import io.netty.channel.socket.nio.NioServerSocketChannel;

/**
 * Netty版本的tomcat
 * 监听请求,调用request和response对请求作出反应
 * @author 申劭明
 * @date 2019/9/16 17:21
 * @version 5.3
 */
public class HttpServer {
    /**
     * 监听端口
     */
    private static int port = 8080;

    public static void main(String[] args) {
        HttpServer httpServer = new HttpServer();
        httpServer.acceptWait();
    }

    /**
     * @Description : Netty监听数据请求
     * @author : 申劭明
     * @date : 2019/9/17 10:29
     */
    public void acceptWait() {
        //监听请求
        EventLoopGroup listenGroup = new NioEventLoopGroup();
        //请求处理
        EventLoopGroup workerGroup = new NioEventLoopGroup();
        ServerBootstrap bootstrap = new ServerBootstrap();

        //绑定监听请求和处理请求的group
        bootstrap.group(listenGroup, workerGroup)
                .channel(NioServerSocketChannel.class)
                .childHandler(new ChannelInitializer() {
                    @Override
                    protected void initChannel(SocketChannel socketChannel) throws Exception {
                        socketChannel.pipeline().addLast(new RequestHandler());
                    }
                });
        ChannelFuture future = null;
        try {
            future = bootstrap.bind(port).sync();
            future.channel().closeFuture().sync();

        } catch (InterruptedException e) {
            e.printStackTrace();
        } finally {
            listenGroup.shutdownGracefully();
            workerGroup.shutdownGracefully();
        }
    }
}
这里我直接用的是之前手写tomcat里的方法,接收请求后交给RequestHandler。
package tomcat.core;

import io.netty.buffer.ByteBuf;
import io.netty.channel.ChannelHandlerContext;
import io.netty.channel.SimpleChannelInboundHandler;

/**
 * @Author: 申劭明
 * @Date: 2019/9/17 17:45
 */
public class RequestHandler extends SimpleChannelInboundHandler {

    public RequestHandler(){
    }
    @Override
    protected void messageReceived(ChannelHandlerContext channelHandlerContext, Object o) {
        //接收数据
        Request request = new Request((ByteBuf) o);
        System.out.println(request.getMessage());
        channelHandlerContext.close();
    }
}
Request中只是从ByteBuf中的数据采用UTF-8的编码格式提取出来而已。
package tomcat.core;

import io.netty.buffer.ByteBuf;
import io.netty.util.CharsetUtil;


/**
 * @Author: 申劭明
 * @Date: 2019/9/16 17:24
 */
public class Request {
    /**
     * 接收到的用户消息
     */
    private String message;

    public Request(){

    }

    public Request(String message){
        this.message = message;
    }

    public Request(ByteBuf byteBuf){
        this.message = byteBuf.toString(CharsetUtil.UTF_8);
    }

    public String getMessage() {
        return message;
    }
}
C++实现的微信机器人原文地址:https://blog.csdn.net/qq_38474570/article/details/96723746
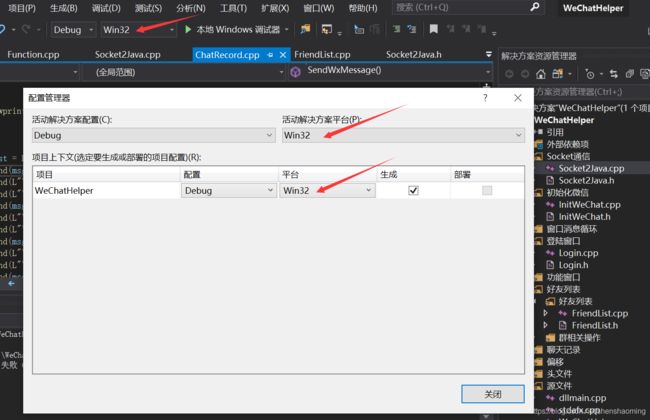
需要注意的是,WeChatHelper产生的是.dll文件,需要将该文件放在微信的目录里。另外,环境要采用WIN32,如图。
netty版本是5.0.0