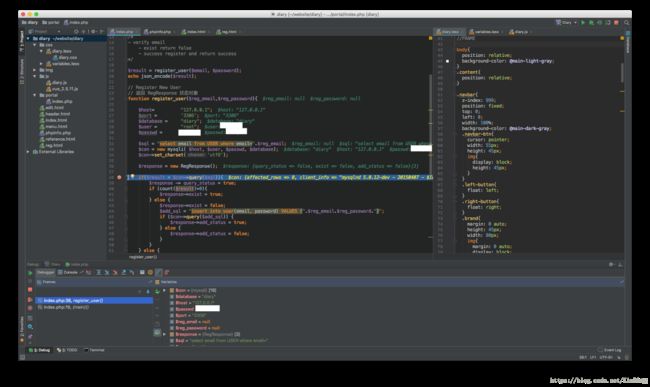
【教程】Mac XAMPP phpStorm Xdebug 详细配置说明 phpize rootless
XAMPP xdebug 配置(系统自带php无法正常使用 xdebug 扩展)
参考
https://blog.csdn.net/daizikai77/article/details/72103674
https://blog.csdn.net/longwenxia1234/article/details/77170269
如果你能把这个配置完成了。那mac上开发环境的大部分问题基本都可以解决了。
过程是这样的:
为了用xdebug插件,舍弃系统自带的php环境,换成XAMPP集成环境,为了安装xdebug插件,需要知道如何关闭mac系统的rootLess,然后,为了能使用正确的php环境,需要知道怎么切换php环境的目录,为了编译xdebug插件,需要安装autoconf,为了安装autoconf需要安装brew, 为了安装brew需要知道怎么连接外网,如何使用代理。OK,这一套下来,如果你都能理解了,那就很不错了。我会把这些问题都写在日志里。
最近把Mac系统升级了,以前生成的 xdebug.so 文件也不能用了。会提示这样的错误。
当前版本macOS 10.14Mojave
下图是系统自带php在正确配置xdebug后 出现的错误,至今没找到解决方案。
最终,听取网友建议,不再使用系统自带的
php了,改用XAMPP,不了解的点这里这里这里 ,然后又重新下载安装了一遍xdebug,这次把教程补全,过程挺曲折的。
读完这篇日志,你会完成的东西:
- 配置 terminal 的 php 环境 到 xampp 中的 php上 参阅:https://blog.csdn.net/KimBing/article/details/86532231
- 关闭 Mac rootLess 机制
- 给 mac 安装比较流行的
brew程序包管理工具,类似centOS和ubuntu的 yum - 会
XAMPP的所有操作 参阅:https://blog.csdn.net/KimBing/article/details/86532617
1. 下载合适你mac的 xdebug 文件(手动)
进入这个网址 https://xdebug.org/download.php 下载
截至现在 2019-01-18 最新的版本是这个
https://xdebug.org/files/xdebug-2.7.0beta1.tgz
安装过程翻译
- 下载
xdebug-2.7.0beta1.tgz- 解压文件
tar -xvzf xdebug-2.7.0beta1.tgz- 运行:
cd xdebug-2.7.0beta1- 运行:
phpize
应该显示类似的结果,如果不,请移到下面的第二条
Configuring for:
…
Zend Module Api No: 20160303
Zend Extension Api No: 320160303- 运行
./configure- 运行
make
2. 解决 phpize 不出现 zend module API No 的问题
进行第4步的时候,我的刚开始是这样的
$ phpize
grep: /usr/include/php/main/php.h: No such file or directory
grep: /usr/include/php/Zend/zend_modules.h: No such file or directory
grep: /usr/include/php/Zend/zend_extensions.h: No such file or directory
Configuring for:
PHP Api Version:
Zend Module Api No:
Zend Extension Api No:
这样是不正确的,解决这个问题需要
1)关闭 Mac 的 RootLess 机制
RootLess 是什么 http://www.mayanlong.com/archives/2016/348.html
关机,开机,在听到开机声后,点击键盘 Command + R 进入 恢复模式 这个过程开机会比较慢,属于正常。
开机后,点上面菜单栏,找到终端应用 ,输入下面指令,正常重启
$ csrutil disable
再在root 模式下执行下面指令(不关闭 rootLess 将无法执行这个指令,即使是在Root 模式下),这个需要你电脑上已经安装了 Xcode,如果没有,需要去商店里搜索下载一下,免费的,6G左右。
$ ln -s /Applications/Xcode.app/Contents/Developer/Platforms/MacOSX.platform/Developer/SDKs/MacOSX10.12.sdk/usr/include  /usr/include
# 用 tap 完成路径的填充,因为不同版本的系统对应不同 MacOSX 路径。
2)此时 phpize 正常显示
kyle-mbp:xdebug-2.7.0beta1 Kyle$ phpize
Configuring for:
PHP Api Version:         20180731
Zend Module Api No:      20180731
Zend Extension Api No:   320180731
3) 安装 autoconfig automake
如果运行 phpize 的时候,下面还有其它的提示,提示没有autoconf,就需要执行下面的操作
需要先安装 brew 查看官网 https://brew.sh/
注意:执行这个命令需要用外网,不然会出错
如果有 socks,把终端的代理临时设置成 socks5,这个只是临时用,在关闭窗口后就失效
export ALL_PROXY=socks5://127.0.0.1:1080
/usr/bin/ruby -e "$(curl -fsSL https://raw.githubusercontent.com/Homebrew/install/master/install)"
kyle-mbp:xdebug-2.6.1 Kyle$ brew install autoconf
==> Downloading https://homebrew.bintray.com/bottles/autoconf-2.69.mojave.bottle.4.tar.gz
######################################################################## 100.0%
==> Pouring autoconf-2.69.mojave.bottle.4.tar.gz
==> Caveats
Emacs Lisp files have been installed to:
  /usr/local/share/emacs/site-lisp/autoconf
==> Summary
?  /usr/local/Cellar/autoconf/2.69: 71 files, 3.0MB
安装 automake
kyle-mbp:xdebug-2.6.1 Kyle$ brew install automake
==> Downloading https://homebrew.bintray.com/bottles/automake-1.16.1_1.mojave.bottle.tar.gz
######################################################################## 100.0%
==> Pouring automake-1.16.1_1.mojave.bottle.tar.gz
?  /usr/local/Cellar/automake/1.16.1_1: 131 files, 3.4MB
3. 复制xdebug.so
接着第一条的第4小条进行下去,当成功后,会显示
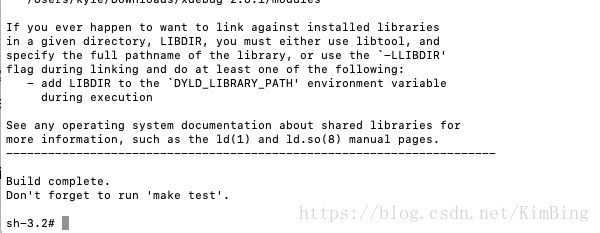
此时,在当前目录下 module 里面会有一个 xdebug.so 文件,把它复制到一个地方,我的复制到我自己指令的目录下了,这个目录在后面的 php.ini 配置文件中会用到。
cp /module/xdebug.so /opt/php71/extensions/
4. 配置 php.ini
XAMPP 中的 php.ini 在 /Applications/XAMPP/xamppfiles/etc/php.ini 中
在末尾添加以下内容:
[xdebug]
zend_extension=/opt/php71/extensions/xdebug.so
;上面的路径就是在第3步中你复制的 xdebug.so 的路径

xdebug.remote_autostart = On

;是否开启远程调试
xdebug.remote_enable = On

;允许调试的客户端IP
xdebug.remote_host=localhost

;远程调试的端口(默认9000)
xdebug.remote_port=9000

;调试插件dbgp
xdebug.remote_handler=dbgp

;是否收集变量
xdebug.collect_vars = On

;是否收集返回值
xdebug.collect_return = On

;是否收集参数
xdebug.collect_params = On

;是否开启调试内容
xdebug.profiler_enable=On

;设置php显示的级别长度
xdebug.var_display_max_depth=10

xdebug.idekey = PHPSTORM

;关闭错误信息显示
display_errors = Off
html_errors = Off
配置完成后 terminal 中执行以下指令重启 apache 服务器,使配置生效
/Applications/XAMPP/xamppfiles/xampp restartapache
再在运行 php --version
会看到这样的结果,里面会提到已关联的插件,说明插件安装成功
sh-3.2# php --version
PHP 7.3.0 (cli) (built: Dec 11 2018 01:01:47) ( NTS )
Copyright (c) 1997-2018 The PHP Group
Zend Engine v3.3.0-dev, Copyright (c) 1998-2018 Zend Technologies
    with Xdebug v2.7.0beta1, Copyright (c) 2002-2018, by Derick Rethans
xammp 相关的重启说明:
sh-3.2# ./xampp --help
Usage: xampp <action>

	start         Start XAMPP (Apache, MySQL and eventually others)
	startapache   Start only Apache
	startmysql    Start only MySQL
	startftp      Start only ProFTPD

	stop          Stop XAMPP (Apache, MySQL and eventually others)
	stopapache    Stop only Apache
	stopmysql     Stop only MySQL
	stopftp       Stop only ProFTPD

	reload        Reload XAMPP (Apache, MySQL and eventually others)
	reloadapache  Reload only Apache
	reloadmysql   Reload only MySQL
	reloadftp     Reload only ProFTPD

	restart       Stop and start XAMPP
	security      Check XAMPP's security

	enablessl     Enable SSL support for Apache
	disablessl    Disable SSL support for Apache

	backup        Make backup file of your XAMPP config, log and data files

	oci8          Enable the oci8 extenssion

	fix_rights    Resets file permissions.
5. 配置 phpStorm
配置 php 执行文件路径
这里需要设置phpStorm使用 XAMPP 的 php,设置如下位置,如果你之前位置设置正确,这里右下角会显示当前xdebug 版本
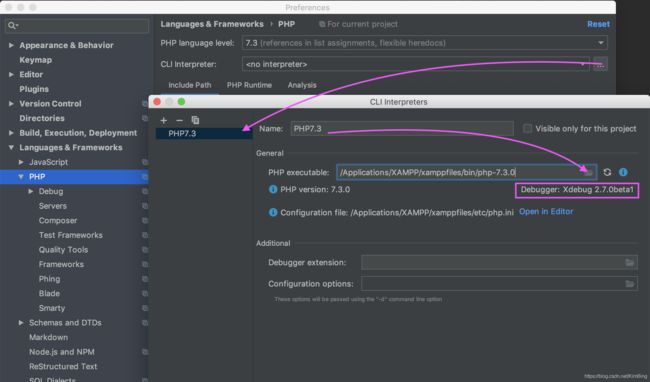
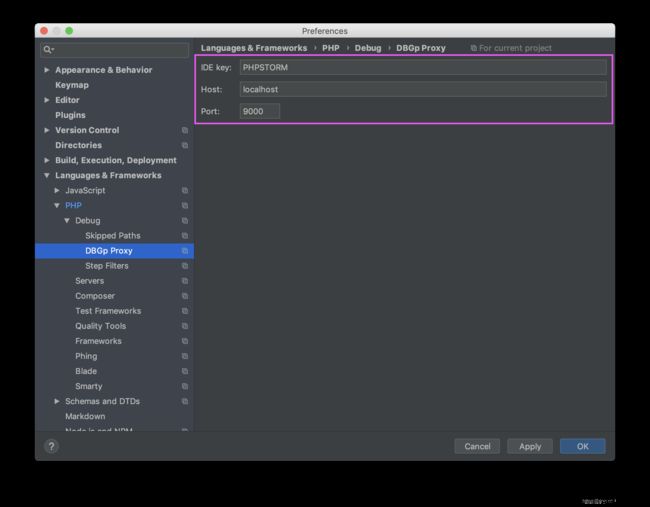
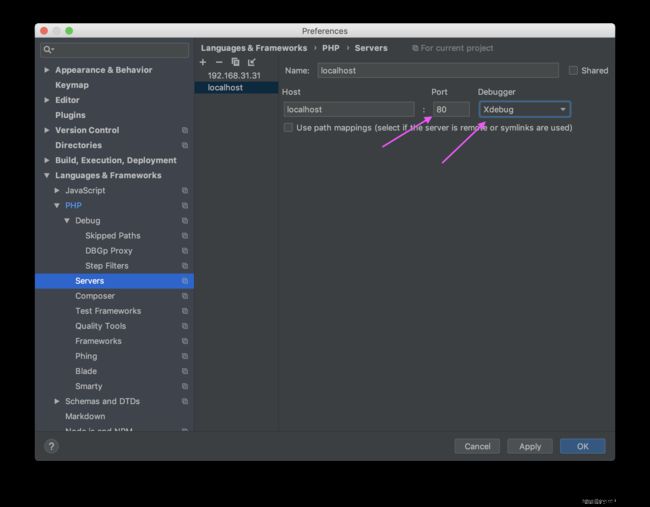
看图说话就可以了,端口要设置成 9000 跟php.ini中的端口一致
6. 浏览器插件
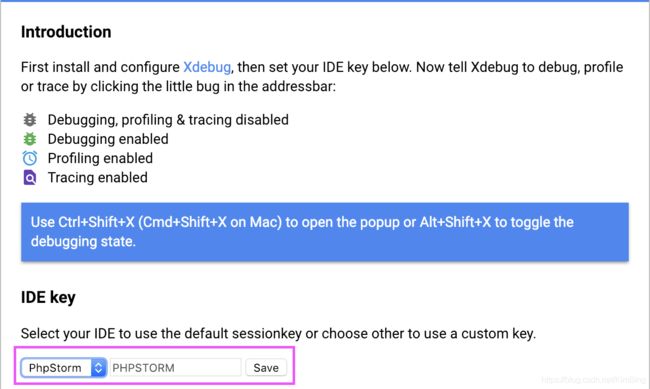
Chrome 应用商店搜索下载 Xdebug 插件
需要ss帐号的可以email 我 kylebing###163.com(###换@),我可以提供临时帐号,仅供学习用
配置 xdebug 插件
7. 正常使用
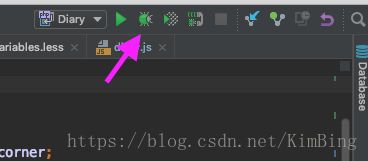
phpStorm 中把这个小虫子点亮,开始调试,在文件中设置断点。
