自动化运维工具Ansible
ansible简介:
ansible是新出现的自动化运维工具,基于Python开发,集合了众多运维工具(puppet、cfengine、chef、func、fabric)的优点,实现了批量系统配置、批量程序部署、批量运行命令等功能。
ansible是基于模块工作的,本身没有批量部署的能力。真正具有批量部署的是ansible所运行的模块,ansible只是提供一种框架。主要包括:
- 连接插件connection plugins:负责和被监控端实现通信;
- host inventory:指定操作的主机,是一个配置文件里面定义监控的主机;
- 各种模块核心模块、command模块、自定义模块;
- 借助于插件完成记录日志邮件等功能;
- playbook:剧本执行多个任务时,非必需可以让节点一次性运行多个任务。
图形介绍:
- 优点:
- no agents:不需要在被控主机上安装任何客户端;
- no server:无服务器端,使用时直接运行命令即可;
- modules in any languages:基于模块工作,可使用任意语言开发模块;
- yaml,not code:使用yaml语言定制剧本playbook;
- ssh by default:基于ssh工作;
- strong multi-tier solution:可实现多级指挥。
- 轻量级,无需在客户端安装agent,更新时,只需在操作机上进行一次更新即可;
- 批量任务执行可以写成脚本,而且不用分发到远程就可以执行;
- 使用python编写,维护更简单,ruby语法过于复杂;
实验环境:
redhat6.5
test1:172.25.254.11 ansible服务器端 安装python2.7模块 ansible
test2:172.25.254.12 客户端 安装python2.7模块
官网:https://www.ansible.com
server端与client端安装python模块:
[root@test1 ~]# yum install -y gcc zlib zlib-devel openssl-devel openssl
[root@test1 ~]# ls //提前下载好python软件包,可打开网页进行下载:https://www.python.org/ftp/python/2.7.8/Python-2.7.8.tgz
Python-2.7.8.tgz
[root@test1 ~]# cd Python-2.7.8
[root@test1 Python-2.7.8]# ./configure --prefix=/usr/local
[root@test1 Python-2.7.8]# make && make install
到这里一定要注意,由于我们只是做实验,所以为了虚拟机之后的正常使用,请提前备份/usr/bin/python* ,实验做完之后删除/usr/bin/python* ,然后将备份后的东西还原回去。

[root@test1 Python-2.7.8]# mkdir /tmp/python            //创建一个备份文件

[root@test1 Python-2.7.8]# cp -a /usr/bin/python* /tmp/python            //备份原来的python文件
[root@test1 Python-2.7.8]# cp -a /usr/local/include/python2.7/* /usr/local/include/
[root@test1 Python-2.7.8]# cd /usr/bin/
[root@test1 bin]# ln -s /usr/local/bin/python2.7 /usr/local/bin/python
[root@test1 bin]# rm -f /usr/bin/python
[root@test1 bin]# cp /usr/local/bin/python2.7 /usr/bin/python
仅server端安装ansible:
接下来安装setuptools模块
[root@test1 ~]# ls //下载链接: http://ftp.leg.uct.ac.za/pub/packages/macports/distfiles/py-setuptools/
Python-2.7.8.tgz
setuptools-7.0.tar.gz[root@test1 setuptools-7.0]# python setup.py install
安装pycrypto模块
[root@test1 ~]# cd
[root@test1 ~]# ls //下载链接:https://www.dlitz.net/software/pycrypto/
pycrypto-2.6.1.tar.gz
Python-2.7.8
Python-2.7.8.tgz
setuptools-7.0
setuptools-7.0.tar.gz[root@test1 ~]# tar zxf pycrypto-2.6.1.tar.gz
[root@test1 ~]# cd pycrypto-2.6.1
[root@test1 pycrypto-2.6.1]# python setup.py install安装PyYAML模块:
[root@test1 ~]# ls //下载链接:https://pyyaml.org/download/pyyaml/
pycrypto-2.6.1
pycrypto-2.6.1.tar.gz
Python-2.7.8
Python-2.7.8.tgz
PyYAML-3.11.tar.gz
setuptools-7.0
setuptools-7.0.tar.gz[root@test1 ~]# tar zxf PyYAML-3.11.tar.gz
[root@test1 ~]# cd PyYAML-3.11
[root@test1 PyYAML-3.11]# python setup.py install
安装Jinja2模块://下载链接:https://pypi.python.org/packages/source/M/MarkupSafe/MarkupSafe-0.9.3.tar.gz
[root@test1 ~]# tar zxf MarkupSafe-0.9.3.tar.gz
[root@test1 ~]# cd MarkupSafe-0.9.3
[root@test1 MarkupSafe-0.9.3]# python setup.py install[root@test1 ~]# tar zxf Jinja2-2.7.3.tar.gz //下载链接:https://pypi.python.org/packages/source/J/Jinja2/Jinja2-2.7.3.tar.gz
[root@test1 ~]# cd Jinja2-2.7.3
[root@test1 Jinja2-2.7.3]# python setup.py install安装paramiko模块:
[root@test1 ~]# tar zxf ecdsa-0.11.tar.gz https://pypi.python.org/packages/source/e/ecdsa/ecdsa-0.11.tar.gz
[root@test1 ~]# cd ecdsa-0.11
[root@test1 ecdsa-0.11]# python setup.py install[root@test1 ~]# tar zxf paramiko-1.15.1.tar.gz https://pypi.python.org/packages/source/p/paramiko/paramiko-1.15.1.tar.gz
[root@test1 ~]# cd paramiko-1.15.1
[root@test1 paramiko-1.15.1]# python setup.py install安装simplejson模块
[root@test1 ~]# tar zxf simplejson-3.6.5.tar.gz https://pypi.python.org/packages/source/s/simplejson/simplejson-3.6.5.tar.gz
[root@test1 ~]# cd simplejson-3.6.5
[root@test1 simplejson-3.6.5]# python setup.py install最后安装ansible
[root@test1 ~]# tar zxf ansible-1.7.2.tar.gz https://github.com/ansible/ansible/archive/v1.7.2.tar.gz
[root@test1 ~]# cd ansible-1.7.2
[root@test1 ansible-1.7.2]# python setup.py install到此ansible就配置完毕啦!!!
接下来继续进行server端配置
[root@test1 ansible-1.7.2]# cd examples/
[root@test1 examples]# ls
ansible.cfg DOCUMENTATION.yml hosts issues playbooks scripts
[root@test1 examples]# mkdir /etc/ansible
[root@test1 examples]# cp hosts ansible.cfg /etc/ansible/
1、SSH免密钥登录设置
[root@test1 ~]# ssh-keygen //生成公私钥对
[root@test1 ~]# cd /root/.ssh
[root@test1 .ssh]# ls //可以看到生成的公私钥对
id_rsa id_rsa.pub known_hosts
[root@test1 .ssh]# ssh-copy-id 172.25.254.11
[root@test1 .ssh]# cd ..
[root@test1 ~]# scp -r .ssh/ 172.25.254.12:/root/ //将公私钥对以及刚生成的认证发送给test2
[email protected]'s password:
known_hosts 100% 1970 1.9KB/s 00:00
id_rsa.pub 100% 392 0.4KB/s 00:00
authorized_keys 100% 392 0.4KB/s 00:00
id_rsa 100% 1675 1.6KB/s 00:00
[root@test1 ~]# ssh 172.25.254.12 //登陆test2,可以看到是免密登陆,即不需要输入test2的root密码就可以登陆test2的主机
当然test2登陆test1也是免密的
[root@test2 ~]# ssh 172.25.254.11
[root@test1 ~]# vim /etc/ansible/hosts //修改配置文件
#[dbservers]
#db01.intranet.mydomain.net
#db02.intranet.mydomain.net
#10.25.1.56
#10.25.1.57
# Here's another example of host ranges, this time there are no
# leading 0s:
#db-[99:101]-node.example.com
172.25.254.12
[root@test1 ~]# ansible all -m ping
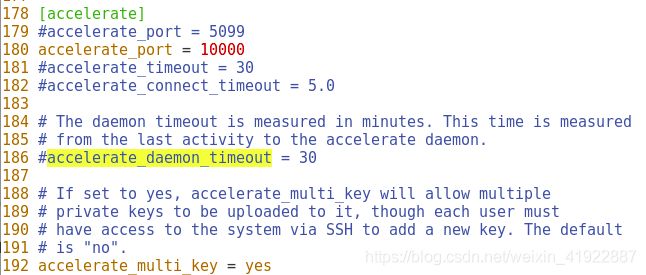
[root@test1 ~]# vim /etc/ansible/ansible.cfg
[root@test1 ~]# vim /etc/ansible/hosts //这里需要注意hosts文件里面的testhosts对应的主机必须已经下载过python2.7
[root@test1 ~]# ansible testhosts -m command -a 'w'
[root@test1 ~]# ansible all -m command -a 'uptime'
作为自动化运维工具,ansible当然可以批量的做一些事情
例如:通过ansible可以将本地文件/目录同步到想要发送的客户端
[root@test1 ~]# vim /var/www/html/index.html
[root@test1 ~]# ansible testhosts -s -m copy -a 'src=/var/www/html/index.html dest=/mnt/index.html mode=0755'
发送成功,接下来看看test1和test2是否同步过去文件
[root@test1 tmp]#
[root@test1 tmp]# cd /mnt/
[root@test1 mnt]# ls //可以看到文件已经推送过来
default.conf honeyd-1.5c.tar-2.gz index.html
[root@test1 mnt]# cat index.html
we are family
[root@test2 tmp]# cd /mnt/
[root@test2 mnt]# ls
index.html index.php keepalived-2.0.6
[root@test2 mnt]# cat index.html
we are family
接下来讲一些ansible常用的模块及命令等
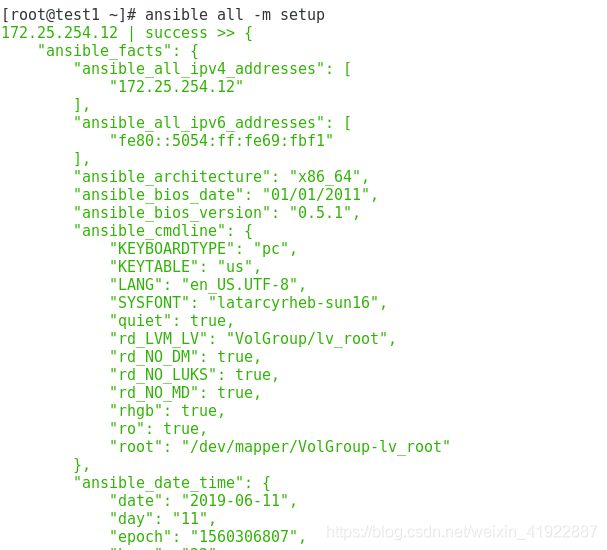
1、setup //用来查看远程主机的一些信息
[root@test1 ~]# ansible all -m setup
2、ping //查看远程主机的运行状态
3、file //设置文件的属性,例如:
[root@test1 ~]# ansible all -m file -a "src=/var/www/html/index.html dest=/tmp/index.html state=link"
具体详解:
| backup | 在覆盖远程服务器前将远程服务器的源文件进行备份,备份文件包含时间信息 |
| content | 用于替代 'src' ,可以直接设定制定文件的值 |
| src | 被链接的本地文件,可以是绝对路径也可以是相对路径,如果路径是目录,则它将递归复制。若路径是用/结尾,则只复制目录里的内容,若没有用/则复制目录里面的所有内容包括时间权限等,类似于rsync,只应用于state=link的情况 |
| dest | (必选项)被链接到的路径,要将源文件复制到的(远程主机的绝对路径),只应用于state=link的情况 |
| link | 创建软链接 |
| hard | 创建硬链接 |
| mode | 定义文件/目录的权限(四位数,如:mode=0755) |
| group | 定义文件/目录的属组 |
| owner | 定义文件/目录的属主 |
| path | 必选项,定义文件/目录的路径 |
| recurse | 递归设置文件的属性,只对目录有效 |
| directory | 如果目录不存在,就创建目录 |
| file | 即使文件不存在也不被创建 |
| touch | 如果文件不存在,则会创建一个新的文件,如果文件/目录已存在,则更新其最后修改时间 |
| absent | 删除目录、文件或者取消链接文件 |
| force | 两种情况下需要强制创建软链接,1、源文件不存在,但之后会建立的情况下;2、目标软链接已存在,需要先取消之前的软链接,然后创建新的软链 |
如:
[root@test1 etc]# ansible all -m command -a "ls -al /etc/passwd" //远程文件信息查看
[root@test1 ~]# ansible all -m file -a "src=/etc/passwd dest=/mnt/passwd state=link" //文件链接成功,此时/mnt下有文件passwd
[root@test1 mnt]# ansible all -m command -a "ls -al /mnt/passwd" //此时查看文件存在
[root@test1 mnt]# ansible all -m file -a "path=/mnt/passwd state=absent" //删除文件
[root@test1 mnt]# ansible all -m command -a "ls -al /mnt/passwd" //查看时报错,说明已经删除
4、copy //复制文件到远程主机
5、command //在远程主机上执行命令
参数有:
creates:一个文件名,当该文件存在,则该命令不执行
free_form:要执行的linux指令
chdir:在执行指令之前,先切换到该目录
removes:一个文件名,当该文件不存在,则该选项不执行
executable:切换shell来执行指令,该执行路径必须是一个绝对路径
ansible就介绍到这!!!
如果要还原虚拟机原本的状态不影响yum等命令,可以将之前的文件再还原回去,如下:
[root@test1 ~]# cd /usr/bin/
[root@test1 bin]# ls python*
python python2 python2.6 python.old
[root@test1 bin]# rm -rf python*
[root@test1 bin]# mv /tmp/python/* .
test2和test1的步骤一样,这里就不再赘述。
试一下看虚拟机是否正常可以用:
[root@test1 bin]# yum repolist //若出现这样的报错,可以执行下面的命令
-bash: /usr/bin/yum: /usr/bin/python2.4: bad interpreter: No such file or directory[root@test1 bin]# ls python*
python python2 python2.6[root@test1 bin]# mv python python2.4


