Harbor集成Clair镜像安全扫描并手动导入漏洞数据
通过这篇文章,你会了解到:
- harbor启停方法
- clair镜像扫描原理
- harbor数据库(MySQL)一览
- clair数据库(PostgreSql)一览
- harbor手动导入漏洞数据方法
背景
先说明下背景和版本
公司内网使用(无Internet)Harbor:V1.5.0,没有Clair,没有启用https。
需求:开启使用Clair进行镜像安全扫描。
PS:
- harbor介绍及安装可以参考文末链接资料
- 对于harbor 1.6以上版本导入漏洞数据稍有不同,见文中介绍
镜像扫描功能介绍
开源企业级镜像仓库 Harbor v1.2 新增了镜像漏洞扫描的功能,可以帮助用户发现容器镜像中的安全漏洞,及时采取防范措施。
容器镜像本质上是一系列静态文件的集合,也是容器应用运行的时候可见的文件系统。镜像扫描就是遍历所有镜像中的文件系统,逐个检查软件包(Package)是否包含安全漏洞。这个过程有点像我们电脑里面的扫病毒软件做的事情,把电脑的所有文件进行分析,和已知病毒数据库的病毒指纹特征做对比,从而发现病毒的踪迹。
Clair镜像扫描原理
clair的目标是能够从一个更加透明的维度去看待基于容器化的基础框架的安全性。Clair=clear + bright + transparent
在 Harbor 中,我们集成了开源项目 Clair 的扫描功能,可从公开的 CVE 字典库下载漏洞资料。CVE 是 Common Vulnerabilities and Exposures 的缩写,由一些机构自愿参与维护的软件安全漏洞标识,记录已知的漏洞标准描述及相关信息,公众可以免费获取和使用这些信息。全球共有77个机构参与维护不同软件的 CVE 库,例如:VMware 维护着 VMware 产品的 CVE 库,红帽维护着Linux 上的 CVE 等等。容器镜像基本上涉及的是 Linux 操作系统上的软件,因此镜像扫描需要参考 Linux 相关的 CVE 库,目前 Harbor(Clair)使用的CVE 源有:
Debian Security Bug Tracker
Ubuntu CVE Tracker
RedHat Security Data
Oracle Linux Security Data
Alpine SecDB
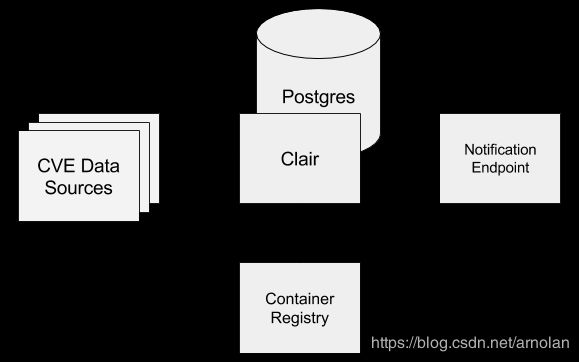
通过对容器的layer进行扫描,发现漏洞并进行预警,其使用数据是基于Common Vulnerabilities and Exposures数据库(简称CVE), 各Linux发行版一般都有自己的CVE源,而Clair则是与其进行匹配以判断漏洞的存在与否,比如HeartBleed的CVE为:CVE-2014-0160。具体的分层扫描比对原理流程参见文末链接资料。
重启Harbor启用Clair
OK,根据github上的安装文档描述,也容易,需要停一下harbor:
$ sudo docker-compose -f ./docker-compose.yml -f ./docker-compose.clair.yml down -v
$ vim harbor.cfg
$ sudo prepare --with-clair
$ sudo docker-compose -f ./docker-compose.yml -f ./docker-compose.clair.yml up -d
ps: 如果未修改配置则不用修改
OK, 我们先检查下所有的容器是否正常,现在VM上运行的容器有:
[root@bogon harbor]# docker ps
CONTAINER ID        IMAGE                                  COMMAND                  CREATED             STATUS                 PORTS                                                              NAMES
d113561e912a        vmware/harbor-jobservice:v1.5.0        "/harbor/start.sh"       2 hours ago         Up 2 hours                                                                                harbor-jobservice
7bdf130fcda8        vmware/nginx-photon:v1.5.0             "nginx -g 'daemon ..."   2 hours ago         Up 2 hours (healthy)   0.0.0.0:80->80/tcp, 0.0.0.0:443->443/tcp, 0.0.0.0:4443->4443/tcp   nginx
7e1e97981277        vmware/harbor-ui:v1.5.0                "/harbor/start.sh"       2 hours ago         Up 2 hours (healthy)                                                                      harbor-ui
b6ebd3b6e381        vmware/clair-photon:v2.0.1-v1.5.0      "/docker-entrypoin..."   2 hours ago         Up 2 hours (healthy)   6060-6061/tcp                                                      clair
3d6c9108b564        vmware/redis-photon:v1.5.0             "docker-entrypoint..."   2 hours ago         Up 2 hours             6379/tcp                                                           redis
e96278accc6f        vmware/postgresql-photon:v1.5.0        "/entrypoint.sh po..."   2 hours ago         Up 2 hours (healthy)   5432/tcp                                                           clair-db
11592f2f6cef        vmware/registry-photon:v2.6.2-v1.5.0   "/entrypoint.sh se..."   2 hours ago         Up 2 hours (healthy)   5000/tcp                                                           registry
bf8b6a808fe7        vmware/harbor-adminserver:v1.5.0       "/harbor/start.sh"       2 hours ago         Up 2 hours (healthy)                                                                      harbor-adminserver
ea117c821aa8        vmware/harbor-db:v1.5.0                "/usr/local/bin/do..."   2 hours ago         Up 2 hours (healthy)   3306/tcp                                                           harbor-db
4ad88c87d579        vmware/harbor-log:v1.5.0               "/bin/sh -c /usr/l..."   2 hours ago         Up 2 hours (healthy)   127.0.0.1:1514->10514/tcp                                          harbor-log
然后再Harbor UI中检查功能是否已经有漏洞扫描的相关界面了,包括配置界面里面也可以看到,你可以点击扫描,很幸运,它会告诉你:哇,没问题,一个漏洞也没有,很干净!
是不是很激动,然鹅,是因为数据库没有下载漏洞元CVE数据而已。
而且你会看到harbor界面中有黄色告警标志:
“Vulnerability database might not be fully ready”
漏洞数据库没有完全准备好!
我们这篇文章就是要解决这个问题,先来看下我们的harbor数据库界面,先登陆harbor-db这个容器
注意: 因为是1.5.0版本的,所以Harbor还是用的Mysql数据库
,而Harbor 1.5.0版本的Clair是用的postgresql数据库,Harbor 1.6.0以后的版本则统一使用postgresql数据库了
登陆后可以看到我们使用的是registry这个库,关注到其后这张表:clair_vuln_timestamp,它是Clair漏洞元扫描的时间戳记录,查询后发现是空的有没有???
这就说明harbor的Clair并没有同步过CSV漏洞元数据
[root@bogon harbor]# docker exec -it harbor-db /bin/bash
root [ / ]# mysql -h localhost -p -uroot
Enter password:
Welcome to the MariaDB monitor.  Commands end with ; or \g.
Your MariaDB connection id is 456
Server version: 10.2.14-MariaDB Source distribution

Copyright (c) 2000, 2018, Oracle, MariaDB Corporation Ab and others.

Type 'help;' or '\h' for help. Type '\c' to clear the current input statement.

MariaDB [(none)]> show tables;
ERROR 1046 (3D000): No database selected
MariaDB [(none)]> show databases;
+--------------------+
| Database           |
+--------------------+
| information_schema |
| mysql              |
| performance_schema |
| registry           |
+--------------------+
4 rows in set (0.55 sec)

MariaDB [(none)]> use registry
Reading table information for completion of table and column names
You can turn off this feature to get a quicker startup with -A

Database changed
MariaDB [registry]> show tables;
+-------------------------------+
| Tables_in_registry            |
+-------------------------------+
| access                        |
| access_log                    |
| alembic_version               |
| clair_vuln_timestamp          |
| harbor_label                  |
| harbor_resource_label         |
| img_scan_job                  |
| img_scan_overview             |
| project                       |
| project_member                |
| project_metadata              |
| properties                    |
| replication_immediate_trigger |
| replication_job               |
| replication_policy            |
| replication_target            |
| repository                    |
| role                          |
| user                          |
| user_group                    |
+-------------------------------+
20 rows in set (0.01 sec)

MariaDB [registry]> select * from clair_vuln_timestamp;
Empty set (0.12 sec)
那么,要怎么办?
答案是:等。
如果是Internet环境并开放了443端口,Clair会每隔12小时(配置文件中可以看到)进行一次同步。
但是我们是公司局域网没有办法同步,怎么办?那么要么就只有设置代理了。这个是后话,后面我们需要由安全部门统一的去做这个事,我现在只是验证我们的Clair是否可以正常工作以及把当前的漏洞元下载下来,毕竟漏洞元这玩意儿不是查一时半会没问题。那么就要开始我们的第二步了,导入漏洞源数据。
导入CVE漏洞元数据
OK,我们在GitHub社区文档中找到答案:import_vulnerability_data.md
按照文档说明,在没有外网连接的情况下只能手动导入漏洞元数据了,下面我一边手动翻译这篇文档,一边按照它说的来做:
Preparation 准备
A. You need to install an instance of Clair with internet connection. If you have another instance of Harbor with internet access, it also works.
A. 你需要安装一个带有互联网连接的Clair实例,如果你有另外一个可以联网的harbor实例的话,当然也是可以的。
没辙,我们选择直接搭建一个Clair实例,按照Clair官网安装文档来做,其实也很简单,我们选择dockers的方式来部署,先在当前目录建一个clair_config目录,然后下载clair的配置文件,也不需要修改什么,毕竟我们只是用来在外网下载漏洞元数据的,同时这里需要留一下,Clair是需要postresql(9.4以上版本)支持的,所以需要先安装一个pg数据库容器,然后就直接从官网拉镜像指定配置文件和pg数据库密码、端口等把容器跑起来:
$ mkdir $PWD/clair_config
$ curl -L https://raw.githubusercontent.com/coreos/clair/master/config.yaml.sample -o $PWD/clair_config/config.yaml
$ docker run -d -e POSTGRES_PASSWORD="" -p 5432:5432 postgres:9.6
$ docker run --net=host -d -p 6060-6061:6060-6061 -v $PWD/clair_config:/config quay.io/coreos/clair:latest -config=/config/config.yaml
这里需要留意的一点就是文档中给出来的默认是clair-git:latest版本(开发版本),我安装完之后获取漏洞元的时候总是报错,直接然后大量写日志,最终运行几分钟后容器直接退出了
如下,可以看到退出码Exited(137):
[root@bogon harbor]# docker ps -a
CONTAINER ID        IMAGE                                        COMMAND                  CREATED             STATUS                      PORTS                                                              NAMES
8edb84178c89        quay.io/coreos/clair-git:latest              "/usr/bin/dumb-ini..."   2 hours ago         Exited (137) 2 hours ago                                                                       happy_montalcini
再看日志,大量的日志报这个错:
[root@bogon harbor]# docker logs 8edb84178c89
{"Event":"Could not extract package name and version from comment","Level":"warning","Location":"suse.go:396","Time":"2019-10-20 10:21:40.350470","comment":"hyper-v-7-7 is installed","error":"Cannot extract package name and version from hyper-v-7-7"}
{"Event":"could not determine a valid package from criterions","Level":"warning","Location":"suse.go:419","Time":"2019-10-20 10:21:40.350489","criterions":"[{SUSE Linux Enterprise Server 12 SP4 is installed} {hyper-v-7-7 is installed}]"}
搞了半天也每弄明白这个是什么问题,完全没有头绪,最终解决办法就是换了稳定版:clair:latest
但是马上又报了一个错误:parent_id
[root@bogon harbor]# docker logs 1f876c2b02f7
{"Event":"running database migrations","Level":"info","Location":"pgsql.go:216","Time":"2019-10-20 10:36:18.713848"}
{"Event":"pgsql: an error occured while running migrations: migration 2 failed: pq: column \"parent_id\" does not exist","Level":"fatal","Location":"main.go:96","Time":"2019-10-20 10:36:18.731490"}
在GitHub issue中翻了翻,好像是说数据库不干净导致的,因为之前我在使用clair-git版本之前就已经安装了数据库,所以我就把这个pg容器先干掉,重新docker run拉起来,然后再拉起clair:latest容器即可。
当然对于直接按照我上面写的稳定版本的话应该不会遇到这个问题。浪费了我不少时间。
B. Check whether your Clair instance has already updated the vulnerability database to the latest version. If it has not, wait for Clair to get the data from public endpoints.
B. 检查你的Clair实例是否已经更新了漏洞数据库到最新的版本,如果没有,等待Clair从公共节点中获取数据。
- Use command docker ps to find out the container id of Clair.使用命令docker ps找出这个正在用的Clair容器(即下方的ef39b37cbb73)
docker ps
[root@bogon harbor]# docker ps
CONTAINER ID        IMAGE                                  COMMAND                  CREATED             STATUS                 PORTS                                                              NAMES
ef39b37cbb73        quay.io/coreos/clair:latest            "/clair -config=/c..."   2 hours ago         Up 2 hours                                                                                distracted_curran
7bb02fc793e9        postgres:9.6                           "docker-entrypoint..."   2 hours ago         Up 2 hours             0.0.0.0:5432->5432/tcp                                             agitated_kirch
- Run command docker logs container_id to check the log of the Clair container. If you are using Harbor you can find the latest Clair log under /var/log/harbor/2017-xx-xx/clair.log 使用命令docker logs来检查Clair容器日志,如果你使用可以联网的Harbor实例的话则可以从这个文件夹下检查Clair的日志:/var/log/harbor/2017-xx-xx/clair.log (PS:我harbor 1.5的版本是统一在/var/log/harbor文件夹下没有按日期区分,如下所示,查看其中的clair.log即可:)
[root@bogon harbor]# pwd
/var/log/harbor
[root@bogon harbor]# ll
总用量 11756
-rw-r----- 1 10000 10000      61 10月 14 11:43 #015.log
-rw-r----- 1 10000 10000      43 10月 14 11:43 Accept:.log
-rw-r----- 1 10000 10000  933825 10月 20 21:06 adminserver.log
-rw-r----- 1 10000 10000   14420 10月 20 19:48 clair-db.log
-rw-r----- 1 10000 10000 4787144 10月 20 19:48 clair.log
-rw-r----- 1 10000 10000      52 10月 14 11:43 Host:.log
-rw-r----- 1 10000 10000   63811 10月 20 19:48 jobservice.log
-rw-r----- 1 10000 10000      35 10月 10 17:30 _.log
-rw-r----- 1 10000 10000   79281 10月 20 20:00 mysql.log
-rw-r----- 1 10000 10000 1642362 10月 20 21:06 proxy.log
-rw-r----- 1 10000 10000  967146 10月 20 21:02 redis.log
-rw-r----- 1 10000 10000 2870674 10月 20 21:06 registry.log
-rw-r----- 1 10000 10000  326855 10月 20 21:06 ui.log
-rw-r----- 1 10000 10000      55 10月 14 11:43 User-Agent:.log

[root@bogon harbor]# cat clair.log|tail -n 100  |grep 'finished'
Oct 20 19:43:36 172.19.0.1 clair[14222]: {"Event":"finished fetching","Level":"info","Location":"updater.go:227","Time":"2019-10-20 11:43:36.566392","updater name":"debian"}
Oct 20 19:43:46 172.19.0.1 clair[14222]: {"Event":"update finished","Level":"info","Location":"updater.go:198","Time":"2019-10-20 11:43:46.198349"}
Oct 20 19:43:46 172.19.0.1 clair[14222]: {"Event":"finished fetching","Level":"info","Location":"updater.go:227","Time":"2019-10-20 11:43:46.286040","updater name":"rhel"}
Oct 20 19:43:46 172.19.0.1 clair[14222]: {"Event":"finished fetching","Level":"info","Location":"updater.go:227","Time":"2019-10-20 11:43:46.879641","updater name":"oracle"}
Oct 20 19:43:48 172.19.0.1 clair[14222]: {"Event":"finished fetching","Level":"info","Location":"updater.go:227","Time":"2019-10-20 11:43:48.210510","updater name":"debian"}
Oct 20 19:43:59 172.19.0.1 clair[14222]: {"Event":"update finished","Level":"info","Location":"updater.go:198","Time":"2019-10-20 11:43:59.626580"}
PS:这里其实可以看出,默认的harbor 1.5.0版本实例(即使带有互联网功能,它依然无法下载全所有的漏洞元数据,只下载了三个:debian, oracal, rhel,还有alpine和ubuntu失败了,原因是:
Oct 20 19:43:46 172.19.0.1 clair[14222]: {"Event":"could not pull Ubuntu repository","Level":"error","Location":"ubuntu.go:189","Time":"2019-10-20 11:43:46.391348","error":"exit status 3","output":"bzr: ERROR: Not a branch: \"/tmp/ubuntu-cve-tracker887025464/\".\n"}
Oct 20 19:43:46 172.19.0.1 clair[14222]: {"Event":"an error occured when fetching update","Level":"error","Location":"updater.go:220","Time":"2019-10-20 11:43:46.391457","error":"could not download requested resource","updater name":"ubuntu"}
这里说明下原因:Clair漏洞数据源已经不再支持bzr(版本控制工具)的方式,而是改用了git方式来做版本控制,导致Clair的bzr命令拉取失败,这里又是一个坑,参考:Clair cannot download Ubuntu CVEs anymore (56996),里面的原因说得很清楚:The updates for the known Common Vulnerabilities and Exposures (CVE) are now provided in the git format where previously these were provided in the bzr format. 现在,已知的常见漏洞和披露(CVE)的更新以git格式提供,以前这些更新是以bzr格式提供的。
总的来说建议升级harbor
好,上面是题外话,针对使用可以联网的harbor容器的,我们继续翻译,
- Look for logs that look like the below:查看日志如下所示:
Jul 3 20:40:46 172.18.0.1 clair[3516]: {"Event":"finished fetching","Level":"info","Location":"updater.go:227","Time":"2017-07-04 03:40:46.768924","updater name":"alpine"}
Jul 3 20:40:47 172.18.0.1 clair[3516]: {"Event":"finished fetching","Level":"info","Location":"updater.go:227","Time":"2017-07-04 03:40:47.190982","updater name":"oracle"}
Jul 3 20:41:07 172.18.0.1 clair[3516]: {"Event":"Debian buster is not mapped to any version number (eg. Jessie-\u003e8). Please update me.","Level":"warning","Location":"debian.go:128","Time":"2017-07-04 03:41:07.833720"}
Jul 3 20:41:07 172.18.0.1 clair[3516]: {"Event":"finished fetching","Level":"info","Location":"updater.go:227","Time":"2017-07-04 03:41:07.833975","updater name":"debian"}
Jul 4 00:26:17 172.18.0.1 clair[3516]: {"Event":"finished fetching","Level":"info","Location":"updater.go:227","Time":"2017-07-04 07:26:17.596986","updater name":"ubuntu"}
Jul 4 00:26:18 172.18.0.1 clair[3516]: {"Event":"adding metadata to vulnerabilities","Level":"info","Location":"updater.go:253","Time":"2017-07-04 07:26:18.060810"}
Jul 4 00:38:05 172.18.0.1 clair[3516]: {"Event":"update finished","Level":"info","Location":"updater.go:198","Time":"2017-07-04 07:38:05.251580"}
The phrase “finished fetching” indicates that Clair has finished a round of vulnerability update from an endpoint. Please make sure all five endpoints (rhel, alpine, oracle, debian, ubuntu) are updated correctly.
其中 “finished fetching” 表示Clair已经完成了从一个公开节点漏洞数据的更新,请确保所有5个节点(rhel, alpine, oracle, debian, ubuntu)都已经正确更新完成。(即如下所示:)
PS:这里需要说明下下载的时间其实也没有太久,没有网上说的几个小时,正常大概十几二十分钟就下载好了,可能和网速也有关系,毕竟是外网,可以的话用VPN,但可能有报错,逐一察看解决
[root@bogon harbor]# docker logs ef39b37cbb73|grep 'finished'
{"Event":"finished fetching","Level":"info","Location":"updater.go:253","Time":"2019-10-20 10:47:44.794085","updater name":"alpine"}
{"Event":"finished fetching","Level":"info","Location":"updater.go:253","Time":"2019-10-20 10:47:46.352260","updater name":"debian"}
{"Event":"finished fetching","Level":"info","Location":"updater.go:253","Time":"2019-10-20 10:49:52.513690","updater name":"ubuntu"}
{"Event":"finished fetching","Level":"info","Location":"updater.go:253","Time":"2019-10-20 11:02:42.302675","updater name":"oracle"}
{"Event":"finished fetching","Level":"info","Location":"updater.go:253","Time":"2019-10-20 11:03:54.541151","updater name":"rhel"}
{"Event":"update finished","Level":"info","Location":"updater.go:223","Time":"2019-10-20 11:15:48.724593"}
对于Harbor 1.6以下版本(本篇关注)
参考对应版本里面的文档,我们是1.5的版本,打开对应文档
Dumping vulnerability data 导出数据
Log in to the host (that is connected to Internet) where Clair database (Postgres) is running.
登陆运行Clair数据库(Postgres)的服务器(可以连互联网)
Dump Clair’s vulnerability database by the following commands, two files (vulnerability.sql and clear.sql) are generated:
通过以上的命令导出Clair的漏洞元数据库,会生成以下两个文件(vulnerability.sql and clear.sql)
$ docker exec clair-db /bin/bash -c  "pg_dump -U postgres -a -t feature -t keyvalue -t namespace -t schema_migrations -t vulnerability -t vulnerability_fixedin_feature" > vulnerability.sql
$ docker exec clair-db /bin/bash -c "pg_dump -U postgres -c -s" > clear.sql
PS:以上命令中的clair-db容器就是自己的Clair实例所用的Pg数据库容器名称,如果之前docker run的时候没有给这个容器专门命名为clair-db的话可能不叫这个名字,根据自己的实际环境填写即可(harbor中集成的Clair所用的db名称就是clair-db)
对于Clair所用的Pg数据库,我们这里也可以简单的介绍下
postgresql的基本操作大家可以自行查阅下,我们来看下Clair所用的db结构[root@bogon lanjian]# docker exec -it 7bb02fc793e9 /bin/bash root@7bb02fc793e9:/# su postgres postgres@7bb02fc793e9:/$ psql psql (9.6.15) Type "help" for help. postgres=# \l List of databases Name | Owner | Encoding | Collate | Ctype | Access privileges -----------+----------+----------+------------+------------+----------------------- postgres | postgres | UTF8 | en_US.utf8 | en_US.utf8 | template0 | postgres | UTF8 | en_US.utf8 | en_US.utf8 | =c/postgres + | | | | | postgres=CTc/postgres template1 | postgres | UTF8 | en_US.utf8 | en_US.utf8 | =c/postgres + | | | | | postgres=CTc/postgres (3 rows) postgres=# \d List of relations Schema | Name | Type | Owner --------+---------------------------------------------+----------+---------- public | feature | table | postgres public | feature_id_seq | sequence | postgres public | featureversion | table | postgres public | featureversion_id_seq | sequence | postgres public | keyvalue | table | postgres public | keyvalue_id_seq | sequence | postgres public | layer | table | postgres public | layer_diff_featureversion | table | postgres public | layer_diff_featureversion_id_seq | sequence | postgres public | layer_id_seq | sequence | postgres public | lock | table | postgres public | lock_id_seq | sequence | postgres public | namespace | table | postgres public | namespace_id_seq | sequence | postgres public | schema_migrations | table | postgres public | vulnerability | table | postgres public | vulnerability_affects_featureversion | table | postgres public | vulnerability_affects_featureversion_id_seq | sequence | postgres public | vulnerability_fixedin_feature | table | postgres public | vulnerability_fixedin_feature_id_seq | sequence | postgres public | vulnerability_id_seq | sequence | postgres public | vulnerability_notification | table | postgres public | vulnerability_notification_id_seq | sequence | postgres (23 rows)这次我们要导出的数据表有feature、keyvalue 、namespace 、schema_migrations、vulnerability、vulnerability_fixedin_feature以及表结构整体
这几个表的功能可以自己查下内容和文档就知道了,比如:postgres=# \d feature Table "public.feature" Column | Type | Modifiers --------------+------------------------+------------------------------------------------------ id | integer | not null default nextval('feature_id_seq'::regclass) namespace_id | integer | not null name | character varying(128) | not null Indexes: "feature_pkey" PRIMARY KEY, btree (id) "feature_namespace_id_name_key" UNIQUE CONSTRAINT, btree (namespace_id, name) Foreign-key constraints: "feature_namespace_id_fkey" FOREIGN KEY (namespace_id) REFERENCES namespace(id) Referenced by: TABLE "featureversion" CONSTRAINT "featureversion_feature_id_fkey" FOREIGN KEY (feature_id) REFERENCES feature(id) TABLE "vulnerability_fixedin_feature" CONSTRAINT "vulnerability_fixedin_feature_feature_id_fkey" FOREIGN KEY (feature_id) REFERENCES feature(id)
Back up Harbor’s Clair database备份Harbor的Clair数据库
Before importing the data, it is strongly recommended to back up the Clair database in Harbor.
在导入数据之前,强烈建议备份Harbor中的Clair数据库
$ docker exec clair-db /bin/bash -c "pg_dump -U postgres -c" > all.sql
Update Harbor’s Clair databas 更新Harbor的Clair数据库
Copy the vulnerability.sql and clear.sql to the host where Harbor is running on. Run the below commands to import the data to Harbor’s Clair database:
拷贝vulnerability.sql 和 clear.sql这两个文件到Harbor运行的服务器,执行如下命令导入到harbor的Clair数据库中:
$ docker exec -i clair-db psql -U postgres < clear.sql
$ docker exec -i clair-db psql -U postgres < vulnerability.sql
Rescanning images重新扫描镜像
After importing the data, trigger the scanning process in the administrator’s web UI: Administration->Configuration->Vulnerability->SCAN NOW. Harbor reflects the new changes after the scanning is completed. (Otherwise the summary of the image vulnerabilities will not be displayed correctly.)
完成数据导入后,在harbor ui界面中触发扫描进程:系统管理–》配置管理–》漏洞–》开始扫描。扫描完成后Harbor界面中可以看到一些新的提示(否则镜像的漏洞扫描总结就不会准确的展示)

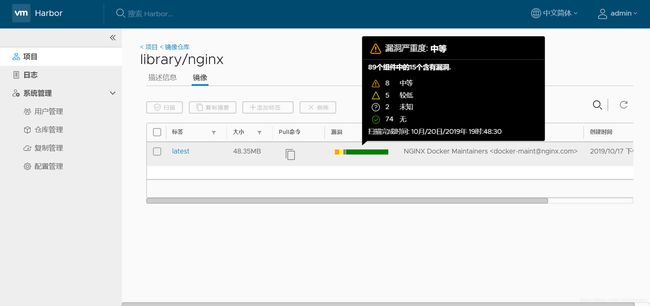
稍微等扫描完成后,就可以看到结果啦

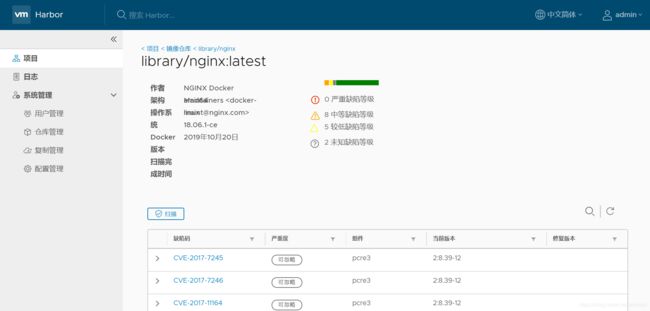
点击标签可以进入查看扫描详情

对于Harbor 1.6以上版本
Databased were consolidated in version 1.6 which moved the clair database to the harbor-db container and removed the clair-db container.
版本1.6数据库中已经统一clair和harbor的数据库了,将clair数据库移到harbor-db里面并移除了clair-db容器。
PS:也就是说,导出的两个数据库文件导入harbor的时候需要留意并不是导入到clair-db这个容器,而是harbor-db这个容器,比如说更新数据库时执行的就是harbor-db这个容器,而不是上文中的clair-db,备份的也是harbor-db,其他流程时是一样的:
 $ docker exec -i harbor-db psql -U postgres < clear.sql
 $ docker exec -i harbor-db psql -U postgres < vulnerability.sql
参考资料(GitHub官网文档我就不单独贴了)
- Harbor UI shows a warning “Vulnerability database might not be fully ready” (65192),官方VMware Knowledge Base
这篇文章最主要参考的解决问题方案 - 安装harbor1.6 企业级镜像仓库,作者:bdslinux
总体比较全面的流程 - Harbor 完全定制手册 – 制作一个更好用的registry,作者:jagjag
很详细,包括证书签发/存储更改/Clair安装等 - Harbor仓库镜像扫描原理,作者:君无止境
将总体原理做了介绍 - 安全防护工具之:Clair,作者: liumiaocn
这篇文章的时间是2017年8月,Clair单独的安装部分可以参考这篇文章,里面clairctl已经停更了,可用可不用,可以结合下面这篇一年后写的文章一起看 - 安全工具:无疾而终的clairctl,作者:liumiaocn
clairctl可以单独生成html报告,对clairctl感兴趣的可以了解下,因为harbor和Clair集成方案已经很好了,没有必要再用一个停更了工具 - 【Docker】镜像安全扫描工具clair与clairctl,作者:SunAlwaysOnline
同上,有兴趣的可以了解下,也是参考了上述两篇文章写的 - docker基础:私库系列:再探Harbor:(5)集成clair,作者:liumiaocn
上面两篇介绍clair文章的作者写的harbor集成clair的介绍文章 ,可以了解下
