【死磕Redis系列】二、Redis安装配置
------------------------------------------------------------------------------------------------------慢慢来,一切都来得及
一、安装gcc依赖
由于 redis 是用 C 语言开发,安装之前必先确认是否安装 gcc 环境(gcc -v),如果没有安装,执行以下命令进行安装
[root@centos7-1 local]# yum install -y gcc
二、下载并解压安装包
1.在 opt/下创建redis目录
[root@centos7-1 opt]# mkdir redis
2.cd进入redis目录下载redis安装包
[root@centos7-1 redis]# wget http://download.redis.io/releases/redis-5.0.5.tar.gz
3.解压
[root@centos7-1 redis]# tar -xzvf redis-5.0.5.tar.gz
三、切换到redis解压目录下,执行编译
[root@centos7-1 redis]# cd redis-5.0.5
[root@centos7-1 redis-5.0.5]# make
此时报错了......
In file included from adlist.c:34:0: zmalloc.h:50:31: fatal error: jemalloc/jemalloc.h: No such file or directory #include
原因分析:
方案1
在README 有这个一段话
Allocator
---------
Selecting a non-default memory allocator when building Redis is done by setting
the `MALLOC` environment variable. Redis is compiled and linked against libc
malloc by default, with the exception of jemalloc being the default on Linux
systems. This default was picked because jemalloc has proven to have fewer
fragmentation problems than libc malloc.
To force compiling against libc malloc, use:
% make MALLOC=libc
To compile against jemalloc on Mac OS X systems, use:
% make MALLOC=jemalloc
说关于分配器allocator, 如果有MALLOC 这个 环境变量, 会有用这个环境变量的 去建立Redis。
而且libc 并不是默认的 分配器, 默认的是 jemalloc, 因为 jemalloc 被证明 有更少的 fragmentation problems 比libc。
但是如果你又没有jemalloc 而只有 libc 当然 make 出错。 所以加这么一个参数。
这时候在编译过程时增加一个参数:
[root@centos7-1 redis-5.0.5]# make MALLOC=libc
方案2
使用命令-- make distclean 先清除残留文件,之后再make
编译成功:
四、安装
make install 会将make编译生成的可执行文件拷贝到/usr/local/bin目录下
[root@centos7-1 redis-5.0.5]# make install
五、启动redis服务
5.1前台启动
切换到redis安装目录src下,直接启动
[root@centos7-1 redis-5.0.5]# cd src
[root@centos7-1 src]# ./redis-server
redis启动成功,这种启动方式需要一直打开窗口,不太方便.按 ctrl + c可以关闭窗口。
5.2后台启动
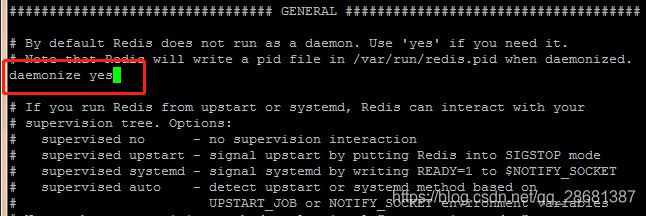
1在redis安装目录下找到redis.conf文件,daemonize = no 修改为 daemonize = yes
2指定redis.conf文件启动
[root@centos7-1 src]# ./redis-server /opt/redis/redis-5.0.5/redis.conf
3关闭redis进程
首先使用ps -aux | grep redis查看redis进程
使用kill命令杀掉redis进程
[root@centos7-1 src] kill 63468
5.3设置开机自启动
1、在/etc目录下新建redis目录
mkdir redis
[root@centos7-1 etc]# mkdir redis
2、将/opt/redis/redis-5.0.5/redis.conf 文件复制一份到/etc/redis目录下,并命名为6379.conf
[root@centos7-1 redis]# cp /opt/redis/redis-5.0.5/redis.conf /etc/redis/6379.conf
3、将redis的启动脚本复制一份放到/etc/init.d目录下
[root@centos7-1 init.d]# cp /opt/redis/redis-5.0.5/utils/redis_init_script /etc/init.d/redisd
4、设置redis开机自启动
先切换到/etc/init.d目录下
然后执行自启命令
[root@centos7-1 init.d]# chkconfig redisd on
service redisd does not support chkconfig
看结果是redisd不支持chkconfig
解决方法:
使用vim编辑redisd文件,在第一行加入如下两行注释,保存退出
# chkconfig:   2345 90 10
# description:  Redis is a persistent key-value database
注释的意思是,redis服务必须在运行级2,3,4,5下被启动或关闭,启动的优先级是90,关闭的优先级是10。
再次执行开机自启命令,成功
[root@centos7-1 init.d]# chkconfig redisd on
现在可以直接已服务的形式启动和关闭redis了
启动:
service redisd start
[root@centos7-1 ~]# service redisd start
Starting Redis server...
2288:C 13 Dec 13:51:38.087 # oO0OoO0OoO0Oo Redis is starting oO0OoO0OoO0Oo
2288:C 13 Dec 13:51:38.087 # Redis version=4.0.6, bits=64, commit=00000000, modified=0, pid=2288, just started
2288:C 13 Dec 13:51:38.087 # Configuration loaded
关闭:
方法1:service redisd stop
[root@centos7-1 ~]# service redisd stop
Stopping ...
Redis stopped
方法2:redis-cli SHUTDOWN
考虑到 Redis 有可能正在将内存中的数据同步到硬盘中,强行终止 Redis 进程可能会导 致数据丢失。正确停止Redis的方式应该是向Redis发送SHUTDOWN命令,方法为: redis-cli SHUTDOWN
当Redis收到SHUTDOWN命令后,会先断开所有客户端连接,然后根据配置执行持久 化,最后完成退出。 Redis可以妥善处理 SIGTERM信号,所以使用 kill Redis 进程的 PID也可以正常结束 Redis,效果与发送SHUTDOWN命令一样。
配置远程连接
注意:在3.2版本后Redis默认运行在保护模式下,客户端也不需要认证的密码,在这种情况下只允许lookback(127.0.0.1)连接,要想远程连接,需要
1.在redis.conf配置文件中,注释掉 bind 127.0.0.1 或者修改为 bind 0.0.0.0 ,允许所有ip访问连接
2.将 protected-mode yes改为 protected-mode no
3.服务器开放6379端口(本测试机为CentOS7)
/sbin/iptables -I INPUT -p tcp --dport 6379 -j ACCEPT
测试远程连接:可在测试远程机器用 telnet ip port 进行测试 ,例 telnet 192.168.16.128 6379 ,如果设置密码,telnet成功后 输入 auth 密码 即可进行 set get测试。
设置密码
修改配置文件redis.conf
requirepass 123456
如果使用密码在登陆的需要指定密码
redis-cli -h 192.168.1.101 -p 6379 -a 123456
查看当前连接客户端:
CLIENT LIST获取客户端列表


