SpringBoot+Websocket+stomp
第一步:引入pom.xml
    4.0.0
    com.hikvision.zl
    websocket
    1.0-SNAPSHOT
    war
    websocket
    Demo project for Spring Boot

        org.springframework.boot
        spring-boot-starter-parent
        2.1.4.RELEASE


        1.8


            org.springframework.boot
            spring-boot-starter-thymeleaf


            org.springframework.boot
            spring-boot-starter-web


            org.projectlombok
            lombok
            true


            org.springframework.boot
            spring-boot-starter-test
            test


            org.springframework.boot
            spring-boot-devtools
            true


            org.springframework.boot
            spring-boot-starter-websocket
            2.1.4.RELEASE


            org.webjars.npm
            mdui
            0.4.0


            org.webjars
            webjars-locator-core
            0.37


            org.webjars
            sockjs-client
            1.1.2


            org.webjars
            stomp-websocket
            2.3.3-1


            org.webjars
            jquery
            3.4.0


            com.alibaba
            fastjson
            1.2.49


            org.springframework.boot
            spring-boot-starter-tomcat
            provided


        websocket


                org.springframework.boot
                spring-boot-maven-plugin
第二步:配置Websocket
package com.zl.config;

import org.springframework.context.annotation.Configuration;
import org.springframework.messaging.simp.config.MessageBrokerRegistry;
import org.springframework.web.socket.config.annotation.EnableWebSocketMessageBroker;
import org.springframework.web.socket.config.annotation.StompEndpointRegistry;
import org.springframework.web.socket.config.annotation.WebSocketMessageBrokerConfigurer;

/**
 * @packagb:com.zl.config
 * @Author: fab
 * @Description:websocket配置类
 * @Date:Create:in 2019/11/22
 * @Modified By:
 */
@Configuration
@EnableWebSocketMessageBroker//使用此注解来标识使能WebSocket的broker.即使用broker来处理消息.
public class WebSocketConfig implements WebSocketMessageBrokerConfigurer {
    /**
     * 连接路径配置
     *
     * @param registry
     */
    @Override
    public void registerStompEndpoints(StompEndpointRegistry registry) {

        /*
         * 路径"/websocket"被注册为STOMP端点,对外暴露,客户端通过该路径获取与socket的连接
         */
        registry.addEndpoint("/chat").setAllowedOrigins("*").withSockJS();
    }

    /**
     * 服务端接收消息路径配置
     *
     * @param config
     */
    @Override
    public void configureMessageBroker(MessageBrokerRegistry config) {
        //消息代理的前缀 该路径消息会被代理通过广播方式发给客户端(广播路径)
        config.enableSimpleBroker("/topic");

        /*
         * 过滤该路径集合发送过来的消息,被@MessageMapping注解的方法接收处理具体决定广播还是单点发送到客户端
         */
        config.setApplicationDestinationPrefixes("/app", "/queue");
    }


}
第三步:消息实体类
package com.zl.model;

import lombok.AllArgsConstructor;
import lombok.Data;
import lombok.NoArgsConstructor;

/**
 * @packagb:com.zl.model
 * @Author: fab
 * @Description: 消息类
 * @Date:Create:in 2019/11/22
 * @Modified By:
 */
@Data
@AllArgsConstructor
@NoArgsConstructor
public class Message {
    private String name; //发送人
    private String content; //发送消息
    private String date;

}
第四步:控制类
package com.zl.controller;

import com.zl.model.Message;
import lombok.extern.slf4j.Slf4j;
import org.springframework.beans.factory.annotation.Autowired;
import org.springframework.messaging.handler.annotation.MessageMapping;
import org.springframework.messaging.handler.annotation.SendTo;
import org.springframework.messaging.simp.SimpMessagingTemplate;
import org.springframework.stereotype.Controller;
import org.springframework.web.bind.annotation.RequestMapping;

/**
 * @packagb:com.zl.controller
 * @Author: fab
 * @Description:websoket控制类
 * @Date:Create:in 2019/11/22
 * @Modified By:
 */
@Controller
@Slf4j
public class WebSocketController {
    @Autowired
    private SimpMessagingTemplate messagingTemplate;

    /*页面入口*/
    @RequestMapping("/chat")
    public String chat() {
        return "chat";
    }
    /**
     * 群发
     *
     * @param message
     * @return
     * @throws Exception
     */
    @MessageMapping("/hello") //接收/app/hello路径发来的信息:/app被@MessageMapping拦截,/hello被注解内参数拦截
    @SendTo("/topic/greetings")//接收上面路径发来的消息后在发送到广播的路径上 即会被代理进行广播群发
    public Message messageHandling(Message message) throws Exception {
        return message;
    }
}
注意:
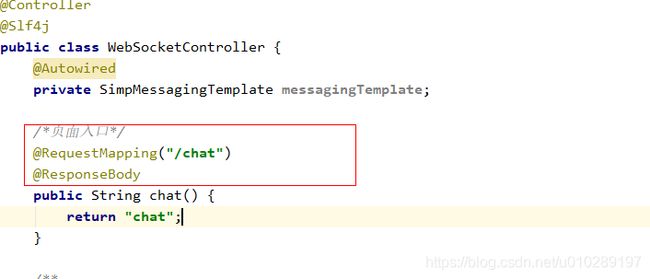
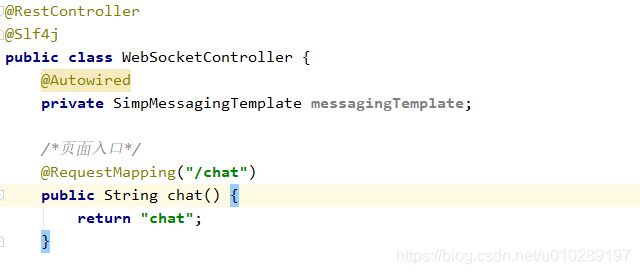
1.要用Spring的原生注解@Controller,而不是SpringBoot的RestController注解。
2. @RequestMapping("/chat")而不是要用@RequestMapping("/chat")和
@ResponseBody组合的注解。
和
访问时不能跳转到制定的页面。
第五步:定时任务
package com.zl.job;

import com.zl.model.Message;
import lombok.extern.slf4j.Slf4j;
import org.springframework.beans.factory.annotation.Autowired;
import org.springframework.context.annotation.Configuration;
import org.springframework.messaging.simp.SimpMessagingTemplate;
import org.springframework.scheduling.annotation.Scheduled;
import org.springframework.stereotype.Component;

import java.text.SimpleDateFormat;
import java.util.Date;

/**
 * @packagb:com.zl.job
 * @Author: fab
 * @Description:定时任务
 * @Date:Create:in 2019/11/22
 * @Modified By:
 */
@Component
@Slf4j
public class MyJob {
    @Autowired
    private SimpMessagingTemplate messagingTemplate;

    @Scheduled(fixedDelay = 1000)
    public void send() {
        log.info("8888");
        SimpleDateFormat sdf=new SimpleDateFormat();
        String formatDate = sdf.format(new Date());
        messagingTemplate.convertAndSend("/topic/greetings", new Message("定时任务:", "通信", formatDate));
    }

}
第六步:配置文件application.properties
spring.thymeleaf.prefix=classpath:/templates/
spring.thymeleaf.suffix=.html
spring.thymeleaf.mode=HTML
spring.thymeleaf.encoding=UTF-8
spring.thymeleaf.cache=false
server.port=8081
server.servlet.context-path=/websocket
第七部:创建服务启动类
package com.zl;
import org.springframework.boot.SpringApplication;
import org.springframework.boot.autoconfigure.SpringBootApplication;
import org.springframework.scheduling.annotation.EnableScheduling;
/**
 * @packagb:com.zl
 * @Author: fab
 * @Description:程序启动类
 * @Date:Create:in 2019/11/22
 * @Modified By:
 */
@EnableScheduling
@SpringBootApplication
public class WebSocketApplication {
    public static void main(String[] args) {
        SpringApplication.run(WebSocketApplication.class, args);
    }

}
特别注意:@EnableScheduling开启定时任务。
第七步:前端模板代码
创建chat.html文件代码如下所示:
    777


    聊天室
    exit
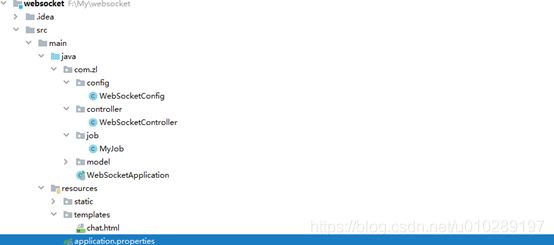
第八步:最终创建工程如下所示
第九步:测试
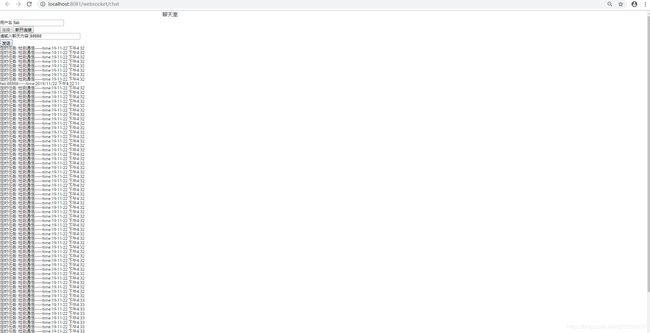
访问路径:http://localhost:8081/websocket/chat


