使用scrapy框架爬取前程无忧
注:后续博客地址:https://blog.csdn.net/ITwangxiaoxu/article/details/107220339
项目要求
利用python编写爬虫程序,从招聘网上爬取数据,将数据存入到MongoDB中,将存入的数据作一定的数据清洗后分析数据,最后做数据可视化。
工具软件
python 3.7
pycharm 2020.1.2
具体知识点
python基础知识
scrapy框架知识点
pyecharts 1.5
MongoDB
爬取字段
职位名称、薪资水平、招聘单位、工作地点、工作经验、学历要求、工作内容(岗位职责)、任职要求(技能要求)
数据存储
将爬取到的数据保存在MongoDB中
数据分析与可视化
具体要求
(1) 分析“数据分析”、“大数据开发工程师”、“数据采集”等岗位的平均工资、最高工资、最低工资,并作条形图将结果展示出来。
(2)分析“数据分析”、“大数据开发工程师”、“数据采集”等大数据相关岗位在成都、北京、上海、广州、深圳的岗位数,并做条形图将结果展示出来。
(3)分析大数据相关岗位1-3年工作经验的薪资水平(平均工资、最高工资、最低工资),并做出条形图展示出来;
(4)将数据采集岗位要求的技能做出词云图
具体步骤
1.分析网页
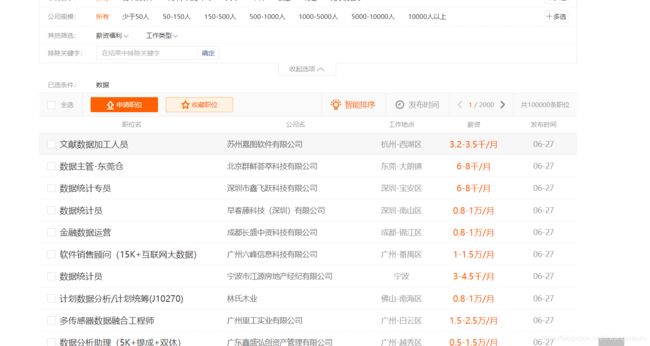
点击进入网页:https://search.51job.com/list/000000,000000,7500,00,9,99,%2520,2,1.html?lang=c&stype=&postchannel=0000&workyear=99&cotype=99°reefrom=99&jobterm=99&companysize=99&providesalary=99&lonlat=0%2C0&radius=-1&ord_field=0&confirmdate=9&fromType=&dibiaoid=0&address=&line=&specialarea=00&from=&welfare=
我们先来看看网页构造。再来分析思路:
由于我们需要的数据岗位的分布数据,所以我们就直接搜索条件,分析数据岗位在全国的一个分布情况。

由于我需要爬取的字段在招聘列表上面不完整,就需要进入详情里面去分析我们的字段。先来看看进去后是什么样子。

我们需要的字段都在这里面了,所以,就可以开始研究网页结构布局

首先我需要抓取全部列表信息岗位的网址,并要进入到每一个网址去,那么就必然需要每一个进去的入口,而这个入口就是这个这个职位名称所包含的网址:

新建一个爬虫项目:
scrapy startproject qiancheng
然后打开我们的项目,进入瞅瞅会发现啥都没有,我们再cd到我们的项目里面去开始一个爬虫项目
cd qiancheng
scrapy genspider qc https://search.51job.com/
这后边的网址就是你要爬取的网址。
先设置一下我们的配置文件settings.py中写上我们的配置信息:
关闭网页机器人协议
ROBOTSTXT_OBEY = False
请求头信息
DEFAULT_REQUEST_HEADERS = {
  'Accept': 'text/html,application/xhtml+xml,application/xml;q=0.9,*/*;q=0.8',
  'Accept-Language': 'en',
'User_Agent' :'Mozilla/5.0 (Windows NT 10.0; Win64; x64) AppleWebKit/537.36 (KHTML, like Gecko) Chrome/83.0.4103.106 Safari/537.36'
}
下载管道
ITEM_PIPELINES = {
 'qiancheng.pipelines.QianchengPipeline': 300,
}
下载延时
DOWNLOAD_DELAY = 1(可忽略)
然后再去我们的pipelines.py中连接mongodb数据库
方案一:
设置setting.py的配置信息
mongodb地址
MONGODB_HOST='127.0.0.1'#(localhost)
mongodb端口号
MONGODB_PORT = 27017#(这个端口为默认端口)
设置数据库名称
MONGODB_DBNAME = 'qiancheng'
存放本数据的表名称
MONGODB_DOCNAME = 'Table'
from scrapy.utils.project import get_project_settings
settings = get_project_settings()
import pymongo
class QianchengPipeline:
    def __init__(self):
        host = settings['MONGODB_HOST']
        port = settings['MONGODB_PORT']
        self.client = pymongo.MongoClient(host=host, port=port)
        self.db = self.client[settings['MONGODB_DBNAME']]
        self.coll = self.db[settings['MONGODB_DOCNAME']]

    def process_item(self, item, spider):
    #插入数据
        data = dict(item)
        self.coll.insert(data)
        return item
#关闭数据库
    def close(self):
        self.client.close()
方案二:(推荐)
import pymongo
class YaoPipeline(object):
def init(self):
#链接数据库
self.client=pymongo.MongoClient(‘localhost’)
#创建库
self.db=self.client[‘qiangcheng’]
self.table=self.db[‘Table’]
def process_item(self,item,spider):
#插入值
self.table.insert(dict(item))
def close(self):
self.client.close()
定义好pipelines.py之后,我们还需要去items.py中去定义好我们需要爬取的字段,用来向pipelines.py中传输数据
class QianchengItem(scrapy.Item):
    # define the fields for your item here like:
    # name = scrapy.Field()
    jobname = scrapy.Field()#职位名称
    salary = scrapy.Field()#薪资水平
    company = scrapy.Field()#招聘单位
    area = scrapy.Field()#工作地点
    workingExp = scrapy.Field()#工作经验
    edulevel = scrapy.Field()#学历要求
    yaoqiu = scrapy.Field()#工作内容
    jineng = scrapy.Field()#要求技能
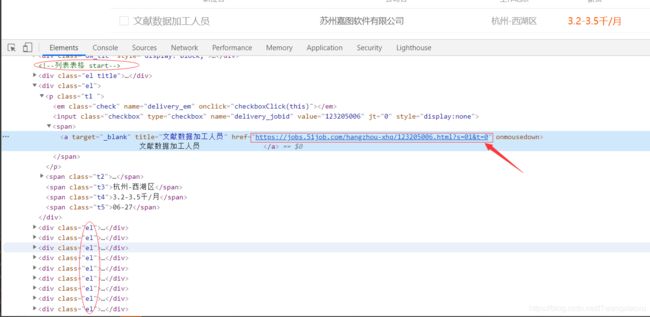
在敲代码之前,还是要先分析一下网页结构。打开审查工具,看看我们需要爬取的具体网址怎么用xpath语法提取出来:

可以很清晰的看到,这个整个栏目都在div class='el’下,而且所有的招聘岗位都在这下面,所以,我们为了能够拿到所有的url,就可以去定位他的上一级标签,然后拿到所有子标签。再通过子标签去拿里面的href属性。
所以,xpath语法就可以这样写:
//*[@id='resultList']/div[@class='el']/p/span/a/@href
可以试着打印一下这一页的所有详情页试试:
import scrapy
from scrapy.linkextractors import LinkExtractor
from qiancheng.items import QianchengItem
from scrapy.spiders import CrawlSpider, Rule
class QcwySpider(scrapy.Spider):
    name = 'qc'
    allowed_domains = ['https://search.51job.com/']
    start_urls = ['https://search.51job.com/list/000000,000000,7500,00,9,99,%2520,2,1.html?lang=c&stype=&postchannel=0000&workyear=99&cotype=99°reefrom=99&jobterm=99&companysize=99&providesalary=99&lonlat=0%2C0&radius=-1&ord_field=0&confirmdate=9&fromType=&dibiaoid=0&address=&line=&specialarea=00&from=&welfare=']
    def parse(self, response):

        all_urls = response.xpath("//*[@id='resultList']/div[@class='el']/p/span/a/@href").getall()
        for urls in all_urls:
        print(urls)
在打印前先编写一个便于后面调试的启动函数run.py(在当前项目的任何位置新建一个),然后写上这两行代码:
from scrapy.cmdline import execute
execute("scrapy crawl qc".split())#qc为爬虫名称(name)
这个意思就是从scrapy包的cmdline下导入execute模块,然后,用这个模块去运行当前项目;
运行结果:

我们拿到所有超链接之后,还不够。要记住,我们需要的所有页面的超链接。所以,我们再来分析分析每一页之间的规律。注意看最上方的url:
https://search.51job.com/list/000000,000000,7500,00,9,99,%2520,2,1.html?lang=c&stype=&postchannel=0000&workyear=99&cotype=99°reefrom=99&jobterm=99&companysize=99&providesalary=99&lonlat=0%2C0&radius=-1&ord_field=0&confirmdate=9&fromType=&dibiaoid=0&address=&line=&specialarea=00&from=&welfare=
当我们点击下一页的时候,看看url发生了哪些变化:
https://search.51job.com/list/000000,000000,7500,00,9,99,%2B,2,2.html?lang=c&postchannel=0000&workyear=99&cotype=99°reefrom=99&jobterm=99&companysize=99&ord_field=0&dibiaoid=0&line=&welfare=
发现,中间的%2520,2,1.html?变成了%2B,2,2.html?;还有很大区别,在多看几页找规律,发现从第二页开始就只有.html?前的数字在变化,那这样怎么构造爬虫的url呢,查看了众多博客对于构造这个url都没有很好理解的方法,容易跳页,最后找到一个不用找规律的方法-------模拟点击跳页

看到这个之后,知道我要干什么了吧。我们可以直接写xpath语法去获取这个url,如果有,就交给解析函数去解析当前页的网址,没有的话就结束函数的运行:
看看xpath语法该咋写:
//div[@class=‘p_in’]//li[last()]/a/@href
所以我们只需要做如下判断:
next_page = response.xpath("//div[@class='p_in']//li[last()]/a/@href").get()
        if next_page:
            yield scrapy.Request(next_page, callback=self.parse, dont_filter=True)
如果有下一页,就继续交给parse()函数去解析网址;然后继续进入详情页爬取
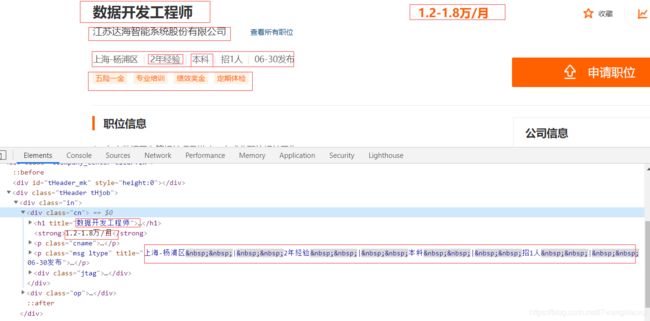
我们随便点进去一个招聘信息瞅一瞅;

我们很大一部分的信息都在这个标签里面,所以,我们就可以单独在这个标签中拿到我们需要的信息
我们除了这些字段,还需要任职要求。我们再看看,下面的职位信息这个标签中的内容;

我们需要的内容都在这个标签里面。
所以,我们抓取全部的字段,就可以这样来写:
			jobname = response.xpath("//div[@class='cn']/h1/text()").getall()[0]#工作名称
            salary = response.xpath("//div[@class='cn']//strong/text()").get()#工资
            company = response.xpath("//div[@class='cn']//p[@class='cname']/a[1]/@title").get()#公司名称
            area = response.xpath("//div[@class='cn']//p[@class='msg ltype']/text()").getall()[0]#招聘地点
            workingExp = response.xpath("//div[@class='cn']//p[@class='msg ltype']/text()").getall()[1]
            edulevel = response.xpath("//div[@class='cn']//p[@class='msg ltype']/text()").getall()[2]
            yaoqius = response.xpath("//div[@class='bmsg job_msg inbox']//text()").getall()
当然,这些字段抓取到了然后呢,总得需要去想个办法保存到MongoDB中吧,所以,我们就可以通过之前定义好的items来保存数据;
所有代码:
# -*- coding: utf-8 -*-
import scrapy

from qiancheng.items import QianchengItem

class QcwySpider(scrapy.Spider):
    name = 'qc'
    allowed_domains = ['https://search.51job.com/']

    # start_urls = ['https://search.51job.com/list/000000,000000,7500,01,9,99,%2B,2,{}.html?lang=c&postchannel=0000&workyear=99&cotype=99°reefrom=99&jobterm=99&companysize=99&ord_field=0&dibiaoid=0&line=&welfare='.format(i) for i in range(1,2000)]
    start_urls = ['https://search.51job.com/list/010000%252C020000%252C040000%252C030200%252C090200,000000,0130,00,9,99,%2520,2,1.html?lang=c&stype=&postchannel=0000&workyear=99&cotype=99°reefrom=99&jobterm=99&companysize=99&providesalary=99&lonlat=0%2C0&radius=-1&ord_field=0&confirmdate=9&fromType=&dibiaoid=0&address=&line=&specialarea=00&from=&welfare=']
    def parse(self, response):

        all_urls = response.xpath("//*[@id='resultList']/div[@class='el']/p/span/a/@href").getall()
        for urls in all_urls:

            yield scrapy.Request(urls, callback=self.parse_html, dont_filter=True)
        next_page = response.xpath("//div[@class='p_in']//li[last()]/a/@href").get()
        if next_page:
            yield scrapy.Request(next_page, callback=self.parse, dont_filter=True)
    def parse_html(self, response):
            item = QianchengItem()

            jobname = response.xpath("//div[@class='cn']/h1/text()").getall()[0]#工作名称
            salary = response.xpath("//div[@class='cn']//strong/text()").get()#工资
            company = response.xpath("//div[@class='cn']//p[@class='cname']/a[1]/@title").get()#公司名称
            area = response.xpath("//div[@class='cn']//p[@class='msg ltype']/text()").getall()[0]#招聘地点
            workingExp = response.xpath("//div[@class='cn']//p[@class='msg ltype']/text()").getall()[1]
            edulevel = response.xpath("//div[@class='cn']//p[@class='msg ltype']/text()").getall()[2]
            yaoqius = response.xpath("//div[@class='bmsg job_msg inbox']//text()").getall()
            yaoqiu_str = ""
            for yaoqiu in yaoqius:
                yaoqiu_str += yaoqiu.strip()
            jineng = ""
            jinenglan = response.xpath("//p[@class='fp'][2]/a/text()").getall()
            for i in jinenglan:
                    jineng += i + " "

            item['jobname'] = jobname
            item['company'] = company
            item['area'] = area
            item['salary'] = salary
            item['edulevel'] = edulevel
            item['workingExp'] = workingExp
            item['yaoqiu'] = yaoqiu_str
            item['jineng']=jineng
            yield item
然后,开始我们的爬虫启动;
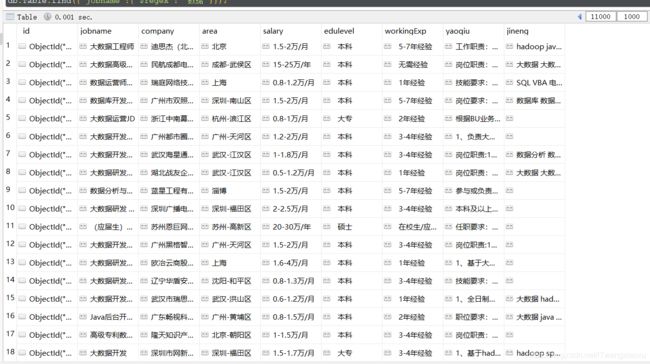
然后再看看我们拿到的数据是什么样子的;

到此爬取数据就差不多了
注:后续博客地址:https://blog.csdn.net/ITwangxiaoxu/article/details/107220339