Spring Cloud Consul注册中心的使用
Consul作为SpringCloud注册中心
- Consul简介
- Consul和Eureka对比
- Consul特性
- Consul安装(Linux)
- Consul 服务端
- 配置常见问题
- Consul 消费者
- 使用ribbon、feign消费服务
- 使用ribbon
- 使用feign
- 参考
Consul简介
Consul 是 HashiCorp 公司推出的开源工具,用于实现分布式系统的服务发现与配置。与其它分布式服务注册与发现的方案,Consul 的方案更“一站式”,内置了服务注册与发现框 架、分布一致性协议实现、健康检查、Key/Value 存储、多数据中心方案,不再需要依赖其它工具(比如 ZooKeeper 等)。使用起来也较 为简单。Consul 使用 Go 语言编写,因此具有天然可移植性(支持Linux、windows和Mac OS X);安装包仅包含一个可执行文件,方便部署,与 Docker 等轻量级容器可无缝配合。
由于Consul主要功能也是用于服务的发现和配置,因此也可以作为SpringCloud微服务体系中的注册中心使用。
Spring Cloud 中注册中心组件对比 :
| Feature | Eureka | Consul | zookeeper | etcd |
|---|---|---|---|---|
| 服务健康检查 | 可配支持 | 服务状态,内存,硬盘等 | (弱)长连接,keepalive | 连接心跳 |
| 多数据中心 | — | 支持 | — | — |
| kv 存储服务 | — | 支持 | 支持 | 支持 |
| 一致性 | — | raft | paxos | raft |
| cap | ap | ca | cp | cp |
| 使用接口(多语言能力) | http(sidecar) | 支持 http 和 dns | 客户端 | http/grpc |
| watch支持 | 支持 long polling/大部分增量 | 全量/支持long polling | 支持 | 支持 long polling |
| 自身监控 | metrics | metrics | — | metrics |
| 安全 | — | acl /https | acl | https 支持(弱) |
| spring cloud 集成 | 已支持 | 已支持 | 已支持 | 已支持 |
cap解释:
CAP理论:一个分布式系统最多只能同时满足一致性(Consistency)、可用性(Availability)和分区容错性(Partition tolerance)这三项中的两项。
一致性(Consistency),即更新操作成功并返回客户端完成后,所有节点在同一时间的数据完全一致,所以,一致性,说的就是数据一致性。
可用性(Availability), 即服务一直可用,而且是正常相应时间。
分区容错性(Partition Tolerance),即分布式系统在遇到某节点或网络分区故障的时候,仍然能够对外提供满足一致性和可用性的服务。
参考: 分布式系统的CAP理论
Consul和Eureka对比
根据上边注册中心组建对比的表格,我们知道,Consul和Eureka最大区别在于,Consul保证CA,而Eureka保证了AP;
Consul强一致性©带来的是:
- 服务注册相比Eureka会稍慢一些。因为Consul的raft协议要求必须过半数的节点都写入成功才认为注册成功
- Leader挂掉时,重新选举期间整个consul不可用。保证了强一致性但牺牲了可用性。
Eureka保证高可用(A)和最终一致性:
- 服务注册相对要快,因为不需要等注册信息replicate到其他节点,也不保证注册信息是否replicate成功
- 当数据出现不一致时,虽然A, B上的注册信息不完全相同,但每个Eureka节点依然能够正常对外提供服务,这会出现查询服务信息时如果请求A查不到,但请求B就能查到。如此保证了可用性但牺牲了一致性。
Consul特性
Consul优势:
- 支持多数据中心,内外网的服务采用不同的端口进行监听。 多数据中心集群可以避免单数据中心的单点故障,而其部署则需要考虑网络延迟, 分片等情况等。 zookeeper 和 etcd 均不提供多数据中心功能的支持。
- 使用 Raft 算法来保证一致性, 比复杂的 Paxos 算法更直接. 相比较而言, zookeeper 采用的是 Paxos, 而 etcd 使用的则是 Raft。
- 支持健康检查。
- 支持 http 和 dns 协议接口。 zookeeper 的集成较为复杂, etcd 只支持 http 协议。
- 官方提供 web 管理界面, etcd 无此功能。
特性:
- 服务发现
- 健康检查
- Key/Value 存储
- 多数据中心
Consul角色:
- client: 客户端, 无状态, 将 HTTP 和 DNS 接口请求转发给局域网内的服务端集群。
- server: 服务端, 保存配置信息, 高可用集群, 在局域网内与本地客户端通讯, 通过广域网与其它数据中心通讯。 每个数据中心的 server 数量推荐为 3 个或是 5 个。
Consul整体架构:
![]()
图中有两个数据中心,Consul很好的支持了多数据中心,每个数据中心中有客户端和服务端,服务端推荐为3-5个,客户端可以有任意个,因为只有server端才会存在数据同步的问题。
同时Consul又通过Gossip协议,构建两个Gossip池,叫做LAN池和WAN池。每个数据中心有一个LAN池,包含数据中心的所有成员,client和server,LAN池的主要目的:
- 成员关系信息允许client自动发现server, 减少了所需要的配置量。
- 分布式失败检测机制使得由整个集群来做失败检测这件事, 而不是集中到几台机器上。
- gossip池使得类似领导人选举这样的事件变得可靠而且迅速。
WAN池,是全局唯一的,包含所有的server节点,由于WAN池的存在,server可以做跨数据中心的请求。
Consul服务注册发现工作原理:
- 1、当 Producer 启动的时候,会向 Consul 发送一个 post 请求,告诉 Consul 自己的 IP 和 Port
- 2、Consul 接收到 Producer 的注册后,每隔10s(默认)会向 Producer 发送一个健康检查的请求,检验Producer是否健康
- 3、当 Consumer 发送 GET 方式请求 /api/address 到 Producer 时,会先从 Consul 中拿到一个存储服务 IP 和 Port 的临时表,从表中拿到 Producer 的 IP 和 Port 后再发送 GET 方式请求 /api/address
- 4、该临时表每隔10s会更新,只包含有通过了健康检查的 Producer
Consul安装(Linux)
-
下载压缩包
进入Consul官网后,根据不同的操作系统,选择下载需要的文件。
-
解压
Linux中安装比较简单,下载之后只需要解压就可以了。上一步可以看到下载的是一个zip压缩包,解压后即可运行。 -
启动
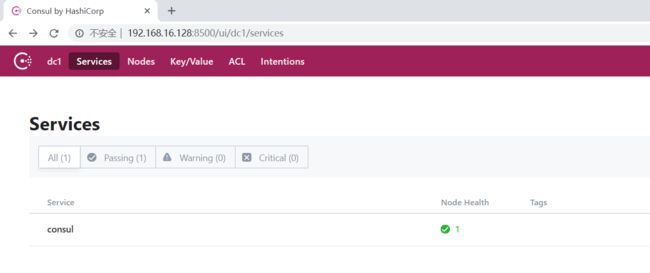
./consul agent -dev -node=consul-dev -client=192.168.16.128
- -dev: 创建开发环境下的server节点
- -node: 指定节点的名称
- -client: 指定客户端访问地址(这里我使用的是虚拟机,写的是虚拟机ip)
启动后,本地方法 http://192.168.16.128:8500 即可看到界面。

Consul 服务端
- 创建一个服务提供者
- 引入pom依赖
<dependency>
	<groupId>org.springframework.bootgroupId>
	<artifactId>spring-boot-starter-actuatorartifactId>
dependency>

<dependency>
	<groupId>org.springframework.cloudgroupId>
	<artifactId>spring-cloud-starter-consul-discoveryartifactId>
dependency>
- 启动类添加 @EnableDiscoveryClient 注解
- 配置注册中心信息
spring.application.name=spring-cloud-consul-producer
server.port=8501

spring.cloud.consul.host=192.168.16.128
spring.cloud.consul.port=8500

#注册到 consul 中的服务名称
spring.cloud.consul.discovery.serviceName=service-producer
这里,注册的服务名称属性为spring.cloud.consul.discovery.serviceName,而不再是像Eureka中使用 spring.application.name=xx
配置常见问题
- 一般按照上边的配置是没有问题了,但是,服务注册时,默认使用的是hostname,在开发环境也就是localhost,如果注册中心Consul所在服务器,和注册的微服务不在同一台服务器,就会出现访问不到,健康检查失败,因此,可以增加配置
spring.cloud.consul.discovery.prefer-ip-address=true
spring.cloud.consul.discovery.ip-address= 服务ip
- 另外,如果使用的是Spring Cloud版本为Dalston.SR1,更具体的应该是 Spring Cloud consul版本1.3之前的,需要增加如下配置,否则健康检查总是返回 503, {status: ‘DOWN’} 导致服务不可用,修改SpringCloud版本为Finchley.RELEASE(SpringBoot需要2.0以上版本)之后,没有改问题。
# 取消 consul 的安全检查
management.health.consul.enabled=false
健康检查失败问题说明:
- 添加 management.security.enabled=false 配置,该配置含义,该配置属性用于设置是否需要授权才能访问,默认是true,即暴露所有的断点。Spring Boot 2.0后没有了该配置,想要实现该功能需要使用如下配置
# 启用端点 env
management.endpoint.env.enabled=true

# 暴露端点 env 配置多个,隔开
management.endpoints.web.exposure.include=env

management.endpoints.web.exposure.include=*
- 添加了以上配置之后,模拟健康检查,使用 /health 请求访问,返回结果如下,可以看到主要是consul 健康检查失败,导致了整个服务健康检查失败,上边取消了consul的健康检查之后,整个服务可以通过健康检查。
{
    "status": "DOWN",
    "discoveryComposite": {
        "description": "Spring Cloud Consul Discovery Client",
        "status": "UP",
        "discoveryClient": {
            "description": "Spring Cloud Consul Discovery Client",
            "status": "UP",
            "services": [
                "consul",
                "service-producer"
            ]
        }
    },
    "diskSpace": {
        "status": "UP",
        "total": 159015497728,
        "free": 75346374656,
        "threshold": 10485760
    },
    "refreshScope": {
        "status": "UP"
    },
    "consul": {
        "status": "DOWN",
        "services": {
            "consul": [
            ],
            "service-producer": [
            ]
        },
        "error": "java.lang.IllegalArgumentException: Value must not be null"
    },
    "hystrix": {
        "status": "UP"
    }
}
SpringBootActuator健康检查原理,参考: Spring boot 2.0 Actuator 的健康检查
Consul 消费者
- 创建一个消费者应用,pom文件和服务生产者一致
配置文件
spring.application.name=spring-cloud-consul-consumer
server.port=8503
spring.cloud.consul.host=192.168.16.128
spring.cloud.consul.port=8500
#设置不需要注册到 consul 中
spring.cloud.consul.discovery.register=false
消费者可以注册到注册中心,也可以不注册,因为这里选择不注册,因此启动类就不用添加服务发现的注解。
- 调用生产者
根据Consul的工作原理,消费者调用生产者时,会通过Consul来获取对应的地址,具体实现:
1、通过LoadBalancerClient 的 choose(service-id)方法随机选择一个对应的应用名称的服务实例,
2、然后使用 RestTemplate()来模拟发送请求。
@RestController
public class CallHelloController {

    @Autowired
    private LoadBalancerClient loadBalancer;

    @RequestMapping("/call")
    public String call() {
        ServiceInstance serviceInstance = loadBalancer.choose("service-producer");
        System.out.println("服务地址:" + serviceInstance.getUri());
        System.out.println("服务名称:" + serviceInstance.getServiceId());

        String callServiceResult = new RestTemplate().getForObject(serviceInstance.getUri().toString() + "/hello", String.class);
        System.out.println(callServiceResult);
        return callServiceResult;
    }

}
消费者调用主要有两个接口:LoadBalancerClient,DiscoveryClient具体使用如下:
@RestController
public class ServiceController {

    @Autowired
    private LoadBalancerClient loadBalancer;
    @Autowired
    private DiscoveryClient discoveryClient;

    /**
     * 获取所有服务
     */
    @RequestMapping("/services")
    public Object services() {
        // 获取对应服务名称的所有实例信息
        return discoveryClient.getInstances("service-producer");
    }

    /**
     * 从所有服务中选择一个服务(轮询)
     */
    @RequestMapping("/discover")
    public Object discover() {
        return loadBalancer.choose("service-producer").getUri().toString();
    }

}
loadBalancer.choose(“service-producer”);随机选择一个服务名称对应的实例返回;
discoveryClient.getInstances(“service-producer”);是查询服务名称的所有实例信息:
[
    {
        "serviceId": "service-producer",
        "host": "132.126.3.87",
        "port": 8501,
        "secure": false,
        "metadata": {
            "secure": "false"
        },
        "uri": "http://132.126.3.87:8501",
        "scheme": null
    },
    {
        "serviceId": "service-producer",
        "host": "132.126.3.87",
        "port": 8502,
        "secure": false,
        "metadata": {
            "secure": "false"
        },
        "uri": "http://132.126.3.87:8502",
        "scheme": null
    }
]
使用ribbon、feign消费服务
使用ribbon
SpringCloudConsul中已经集成了ribbon,上边的消费者调用,我们可以看出,实际也是使用了ribbon的方式来调用,我们可以对其稍作修改:
// 添加RestTemplate bean
@Bean
@LoadBalanced
RestTemplate restTemplate() {
	return new RestTemplate();
}

@GetMapping("/ribbon")
public String call2() {
    return restTemplate.getForObject("http://service-producer/hello", String.class);
}
之前只不过是先使用LoadBalancerClient接口,获取对应了url,然后访问;使用ribbon之后,可以直接使用service-id进行访问。
使用feign
- 添加依赖
<dependency>
	<groupId>org.springframework.cloudgroupId>
	<artifactId>spring-cloud-starter-feignartifactId>
dependency>
- 启动类添加@EnableFeignClients 注解,启用Feign客户端注解
- 创建一个调用服务的interface
@FeignClient("service-producer")
public interface HelloRemote {
    @RequestMapping(value = "/hello")
    public String hello(@RequestParam(value = "name") String name);
}
controller中调用
@RestController
public class CallHelloController {

    @Autowired
    private HelloRemote helloRemote;

    @GetMapping("/feign")
    public String call3() {
        return helloRemote.hello();
    }

}
参考
Spring Cloud(二) Consul 服务治理实现
springcloud(十三):注册中心 Consul 使用详解
构建微服务(二)服务注册与发现
