Ambari集成接入Elasticsearch服务(无网接入)
注明:个人从git上下载了Elasticsearch5.2版本,但脚本编写不完整,未发现slave相关的py脚本,需添加完善。
故暂时接入Elasticsearch 2.3.3版本
Github下载地址(接入Elasticsearch版本可能后续会更新变化):
https://github.com/teamsoo/elasticsearch-ambari
1 环境配置
1.1 系统配置
关闭所有的swap files
sudo swapoff -a
配置/etc/security/limits.conf ,如下图所示(末尾追加):
执行命令:
ulimit -n 65536
ulimit -a
配置 /etc/sysctl.conf文件,添加行 vm.max_map_count=262144
并且执行命令: # sysctl -p
详细见链接:https://www.elastic.co/guide/en/elasticsearch/reference/current/system-config.html
2 安装
创建目录(目录名一定要大写):
# mkdir -p /var/lib/ambari-server/resources/stacks/HDP/2.6/services/ELASTICSEARCH
将下载的elasticsearch-ambari-master.zip进行解压并拷贝
# unzip elasticsearch-ambari-master.zip
# cd elasticsearch-ambari-master
# cp -R * /var/lib/ambari-server/resources/stacks/HDP/2.6/services/ELASTICSEARCH/
重启ambari
# ambari-server restart
然后再从服务中添加安装Elasticsearch
2.1无网安装
因无网环境,个人首次安装失败,需手动下载:
https://www.elastic.co/downloads/past-releases/elasticsearch-2-3-3
确保每个节点已经安装wget
新建目录:/var/www/html/repo/local,将文件拷贝此目录下
使用createrepo创建索引
# yum install createrepo (如果未安装)
# createrepo /var/www/html/repo/local
观察,此时会自动生成repodata文件夹;
此步骤是将这安装包设置为本地仓库进行安装(无网络环境)
在/etc/yum.repos.d/目录下新增local.repo文件,内容如下:
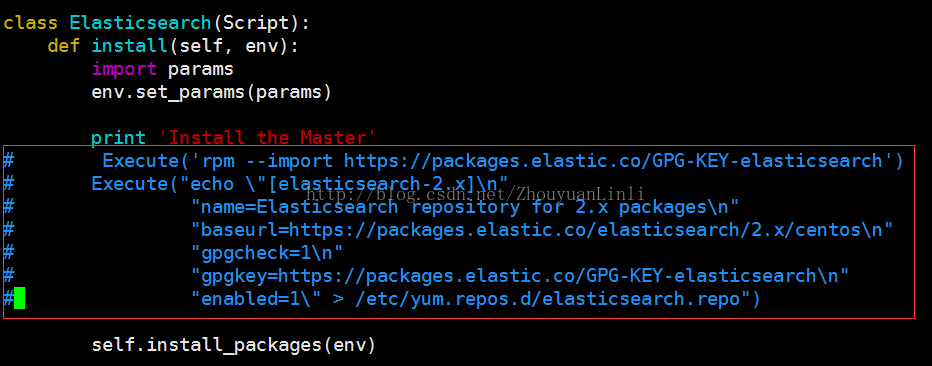
(1)修改
/var/lib/ambari-server/resources/stacks/HDP/2.6/services/ELASTICSEARCH/package/scripts
目录下elastic_master.py中内容
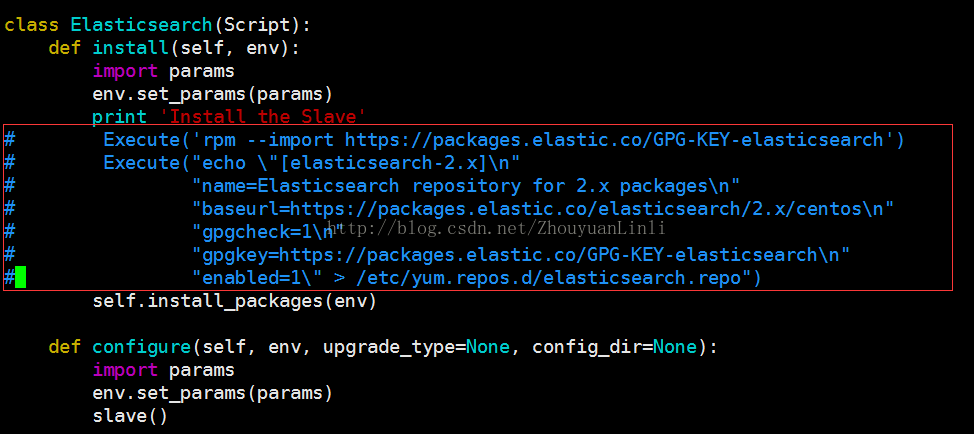
(2)修改
/var/lib/ambari-server/resources/stacks/HDP/2.6/services/ELASTICSEARCH/package/scripts
目录下elastic_slave.py中内容:
注释掉如下内容:
(注明:需将配置文件/etc/yum.repos.d/local.repo传递到其他机器上)
各个机器上执行如下命令:
# yum clean all (清除缓存)
# yum makecache (建立新缓存)
重启Ambari server
# ambari-server restart
然后添加Elasticsearch服务进行安装
(注明:如果启动失败,查看日志cat /var/log/elasticsearch/elasticsearch.log)
个人修改了network_host参数:
Elasticsearch服务全部重启,添加服务成功后如下图所示:
如果修改配置中参数或自定义参数功能不生效(可能不完善),个人手动修改
# /etc/elasticsearch/elasticsearch.yml
# service elasticsearch restart
注:
后续更新用6.*版本,需简单更改
(1)script目录下文件,需修改elastic.py和slave.py脚本中root用户为elasticsearch(既params.elastic_user)
(2)templates目录下模板文件,elasticsearch.master.yaml.j2和elasticsearch.slave.yaml.j2,在path.data后面新增path.logs,按对应格式添加,值为:"{{log_dir}}"
(3)上述模板以index开头的配置删除,因为5.*就不允许在elasticsearch.yaml中配置
(4)界面配置参数cluster_routing_allocation_disk_watermark_low改为0.85,cluster_routing_allocation_disk_watermark_high改为0.9
(5)去除elasticsearch.master.yaml.j2和elasticsearch.slave.yaml.j2模板冗余参数
删除参数:
indices.memory.store.throttle.type
indices.cluster.send_refresh_mapping
threadpool.index.queue_size
threadpool.bulk.queue_size
bootstrap.mlockall
discovery.zen.ping.multicast.enabled
参数port改为http.port
(6)将elastic_master.py和 elastic_slave.py脚本中在检查 def status(self, env):函数中命令换成: status_cmd = format("systemctl status elasticsearch")
否则有可能报错:ES_USER and ES_GROUP settings are no longer supported. To run as a custom user/group use the archive distribution of Elasticsearch.
2.1 文件配置
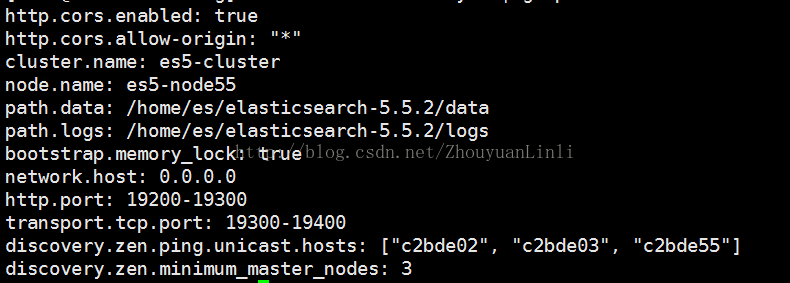
注明:这是在手动安装es集群进行的配置,通过Ambari方式不需要进行如下操作,此处仅记录下个人配置;
在Elasticsearch目录下的config/elasticsearch.yml,将
Bootstrap . memory_lock: true 前的#去掉,保存。
个人配置如下(仅供参考):
配置文件config/jvm.options
将Xms8g 中的数字修改(根据实际情况调整)。
详细配置见链接:
https://www.elastic.co/guide/en/elasticsearch/reference/current/bootstrap-checks.html
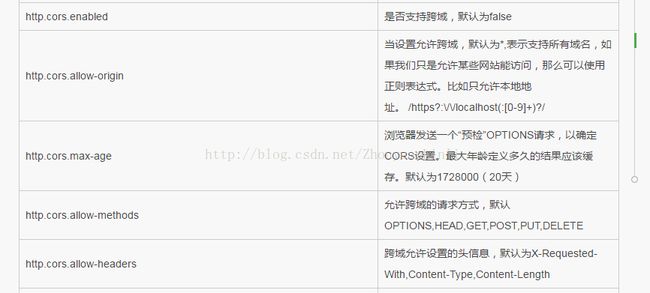
如:
http.cors.enabled : true
http.cors.allow-origin : "*"
http.cors.allow-methods : OPTIONS, HEAD, GET, POST, PUT, DELETE
http.cors.allow-headers : X-Requested-With,X-Auth-Token,Content-Type, Content-Length


