并发编程之线程池ThreadPoolExecutor& Executors
线程池
线程池的结构
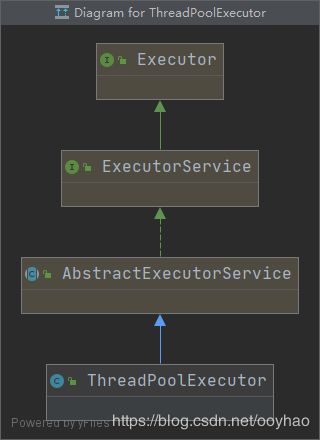
上面是线程池的继承结构。首先Excutor 和 ExecutorService 都是接口,而 AbstractExecutorService 是抽象类,均无法实例化,所以我们使用的是 ThreadPoolExecutor 类。
ThreadPoolExecutor
先看非常重要的全参构造函数
/**
 * Creates a new {@code ThreadPoolExecutor} with the given initial
 * parameters.
 *
 * @param corePoolSize the number of threads to keep in the pool, even
 *        if they are idle, unless {@code allowCoreThreadTimeOut} is set
 * @param maximumPoolSize the maximum number of threads to allow in the
 *        pool
 * @param keepAliveTime when the number of threads is greater than
 *        the core, this is the maximum time that excess idle threads
 *        will wait for new tasks before terminating.
 * @param unit the time unit for the {@code keepAliveTime} argument
 * @param workQueue the queue to use for holding tasks before they are
 *        executed.  This queue will hold only the {@code Runnable}
 *        tasks submitted by the {@code execute} method.
 * @param threadFactory the factory to use when the executor
 *        creates a new thread
 * @param handler the handler to use when execution is blocked
 *        because the thread bounds and queue capacities are reached
 * @throws IllegalArgumentException if one of the following holds:

 *         {@code corePoolSize < 0}

 *         {@code keepAliveTime < 0}

 *         {@code maximumPoolSize <= 0}

 *         {@code maximumPoolSize < corePoolSize}
 * @throws NullPointerException if {@code workQueue}
 *         or {@code threadFactory} or {@code handler} is null
 */
public ThreadPoolExecutor(int corePoolSize,
					  int maximumPoolSize,
					  long keepAliveTime,
					  TimeUnit unit,
					  BlockingQueue<Runnable> workQueue,
					  ThreadFactory threadFactory,
					  RejectedExecutionHandler handler) {
	if (corePoolSize < 0 ||
		maximumPoolSize <= 0 ||
		maximumPoolSize < corePoolSize ||
		keepAliveTime < 0)
		throw new IllegalArgumentException();
	if (workQueue == null || threadFactory == null || handler == null)
		throw new NullPointerException();
	this.acc = System.getSecurityManager() == null ?
		null :
	AccessController.getContext();
	this.corePoolSize = corePoolSize;
	this.maximumPoolSize = maximumPoolSize;
	this.workQueue = workQueue;
	this.keepAliveTime = unit.toNanos(keepAliveTime);
	this.threadFactory = threadFactory;
	this.handler = handler;
}
构造函数参数说明
- corePoolSize : 线程池始终会维持的线程数,即使这些线程时空闲。当然,如果
allowCoreThreadTimeOut被设置了,就会进行回收处理。 - maximumPoolSize: 线程池允许的最大线程数。
- keepAliveTime: 当线程数大于
corePoolSize时,空闲线程等待keepAliveTime时间之后,就会被回收。 - unit:
keepAliveTime的时间单位 - workQueue:
workQueue用于装所有需要执行的任务。当然,这个队列仅仅只会接受由execute方法提交过来的Runnable类型的任务。 - threadFactory: 当线程池需要新建线程时,从线程工厂中获取。
- handler: 拒绝策略。因为当线程池和工作队列
workQueue都达到了容量时,线程池启用拒绝策略来处理新提交的线程。
分析一下 IllegalArgumentException 的可以知道:
- corePoolSize 不能小于0
- maximumPoolSize 不能小于等于0
- maximumPoolSize 不能小于corePoolSize
- keepAliveTime 不能小于0
线程工厂(DefaultThreadFactory)
static class DefaultThreadFactory implements ThreadFactory {
    private static final AtomicInteger poolNumber = new AtomicInteger(1);
    private final ThreadGroup group;
    private final AtomicInteger threadNumber = new AtomicInteger(1);
    private final String namePrefix;

    DefaultThreadFactory() {
        SecurityManager s = System.getSecurityManager();
        group = (s != null) ? s.getThreadGroup() :
        Thread.currentThread().getThreadGroup();
        namePrefix = "pool-" + poolNumber.getAndIncrement() + "-thread-";
    }

    public Thread newThread(Runnable r) {
        Thread t = new Thread(group, r, namePrefix + threadNumber.getAndIncrement(), 0);
        if (t.isDaemon())
            t.setDaemon(false);
        if (t.getPriority() != Thread.NORM_PRIORITY)
            t.setPriority(Thread.NORM_PRIORITY);
        return t;
    }
}
DefaultThreadFactory 是在 Executors 工具类中定义的,也可以自己实现 ThreadFactory 接口来自定义。
拒绝策略(RejectedExecutionHandler)
下面是Executor自带的几种
public static class CallerRunsPolicy implements RejectedExecutionHandler {
	public CallerRunsPolicy() { }
	public void rejectedExecution(Runnable r, ThreadPoolExecutor e) {
		if (!e.isShutdown()) {
            // 直接运行
			r.run();
		}
	}
}


public static class AbortPolicy implements RejectedExecutionHandler {
	public AbortPolicy() { }
	public void rejectedExecution(Runnable r, ThreadPoolExecutor e) {
        // 抛出RejectedExecutionException异常
		throw new RejectedExecutionException("Task " + r.toString() +
											 " rejected from " +
											 e.toString());
	}
}


public static class DiscardPolicy implements RejectedExecutionHandler {
	public DiscardPolicy() { }
	public void rejectedExecution(Runnable r, ThreadPoolExecutor e) {
        //直接丢弃
	}
}


public static class DiscardOldestPolicy implements RejectedExecutionHandler {
	public DiscardOldestPolicy() { }
	public void rejectedExecution(Runnable r, ThreadPoolExecutor e) {
		if (!e.isShutdown()) {
            // 取回并且移除队列的头部元素(oldest),如果队列为空,则返回null
			e.getQueue().poll();
            // 并且执行 r
			e.execute(r);
		}
	}
}
线程池的使用
- 使用 Executors工具类创建
public class ExecutorTest {
    public static void main(String[] args) {
        ExecutorService executorService = Executors.newFixedThreadPool(5);
        for (int i = 0; i < 20; i++) {
            executorService.execute(() -> {
                try {
                    TimeUnit.SECONDS.sleep(1);
                } catch (InterruptedException e) {
                    e.printStackTrace();
                }
                System.out.println(Thread.currentThread().getName()+" -> "
                                   + System.currentTimeMillis() + " run.");
            });
        }
        executorService.shutdown();
    }
}
- 使用ThreadPoolExecutor 构造方法创建
public class ExecutorTest2 {
    public static void main(String[] args) {
        ExecutorService executorService = new ThreadPoolExecutor(5, 5, 60L, TimeUnit.SECONDS,
                new LinkedBlockingQueue<>(),
                new ThreadFactory() {
                    @Override
                    public Thread newThread(Runnable r) {
                        return new Thread(r);
                    }
                },
        new ThreadPoolExecutor.AbortPolicy());

        for (int i = 0; i < 20; i++) {
            executorService.execute(()->{
                try {
                    TimeUnit.SECONDS.sleep(1);
                } catch (InterruptedException e) {
                    e.printStackTrace();
                }
                System.out.println(Thread.currentThread().getName()+" -> "
                                   + System.currentTimeMillis() + " run.");
            });
        }
    }
}
上述的运行结果为:
Thread-1 -> 1592187701630 run.
Thread-2 -> 1592187701630 run.
Thread-3 -> 1592187701631 run.
Thread-0 -> 1592187701631 run.
Thread-4 -> 1592187701631 run.
Thread-1 -> 1592187702630 run.
Thread-3 -> 1592187702631 run.
Thread-0 -> 1592187702631 run.
Thread-4 -> 1592187702631 run.
Thread-2 -> 1592187702631 run.
Thread-1 -> 1592187703630 run.
Thread-3 -> 1592187703631 run.
Thread-0 -> 1592187703631 run.
Thread-4 -> 1592187703631 run.
Thread-2 -> 1592187703632 run.
Thread-1 -> 1592187704630 run.
Thread-0 -> 1592187704631 run.
Thread-3 -> 1592187704631 run.
Thread-4 -> 1592187704631 run.
Thread-2 -> 1592187704634 run.
通过结果可以看到,只创建了5个线程的线程池。并且每5个线程一批,每批次之间间隔一秒。由于maximum设置的也是5,所以一直只有5个线程,下面我们将maximum设置比core大一点。
我们将上面的例子改造一下:
public static void main(String[] args) {
	ExecutorService executorService = new ThreadPoolExecutor(5, 10, 60L, TimeUnit.MILLISECONDS,
			new ArrayBlockingQueue<>(10),
			new ThreadFactory() {
				@Override
				public Thread newThread(Runnable r) {
					return new Thread(r);
				}
			},
			new RejectedExecutionHandler() {
				@Override
				public void rejectedExecution(Runnable r, ThreadPoolExecutor executor) {
					System.out.println(r);
				}
			});

	for (int i = 0; i < 200; i++) {
		executorService.execute(()->{
			try {
				TimeUnit.SECONDS.sleep(1);
			} catch (InterruptedException e) {
				e.printStackTrace();
			}
			System.out.println(Thread.currentThread().getName()+" -> " + System.currentTimeMillis() + " run.");
		});
	}

	executorService.shutdown();
}
输出结果:
...
concurrent.ExecutorTest2$$Lambda$1/558638686@16b98e56
concurrent.ExecutorTest2$$Lambda$1/558638686@16b98e56 // 拒绝策略
concurrent.ExecutorTest2$$Lambda$1/558638686@16b98e56
concurrent.ExecutorTest2$$Lambda$1/558638686@16b98e56
concurrent.ExecutorTest2$$Lambda$1/558638686@16b98e56
concurrent.ExecutorTest2$$Lambda$1/558638686@16b98e56
concurrent.ExecutorTest2$$Lambda$1/558638686@16b98e56
Thread-0 -> 1592188234016 run.
Thread-6 -> 1592188234017 run.
Thread-2 -> 1592188234017 run.
Thread-4 -> 1592188234017 run.
Thread-3 -> 1592188234017 run.
Thread-1 -> 1592188234017 run.
Thread-5 -> 1592188234017 run.
Thread-8 -> 1592188234018 run.
Thread-7 -> 1592188234018 run.
Thread-9 -> 1592188234018 run.
Thread-0 -> 1592188235016 run.
Thread-6 -> 1592188235017 run.
Thread-2 -> 1592188235017 run.
Thread-3 -> 1592188235018 run.
Thread-7 -> 1592188235018 run.
Thread-1 -> 1592188235020 run.
Thread-4 -> 1592188235021 run.
Thread-5 -> 1592188235021 run.
Thread-8 -> 1592188235022 run.
Thread-9 -> 1592188235022 run.
可以看到总共执行了20个任务,启动了10个线程。但是如果将固定长度的workQueue 换成无限长的 LinkedBlockingQueue的话。结果如下:
Thread-1 -> 1592188484947 run.
Thread-3 -> 1592188484948 run.
Thread-2 -> 1592188484954 run.
Thread-0 -> 1592188484956 run.
Thread-4 -> 1592188484957 run.
Thread-1 -> 1592188485948 run.
Thread-3 -> 1592188485948 run.
Thread-2 -> 1592188485955 run.
Thread-4 -> 1592188485957 run.
Thread-0 -> 1592188485957 run.
Thread-1 -> 1592188486948 run.
Thread-3 -> 1592188486948 run.
Thread-2 -> 1592188486955 run.
Thread-4 -> 1592188486957 run.
Thread-0 -> 1592188486957 run.
...
可以看到,当workQueue有容量装任务时,线程池中的线程不会超过corePoolSize, 只有当workQueue无法再接收任务是,才会将线程数扩大到maximumPoolSize.
submit方法执行流程
我们用下列代码来解析submit方法的执行流程。
public class ExecutorTest {
    public static void main(String[] args) {
        ExecutorService executorService = Executors.newFixedThreadPool(5);
        for (int i = 0; i < 20; i++) {
            executorService.submit(new Runnable() {
                @Override
                public void run() {

                }
            });
        }
        executorService.shutdown();
    }
}
1)submit方法
走到的是AbstractThreadPool.submit方法
public Future<?> submit(Runnable task) {
    if (task == null) throw new NullPointerException();
    RunnableFuture<Void> ftask = newTaskFor(task, null);
    execute(ftask);
    return ftask;
}
2)newTaskFor方法
protected <T> RunnableFuture<T> newTaskFor(Runnable runnable, T value) {
    return new FutureTask<T>(runnable, value);
}
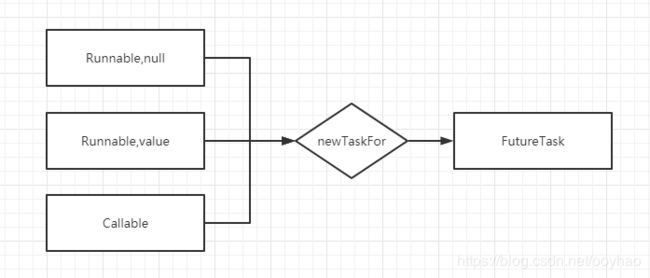
可以看到,底层将Runnable和value封装为一个FutureTask。
3)new FutureTask()
public FutureTask(Runnable runnable, V result) {
    this.callable = Executors.callable(runnable, result);
    this.state = NEW;       // ensure visibility of callable
}
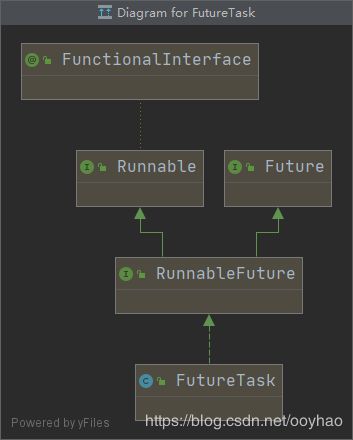
我们先来看一下FutureTask的继承结构
可以看到,FutureTask实现自接口 RunnableFuture 接口。而RunnableFuture 接口实现自 Runnable 和 Future 接口。
再看一下FutureTask的内部属性:
/** The underlying callable; nulled out after running */
private Callable<V> callable;
/** The result to return or exception to throw from get() */
private Object outcome; // non-volatile, protected by state reads/writes
/** The thread running the callable; CASed during run() */
private volatile Thread runner;
/** Treiber stack of waiting threads */
private volatile WaitNode waiters;
可以看到FutureTask内部维护的是一个Callable类型的对象。而上面FutureTask构造函数接收的Runnable对象,所以调用了Executors.callable方法。
4)Executors.callable()方法
public static <T> Callable<T> callable(Runnable task, T result) {
    if (task == null)
        throw new NullPointerException();
    return new RunnableAdapter<T>(task, result);
}
可以看到,由于 Executors.callable(runnable, result);接收的是一个Runnable类型的对象,返回的是一个Callable类型的对象,所以我们猜测RunnableAdapter 就是将Runnable构造为Callable类型的。所以RunnableAdapter肯定是实现了Callable接口的,下面我们看看源码:
static final class RunnableAdapter<T> implements Callable<T> {
    final Runnable task;
    final T result;
    RunnableAdapter(Runnable task, T result) {
        this.task = task;
        this.result = result;
    }
    public T call() {
        task.run();
        return result;
    }
}
这个类非常简单,实现了Callable接口,同时接收一个Runnable类型的task和一个结果result。并且可以看到,call方法内部调用的是run方法,并且返回的是既定的结果result。
以上四步,就完美的把传入的任务(Runnable或Callable)构造成一个FutureTask对象。
5)* execute()
走到的是 ThreadPoolExecutor.execute(Runnable command)方法。只走大致流程,不细分析
public void execute(Runnable command) {
	if (command == null)
		throw new NullPointerException();
	int c = ctl.get();
	if (workerCountOf(c) < corePoolSize) {
		if (addWorker(command, true))
			return;
		c = ctl.get();
	}
	if (isRunning(c) && workQueue.offer(command)) {
		int recheck = ctl.get();
		if (! isRunning(recheck) && remove(command))
			reject(command);
		else if (workerCountOf(recheck) == 0)
			addWorker(null, false);
	}
	else if (!addWorker(command, false))
		reject(command);
}
我们需要注意的是addWorker方法:
6)* addWorker()
private boolean addWorker(Runnable firstTask, boolean core) {
    retry:
    for (;;) {
        int c = ctl.get();
        int rs = runStateOf(c);

        if (rs >= SHUTDOWN &&
            ! (rs == SHUTDOWN &&
               firstTask == null &&
               ! workQueue.isEmpty()))
            return false;

        for (;;) {
            int wc = workerCountOf(c);
            if (wc >= CAPACITY ||
                wc >= (core ? corePoolSize : maximumPoolSize))
                return false;
            if (compareAndIncrementWorkerCount(c))
                break retry;
            c = ctl.get();  // Re-read ctl
            if (runStateOf(c) != rs)
                continue retry;
        }
    }

    boolean workerStarted = false;
    boolean workerAdded = false;
    Worker w = null;
    try {
        w = new Worker(firstTask);
        final Thread t = w.thread;
        if (t != null) {
            final ReentrantLock mainLock = this.mainLock;
            mainLock.lock();
            try {
                int rs = runStateOf(ctl.get());
                if (rs < SHUTDOWN ||
                    (rs == SHUTDOWN && firstTask == null)) {
                    if (t.isAlive())
                        throw new IllegalThreadStateException();
                    workers.add(w);
                    int s = workers.size();
                    if (s > largestPoolSize)
                        largestPoolSize = s;
                    workerAdded = true;
                }
            } finally {
                mainLock.unlock();
            }
            if (workerAdded) {
                t.start();
                workerStarted = true;
            }
        }
    } finally {
        if (! workerStarted)
            addWorkerFailed(w);
    }
    return workerStarted;
}
可以看到里面构造了一个Worker对象。由于FutureTask继承自Runnable,所以这里使用Runnable接收也是可以的。
Worker(Runnable firstTask) {
    setState(-1); // inhibit interrupts until runWorker
    this.firstTask = firstTask;
    this.thread = getThreadFactory().newThread(this);
}
Worker中接收一个任务Runnable(FutureTask), 并且从线程工厂中获取一个线程,并且把自身当成Task传入。
后面有这样一步:t.start();.
即启动一个线程。此时由于是将Worker传入到线程中,所以我们需要看Worker中的run方法:
private final class Worker extends AbstractQueuedSynchronizer implements Runnable {
	final Thread thread;
	Runnable firstTask;

	Worker(Runnable firstTask) {
		setState(-1);
		this.firstTask = firstTask;
		this.thread = getThreadFactory().newThread(this);
	}

	public void run() {
		runWorker(this);
	}
	//...
}
将部分方法和属性删除了。 可以看到run方法中调用的是runWorker(this)。
7)* runWorker(this)方法
final void runWorker(Worker w) {
	Thread wt = Thread.currentThread();
	Runnable task = w.firstTask; // 获取到task
	w.firstTask = null;
	w.unlock();
	boolean completedAbruptly = true;
	try {
		while (task != null || (task = getTask()) != null) {
			w.lock();
			if ((runStateAtLeast(ctl.get(), STOP) || (Thread.interrupted() &&
				  runStateAtLeast(ctl.get(), STOP))) && !wt.isInterrupted())
				wt.interrupt();
			try {
				beforeExecute(wt, task);
				Throwable thrown = null;
				try {
					task.run();
				} catch (RuntimeException x) {
					thrown = x; throw x;
				} catch (Error x) {
					thrown = x; throw x;
				} catch (Throwable x) {
					thrown = x; throw new Error(x);
				} finally {
					afterExecute(task, thrown);
				}
			} finally {
				task = null;
				w.completedTasks++;
				w.unlock();
			}
		}
		completedAbruptly = false;
	} finally {
		processWorkerExit(w, completedAbruptly);
	}
}
循环:
while (task != null || (task = getTask()) != null){}
这里就是循环获取Task,起到了线程复用的功能。调用了run方法。
task.run();
注意,我们需要注意这里虽然是使用Runnable接收的,但是实际是FutureTask类型的,如果当成Runnable类型的,返回值就消失了。
下面我们看FutureTask的run方法:
public void run() {
	if (state != NEW || !UNSAFE.compareAndSwapObject(this, runnerOffset,null, Thread.currentThread()))
		return;
	try {
		Callable<V> c = callable;
		if (c != null && state == NEW) {
			V result;
			boolean ran;
			try {
				result = c.call();//统一调用的是call方法,由于如果传入的是runnable,会被RunnableAdapter封装为Callable对象。底层调用的还是Runnable的run方法。
				ran = true;
			} catch (Throwable ex) {
				result = null;
				ran = false;
				setException(ex);
			}
			if (ran)
				set(result);
		}
	} finally {
		runner = null;
		int s = state;
		if (s >= INTERRUPTING)
			handlePossibleCancellationInterrupt(s);
	}
}
可以看到这里有任务的处理结果。会调用set方法进行结果设置
protected void set(V v) {
    if (UNSAFE.compareAndSwapInt(this, stateOffset, NEW, COMPLETING)) {
        outcome = v;
        UNSAFE.putOrderedInt(this, stateOffset, NORMAL);
        finishCompletion();
    }
}
outcome 就是我们的结果。我们可以看看get方法:
public V get() throws InterruptedException, ExecutionException {
    int s = state;
    if (s <= COMPLETING)
        s = awaitDone(false, 0L);
    return report(s);
}
里面调用了report方法:
private V report(int s) throws ExecutionException {
    Object x = outcome;
    if (s == NORMAL)
        return (V)x;
    if (s >= CANCELLED)
        throw new CancellationException();
    throw new ExecutionException((Throwable)x);
}
通过上面的几个步骤,大致可以知道submit方法的执行流程。
submit() VS execute()
submit方法:
<T> Future<T> submit(Callable<T> task)
	提交一个值返回任务执行,并返回一个表示任务挂起结果的未来。
Future<?> submit(Runnable task)
	提交执行一个Runnable任务并返回一个表示该任务的未来。
<T> Future<T> submit(Runnable task, T result)
	提交执行一个Runnable任务并返回一个表示该任务的未来。
execute方法:
void execute(Runnable command)
	在未来的某个时候执行给定的任务。
首先我们从 API 方法就可以看到,submit方法可以接收 Callable 和 Runnable 两种类型的Task。但是execute方法只能接收Runnable类型的任务。如果我们执行的是execute方法的话,那么就是执行下面的代码:
final void runWorker(Worker w) {
    Thread wt = Thread.currentThread();
    Runnable task = w.firstTask;
    w.firstTask = null;
    w.unlock();
    boolean completedAbruptly = true;
    try {
        while (task != null || (task = getTask()) != null) {
            w.lock();
            if ((runStateAtLeast(ctl.get(), STOP) || (Thread.interrupted() &&
                  runStateAtLeast(ctl.get(), STOP))) && !wt.isInterrupted())
                wt.interrupt();
            try {
                beforeExecute(wt, task);
                Throwable thrown = null;
                try {
                    task.run();
                } catch (RuntimeException x) {
                    thrown = x; throw x;
                } catch (Error x) {
                    thrown = x; throw x;
                } catch (Throwable x) {
                    thrown = x; throw new Error(x);
                } finally {
                    afterExecute(task, thrown);
                }
            } finally {
                task = null;
                w.completedTasks++;
                w.unlock();
            }
        }
        completedAbruptly = false;
    } finally {
        processWorkerExit(w, completedAbruptly);
    }
}
可以看到这里就会执行调用传入的Runnable的run方法,没有返回值,所以正如前面execute的API那样,返回值是void。
还有就是,使用submit方法提交任务时,执行代码时,如果发生异常,会被catch捕捉到,然后set到outcome中。只有在get的时候,如果执行时发生异常,才会抛出。
try {
    result = c.call();
    // 统一调用的是call方法,由于如果传入的是runnable,会被RunnableAdapter封装为Callable对象。
    // 底层调用的还是Runnable的run方法。
    ran = true;
} catch (Throwable ex) {
    result = null;
    ran = false;
    setException(ex);
}
而我们看到,执行execute方法时:
try {
    task.run();
} catch (RuntimeException x) {
    thrown = x; throw x;
} catch (Error x) {
    thrown = x; throw x;
} catch (Throwable x) {
    thrown = x; throw new Error(x);
} finally {
    afterExecute(task, thrown);
}
虽然在run方法时被try包裹,但是catch中捕捉到又及时抛出去了,所以可以发现submit和execute方法处理异常的方式不同。
总结:
-
从API看,接收的任务类型不同。
- submit方式提交任务可以接收Runnable 和 Callable 两种类型的任务。
- 而通过execute方法提交只能接收Runnable类型的任务。
-
从API看,submit方式提交任务是有返回值的。
- 如果是Runnable类型的任务,
- 未传入既定的value,则返回null。
- 传入了既定的value,则返回value。
- 如果是Callable类型的任务;
- 返回call方法的返回值。
而execute返回只接收Runnable类型的参数,并且由于run方法时没有返回值的,所以execute方法的返回值为void
- 如果是Runnable类型的任务,
-
异常处理方式:
- submit方法提交任务走的是FutureTask的run方法,内部调用的是Callable的call方法。call方法在try-catch块中,如果发生异常,会把异常信息暂存在成员变量outcome中,只要当get时,发生的异常才会抛出。
- execute方法提交任务发生异常时,虽然也是在try-catch块中,但是立即就被抛出来了,所以在执行的过程中就会立即抛出来。
到这一步,submit和execute两者的区别差不多就总结完了,但是我们会想一下,submit里面其实也是调用了execute方法,那么我们是不是可以使用execute方法来实现submit同样的效果呢?
我们在回顾一下FutureTask的继承结构:
public class ExecutorTest {
    static class IRunnable implements Runnable {
        @Override
        public void run() {
            try {
                TimeUnit.SECONDS.sleep(5);
            } catch (InterruptedException e) {
                e.printStackTrace();
            }
            System.out.println("iRunning ...");
        }
    }

    static class ICallable implements Callable<Integer>{
        private final int firstNum;
        private final int secondNum;
        public ICallable(int firstNum, int secondNum){
            this.firstNum = firstNum;
            this.secondNum = secondNum;
        }
        @Override
        public Integer call() throws Exception {
            TimeUnit.SECONDS.sleep(5);
            return firstNum + secondNum;
        }
    }

    public static void main(String[] args) {
        ExecutorService executorService = Executors.newFixedThreadPool(5);
//        FutureTask futureTask = new FutureTask<>(new IRunnable(),null);
        FutureTask<Integer> futureTask = new FutureTask<>(new ICallable(1,2));
        executorService.execute(futureTask);
        Integer result = null;
        try {
            result = futureTask.get();
            System.out.println(result);
        } catch (InterruptedException | ExecutionException e) {
            e.printStackTrace();
        }
        executorService.shutdown();
    }
}
通过上面的代码就可以使用execute方法实现submit同样的效果。其实就是需要先将 Runnable 或 Callable 任务封装为FutureTask对象,就可以使用Future模式了。因为FutureTask是实现了Runnable接口的,所以execute是可以直接执行的。
Executors
Executor是线程池的接口,而Executors是一个工具类。
我们一般会使用Executors工具类来创建线程池。
newFixedThreadPool
static ExecutorService newFixedThreadPool(int nThreads)
	创建一个线程池,使用固定数量的线程操作了共享无界队列。
static ExecutorService newFixedThreadPool(int nThreads, ThreadFactory threadFactory)
	创建一个线程池,使用固定数量的线程操作了共享无界队列,使用提供的threadfactory创建新线程。
创建一个固定数量的线程池。也可以自己指定线程工厂 ThreadFactory.
源码:
public static ExecutorService newFixedThreadPool(int nThreads) {
	return new ThreadPoolExecutor(nThreads, nThreads, 0L,
                                  TimeUnit.MILLISECONDS,
                                  new LinkedBlockingQueue<Runnable>());
}

public static ExecutorService newFixedThreadPool(int nThreads, ThreadFactory threadFactory) {
	return new ThreadPoolExecutor(nThreads, nThreads,0L,
                                  TimeUnit.MILLISECONDS,
                     new LinkedBlockingQueue<Runnable>(),threadFactory);
}
但是可以看到,keepAliveTime为0,所以当线程空闲时,就会被回收掉。然而corePoolSize和maximumPoolSize都是nThreads,所以线程数始终是nThreads; 只有当线程数大于corePoolSize的时候,才会有被回收的步骤。所以上面的keepAliveTIme其实是无效的。
newSingleThreadExecutor
static ExecutorService newSingleThreadExecutor()
	创建一个执行器,使用一个单一的工作线程操作关闭一个无限的队列。
static ExecutorService newSingleThreadExecutor(ThreadFactory threadFactory)
	创建一个执行器,采用单线程操作了无界队列,并使用所提供的threadfactory创建新线程需要时。
创建一个单一线程的线程池。
源码:
public static ExecutorService newSingleThreadExecutor() {
    return new FinalizableDelegatedExecutorService
        (new ThreadPoolExecutor(1, 1,
                                0L, TimeUnit.MILLISECONDS,
                                new LinkedBlockingQueue<Runnable>()));
}
public static ExecutorService newSingleThreadExecutor(ThreadFactory threadFactory) {
    return new FinalizableDelegatedExecutorService
        (new ThreadPoolExecutor(1, 1,
                                0L, TimeUnit.MILLISECONDS,
                                new LinkedBlockingQueue<Runnable>(),
                                threadFactory));
}
public LinkedBlockingQueue() {
    this(Integer.MAX_VALUE);
}
首先我们可以发现,在源码里,使用的是ThreadPoolExecutor对象。corePoolSize 和 maximumPoolSize 都是1,然后keepAliveTime 是0;使用的是LinkedBlockedQueue来保存任务。 但是我们可以看到,这里使用FinalizableDelegatedExecutorService包裹了一层,我们看一下这个类:
static class FinalizableDelegatedExecutorService
    extends DelegatedExecutorService {
    FinalizableDelegatedExecutorService(ExecutorService executor) {
        super(executor);
    }
    protected void finalize() {
        super.shutdown();
    }
}
这个类没做什么,就是单纯的实现了一些重写了一下finalize方法,然后将ExecutorService对象传给了父类,我们来看一下父类:
/**
 * A wrapper class that exposes only the ExecutorService methods
 * of an ExecutorService implementation.
 */
static class DelegatedExecutorService extends AbstractExecutorService {
    private final ExecutorService e;
    DelegatedExecutorService(ExecutorService executor) { e = executor; }
    public void execute(Runnable command) { e.execute(command); }
    public void shutdown() { e.shutdown(); }
    public List<Runnable> shutdownNow() { return e.shutdownNow(); }
    public boolean isShutdown() { return e.isShutdown(); }
    public boolean isTerminated() { return e.isTerminated(); }
    public boolean awaitTermination(long timeout, TimeUnit unit)
        throws InterruptedException {
        return e.awaitTermination(timeout, unit);
    }
    public Future<?> submit(Runnable task) {return e.submit(task);}
    public <T> Future<T> submit(Callable<T> task) {return e.submit(task);}
    public <T> Future<T> submit(Runnable task, T result) {return e.submit(task, result);}
    public <T> List<Future<T>> invokeAll(Collection<? extends Callable<T>> tasks)
        throws InterruptedException {
        return e.invokeAll(tasks);
    }
    public <T> List<Future<T>> invokeAll(Collection<? extends Callable<T>> tasks,
                                         long timeout, TimeUnit unit)
        throws InterruptedException {
        return e.invokeAll(tasks, timeout, unit);
    }
    public <T> T invokeAny(Collection<? extends Callable<T>> tasks)
        throws InterruptedException, ExecutionException {
        return e.invokeAny(tasks);
    }
    public <T> T invokeAny(Collection<? extends Callable<T>> tasks,
                           long timeout, TimeUnit unit)
        throws InterruptedException, ExecutionException, TimeoutException {
        return e.invokeAny(tasks, timeout, unit);
    }
}
通过上面的注释,我们也可以大致知道什么意思:这是一个 仅仅暴露ExecutorService方法的包装类。屏蔽了ThreadPoolExecutor自己的一些方法,比如修改corePoolSize 方法 setCorePoolSize(int corePoolSize)
下面我们比较一下 newFixedThreadPool(1) 和 newSingleThreadExecutor 的异同点:
1) newFixedThreadPool 和 newSingleThreadExecutor 都可以保证任务执行的顺序,采用FIFO,即先提交的任务先执行。
2)newFixedThreadPool 和 newSingleThreadExecutor 两个在执行时,如果发生异常,都会重新创建一个新的线程来替换之前的线程继续执行。
3)不同的点时,newFixedThreadPool(1) 可以通过setCorePoolSize方法来修改线程池的线程数,但是newSingleThreadExecutor 把处理ExecutorService中的方法之前外的全部给屏蔽了,所以它是无法进行修改的,是一个真正的单线程的线程池。
newCachedThreadPool
static ExecutorService newCachedThreadPool()
	创建一个线程池,根据需要创建新的线程,但在可用时将重用先前构建的线程。
static ExecutorService newCachedThreadPool(ThreadFactory threadFactory)
	创建一个线程池线程创建新的需要,但会重用以前构建的线程可用时,使用所提供的threadfactory创建新线程。
创建一个缓存类型的线程池,也可以自己指定线程工厂 ThreadFactory
源码:
public static ExecutorService newCachedThreadPool() {
    return new ThreadPoolExecutor(0, Integer.MAX_VALUE,
                                  60L, TimeUnit.SECONDS,
                                  new SynchronousQueue<Runnable>());
}

public static ExecutorService newCachedThreadPool(ThreadFactory threadFactory) {
    return new ThreadPoolExecutor(0, Integer.MAX_VALUE,
                                  60L, TimeUnit.SECONDS,
                                  new SynchronousQueue<Runnable>(),
                                  threadFactory);
}
通过源码可以看到,corePoolSize为0,maximumPoolSize为Integer.MAX_VALUE, keepAliveTime设置为60秒。workQueue是一个同步队列。这种线程池的特点就是,当有任务提交时,但是没有空闲线程,则会创建一个新的线程去执行任务。
newScheduledThreadPool
static ScheduledExecutorService newScheduledThreadPool(int corePoolSize)
	创建一个线程池,可以调度命令在一个给定的延迟后运行,或周期性地执行。
static ScheduledExecutorService newScheduledThreadPool(int corePoolSize, ThreadFactory threadFactory)
	创建一个线程池,可以调度命令在一个给定的延迟后运行,或周期性地执行。
创建一个可以进行周期性执行的线程池。这是一个ThreadPoolExecutor的实现类,我们需要看一下它的新的方法:
newSingleThreadScheduledExecutor
static ScheduledExecutorService newSingleThreadScheduledExecutor()
	创建一个单线程的执行器,可以调度命令在一个给定的延迟后运行,或周期性地执行。
static ScheduledExecutorService newSingleThreadScheduledExecutor(ThreadFactory threadFactory)
	创建一个单线程的执行器,可以调度命令在一个给定的延迟后运行,或周期性地执行。
创建一个单一线程的线程池。我们来看一下源码:
public static ScheduledExecutorService newSingleThreadScheduledExecutor() {
    return new DelegatedScheduledExecutorService
        (new ScheduledThreadPoolExecutor(1));
}
创建一个corePoolSize为1的ScheduledThreadPoolExecutor。然后使用了DelegatedScheduledExecutorService 这个包装类,这个跟之前newSingleThreadExecutor是一样的,用于屏蔽一些方法,比如修改核心线程数setCorePoolSize。
static class DelegatedScheduledExecutorService
    extends DelegatedExecutorService
    implements ScheduledExecutorService {
    private final ScheduledExecutorService e;
    DelegatedScheduledExecutorService(ScheduledExecutorService executor) {
        super(executor);
        e = executor;
    }
    public ScheduledFuture<?> schedule(Runnable command, long delay, TimeUnit unit) {
        return e.schedule(command, delay, unit);
    }
    public <V> ScheduledFuture<V> schedule(Callable<V> callable, long delay, TimeUnit unit) {
        return e.schedule(callable, delay, unit);
    }
    public ScheduledFuture<?> scheduleAtFixedRate(Runnable command, long initialDelay, long period, TimeUnit unit) {
        return e.scheduleAtFixedRate(command, initialDelay, period, unit);
    }
    public ScheduledFuture<?> scheduleWithFixedDelay(Runnable command, long initialDelay, long delay, TimeUnit unit) {
        return e.scheduleWithFixedDelay(command, initialDelay, delay, unit);
    }
}
newSingleThreadScheduledExecutor
static ScheduledExecutorService newSingleThreadScheduledExecutor()
	创建一个单线程的执行器,可以调度命令在一个给定的延迟后运行,或周期性地执行。
static ScheduledExecutorService newSingleThreadScheduledExecutor(ThreadFactory threadFactory)
	创建一个单线程的执行器,可以调度命令在一个给定的延迟后运行,或周期性地执行。
创建一个单一线程的执行器,可以进行延迟执行和周期性执行。
源码:
public static ScheduledExecutorService newSingleThreadScheduledExecutor() {
    return new DelegatedScheduledExecutorService
        (new ScheduledThreadPoolExecutor(1));
}
可以看到这个方法也是使用一个包装类,然后new了个一个线程的ScheduledThreadPoolExecutor. 看一下这个类 DelegatedScheduledExecutorService 的源码:
static class DelegatedScheduledExecutorService
    extends DelegatedExecutorService
    implements ScheduledExecutorService {
    private final ScheduledExecutorService e;
    DelegatedScheduledExecutorService(ScheduledExecutorService executor) {
        super(executor);
        e = executor;
    }
    public ScheduledFuture<?> schedule(Runnable command, long delay, TimeUnit unit) {
        return e.schedule(command, delay, unit);
    }
    public <V> ScheduledFuture<V> schedule(Callable<V> callable, long delay, TimeUnit unit) {
        return e.schedule(callable, delay, unit);
    }
    public ScheduledFuture<?> scheduleAtFixedRate(Runnable command, long initialDelay, long period, TimeUnit unit) {
        return e.scheduleAtFixedRate(command, initialDelay, period, unit);
    }
    public ScheduledFuture<?> scheduleWithFixedDelay(Runnable command, long initialDelay, long delay, TimeUnit unit) {
        return e.scheduleWithFixedDelay(command, initialDelay, delay, unit);
    }
}
这也是一个包装类,继承自DelegatedExecutorService,并且实现了ScheduledExecutorService接口,这个类拥有DelegatedExecutorService 和 ScheduledExecutorService方法,屏蔽了ScheduledThreadPoolExecutor的一些方法。比如设置核心线程数的个数,这样就使得线程数不可以修改,是一个完全的单线程的线程池。
newWorkStealingPool
static ExecutorService newWorkStealingPool()
	创建一个工作线程池使用 available processors为目标的并行度。
static ExecutorService newWorkStealingPool(int parallelism)
	创建一个线程池,保持足够的线程来支持给定的并行级别,并可以使用多个队列来减少争用。
这个线程池底层使用的不是ThreadPoolExecutor,而是使用的是ForkJoinPool。
源码:
public static ExecutorService newWorkStealingPool() {
    return new ForkJoinPool
        (Runtime.getRuntime().availableProcessors(),
         ForkJoinPool.defaultForkJoinWorkerThreadFactory,
         null, true);
}
newForkJoinPool:
public ForkJoinPool(int parallelism,
                    ForkJoinWorkerThreadFactory factory,
                    UncaughtExceptionHandler handler,
                    boolean asyncMode) {
    this(checkParallelism(parallelism),checkFactory(factory),handler,
         asyncMode ? FIFO_QUEUE : LIFO_QUEUE,"ForkJoinPool-" + nextPoolId() + "-worker-");
    checkPermission();
}
Runtime.getRuntime().availableProcessors() 是获取CPU线程数。虽然构建线程池的时候,并没有传入线程数,但是内部是通过获取CPU的线程数来设置的。也可以通过手动设置。这个线程池和Cached线程池一样,最终也会自动关闭。


