springSecurity基于表单认证源码解析、认证结果如何在多个请求之间共享、获取认证用户信息
备注:此为看视频之后,自己理解总结的
1、认证处理流程说明
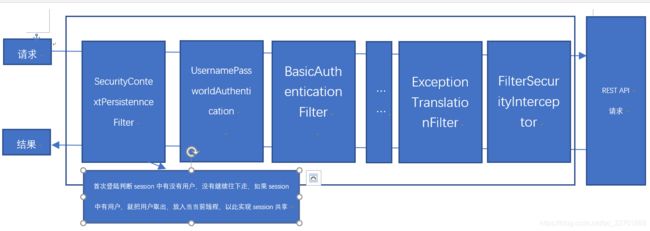
首先是springSecurity的过滤器链
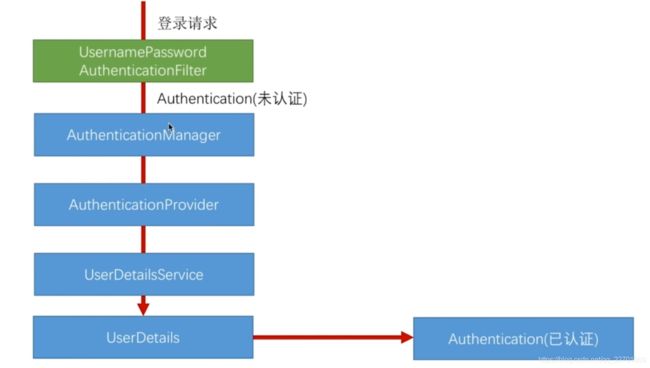
核心认证流程
我们自定义的验证用户名的逻辑MyUserDetailsService
@Component
public class MyUserDetailsService implements UserDetailsService {

	private Logger logger = LoggerFactory.getLogger(getClass());

	@Autowired
	private PasswordEncoder passwordEncoder;
	@Override
	public UserDetails loadUserByUsername(String username) throws UsernameNotFoundException {
		logger.info("登录用户名:" + username);
		// 根据用户名查找用户信息,可以冲数据库获取信息
		//根据查找到的用户信息判断用户是否被冻结
		String password = passwordEncoder.encode("123456");
		logger.info("数据库密码是:"+password);
		return new User(username, password,
				true, true, true, true,
				AuthorityUtils.commaSeparatedStringToAuthorityList("admin"));
	}

}
这里我们主要从UsernamePassworldAuthentication来跟踪源码
public Authentication attemptAuthentication(HttpServletRequest request,
			HttpServletResponse response) throws AuthenticationException {
		if (postOnly && !request.getMethod().equals("POST")) {
			throw new AuthenticationServiceException(
					"Authentication method not supported: " + request.getMethod());
		}

		String username = obtainUsername(request);
		String password = obtainPassword(request);

		if (username == null) {
			username = "";
		}

		if (password == null) {
			password = "";
		}

		username = username.trim();
//1、调用构造方法,创建了一个还没有经过认证的token
		UsernamePasswordAuthenticationToken authRequest = new
 UsernamePasswordAuthenticationToken(
				username, password);

		// 会把我们当前请求request中的session、ip等放到token中
		setDetails(request, authRequest);
//2、这一句就是获取用户authention的方法
		return this.getAuthenticationManager().authenticate(authRequest);
	}
1、调用构造方法,创建了一个还没有经过认证的token
UsernamePasswordAuthenticationToken authRequest = new UsernamePasswordAuthenticationToken(
username, password);
public UsernamePasswordAuthenticationToken(Object principal, Object credentials) {
	//父类权限,当前为登陆,所有权限为空
    super(null);
	this.principal = principal;
	this.credentials = credentials;
    //初始化为未认证过的token,通过认证之后,会重新调用另一个
    //UsernamePasswordAuthenticationToken构造方法,将其设定为true
	setAuthenticated(false);
}
2、接下来是this.getAuthenticationManager().authenticate(authRequest)中的authenticate(authRequest);
//这一句就是获取用户authention的方法return this.getAuthenticationManager().authenticate(authRequest);
getAuthenticationManager这里的AuthenticationManager主要是用来管理AuthenticationProvider的,登陆方式的不同,对应的Provicder不同,比如密码登陆、第三方(qq、微信)登陆,因为对应的provider有多种,所以就有AuthernticationManager来进行管理了。
.authenticate(authRequest);有多个实现类,我们进入ProviderManager
public class ProviderManager implements AuthenticationManager, MessageSourceAware,
		InitializingBean {
	public Authentication authenticate(Authentication authentication)
			throws AuthenticationException {
		Class toTest = authentication.getClass();
		AuthenticationException lastException = null;
		Authentication result = null;
		boolean debug = logger.isDebugEnabled();
		//这里就是ProviderManager管理的AuthenticationProvider,因为不同的登录对应的逻辑是不一样的。
		//比如UsernamePasswordAuthenticationToken、SocialAuthenticationToken,这里只讨论比如UsernamePasswordAuthenticationToken
		for (AuthenticationProvider provider : getProviders()) {//支不支持我传进来的authenticaition
			if (!provider.supports(toTest)) {
				continue;
			}

			if (debug) {
				logger.debug("Authentication attempt using "
						+ provider.getClass().getName());
			}

			try {
			//3、跳入源码,下面会有解说
				result = provider.authenticate(authentication);

				if (result != null) {
					copyDetails(authentication, result);
					break;
				}
			}
		}

		if (result == null && parent != null) {
			// Allow the parent to try.
			try {
				result = parent.authenticate(authentication);
			}
		}

		if (result != null) {
			if (eraseCredentialsAfterAuthentication
					&& (result instanceof CredentialsContainer)) {
				// Authentication is complete. Remove credentials and other secret data
				// from authentication
				((CredentialsContainer) result).eraseCredentials();
			}

			eventPublisher.publishAuthenticationSuccess(result);
			return result;
		}


		prepareException(lastException, authentication);

		throw lastException;
	}
}
3、result = provider.authenticate(authentication);源码跟踪
public abstract class AbstractUserDetailsAuthenticationProvider implements
		AuthenticationProvider, InitializingBean, MessageSourceAware {

	public Authentication authenticate(Authentication authentication)
			throws AuthenticationException {
		// Determine username
		String username = (authentication.getPrincipal() == null) ? "NONE_PROVIDED"
				: authentication.getName();

		boolean cacheWasUsed = true;
		UserDetails user = this.userCache.getUserFromCache(username);

		if (user == null) {
			cacheWasUsed = false;

			try {
			//4、源码跟踪。这一句就会调用我们自己定义的MyUsesrDetailService,从数据库获取用户的逻辑
			//我们进入当前类的实现类DaoAuthenticationProvider查看源码
				user = retrieveUser(username,
						(UsernamePasswordAuthenticationToken) authentication);
			}
		}

		try {
			preAuthenticationChecks.check(user);
			additionalAuthenticationChecks(user,
					(UsernamePasswordAuthenticationToken) authentication);
		}
        //5、跟踪检查用户是否过期超时等
		postAuthenticationChecks.check(user);
        //这里对passwordEncoder密码的一些检查
additionalAuthenticationChecks(user,
					(UsernamePasswordAuthenticationToken) authentication);

		if (!cacheWasUsed) {
			this.userCache.putUserInCache(user);
		}

		Object principalToReturn = user;

		if (forcePrincipalAsString) {
			principalToReturn = user.getUsername();
		}
        //6源码进入
		return createSuccessAuthentication(principalToReturn, authentication, user);
	}
}
//4、源码跟踪。这一句就会调用我们自己定义的MyUsesrDetailService,从数据库获取用户的逻辑
//我们进入当前类的实现类DaoAuthenticationProvider查看源码
user = retrieveUser(username, (UsernamePasswordAuthenticationToken) authentication);
protected final UserDetails retrieveUser(String username,
		UsernamePasswordAuthenticationToken authentication)
		throws AuthenticationException {
	UserDetails loadedUser;

	try {
		//调用我们自己的MyUserDetailService的loadUserByUsername
		loadedUser = this.getUserDetailsService().loadUserByUsername(username);
	}
	return loadedUser;
}
5、跟踪检查用户是否过期超时等postAuthenticationChecks.check(user);
public void check(UserDetails user) {
	if (!user.isAccountNonLocked()) {//检查是否被锁定
		throw new LockedException(messages.getMessage(
				"AccountStatusUserDetailsChecker.locked", "User account is locked"));
	}

	if (!user.isEnabled()) {//检查是否是有效的
		throw new DisabledException(messages.getMessage(
				"AccountStatusUserDetailsChecker.disabled", "User is disabled"));
	}

	if (!user.isAccountNonExpired()) {//检查是否超时
		throw new AccountExpiredException(
				messages.getMessage("AccountStatusUserDetailsChecker.expired",
						"User account has expired"));
	}

	if (!user.isCredentialsNonExpired()) {
		throw new CredentialsExpiredException(messages.getMessage(
				"AccountStatusUserDetailsChecker.credentialsExpired",
				"User credentials have expired"));
	}
}
6、源码进入 return createSuccessAuthentication(principalToReturn, authentication, user);
这里就已经返回一个经过认证的authentication,然后我们返回到最开始的代码
UsernamePasswordAuthenticationFilter的return this.getAuthenticationManager().authenticate(authRequest);protected Authentication createSuccessAuthentication(Object principal,
Authentication authentication, UserDetails user) {
//这里就是最开始说的,认证成功之后,重新new一个token,这里的权限都有了
UsernamePasswordAuthenticationToken result = new UsernamePasswordAuthenticationToken(
principal, authentication.getCredentials(),
authoritiesMapper.mapAuthorities(user.getAuthorities()));
result.setDetails(authentication.getDetails());
return result;
}接下来就会进入到springsecurity的UsernamePasswordAuthenticationFilter前面的过滤器AbstractAuthenticationProcessingFilter
public void doFilter(ServletRequest req, ServletResponse res, FilterChain chain)
		throws IOException, ServletException {

	HttpServletRequest request = (HttpServletRequest) req;
	HttpServletResponse response = (HttpServletResponse) res;

	if (!requiresAuthentication(request, response)) {
		chain.doFilter(request, response);

		return;
	}

	if (logger.isDebugEnabled()) {
		logger.debug("Request is to process authentication");
	}

	Authentication authResult;

	try {
		//这里调用UsernamePasswordAuthenticationFilter.attemptAuthentication方法,
        //获取到了一个authentication
		authResult = attemptAuthentication(request, response);
		if (authResult == null) {
			return;
		}
		sessionStrategy.onAuthentication(authResult, request, response);
	}

	if (continueChainBeforeSuccessfulAuthentication) {
		chain.doFilter(request, response);
	}
	//7、源码跟踪
	successfulAuthentication(request, response, chain, authResult);
}
7、successfulAuthentication(request, response, chain, authResult);
protected void successfulAuthentication(HttpServletRequest request,
		HttpServletResponse response, FilterChain chain, Authentication authResult)
		throws IOException, ServletException {

	if (logger.isDebugEnabled()) {
		logger.debug("Authentication success. Updating SecurityContextHolder to contain: "
				+ authResult);
	}
    //认证结果如何在多个请求之间共享,把当阿倩信息存储到SecurityContextHolder 的ThreadLocal中
	SecurityContextHolder.getContext().setAuthentication(authResult);

	rememberMeServices.loginSuccess(request, response, authResult);

	// Fire event
	if (this.eventPublisher != null) {
		eventPublisher.publishEvent(new InteractiveAuthenticationSuccessEvent(
				authResult, this.getClass()));
	}
	//这里就会调用我们自定义的成功处理器,要了解成功和失败处理器,可自行百度
	successHandler.onAuthenticationSuccess(request, response, authResult);
}
自定义最简单的成功处理器如下
@Component
public class ImoocAuthenticationSuccessHandler implements AuthenticationSuccessHandler {
    private Logger logger = LoggerFactory.getLogger(ImoocAuthenticationSuccessHandler.class);

    @Autowired
    private ObjectMapper objectMapper;
    @Override
    public void onAuthenticationSuccess(HttpServletRequest request,
HttpServletResponse response, Authentication authentication) throws IOException, ServletException {
        logger.info("登陆成功");


        response.setContentType("application/json;charset=UTF-8");
        response.getWriter().write(objectMapper.writeValueAsString(authentication));

    }
}
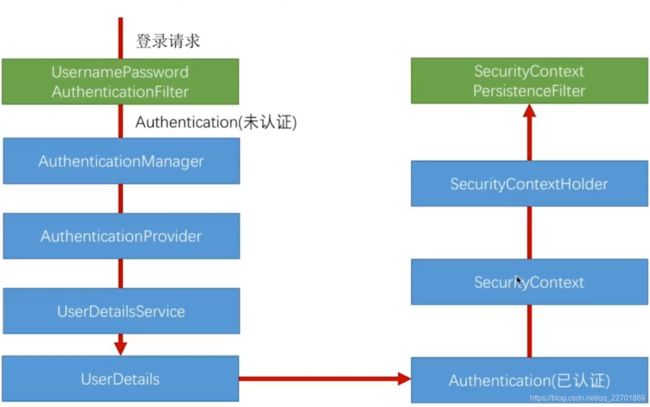
2、认证结果如何在多个请求之间共享
用户在登录成功之后,如何在后续的请求中的线程共享登录状态的呢?
在1、7中,源码如下//认证结果如何在多个请求之间共享,把当阿倩信息存储到SecurityContextHolder 的ThreadLocal变量Context中 SecurityContextHolder.getContext().setAuthentication(authResult);
protected void successfulAuthentication(HttpServletRequest request,
		HttpServletResponse response, FilterChain chain, Authentication authResult)
		throws IOException, ServletException {

	if (logger.isDebugEnabled()) {
		logger.debug("Authentication success. Updating SecurityContextHolder to contain: "
				+ authResult);
	}
    //认证结果如何在多个请求之间共享,把当阿倩信息存储到SecurityContextHolder
    //的ThreadLocal变量Context中,即放到当前线程中了,
    //被SecurityContextPersistenctFilter使用
	SecurityContextHolder.getContext().setAuthentication(authResult);

	rememberMeServices.loginSuccess(request, response, authResult);

	// Fire event
	if (this.eventPublisher != null) {
		eventPublisher.publishEvent(new InteractiveAuthenticationSuccessEvent(
				authResult, this.getClass()));
	}
	//这里就会调用我们自定义的成功处理器,要了解成功和失败处理器,可自行百度
	successHandler.onAuthenticationSuccess(request, response, authResult);
}
被SecurityContextPersistenctFilter使用
3、获取认证用户信息
@RestController
@RequestMapping("/user")
public class UserController {
	//方法一
	@GetMapping("/getUser")
	public Object getCurrentUser(){
		return SecurityContextHolder.getContext().getAuthentication();
	}
	//方法二
	@GetMapping("/getUser2")
	public Object getCurrentUser2(Authentication authentication){
		return authentication;
	}
}
启动服务,登录之后,访问对应接口,返回结果如下,可以通过实际需要,去除多余的信息
{
	"authorities": [{
		"authority": "admin"
	}],
	"details": {
		"remoteAddress": "0:0:0:0:0:0:0:1",
		"sessionId": null
	},
	"authenticated": true,
	"principal": {
		"password": null,
		"username": "admin",
		"authorities": [{
			"authority": "admin"
		}],
		"accountNonExpired": true,
		"accountNonLocked": true,
		"credentialsNonExpired": true,
		"enabled": true
	},
	"credentials": null,
	"name": "admin"
}


