ambari集成第三方应用
背景:最近遇到一个需求,公司运维人员可以通过ambari界面addservice按钮添加、启动、停止我们公司的系统,就花时间研究了一下ambari的集成。
步骤:万事皆套路,ambari集成也同样,一是告诉ambari我要添加什么服务,二是告诉ambari我的服务在哪并且怎么加载的。下面我就按照这两个步骤来说明详细过程。
一、告诉ambari我添加什么服务。
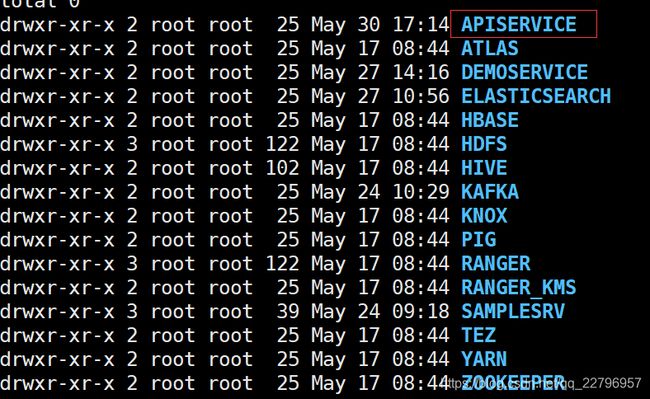
首先要在/var/lib/ambari-server/resources/stacks/HDP/3.1/services路径下添加服务名称,新建一个服务名称文件夹,名称就是要添加的服务的名称,如下图新建APISERVICE服务
然后添加说明文件metainfo.xml,

文件内容为xml格式,包括服务名称、版本、相对路径:

二、告诉ambari我的服务在哪并且怎么加载的。
首先在/var/lib/ambari-server/resources/common-services文件夹下面定义服务的操作步骤,如图所示,也是同样要创建一个服务名称的文件夹。

创建上文xml中定义的路径如:APISERVICE/1.0这个文件夹。
![]()
在这个文件夹1.0下面就是要按照套路来创建相应名称的目录或者文件了,如下图所示:
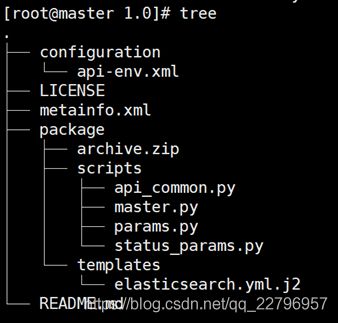
这里面metainfo.xml、master.py、params.py是必须的而且目录结构必须是这样的。
下面来看一下metainfo.xml里面的内容:
2.0
APISERVICE
API Service
api service
1.0
APICOMPONENT
API Component
MASTER
1
PYTHON
600
any
false
这里规定了服务的名称,以及该服务拥有组件的名称还有添加组件要执行的python脚本。
这里的master.py脚本也是固定的要实现几个方法,比如配置、安装、启动、停止等方法。
#!/usr/bin/env python

"""
Licensed to the Apache Software Foundation (ASF) under one
or more contributor license agreements.  See the NOTICE file
distributed with this work for additional information
regarding copyright ownership.  The ASF licenses this file
to you under the Apache License, Version 2.0 (the
"License"); you may not use this file except in compliance
with the License.  You may obtain a copy of the License at
    http://www.apache.org/licenses/LICENSE-2.0
Unless required by applicable law or agreed to in writing, software
distributed under the License is distributed on an "AS IS" BASIS,
WITHOUT WARRANTIES OR CONDITIONS OF ANY KIND, either express or implied.
See the License for the specific language governing permissions and
limitations under the License.
"""

import sys
import os
import glob
import pwd
import grp
import signal
import time
from resource_management import *
from api_common import kill_process

class Master(Script):

    # Install apisearch
    def install(self, env):
        # Import properties defined in -config.xml file from the params class
        import params

        # This allows us to access the params.api_pid_file property as
        # format('{api_pid_file}')
        env.set_params(params)

        # Install dependent packages
        self.install_packages(env)

        # Create user and group for api if they don't exist
        try: grp.getgrnam(params.api_group)
        except KeyError: Group(group_name=params.api_group)

        try: pwd.getpwnam(params.api_user)
        except KeyError: User(username=params.api_user,
                              gid=params.api_group,
                              groups=[params.api_group],
                              ignore_failures=True
                              )

        # Create api directories
        Directory([params.api_base_dir, params.api_pid_dir],
                  mode=0755,
                  cd_access='a',
                  owner=params.api_user,
                  group=params.api_group,
                  create_parents=True
                  )


        # Download apisearch
        cmd = format("cd {api_base_dir}; wget {api_download} -O api.tar.gz")
        Execute(cmd, user="root")

        cmd1 = format("cd {api_base_dir}; tar -zvxf api.tar.gz")
        Execute(cmd1, user="root")

        cmd2 = format("cd {api_base_dir}; rm api.tar.gz")
        Execute(cmd2, user=params.api_user)

        Execute('echo "Install complete"')


    def configure(self, env):
        # Import properties defined in -config.xml file from the params class
        import params

        # This allows us to access the params.api_pid_file property as
        # format('{api_pid_file}')
        env.set_params(params)

        Execute('echo "Configuration complete"')

    def stop(self, env):
        # Import properties defined in -config.xml file from the params class
        import params

        # Import properties defined in -env.xml file from the status_params class
        import status_params

        # This allows us to access the params.api_pid_file property as
        #  format('{api_pid_file}')
        env.set_params(params)

        # Stop apisearch
        kill_process(params.api_pid_file, user="root")
        #cmd = format("kill `cat {api_pid_file}`")
        #Execute(cmd, user=params.api_user, only_if=format("test -f {api_pid_file}"))


    def start(self, env):
        # Import properties defined in -config.xml file from the params class
        import params

        # This allows us to access the params.api_pid_file property as
        #  format('{api_pid_file}')
        env.set_params(params)

        # Configure apisearch
        self.configure(env)

        # Start apisearch
        cmd = format("cd {api_base_dir};sh apiservice.sh {api_pid_file} {api_zk}")
        Execute(cmd, user="root")


    def status(self, env):
        # Import properties defined in -env.xml file from the status_params class
        import status_params

        # This allows us to access the params.api_pid_file property as
        #  format('{api_pid_file}')
        env.set_params(status_params)

        #try:
        #    pid_file = glob.glob(status_params.api_pid_file)[0]
        #except IndexError:
        #    pid_file = ''

        # Use built-in method to check status using pidfile
        check_process_status(status_params.api_pid_file)

if __name__ == "__main__":
    Master().execute()
这里有个apiservice.sh是我自己用shell脚本实现的启动脚本,其实很简单,一共三部分,第一部分执行解压并执行Java -jar/-cp xx.jar,在这里我只是把这个命令封装成脚本,第二部分就是获取App的进程id,第三部分就是把获取到的进程id写到文件里,待停止的时候利用。
#!/bin/sh
unzip xx.zip
dir=`unzip -l xx.zip | awk 'NR==4{print $4}'`
(cd $dir"bin";nohup ./api -z $2 &)
sleep 5 &
wait
pid=`ps -ef | grep $dir | grep -v grep | awk '{print $2}' | awk NR==1`
echo $pid > $1
params.py的内容:
#!/usr/bin/env python

"""
Licensed to the Apache Software Foundation (ASF) under one
or more contributor license agreements.  See the NOTICE file
distributed with this work for additional information
regarding copyright ownership.  The ASF licenses this file
to you under the Apache License, Version 2.0 (the
"License"); you may not use this file except in compliance
with the License.  You may obtain a copy of the License at
    http://www.apache.org/licenses/LICENSE-2.0
Unless required by applicable law or agreed to in writing, software
distributed under the License is distributed on an "AS IS" BASIS,
WITHOUT WARRANTIES OR CONDITIONS OF ANY KIND, either express or implied.
See the License for the specific language governing permissions and
limitations under the License.
"""

from resource_management import *
import os

# config object that holds the configurations declared in the -config.xml file
config = Script.get_config()

java64_home = config['hostLevelParams']['java_home']

hostname = config['hostname']

api_user = config['configurations']['api-env']['api_user']
api_group = config['configurations']['api-env']['api_group']

api_base_dir = config['configurations']['api-env']['api_base_dir']

api_pid_dir = config['configurations']['api-env']['api_pid_dir']
api_pid_file = format("{api_pid_dir}/api.pid")

api_download = 'http://127.0.0.1/tarapi.tar.gz'
api_zk = config['configurations']['api-env']['zk']
注意一点,这里的api-env就是configration/api-env.xml文件的内容,ambari启动的时候回加载这个文件到它自己的字典中,用的时候直接取就可以了。
    api_user
    ams
    USER
    user


    api_group
    hadoop
    GROUP
    group


    api_base_dir
    /opt/api
    api base directory


    api_pid_dir
    /var/run/api
    api PID directory


    zk
    127.0.0.1:2181
    zookeeper address:port
最后就是执行ambari-server restart重启加载。然后在ambari-web中点击addservice就可以看到我们的服务名称了,添加的过程与ambari已经集成Hadoop组件完全相同。