SpringBoot2.0以上版本整合Oautho2.0 已测试ok复制直接用
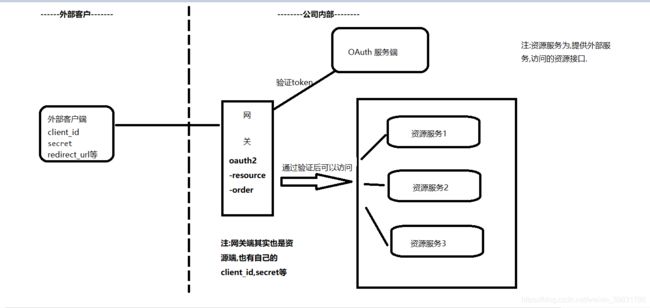
首先看下整体流程图:
一,服务端搭建
首先引入pom依赖 注意 我的版本2.2.0为了给全 我贴出我所有依赖注意个别不要引入
  4.0.0

        org.springframework.boot
        spring-boot-starter-parent
        2.2.0.RELEASE


    com.jxd
    oauth2-server
    0.0.1-SNAPSHOT
    oauth2-server
    Demo project for Spring Boot


        1.8


            org.springframework.boot
            spring-boot-starter-web


            org.projectlombok
            lombok
            true


            org.springframework.boot
            spring-boot-starter-freemarker


            org.springframework.boot
            spring-boot-starter-security


            org.springframework.cloud
            spring-cloud-starter-oauth2


            org.springframework.boot
            spring-boot-starter-test
            test


                    org.junit.vintage
                    junit-vintage-engine


                org.springframework.cloud
                spring-cloud-dependencies
                Finchley.M7
                pom
                import


            spring-milestones
            Spring Milestones
            https://repo.spring.io/libs-milestone

                false
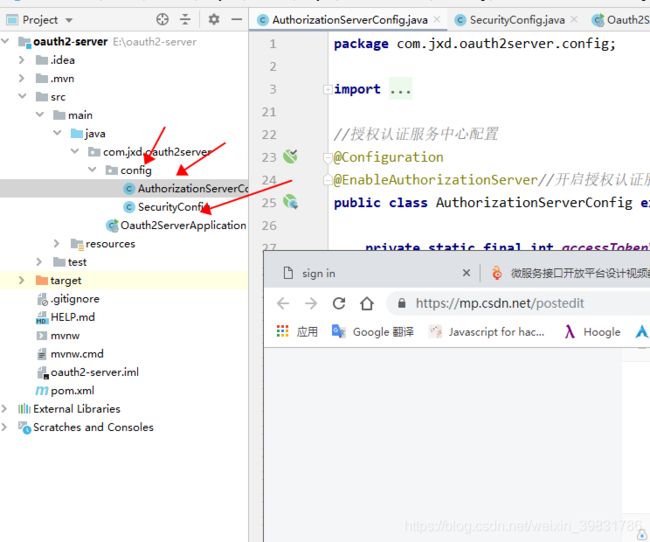
其次创建一个config包 建立两个类 如下图所示
建立 AuthorizationServerConfig 类
package com.jxd.oauth2server.config;

import org.springframework.context.annotation.Bean;
import org.springframework.context.annotation.Configuration;
import org.springframework.http.HttpMethod;
import org.springframework.security.authentication.AuthenticationManager;
import org.springframework.security.authentication.AuthenticationProvider;
import org.springframework.security.authentication.dao.DaoAuthenticationProvider;
import org.springframework.security.core.Authentication;
import org.springframework.security.core.AuthenticationException;
import org.springframework.security.core.userdetails.User;
import org.springframework.security.core.userdetails.UserDetailsService;
import org.springframework.security.crypto.bcrypt.BCryptPasswordEncoder;
import org.springframework.security.crypto.password.PasswordEncoder;
import org.springframework.security.oauth2.config.annotation.configurers.ClientDetailsServiceConfigurer;
import org.springframework.security.oauth2.config.annotation.web.configuration.AuthorizationServerConfigurerAdapter;
import org.springframework.security.oauth2.config.annotation.web.configuration.EnableAuthorizationServer;
import org.springframework.security.oauth2.config.annotation.web.configurers.AuthorizationServerEndpointsConfigurer;
import org.springframework.security.oauth2.config.annotation.web.configurers.AuthorizationServerSecurityConfigurer;
import org.springframework.security.provisioning.InMemoryUserDetailsManager;

//授权认证服务中心配置
@Configuration
@EnableAuthorizationServer//开启授权认证服务中心
public class AuthorizationServerConfig extends AuthorizationServerConfigurerAdapter {

    private static final int accessTokenValiditySeconds =7200;//
    private static final int refreshTokenValiditySeconds =7200;//

    //如果token过期即超过我们设定的7200秒,测试用刷新token获取新的token 至少提前10分钟调用接口进行刷新

    //配置申请id, 申请key 以及回调地址,token有效期 目前演示先写死,正常会再数据库获取


    /**
     * 获取code
     * http://localhost:8011/oauth/authorize?response_type=code&client_id=test_id&redirect_url=http://www.baidu.com
     *
     * 获取token
     *http://localhost:8011/oauth/token?grant_type=authorization_code&code=你的*code&redirect_url=http://www.baidu.com&scope=all&client_id=test_id&client_secret=test123456
     *
     * 密码模式获取token
     * http://localhost:8011/oauth/token?grant_type=password&username=user_1&password=123456&client_id=test_id&client_secret=test123456
     *
     * 刷新token
     * http://localhost:8011/oauth/token?grant_type=refresh_token&refresh_token=你的刷新token&client_id=test_id&client_secret=test123456
     *
     * token无论 密码还是授权码获取的token 值都一样 因为需要保证token 唯一
     *
     * 验证token是否有效
     * http://localhost:8011/oauth/check_token?token=你的token
     *返回 结果
     *
     * {
     *     "active": true, 表示有效
     *     "exp": 1574746989, 还剩余的失效时间单位毫秒
     *     "user_name": "user_1",
     *     "authorities": [
     *         "ROLE_USER"
     *     ],
     *     "client_id": "test_id",
     *     "scope": [
     *         "all"
     *     ]
     * }
     *
     */


    @Override
    public void configure(ClientDetailsServiceConfigurer clients) throws Exception{
        //clients.jdbc()如果连接数据库的话一行代码就可以
        //clients.jdbc().可以自动往数据库插入数据
//        clients.jdbc().withClient("test_id")
//                .secret(passwordEncoder().encode("test123456"))
//                .redirectUris("http://www.baidu.com")
//                .authorizedGrantTypes("authorization_code","password","refresh_token")//通过授权码获取,或者密码模式,和刷新token权限
//                .scopes("all")//所有权限都有
//                .accessTokenValiditySeconds(accessTokenValiditySeconds)//token有效期单位秒
//                .refreshTokenValiditySeconds(refreshTokenValiditySeconds);//refresh_token有效期单位秒


        //1.获取 授权的识别id 和 密钥key  一下代码为了演示写死 正常流程需要读取数据库
        clients.inMemory()
                .withClient("test_id")
                .secret(passwordEncoder().encode("test123456"))
                .redirectUris("http://www.baidu.com")
                .authorizedGrantTypes("authorization_code","password","refresh_token")//通过授权码获取,或者密码模式,和刷新token权限
                .scopes("all")//所有权限都有
                .accessTokenValiditySeconds(accessTokenValiditySeconds)//token有效期单位秒
                .refreshTokenValiditySeconds(refreshTokenValiditySeconds)
                 .and()//添加多个用户
                .withClient("jxd_id")
                .secret(passwordEncoder().encode("test123456"))
                .redirectUris("http://www.baidu.com")
                .authorizedGrantTypes("authorization_code","password","refresh_token")//通过授权码获取,或者密码模式,和刷新token权限
                .scopes("all")//所有权限都有
                .accessTokenValiditySeconds(accessTokenValiditySeconds)//token有效期单位秒
                .refreshTokenValiditySeconds(refreshTokenValiditySeconds)
        ;//refresh_token有效期单位秒
        //密码授权模式, 使用用户名称和密码进行获取accessToken
        //如果clientid appid 同时使用密码模式和授权code 获取accessToken 其实是一致的
        //密码模式和授权码模式是同一套oauton授权模式
    }


    //设置token 类型 可以通过post  后者get获取到
    @Override
    public void configure(AuthorizationServerEndpointsConfigurer  endpoints) {
        endpoints.authenticationManager(authenticationManager()).allowedTokenEndpointRequestMethods(HttpMethod.GET,
                HttpMethod.POST);
        //必须加上下边这两行代码不然刷新token接口会报错
        endpoints.authenticationManager(authenticationManager());
        endpoints.userDetailsService(userDetailsService());
    }

    @Override
    public void configure(AuthorizationServerSecurityConfigurer oauthServer) {
        //表单认证
        oauthServer.allowFormAuthenticationForClients();
        //允许check_token访问
        oauthServer.checkTokenAccess("permitAll()");
    }

    @Bean
    AuthenticationManager authenticationManager(){
        AuthenticationManager authenticationManager = new AuthenticationManager() {
            @Override
            public Authentication authenticate(Authentication authentication) throws AuthenticationException {
                return authenticationProvider().authenticate(authentication);
            }
        };
        return authenticationManager;
    }

    @Bean
    public AuthenticationProvider authenticationProvider(){
        DaoAuthenticationProvider daoAuthenticationProvider = new DaoAuthenticationProvider();
        daoAuthenticationProvider.setUserDetailsService(userDetailsService());
        daoAuthenticationProvider.setHideUserNotFoundExceptions(false);
        daoAuthenticationProvider.setPasswordEncoder(passwordEncoder());
        return daoAuthenticationProvider;
    }


    //设置添加用户信息,正常应该从数据库中读取
    @Bean
    UserDetailsService userDetailsService(){
        InMemoryUserDetailsManager userDetailsManager = new InMemoryUserDetailsManager();
        userDetailsManager.createUser(User.withUsername("user_1").password(//一会你登陆的账户密码
                passwordEncoder().encode("123456")).authorities("ROLE_USER").build()
        );
        userDetailsManager.createUser(User.withUsername("user_2").password(
                passwordEncoder().encode("1234567")).authorities("ROLE_USER").build()
        );
        return userDetailsManager;
    }
    //密码的加密
    @Bean
    PasswordEncoder passwordEncoder(){
        //加密方式
        PasswordEncoder passwordEncoder = new BCryptPasswordEncoder();
        return passwordEncoder;
    }
}
-----------------------------------------------------------------------------------------自此服务端搭建完成
二,资源端搭建
注:pom文件引入和 服务端相同 ,在此不展示
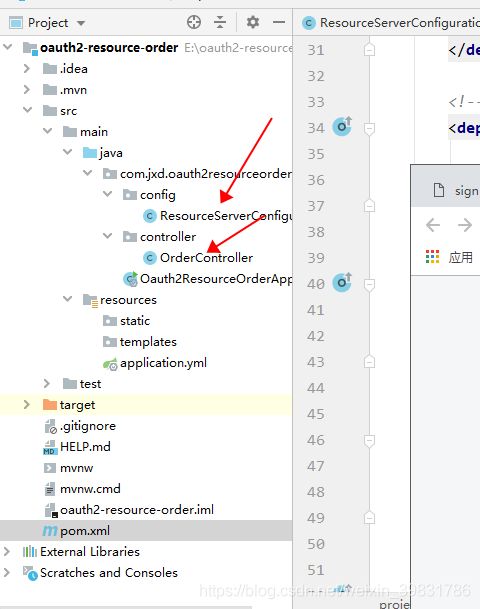
创建一个config 包建立两个文件 如下图所示:
创建 ResourceServerConfiguration 类
package com.jxd.oauth2resourceorder.config;

import org.springframework.context.annotation.Configuration;
import org.springframework.security.config.annotation.web.builders.HttpSecurity;
import org.springframework.security.oauth2.config.annotation.web.configuration.EnableResourceServer;
import org.springframework.security.oauth2.config.annotation.web.configuration.ResourceServerConfigurerAdapter;

@Configuration
@EnableResourceServer//开启资源服务中心
public class ResourceServerConfiguration extends ResourceServerConfigurerAdapter {


    //实际开发中这个拦截资源是要放在网关中的,他不是再资源里边 值放到网关中
    //且内部的接口和外部的接口一定要 分开路径不能混到一起
    @Override
    public void configure(HttpSecurity http) throws Exception{
        //对api/order 请求进行拦截 验证accessToken
        http.authorizeRequests().antMatchers("/api/order/**").authenticated();
    }
}

创建OrderController 访问接口
package com.jxd.oauth2resourceorder.controller;
import org.springframework.web.bind.annotation.RequestMapping;
import org.springframework.web.bind.annotation.RestController;
@RestController
@RequestMapping("/api/order")
public class OrderController {
/**
* /api/order 接口的请求方式
* http://localhost:8019/api/order/addOrder
* 请求头中需要accessToken
* key:Authorization
* value: bearer 你的token
* 如果 不加token你是无法访问的
*/
@RequestMapping("/addOrder")
public String addOrder(){
return "addOrder";
}
application.yml配置
##客户端角色

server:
  port: 8019

#书写自己框架下的日志级别
#logging:
#  level:
#    org.springframework.security:DEBUG

security:
  oauth2:
    resource:
      ##从认证授权中心上验证token
      tokenInfoUri: http://localhost:8011/oauth/check_token
      preferTokenInfo: true
    client:
      accessTokenUri: http://localhost:8011/oauth/token
      userAuthorizationUri: http://localhost:8011/oauth/authorize
      ##app id 这里一定注意,这里的 clientId 是资源服务自己的clientId 虽然他也叫test_id 只是为了测试,客户端又客户端的     #clientId
      clientId: jxd_id
    ##app Secret
      clientSecret: test123456
--------------------------自此服务端和资源端搭建完成 ,客户端自行搭建
备注 我为了方便有些地方 写死了 比如服务端的账户密码 这些需要再数据库操作的,https://blog.csdn.net/qq_34997906/article/details/89609297 看篇文章 他上边 会要求你按找官方文档设计数据库 一定要按照他的要求设计 .


