SpringCloud学习笔记整理
一、eureka是什么?
eureka是一个基于rest服务的,服务注册与发现的组件。
eureka作为注册中心,维护了所有服务的地址列表。服务之间互相调用,通过eureka来发现。
eureka中主要包括两个组件: Eureka Server 和 EurekaClient
- EurekaClient:一个java客户端,用于简化与 EurekaServer 的交互(通常就是一个微服务)
- EurekaServer: 提供服务注册和发现功能(通常就是微服务中的注册中心)
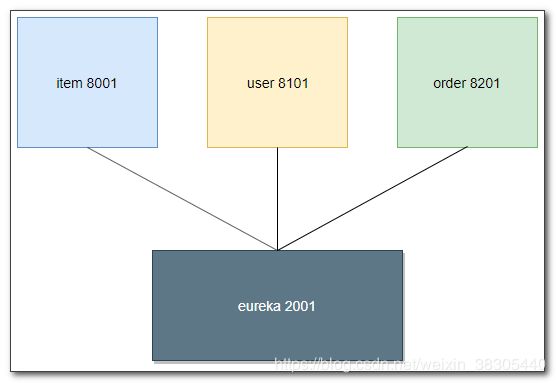
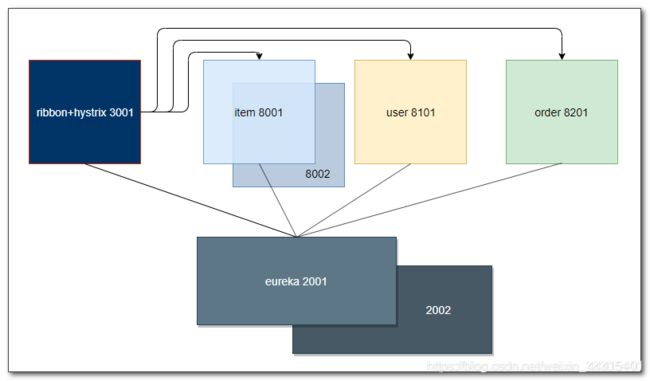
item 8001、user 8101、order8201 是三个微服务,也就是三个 Euerka Client
eureka 2001 是微服务的注册中心 也就是 Euerka Server
- 在这些服务启动时,会连接Euerka Server 注册自身信息,每个微服务的客户端和服务端,都会注册到 Eureka Server。如果连接失败,没有完成注册,会每30秒重试一次进行注册,直到注册完成。
EurekaServer 注册中心中会存储已注册的服务信息(内部通过维护一张服务列表用于保存服务信息)
如果微服务需要调用其他服务,从注册中心发现其他服务的地址,进行访问。服务的消费者每30秒从注册中心获取一次服务列表信息。 - 每个 EurekaServer 会向集群中的其他 EurekaServer进行注册,它们之间可以相互拉取服务列表信息,集群中的多个Euerka服务是通过对等结构实现了服务注册表的同步,形成了Eureka的高可用。
对等结构: 如果Eureka集群数量为3,微服务在注册服务时,会向三个EurekaServer都注册,三台Eureka服务中都存储了服务的注册信息。对等结构中没有主从关系,三台服务都提供服务。如果3个Eureka服务中有一台服务宕机,剩下的两台还能继续提供服务。 - EurekaClient 会缓存从 EurekaServer 中拉取到的服务列表信息
即使所有Eureka Server节点都宕机,微服务的消费者仍可以通过自身缓存中的服务列表信息找到服务的提供者。 - 微服务在成功注册后,会每30秒向 EurekaServer 注册中心发送心跳数据。Eureka会每60s执行一次失效服务检测,如果注册中心连续三次没有接受到心跳数据(也就是90s),会剔除该服务的注册信息。
- Eureka的保护模式:
15分钟内,如果所有已注册的服务器心跳不正常比例达到85%,Eureka服务认为客户端和注册中心出现了网络故障,此时Eureka会进入保护模式。进入保护模式后:
(1) Eureka不再从注册列表中移除因为长时间没有收到心跳而应该过期的服务
(2) Eureka仍然能接受新服务的注册和查询请求,但不会马上同步到其他节点上(既保证当前节点仍可用)
(3) 当网络稳定时,当前实例新的注册信息会同步到其他节点中。
开发测试期间,容易触发保护模式,可以关闭保护模式。项目上线后,开启保护模式。
Eureka和 Zookeeper
CAP理论指出,一个分布式系统不可能同时满足 C(一致性) A(可用性) P(容错性)
由于分区容错性P 在分布式系统中是必须要保证的,因此只能在A和C之间进行选择。
分区容错性:分区容错性要求一个分布式系统需要具有如下特性:分布式系统在遇到任何网络分区故障时,仍能够保证对外提供满足一致性和可用性的服务,除非是整个网络环境都发生了故障。部分服务器发生网络问题,业务依然能够继续运行。
1. Zookeeper保证的是 CP (一致性、分区容错性) Zookeeper集群采用 主从结构
一致性:Zookeeper服务中维护的服务列表一旦发生变化,就会通知消费者服务对缓存中服务列表信息进行更新。
当向注册中心查询服务时,我们可以容忍注册中心返回的是几分钟之前的注册信息,但不能接收注册中心宕机。注册中心的功能对可用性的要求高于一致性。ZK在主节点宕机后,剩余的节点会重新选举主节点,但是重新选举的时间过长,30-120s,选举期间整个ZK集群都不能使用,这就导致了在选举期整个注册服务瘫痪。
2.Eureka保证的是AP(可用性、分区容错性) Eureka集群采用 对等结构
可用性:Eureka在设计时就优先保证可用性,Eureka集群采用了对等结构,各个Eureka节点都是平等的,微服务在进行注册时会向每个节点进行注册,每个节点都可以提供注册和查询服务。集群中如果有Eureka节点宕机,不会影响其他节点的正常工作。如果服务在连接节点时发现连接失败,则会自动切换其他节点进行连接。此外Eureka还提供了保护模式。
总结:Eureka可以很好的应对因网络故障导致部分节点失去联系的情况,而不会像Zookeeper重新进行选举而导致整个注册服务瘫痪
单台EurekaServer搭建
创建Spring-Boot项目
添加Eureka依赖
application.yml 配置
spring:
  application:
    name: eureka-server
server:
  port: 2001
#eureka 配置
eureka:
  server:
    enable-self-preservation: false
  instance:
    hostname: eureka-server1
  client:
    fetch-registry: false
    register-with-eureka: false
- eureka集群服务器之间 通过 hostname 来区分
- eureka.server.enable-self-preservation=fakse
关闭保护模式 - eureka.client.register-with-eureka=false
不向自身注册(euraka在启动时会启动一条线程向其他euerka服务注册自身,现在搭建的是单台,此配置关闭了自动注册,防止向自身注册) - eureka.client.fetch-registry=false
不从自身拉去注册信息 - eureka.instance.lease-expiration-duration-in-seconds
最后一次心跳后,间隔多久认定微服务不可用,默认90s
主启动类
- 添加 @EnableEuerkaServer (启动EuerkaServer服务)
package com.yyf.eurekaserver;

import org.springframework.boot.SpringApplication;
import org.springframework.boot.autoconfigure.SpringBootApplication;
import org.springframework.cloud.netflix.eureka.server.EnableEurekaServer;

@EnableEurekaServer
@SpringBootApplication
public class EurekaServerApplication {

    public static void main(String[] args) {
        SpringApplication.run(EurekaServerApplication.class, args);
    }

}
修改host文件
添加如下内容
127.0.0.1       eureka1
127.0.0.1       eureka2
注:此处添加两行是为了之后搭建2台euerka做准备
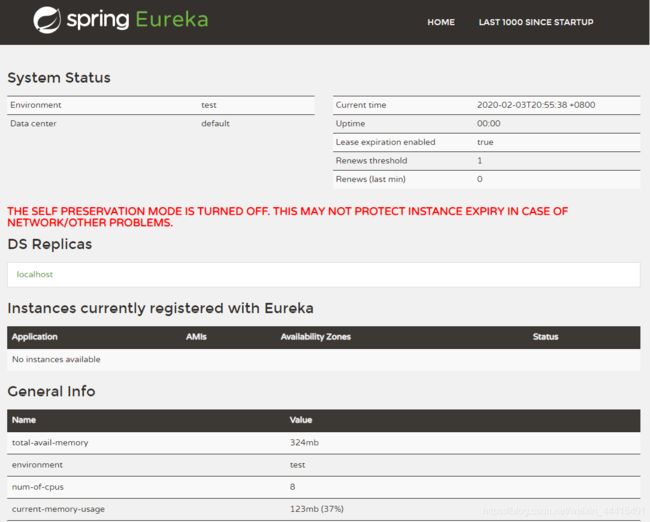
启动 Euerka服务 并进行访问测试
EurekaClient 客户端配置
创建SpringBoot项目
添加Eureka客户端依赖 和 SpringWeb依赖
application.yml配置
spring:
  application:
    name: eureka-client01
server:
  port: 8001
eureka:
  client:
    service-url:
      defaultZone: http://eureka1:2001/eureka
- eureka.client.service-url
指定服务启动时连接的eureka-server的url 基于此url连接注册中心 - defaultZone 表示默认位置,eureka-server在本机时使用。可以修改为具体的地理地址,例如:beijing,shanghai,shenzsheng等。如果eureka服务器搭建在云服务器,则需要由云服务器提供位置。
- eureka.client.registry-fetch-interval-seconds
拉取注册信息的间隔时间,默认为30秒
编辑主启动类
添加 @EnableDiscoveryClient 注解
package com.yyf.eurekaclient01;

import org.springframework.boot.SpringApplication;
import org.springframework.boot.autoconfigure.SpringBootApplication;
import org.springframework.cloud.client.discovery.EnableDiscoveryClient;

@EnableDiscoveryClient
@SpringBootApplication
public class EurekaClient01Application {

    public static void main(String[] args) {
        SpringApplication.run(EurekaClient01Application.class, args);
    }

}
启动服务,并访问eureka查看注册信息
先启动eureka-server服务 再启动客户端client
![]()
访问 http://eureka1:2001 查看
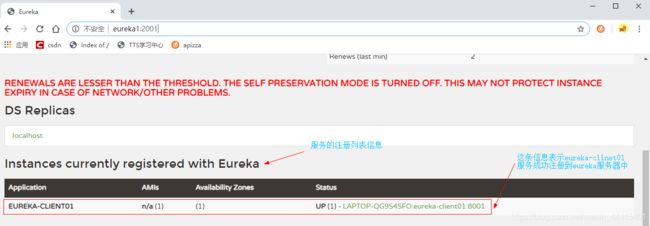
配置启动项 修改端口号 启动两个eureka-client服务 注册到eureka服务中
点击修改启动项

创建两个启动项 并添加接口参数 指定此启动项启动服务时的端口号
01服务参数设置 为8001
02服务设置为8002
启动参数
--server.port=8001

配置结束后此时启动项视图为
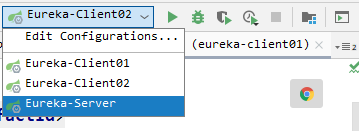
启动Eureka-Server服务后,分别启动01和02服务 。之后访问Eureka服务查看。

Eureka 集群高可用配置
此处为搭建两台eureka服务
添加两个服务器的profile配置文件

application.yml
spring:
  application:
    name: eureka-server
server:
  port: 2001
#eureka 配置
eureka:
  server:
    enable-self-preservation: false
  instance:
    hostname: eureka-server1
  client:
    fetch-registry: false
    register-with-eureka: false
application-euerka1.yml
eureka:
  instance:
    hostname: eureka1
  client:
    register-with-eureka: true  #profile的配置会覆盖公用配置
    fetch-registry: true        #profile的配置会覆盖公用配置
    service-url:
      defaultZone: http://eureka2:2002/eureka  #eureka1启动时向eureka2注册
application-euerka2.yml
eureka:
  instance:
    hostname: eureka2
  client:
    register-with-eureka: true  #profile的配置会覆盖公用配置
    fetch-registry: true        #profile的配置会覆盖公用配置
    service-url:
      defaultZone: http://eureka1:2001/eureka  #eureka2启动时向eureka1注册
注:application.yml中的配置为默认配置,如果我们在启动服务时激活eureka1配置,同时也会加载默认配置,有相同的配置,eureka1配置优先级高,覆盖默认配置,默认配置中没有的配置则视为新增配置。此时搭建的是两台,所以开放注册和拉取配置。并且配置服务1和服务2的相互注册。
idea启动项配置 配置启动参数
通过参数的配置实现两个启动项在启动时选择不同的环境,实现启动两个服务。
搭建计划:server01,使用2001端口,使用eureka1环境 ; server02使用2002端口,使用eureka2环境。

如果在命令行可以使用如下命令选择环境,设置端口号
java -jar xxx.jar --spring.profiles.active=eureka1 --server.port=2001
启动两个Eureka服务并访问测试
http://eureka1:2001/

http://eureka2:2002/

修改客户端配置 向两个服务器注册
修改 eureka-client 服务的 yml 配置 添加 eureka-server02 的注册 url
spring:
  application:
    name: eureka-client01
server:
  port: 8001
eureka:
  client:
    service-url:
      defaultZone: http://eureka1:2001/eureka,http://eureka1:2001/eureka
向两个服务注册后,当一个服务宕机,仍可以连接另一个eureka服务
二、Ribbon服务消费者
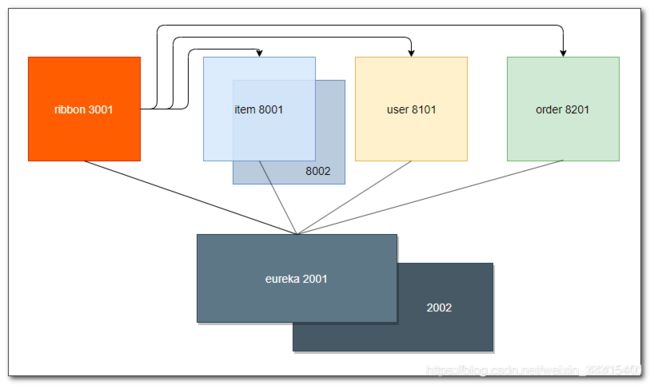
item 8001、user8101、order8201 三台服务为服务的提供者
ribbon3001 服务则为消费者服务,用户访问ribbon服务,ribbon服务调用服务提供者获取数据进行返回。
什么是Ribbon
Ribbon 是 Netflix 发布的云中间层服务开源项目,主要功能是提供了负载均衡算法,提供了一系列完善度的配置项,如连接超时,重试等。
Ribbon 提供了负载均衡和重试功能
Ribbon 底层是使用 RestTemplate 进行 Rest api调用
RestTemplate
RestTemplate 是 SpringBoot 提供的一个Rest远程调用工具。
常用方法:
– getForObject() 执行get请求
        //url:要调用的url地址 responseType:调用服务的返回值类型 uriVariables:这里为Map 用于封装请求参数
        restTemplate.getForObject(url, responseType, uriVariables);
        restTemplate.getForObject(url, responseType);
        //此方法的uriVariables 为可变参数 用于封装请求参数 按顺序替换占位符
        restTemplate.getForObject(url, responseType, uriVariables);
– postForObject() 执行post请求
		//url:要调用的url地址 request:post请求要传递的参数 responseType: 调用服务的返回值类型
        restTemplate.postForObject(url, request, responseType);
ribbon的依赖
eureka-client 中包含了ribbon依赖 添加eureka-client依赖即可使用ribbon
ribbon的负载均衡实现
创建RestTemplate实例时,通过 @LoadBalanced 注解进行修饰该实例
@LoadBalanced 负载均衡注解 会对 RestTemplate实例进行封装,创建代理对象,并切入(AOP)负载均衡代码,把请求分发到集群的服务器中
配置application.yml
spring:
  application:
    name: ribbon

server:
  port: 3001

eureka:
  client:
    service-url: #配置连接eureka
      defaultZone: http://eureka1:2001/eureka,http://eureka2:2002/eureka
配置 RestTemplate
@Configuration
public class RestTemplateConfig {
    /**
     * @LoadBalanced 注解对RestTemplate进行封装添加负载均衡功能
     *  通过创建代理对象的方式,基于AOP添加负载均衡代码,把请求分发到集群的服务器中
     */
    @LoadBalanced
    @Bean
    public RestTemplate getRestTemplate(){
        return new RestTemplate();
    }
}
基于RestTempalte实例进行远程服务调用代码实例
远程服务代码
(为服务的调用者提供数据)
@Slf4j
@RestController
public class ItemController {

    @Autowired
    private ItemService itemService;

    @Value("${server.port}")
    private int port;

    @GetMapping("/{orderId}")
    public JsonResult<List<Item>> getItems(@PathVariable String orderId) {
        List<Item> items = itemService.getItems(orderId);
        return JsonResult.ok(items).msg("port="+port);
    }

    @PostMapping("/decreaseNumber")
    public JsonResult decreaseNumber(@RequestBody List<Item> items){
        itemService.decreaseNumbers(items);
        return JsonResult.ok();
    }
}
基于RestTemplate调用代码
@RestController
public class RibbonController {

    /** RestTemplate 工具由SpringBoot提供
     * 是用来调用其他微服务的工具类 封装了远程调用的代码
     */
    @Autowired
    private RestTemplate restTemplate;

    @GetMapping("/item-service/{orderId}")
    public JsonResult<List<Item>> getItems(@PathVariable String orderId){
        //指定微服务地址发送get请求 并获得该服务的返回结果
        //{1}为占位符 用orderId填充 **此处的url中 (localhost:端口号)被替换为(服务的ID)**
        return restTemplate.getForObject("http://item-service/{1}",JsonResult.class,orderId);
    }

    @PostMapping("/item-service/decreaseNumber")
    public JsonResult decreaseNumber(@RequestBody List<Item> items){
        //发送post请求
        return restTemplate.postForObject("http://item-service/decreaseNumber",items,JsonResult.class);
    }
}
Ribbon消费者服务会从euerka注册中心拉取到服务列表信息,这里调用使用注册表中的服务ID进行url拼接,是为了实现负载均衡,提供相同服务的ID相同,底层会替换为真实的服务地址,并基于负载均衡策略进行访问。
访问服务时访问调用Ribbon消费者服务,调用后台服务提供者服务。
Ribbon的重试实现
添加 spring-retry依赖
<dependency>
	<groupId>org.springframework.retry</groupId>
	<artifactId>spring-retry</artifactId>
</dependency>
application.yml 添加 ribbon重试配置
ribbon:
  MaxAutoRetriesNextServer: 2
  MaxAutoRetries: 1
  OkToRetryOnAllOperations: false
- OkToRetryOnAllOperations
对连接连接超时和读取超时都进行重试,默认是false只对get提交进行重试,设置为true则对get和post请求都进行重试,最好采用默认配置。 - MaxAutoRetriesNextServer
切换服务器实例次数(一台服务器实例重试失败,切换下一台服务器进行请求)
设置为2表示,第一台服务器失败,切换第二台,第二台失败,切换第三台。此时切换次数为2。 - MaxAutoRetries
在当前服务器实例上重试的次数,尝试失败切换下一个实例。1表示重试一次,加上一开始访问一次,一共在当前服务器实例上请求两次。
注:当前服务器重试次数为1,切换服务器实例次数为2,最多一共请求6次服务。
设置RestTemplate的请求工厂超时属性
@Configuration
public class RestTemplateConfig {
    /**
     * @LoadBalanced 注解对RestTemplate进行封装添加负载均衡功能
     *  通过创建代理对象的方式,基于AOP添加负载均衡代码,把请求分发到集群的服务器中
     */
    @LoadBalanced
    @Bean
    public RestTemplate getRestTemplate(){
        SimpleClientHttpRequestFactory factory = new SimpleClientHttpRequestFactory();
        //这里是配置 ribbon的消费者服务连接提供者服务的连接超时时间和响应超时时间
        factory.setConnectTimeout(1000);//不配置 默认是-1 没有连接超时限制
        factory.setReadTimeout(1000); //响应超时(读取数据超时) 不配置默认-1 没有时间限制
        return new RestTemplate(factory);
    }
}
注:超过设置的连接超时时间限制和响应超时时间限制,请求就失败了,此时应该进行重试。
三、 hystrix 断路器
hystrix提供了一种容错机制,当后台服务故障或运行缓慢,可以避免引起其他服务器故障,避免造成服务器集群的雪崩效应。
hystrix提供了服务的降级和熔断机制
降级
当前台消费者服务调用后台服务时(后台服务不存在,出现异常,或执行缓慢时),可以执行当前服务器的一段代码直接向客户端返回结果。
熔断
前台服务器10秒内向后台服务发起20次请求,如果有50%请求失败,执行了降级代码,此时两个条件都满足,则会触发熔断。(10秒20此请求为第一个条件,50%请求失败为第二个条件。只有在第一个条件满足后,才会对第二个条件进行判断)
熔断触发后,此时断路器打开,链路断开,5秒内的所有对后台服务的请求都会直接降级,执行降级代码直接返回结果。
断路器打开5秒后,会进入半开状态,进入半开状态后,会尝试向后台服务发送一次请求,如果此次请求成功,断路器会关闭,链路重新连接,服务调用恢复正常;如果此次请求失败,断路器会继续打开,直到下一个5秒后重新向后台服务发起请求。
hystrix 的相关配置
-
https://github.com/Netflix/Hystrix/wiki/Configuration
-
hystrix.command.default.execution.isolation.thread.timeoutInMilliseconds
请求超时时间,超时后触发失败降级 -
hystrix.command.default.circuitBreaker.requestVolumeThreshold
10秒内请求数量,默认20,如果没有达到该数量,即使请求全部失败,也不会触发断路器打开 -
hystrix.command.default.circuitBreaker.errorThresholdPercentage
失败请求百分比,达到该比例则触发断路器打开 -
hystrix.command.default.circuitBreaker.sleepWindowInMilliseconds
断路器打开多长时间后,再次允许尝试访问(半开),仍失败则继续保持打开状态,如成功访问则关闭断路器,默认 5000
ribbon中添加 hystrix
<dependency>
	<groupId>org.springframework.cloud</groupId>
	<artifactId>spring-cloud-starter-netflix-hystrix</artifactId>
</dependency>
在主启动类中添加 @EnableCircuitBreaker 启用 hystrix 断路器
启动断路器,断路器提供两个核心功能
- 降级,当后台服务 超时、出错、不可达时,对服务降级,返回错误信息或者是缓存数据。
- 熔断,当 后台服务压力过大,错误比例过多时,熔断所有请求,所有请求直接降级。
//@SpringCloudApplication注解可以代替如下三个注解
@EnableCircuitBreaker
@EnableDiscoveryClient
@SpringBootApplication
public class Sp07HystrixApplication {

    public static void main(String[] args) {
        SpringApplication.run(Sp07HystrixApplication.class, args);
    }

}
RibbonController中添加降级方法
- 为每个方法添加降级方法 例如 getItems() 添加降级方法 getItemsFB()
- 在要添加降级方法的方法上 通过 @HystrixCommand注解,指定降级方法名
注:在调用后台服务失败时,会执行降级方法,返回数据。
@RestController
public class RibbonController {

    @Autowired
    private RestTemplate restTemplate;

    @GetMapping("/item-service/{orderId}")
    @HystrixCommand(fallbackMethod = "getItemsFB")
    public JsonResult<List<Item>> getItems(@PathVariable String orderId){
        //指定微服务地址发送get请求 并获得该服务的返回结果
        //{1}为占位符 用orderId填充
        return restTemplate.getForObject("http://item-service/{1}",JsonResult.class,orderId);
    }

    @PostMapping("/item-service/decreaseNumber")
    public JsonResult decreaseNumber(@RequestBody List<Item> items){
        //发送post请求
        return restTemplate.postForObject("http://item-service/decreaseNumber",items,JsonResult.class);
    }

    public JsonResult<List<Item>> getItemsFB(String orderId){
        return JsonResult.err("无法获取订单商品信息");
    }

    public JsonResult<User> getUserFB(Integer userId){
        return JsonResult.err("无法获取到用户信息");
    }
}
Hystrix超时设置
在Application.xml文件中添加如下配置
hystrix:
  command:
    default:
      execution:
        isolation:
          thread:
            timeoutInMilliseconds: 1000
1.此处配置的 hystrix超时时间为1000毫秒,不配置默认是1000毫秒。
2.hystrix在等待超时后,会执行降级代码,快速向客户端返回降级结果。
3.hystrix的超时时间应该大于ribbon的重试总时间,否则hystrix超时后会直接降级代码,此时ribbon还在重试,最后重试成功返回正确数据也是无用功,因为hystrix在他之前已经返回结果了。
四、hystrix dashboard 断路器仪表盘

hystrix 对服务调用的降级和熔断,可以产生监控信息,hystrix dashboard 可以对监控信息做一个图形化页面的展现,方便我们实时进行监控。
1. 被监控项目配置
被监控项目首先必须添加 hystrix 服务降级
在需要监控的微服务项目中添加 actuator 依赖,并配置暴露 hystrix监控端点
- actuator 是 spring boot 提供的服务监控工具 提供了各种监控信息的监控端点
- management.endpoints.web.exposure.include
此配置选项可以指定端点名进行暴露,如果需要暴露所有的监控端点,可以使用 “*”
添加actuator依赖
<dependency>
	<groupId>org.springframework.boot</groupId>
	<artifactId>spring-boot-starter-actuator</artifactId>
</dependency>
修改application.yml文件,暴露 hystrix.stream 监控端点
添加如下配置:
...
management:
  endpoints:
    web:
      exposure:
        include: hystrix.stream
重启服务,访问 actuator 路径 可以查看已暴露的监控端点

2.创建 hystrix dashboard 项目
添加 hystrix dashboard 依赖和 eureka-client 依赖
<dependency>
    <groupId>org.springframework.cloud</groupId>
    <artifactId>spring-cloud-starter-netflix-eureka-client</artifactId>
</dependency>
<dependency>
    <groupId>org.springframework.cloud</groupId>
    <artifactId>spring-cloud-starter-netflix-hystrix-dashboard</artifactId>
</dependency>
application.yml
连接eureka
spring:
  application:
    name: hystrix-dashboard

server:
  port: 4001

eureka:
  client:
    service-url:
      defaultZone: http://eureka1:2001/eureka, http://eureka2:2002/eureka
主程序添加@EnableHystrixDashboard 和 @EnableDiscoveryClient注解
package com.yyf.sp08;

import org.springframework.boot.SpringApplication;
import org.springframework.boot.autoconfigure.SpringBootApplication;
import org.springframework.cloud.client.circuitbreaker.EnableCircuitBreaker;
import org.springframework.cloud.netflix.hystrix.dashboard.EnableHystrixDashboard;

@EnableCircuitBreaker
@EnableHystrixDashboard
@SpringBootApplication
public class Sp08HystrixDashboardApplication {

    public static void main(String[] args) {
        SpringApplication.run(Sp08HystrixDashboardApplication.class, args);
    }

}
启动服务,并进行访问
http:localhost:4001/hystrix
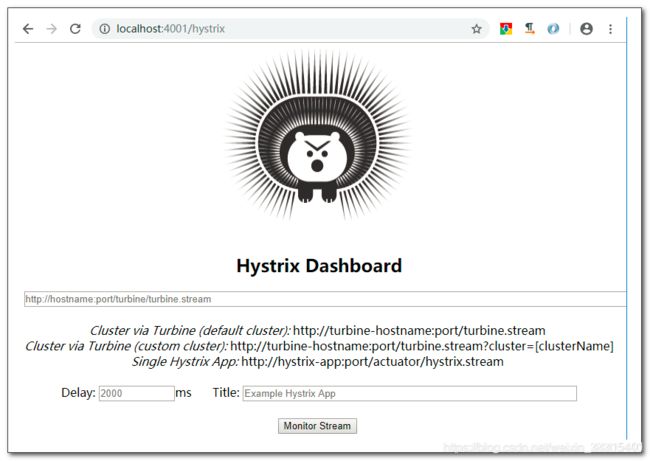
填入之前暴露的监控端点
http://localhost:3001/actuator/hystrix.stream
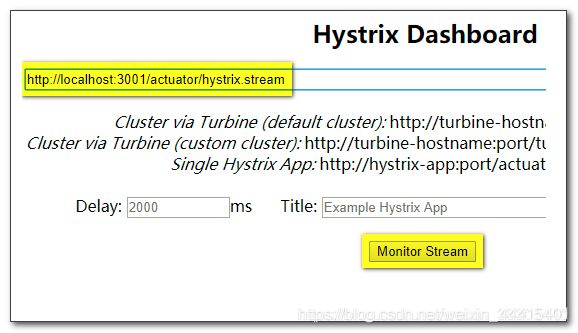
对暴露监控端点的服务进行访问,就可以查看监控信息了
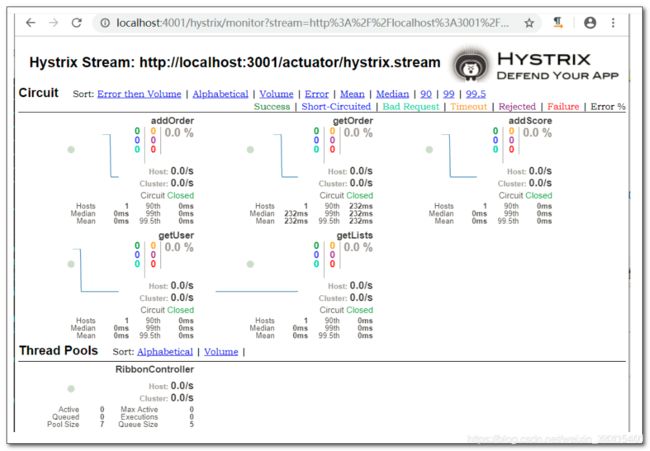
仪表盘数据分析图

五、feign 声明式客户端
feign用于后台微服务之间调用
微服务应用中,ribbon 和 hystrix 总是同时出现,feign 可以整合两者,并且feign提供了声明式的消费者客户端。
在消费者服务中整合 feign
添加 feign 依赖
<dependency>
    <groupId>org.springframework.cloud</groupId>
    <artifactId>spring-cloud-starter-openfeign</artifactId>
</dependency>
主启动类,添加 @EnableFeignClients 注解
package com.yyf.sp04;

import org.springframework.boot.SpringApplication;
import org.springframework.boot.autoconfigure.SpringBootApplication;
import org.springframework.cloud.client.SpringCloudApplication;
import org.springframework.cloud.client.circuitbreaker.EnableCircuitBreaker;
import org.springframework.cloud.client.discovery.EnableDiscoveryClient;
import org.springframework.cloud.openfeign.EnableFeignClients;
//@EnableDiscoveryClient eureka客户端注解
//@SpringBootApplication
//@EnableCircuitBreaker 开启hyxtrix
//@SpringCloudApplication 注解可以代替以上三个注解

@EnableFeignClients
@SpringCloudApplication
public class Sp04OrderserviceApplication {

    public static void main(String[] args) {
        SpringApplication.run(Sp04OrderserviceApplication.class, args);
    }

}
feign 声明式客户端
feign利用了我们熟悉的 spring mvc 注解对接口方法进行设置,通过这些设置,feign可以拼接后台服务的访问路径和提交的参数
例如:
@GetMapping("/{userId}/score")
JsonResult addScore(@PathVariable("userId") Integer userId, @RequestParam Integer score);

//当调用该方法时
service.addScore(7,100);
//此时,feign会向调用的服务发起如下请求
http://调用的额微服务/7/score?score=100
被调用服务的 controller 代码
package com.yyf.sp02.controller;

import com.yyf.sp01.pojo.Item;
import com.yyf.sp01.service.ItemService;
import com.yyf.sp01.web.util.JsonResult;
import lombok.extern.slf4j.Slf4j;
import org.springframework.beans.factory.annotation.Autowired;
import org.springframework.beans.factory.annotation.Value;
import org.springframework.web.bind.annotation.*;

import java.util.List;
import java.util.Random;

@Slf4j
@RestController
public class ItemController {

    @Autowired
    private ItemService itemService;

    @Value("${server.port}")
    private int port;

    @GetMapping("/{orderId}")
    public JsonResult<List<Item>> getItems(@PathVariable String orderId) throws InterruptedException {
        log.info("server.port="+port+", orderId="+orderId);
        List<Item> items = itemService.getItems(orderId);
        return JsonResult.ok(items).msg("port="+port);
    }

    @PostMapping("/decreaseNumber")
    public JsonResult decreaseNumber(@RequestBody List<Item> items) {
        itemService.decreaseNumbers(items);
        return JsonResult.ok();
    }
}
声明式接口代码
package com.yyf.sp04.service;

import com.yyf.sp01.pojo.Item;
import com.yyf.sp01.web.util.JsonResult;
import org.springframework.cloud.openfeign.FeignClient;
import org.springframework.web.bind.annotation.GetMapping;
import org.springframework.web.bind.annotation.PathVariable;
import org.springframework.web.bind.annotation.PostMapping;
import org.springframework.web.bind.annotation.RequestBody;

import java.util.List;

@FeignClient(name="item-service",fallback = ItemFeignServiceFB.class)
public interface ItemFeignService {

    @GetMapping("/{orderId}")
    JsonResult<List<Item>> getItems(@PathVariable("orderId") String orderId);

    @PostMapping("/decreaseNumber")
    JsonResult decreaseNumber(@RequestBody List<Item> items);
}
- 通过添加 @FeignClient 注解声明远程服务调用接口。
- 注解的 name 属性,表示为调用当前接口时,将调用的后台服务的 ID
- fallback属性,声明的是降级类,服务降级后会执行降级类中的代码
基于接口远程服务调用代码
package com.yyf.sp04.service;

import com.yyf.sp01.pojo.Item;
import com.yyf.sp01.pojo.Order;
import com.yyf.sp01.pojo.User;
import com.yyf.sp01.service.OrderService;
import com.yyf.sp01.web.util.JsonResult;
import lombok.extern.slf4j.Slf4j;
import org.springframework.stereotype.Service;

import javax.annotation.Resource;
import java.util.List;

@Slf4j
@Service
public class OrderServiceImpl implements OrderService {

    //注入声明式接口类型的对象 底层会通过代理的方式创建其实现类
    @Resource
    private UserFeignService userFeignService;

    @Resource
    private ItemFeignService itemFeignService;

    @Override
    public Order getOrder(String orderId) {
        JsonResult<User> user = userFeignService.getUser(7);
        //基于接口 远程调用服务
        JsonResult<List<Item>> items = itemFeignService.getItems(orderId);
        Order order = new Order();
        order.setId(orderId);
        order.setUser(user.getData());
        order.setItems(items.getData());
        return order;
    }

    @Override
    public void addOrder(Order order) {
        itemFeignService.decreaseNumber(order.getItems());
        userFeignService.addScore(7, 100);
        log.info("保存订单:"+order);
    }
}
feign + ribbon 负载均衡和重试
- 无需额外的配置,feign默认启用了ribbon的负载均衡和重试机制。可以通过在yml文件中添加配置对参数进行调整。feign的依赖中包含了ribbon依赖。
默认的参数配置:
ConnectTimeout=1000 #连接超时时间 1s
ReadTimeout=1000 #响应超时时间 1s
MaxAutoRetries=0 #当前实例重试次数
MaxAutoRetriesNextServer=1 #切换服务器重试此时
application.yml 配置ribbon超时和重试
- ribbon.xxx全局配置
- item-service.ribbon.xxx 对特定服务ID实例的配置 (在调用此服务ID服务时,执行此配置)
ribbon:
  ConnectTimeout: 1000
  ReadTimeout: 1000

item-service:
  ribbon:
    MaxAutoRetries: 1
    MaxAutoRetriesNextServer: 2
    ConnectTimeout: 1000
    ReadTimeout: 500
feign + hystrix 降级
feign 默认不推荐使用hystrix,因为zuul作为网关,通过zuul可以统一调用后台服务,在zuul中配置了hystrix的话,feign 中配置的 hystrix 就失效了,因为如果后台服务出错或超时,会先执行zuul的hystrix降级和熔断。
feign启用hystrix
- 主启动类添加 @EnableCircuitBreaker 注解
- 需要添加 hystrix 依赖
- feign 默认没有启用 hystrix,需要在 application.xml 中添加如下配置才能启用 hystrix
....
feign:
  hystrix:
    enabled: true
feign远程调用中指定降级类
- 通过使用 @FeignClient 注解的 fallback 属性指定降级类
...
@FeignClient(name="item-service", fallback = ItemFeignServiceFB.class)
public interface ItemFeignService {
...
降级类代码实现
降级类需要交给容器管理,并且降级类要实现 远程调用接口。
在向后台服务调用时,如果超时,出错 就会执行降级类中的方法。
package com.yyf.sp04.service;

import com.yyf.sp01.pojo.Item;
import com.yyf.sp01.web.util.JsonResult;
import org.springframework.stereotype.Component;

import java.util.List;

@Component
public class ItemFeignServiceFB implements ItemFeignService{
    @Override
    public JsonResult<List<Item>> getItems(String orderId) {
        return JsonResult.err("获取订单商品列表信息失败");
    }

    @Override
    public JsonResult decreaseNumber(List<Item> items) {
        return JsonResult.err("减少商品库存失败");
    }
}
feign的降级熔断监控
- 1.添加 springboot actuator 依赖
- 2.开放 hystrix.stream 监控端点
- 3.通过 hystrixdashboard 对开放的监控端点进行进行监控。
六、turbine 集群聚合监控
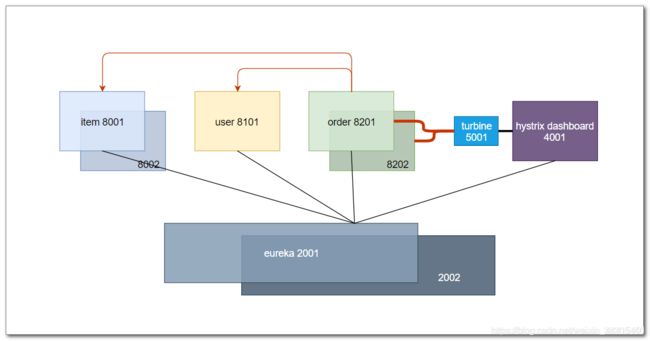
hystrix dashboard 一次只能监控一个服务实例,使用turbine可以汇集监控信息,将聚合后的信息提供给 hystrix dashboard 来集中展示和监控。
创建 turbine 项目
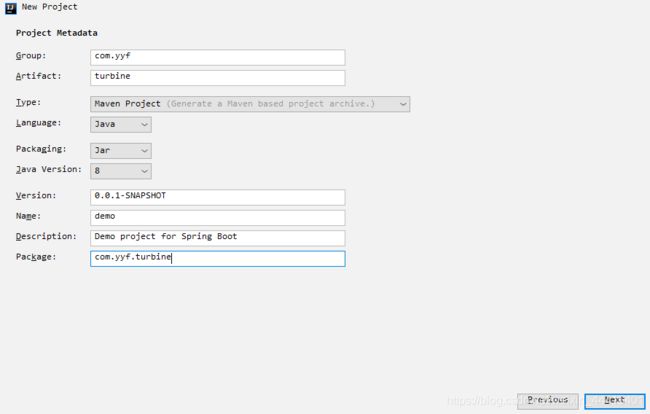
添加 turbine 依赖和 eureka-client 依赖

application.yml文件
被聚集监控的服务必须暴露了 hystrix.stream 监控端口
spring:
  application:
    name: turbin

server:
  port: 5001

eureka:
  client:
    service-url:
      defaultZone: http://eureka1:2001/eureka, http://eureka2:2002/eureka

turbine:
  app-config: item-service,user-service #此处配置聚合监控的服务 多个服务用,隔开
  cluster-name-expression: new String("default") # 给监控的服务集群起名 此处配置为默认
主启动类 添加@EnableTurbine注解 和 @EnableDiscoveryClient注解
package com.yyf.sp10;

import org.springframework.boot.SpringApplication;
import org.springframework.boot.autoconfigure.SpringBootApplication;
import org.springframework.cloud.client.discovery.EnableDiscoveryClient;
import org.springframework.cloud.netflix.turbine.EnableTurbine;

@EnableTurbine
@EnableDiscoveryClient
@SpringBootApplication
public class Sp10TurbineApplication {

    public static void main(String[] args) {
        SpringApplication.run(Sp10TurbineApplication.class, args);
    }

}
turbine 监控路径为:http://localhost:5001/turbine.stream
- 1.启动eureka服务
- 2.启动turbine服务
- 3.启动turbine 配置文件中配置的 需要聚集监控服务(item-service,user-service),并访问服务产生监控数据
- 4.访问turbine 监控路径查看是否有数据
- 5.启动hystrix dashboard服务,并访问监控页面,将turbine的监控路径填入,开启监控
- 6.此时turbine聚合了item-service user-service 两个服务id下所有服务的监控信息。

七、zuul API网关
- zuul API网关,为微服务应用提供了统一的对外访问接口。
- zuul 还提供了过滤器,对所有微服务提供了统一的请求校验。
创建zuul项目

添加 zuul 依赖和 eureka-client依赖
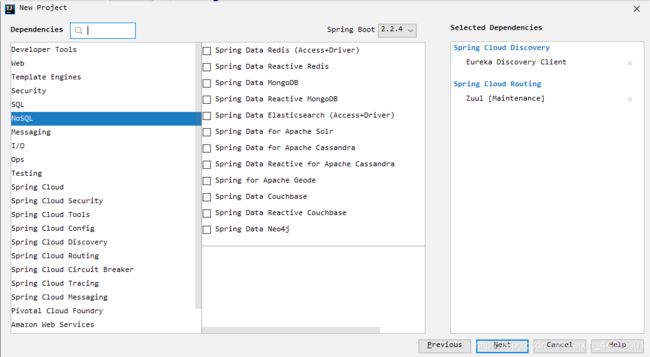
application.yml文件配置
- zuul 的路由配置可以省略 缺省以服务id作为访问路径
- routes 配置的就是服务的路由规则,服务ID: /服务ID/**
- 例如: 访问user-service服务,通过zuul调用,基于此路由规则
url写法为:
http://localhost:3001/user-service/**
http://zuul服务的地址+端口/调用的服务ID/被调用服务方法的具体请求路径
spring:
  application:
    name: zuul

server:
  port: 3001

eureka:
  client:
    service-url:
      defaultZone: http://eureka1:2001/eureka, http://eureka2:2002/eureka

zuul:
  routes:
    item-service: /item-service/**
    user-service: /user-service/**
    order-service: /order-service/**
通过zuul访问后台服务
- http://localhost:3001/user-service/7
- http://localhost:3001/item-service/7
zuul + ribbon 负载均衡
- zuul 已经集成了 ribbon,默认已经实现了负载均衡
- zuul 不推荐使用重试,默认没有开启重试,因为zuul为调用后台服务的入口,后面链路如果很长,使用每个访问都使用重试机制的话,会大大增加服务器集群的负担。
zuul + ribbon 重试
添加 spring-retry 依赖
<dependency>
	<groupId>org.springframework.retry</groupId>
	<artifactId>spring-retry</artifactId>
</dependency>
配置zuul开启重试
- 重试默认不开启,如果需要使用 可以手动开启
在 application.yml 中添加开启重试配置、ribbon的相关参数配置
...
zuul:
  retryable: true
ribbon:
  ConnectTimeout: 1000
  ReadTimeout: 1000
  MaxAutoRetriesNextServer: 1
  MaxAutoRetries: 1
zuul + hystrix 降级
创建降级类,通过实现 FallProvider 接口来声明
- getRoute() 方法中指定应用此降级类的服务id,* 号或 null 值可以匹配所有服务
- fallbackResponse() 方法用于返回封装响应的对象
package com.yyf.sp11.fallback;

import com.yyf.sp01.web.util.JsonResult;
import lombok.extern.slf4j.Slf4j;
import org.springframework.cloud.netflix.zuul.filters.route.FallbackProvider;
import org.springframework.http.HttpHeaders;
import org.springframework.http.HttpStatus;
import org.springframework.http.MediaType;
import org.springframework.http.client.ClientHttpResponse;
import org.springframework.stereotype.Component;

import java.io.ByteArrayInputStream;
import java.io.IOException;
import java.io.InputStream;

@Slf4j
@Component
public class ItemServiceFallback implements FallbackProvider {

    /**
     * getRoute()方法中指定应用此降级类的服务id,
     * 星号或null值可以通配所有服务
     */
    @Override
    public String getRoute() {
        //当前执行item-service 服务失败时应用此降级类
        return "item-service";
    }

    /**
     * 该方法返回封装降级响应的对象
     * ClientHttpResponse 中封装降级响应
     */
    @Override
    public ClientHttpResponse fallbackResponse(String route, Throwable cause) {
        return response();
    }

    private ClientHttpResponse response() {
        return new ClientHttpResponse() {
            @Override
            public HttpStatus getStatusCode() throws IOException {
                return HttpStatus.OK;
            }

            @Override
            public int getRawStatusCode() throws IOException {
                return HttpStatus.OK.value();
            }

            @Override
            public String getStatusText() throws IOException {
                return HttpStatus.OK.getReasonPhrase();
            }

            @Override
            public void close() {
            }

            //封装降级响应
            @Override
            public InputStream getBody() throws IOException {
                log.info("fallback body");
                String result = JsonResult.err("后台服务出错").toString();
                return new ByteArrayInputStream(result.getBytes("UTF-8"));
            }

            //设置响应头 设置响应数据格式为JSON
            @Override
            public HttpHeaders getHeaders() {
                HttpHeaders headers = new HttpHeaders();
                headers.setContentType(MediaType.APPLICATION_JSON);
                return headers;
            }
        };
    }
}
zuul 添加数据监控
- 1.zuul中已经包含了 actuator 依赖
- 2.在application.yml 中开放暴露端点
- 3.使用hystrix dashboard 对zuul的暴露端点进行监控
- 4.必须通过zuul网关访问后台服务才会产生监控数据

可以将zuul 配置到turbine中和其他服务一起,进行聚集监控。只需要将zuul的服务id配置到turbine的配置文件中。
zuul 请求过滤
定义过滤器,继承 ZuulFilter 接口
package com.yyf.sp11.filter;

import com.netflix.zuul.ZuulFilter;
import com.netflix.zuul.context.RequestContext;
import com.netflix.zuul.exception.ZuulException;
import com.yyf.sp01.web.util.JsonResult;
import org.springframework.cloud.netflix.zuul.filters.support.FilterConstants;
import org.springframework.stereotype.Component;

import javax.servlet.http.HttpServletRequest;

@Component
public class AccessFilter extends ZuulFilter {

    //指定过滤器的类型 为前置类型 在调用后台服务之前执行
    @Override
    public String filterType() {
        return FilterConstants.PRE_TYPE;
    }

    /**
     * 指定过滤器执行的顺序 这里设置为6
     * 因为第五个过滤器才会将服务信息存储到context容器中
     * 之后的过滤器才能获取到服务信息,基于服务信息进行过滤操作
     */
    @Override
    public int filterOrder() {
        return FilterConstants.PRE_DECORATION_FILTER_ORDER + 1;
    }

    /**
     * 获取服务信息,基于服务id进行判断 对指定的服务进行过滤
     * 如果要过滤所有服务,直接返回true
     */
    @Override
    public boolean shouldFilter() {
        RequestContext context = RequestContext.getCurrentContext();
        //这里获取的是当前调用的服务id
        String serviceId = (String) context.get(FilterConstants.SERVICE_ID_KEY);
        if(serviceId.equals("item-service"))
            return true;
        return false;
    }

    //过滤代码 这里模拟判断用户是否登录 已登录放行 未登录 返回提示
    @Override
    public Object run() throws ZuulException {
        RequestContext context = RequestContext.getCurrentContext();
        HttpServletRequest request = context.getRequest();
        String token = request.getParameter("token");
        //没有秘钥 不允许调用后台服务
        if(token==null||token.length()==0){
            //此设置会阻止请求被路由到后台微服务
            context.setSendZuulResponse(false);
            //对客户端做出响应
            context.setResponseStatusCode(200);
            context.setResponseBody(JsonResult.err("not login").toString());
        }
        //zuul过滤器返回的数据设计为了以后扩展使用,当前没有被使用
        return null;
    }
}
访问时,没有token参数不可以进行访问
zuul Cookie过滤
zuul 会过滤敏感 http 协议头,默认过滤以下协议头:
- Cookie
- Set-Cookie
- Authorization
可以通过设置zuul不过滤这些协议头:
zuul:
  sensitive-headers:
八、config 配置中心
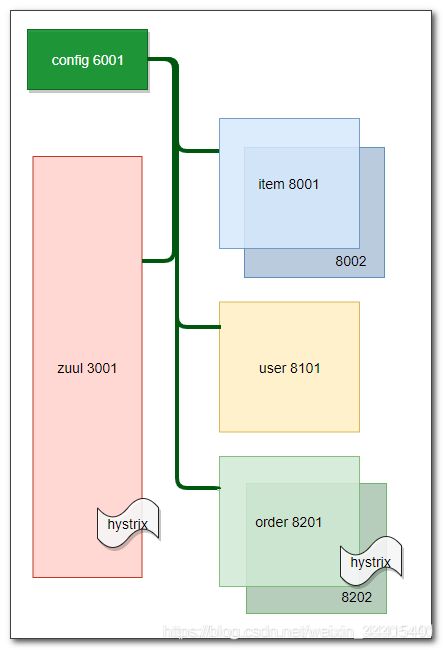
将微服务的 yml 配置文件,保存在 git 服务器。通过配置中心连接 git 仓库,下载 配置文件 ,微服务启动时连接配置中心,下载自己的配置文件,基于配置文件启动服务。
将多个微服务的 yml 配置文件存放在一个空项目中,将此项目 push 到 git 服务器
创建 config 配置中心项目
添加 conifg-server依赖、eureka-client依赖
<dependency>
    <groupId>org.springframework.cloud</groupId>
    <artifactId>spring-cloud-config-server</artifactId>
</dependency>
<dependency>
    <groupId>org.springframework.cloud</groupId>
    <artifactId>spring-cloud-starter-netflix-eureka-client</artifactId>
 </dependency>
application.yml 配置
spring:
  application:
    name: config-server
  cloud:
    config:
      server:
        git:	#uri为yml配置文件存放的仓库的访问路径
          uri: https://github.com/个人路径/仓库名
          search-paths: config #yml配置文件仓库存放在仓库的哪个目录下
          #username: your-username  配置登录git服务器的用户名
          #password: your-password  配置登录gi服务器的密码
server:
  port: 6001
eureka:
  client:
    service-url:
      defaultZone: http://eureka1:2001/eureka,http://eureka2:2002/eureka
config 配置中心 需要配置连接 git 服务器
主启动类添加 @EnableConfigServer 和 @EnableDiscoverClient 注解
package com.yyf.sp12;

import org.springframework.boot.SpringApplication;
import org.springframework.boot.autoconfigure.SpringBootApplication;
import org.springframework.cloud.client.discovery.EnableDiscoveryClient;
import org.springframework.cloud.config.server.EnableConfigServer;

@EnableDiscoveryClient
@EnableConfigServer
@SpringBootApplication
public class Sp12ConfigApplication {

    public static void main(String[] args) {
        SpringApplication.run(Sp12ConfigApplication.class, args);
    }

}
启动配置中心服务,访问测试是否能获取到 git 服务器中的配置信息
git 服务器 config1仓库中 config 目录下保存如下配置信息
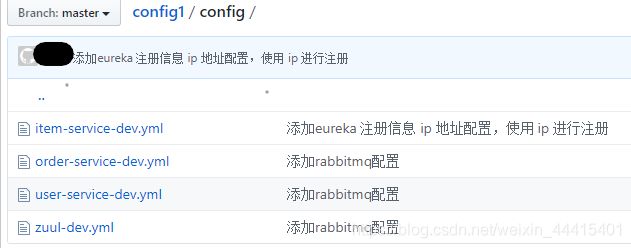
正常启动 config 配置中心服务后,通过如下路径访问
http://localhost:6001/item-service-dev.yml
http://localhost:6001/user-service/dev
http://localhost:6001/item-service/dev
http://localhost:6001/zuul/dev
可以获取到配置信息,说明配置中心连接 git 服务器成功
config-client 客户端配置
在客户端微服务中添加如下配置,启动时从 config-server 配置中心获取配置
添加 config-client 起步依赖
<dependency>
	<groupId>org.springframework.cloud</groupId>
	<artifactId>spring-cloud-starter-config</artifactId>
</dependency>
客户端 application.yml 文件中的内容全部注释
添加 bootstrap.yml 配置文件
bootstrap.yml,引导配置文件,优先于application.yml加载
spring:
  cloud:
    config:
      discovery:
        enabled: true
        service-id: config-server #配置中心的服务id
      name: item-service
      profile: dev   # name+profile item-service-dev 为要启用的profile
#配置连接eureka,基于上面配置的配置中心的服务 id获取到配置中心的真实地址,
#访问并下载上面指定的 item-service-dev.yml 配置文件
eureka:
  client:
    service-url:
      defaultZone: http://eureka1:2001/eureka, http://eureka2:2002/eureka
此时就可以启动服务,观察控制台,可以观察到微服务 config-client 连接配置中心下载配置信息

配置刷新
spring cloud 允许运行时动态刷新配置,可以从配置中心获取新的配置信息
在需要刷新配置的 config-client 中,添加 spring boot actuator 依赖
<dependency>
	<groupId>org.springframework.boot</groupId>
	<artifactId>spring-boot-starter-actuator</artifactId>
</dependency>
application.yml 中配置,暴露刷新端点 refresh 端点
- 修改git 服务器仓库中的 yml 文件,添加暴露 刷新端点配置
management:
  endpoints:
    web:
      exposure:
        include: refresh
业务代码中添加 @RefreshScope 注解
- 只允许对添加了 @RefreshScope 或 @ConfigurationProperties 注解的Bean 刷新配置,可以将更新的配置数据重新注入到 Bean 中。
package com.yyf.sp03.service;

import com.fasterxml.jackson.core.type.TypeReference;
import com.yyf.sp01.pojo.User;
import com.yyf.sp01.service.UserService;
import com.yyf.sp01.web.util.JsonUtil;
import lombok.extern.slf4j.Slf4j;
import org.springframework.beans.factory.annotation.Value;
import org.springframework.cloud.context.config.annotation.RefreshScope;
import org.springframework.stereotype.Service;

import java.util.List;

@RefreshScope
@Slf4j
@Service
public class UserServiceImpl implements UserService {
	//@Value 注解,将配置文件中配置的信息注入到此成员变量中
    @Value("${sp.user-service.users}")
    private String userJson;

    @Override
    public User getUser(Integer id) {
        log.info("users json string : "+userJson);
        List<User> list = JsonUtil.from(userJson, new TypeReference<List<User>>() {});
        for (User u : list) {
            if (u.getId().equals(id)) {
                return u;
            }
        }
        return new User(id, "name-"+id, "pwd-"+id);
    }

    @Override
    public void addScore(Integer id, Integer score) {
        // 这里增加积分
        log.info("user "+id+" - 增加积分 "+score);
    }
}
重新启动配置中心,再重启 config-client 服务,查看暴露的刷新端点
http://localhost:8101/actuator

目前的仓库中的 application.yml 文件
- 此时 yml 文件中只配置了 id为 7,8,9三个user信息
sp:
  user-service:
    users: "[{\"id\":7, \"username\":\"abc\",\"password\":\"123\"},{\"id\":8, \"username\":\"def\",\"password\":\"456\"},{\"id\":9, \"username\":\"ghi\",\"password\":\"789\"}]"
spring:
  application:
    name: user-service
  cloud:
    config:
      override-none: true
server:
  port: 8101
eureka:
  client:
    service-url:
      defaultZone: http://eureka1:2001/eureka,http://eureka2:2002/eureka
management:
  endpoints:
    web:
      exposure:
        include: refresh
修改git仓库中的 application.yml 文件,添加id 为99 的用户信息
sp:
  user-service:
    users: "[{\"id\":7, \"username\":\"abc\",\"password\":\"123\"},{\"id\":8, \"username\":\"def\",\"password\":\"456\"},{\"id\":9, \"username\":\"ghi\",\"password\":\"789\"},{\"id\":99, \"username\":\"aaa\",\"password\":\"111\"}]"
此时业务对象 UserServiceImpl 的 userJson 属性中保存的还是 id 为 7,8,9 的用户信息
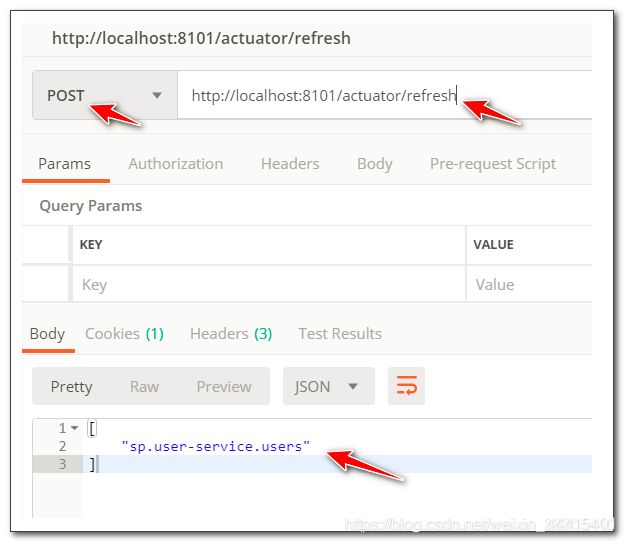
通过post请求访问刷新端点,刷新配置
此时业务对象 UserServiceImpl 对象的 userJson 属性中,保存的是刷新配置后的重新注入 user 数据,保存了 id 为 7,8,9,99 四个用户信息。
九、config bus + rabbitmq 消息总线配置刷新

消息总线 config bus 和 所有 config-client 微服务都必须连接 rabbitmq。
config bus 消息总线暴露 bus-refresh 刷新端点,通过 post 请求此端点,config bus 服务器会向 rabbitmq 发布刷新消息,rabbitmq 会将消息发送给 config-client 微服务,接收到消息的微服务会向配置中心请求刷新配置信息。
rabbitmq 安装笔记
https://blog.csdn.net/weixin_38305440/article/details/102810522
在需要动态更新配置的微服务以及 config 配置中心中添加如下配置
添加 bus、rabbitmq 依赖
<dependency>
			<groupId>org.springframework.boot</groupId>
			<artifactId>spring-boot-starter-amqp</artifactId>
		</dependency>
		<dependency>
			<groupId>org.springframework.cloud</groupId>
			<artifactId>spring-cloud-bus</artifactId>
		</dependency>
		<dependency>
			<groupId>org.springframework.cloud</groupId>
			<artifactId>spring-cloud-stream-binder-rabbit</artifactId>
		</dependency>
		<dependency>
			<groupId>org.springframework.amqp</groupId>
			<artifactId>spring-rabbit-test</artifactId>
			<scope>test</scope>
		</dependency>
所有需要刷新配置的微服务和 config配置中心 的 application.yml 中添加 rabbitmq 连接信息
- 如果配置文件在 git 仓库中,就修改git仓库中的配置文件,添加如下连接信息
spring:
  ......
  rabbitmq:
    host: 192.168.64.140
    port: 5672
    username: rabbitmq用户名
    password: rabbitmq密码
在config配置中心 消息总线项目中暴露 bus-refresh 刷新端点
management:
  endpoints:
    web:
      exposure:
        include: bus-refresh
- 查看暴露的端点:http://localhost:6001/actuator

将服务按顺序启动,进行测试 - 1.启动eureka
- 2.启动config-bus
- 3.启动剩余需要配置中心获取配置的微服务
模拟此处修改了配置,通过 postman 向 bus-refresh 刷新端点发送 post请求 - 此时,config-bus 会向 rabbitmq 发送刷新消息,rabbitmq 会将消息发送给所有的 config-client 微服务,这些微服务会向 config 配置中心请求刷新配置。

- 如果刷新指定的微服务,可以按照下面的格式进行访问
http://localhost:6001/actuator/bus-refresh/user-service:8101
http://localhost:6001/actuator/bus-refresh/服务ID:端口号
十、sleuth 链路跟踪
随着系统规模越来越大,微服务之间的调用关系变得错综复杂,一条调用链路中可能调用多个微服务,任何一个微服务不可用都可能导致整个调用过程失败。
spring cloud sleuth 可以跟踪调用链路,分析链路中每个节点的执行情况。
在所有的后台服务中添加 spring cloud sleuth 依赖
<dependency>
	<groupId>org.springframework.cloud</groupId>
	<artifactId>spring-cloud-starter-sleuth</artifactId>
</dependency>
- 只需要添加 sleuth 依赖,就可以在后台服务调用时,在控制台输出链路跟踪日志
在控制台查看链路跟踪日志
- 通过zuul网关,访问后台服务
在zuul网关服务 和 后台服务的控制台可以看到以下信息:
[服务id,请求id,span id,是否发送到zipkin]
[服务id,请求id,span id,是否发送到zipkin]- 请求id: 请求到达第一个微服务时生产的一个请求id,该id在调用链路中会一直向后面的微服务传递
- span id:链路中每一步微服务调用,都生产一个新id
[zuul,6c24c0a7a8e7281a,6c24c0a7a8e7281a,false]
[order-service,6c24c0a7a8e7281a,993f53408ab7b6e3,false]
[item-service,6c24c0a7a8e7281a,ce0c820204dbaae1,false]
[user-service,6c24c0a7a8e7281a,fdd1e177f72d667b,false]
sleuth+zipkin
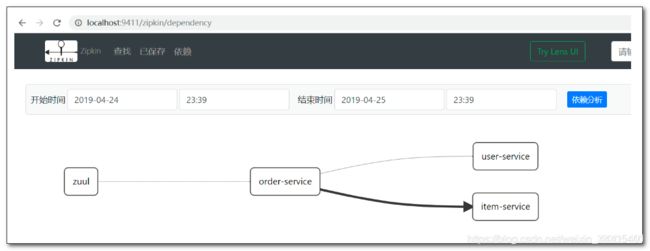
- zipkin可以收集链路跟踪数据,提供可视化的链路分析
链路数据抽样比例
默认10%的链路数据会被发送到zipkin服务。可以基于以下配置修改抽样比例
spring:
  sleuth:
    sampler:
      probability: 0.1
zipkin 服务
下载zipkin服务器
- zipkin原本是需要我们自己配置的,现在官方提供了现成的 zipkin 服务 jar 包,只需要下载运行即可。
- 下载网址:https://github.com/openzipkin/zipkin
启动 zipkin 时,连接到 rabbitmq
- 开启服务并连接rabbitmq:
java -jar zipkin-server-2.12.9-exec.jar --zipkin.collector.rabbitmq.uri=amqp://username:[email protected]:5672

访问 zipkin 提供的可视化链路跟踪页面 - http://localhost:9411/zipkin
<dependency>
    <groupId>org.springframework.cloud</groupId>
    <artifactId>spring-cloud-starter-zipkin</artifactId>
</dependency>
在进行监控前,必须确保进行链路监控的微服务都与 zipkin 连接了同一台 rabbitmq 服务
- 如果没有连接,需要添加 rabbitmq 依赖和配置连接信息。
启动需要进行监控的微服务,并进行访问,之后访问 zipkin 查看链路分析


