java xml 代码_XML模式到Java代码
在你开始前
关于本教程
JiBX是用于将XML数据绑定到Java™对象的工具。 长期以来,JiBX数据绑定是将Java代码绑定到XML的最快,最灵活的方法。 但是,其绑定定义的复杂性以及对日益广泛使用的XML模式定义的有限支持有时使用户感到沮丧。 幸运的是,JiBX的1.2版本对于消除这些问题大有帮助。 在本教程中,您将学习如何使用JiBX 1.2的新功能轻松地从XML模式定义生成Java代码,以及读写与生成的模式定义匹配的XML文档-所有这些都无需深入了解JiBX绑定定义的细节。 。 第1部分介绍了从Java代码开始并生成XML模式定义的另一面。
目标
本教程将指导您完成使用JiBX从XML模式定义生成Java代码的过程。 您将首先学习如何使用简单的模式并生成与该模式匹配的默认Java数据模型,然后使用该数据模型读取和编写XML文档。 接下来,您将看到如何使用自定义项修改代码生成,使其更适合您的需求。 最后,您将继续研究更复杂的行业标准架构示例,并探索定制的功能,以简化为该架构生成的数据模型并提高可用性。 阅读完本教程并完成提供的示例后,您将能够使用JiBX为您自己的模式生成定制的Java数据模型。
先决条件
要理解本教程,您至少应具有Java代码和XML的基本知识。 您不需要详细了解XML模式定义,但是对模式的一些熟悉将有助于您更好地理解示例。
系统要求
要运行示例,您需要安装:
- 要么:
- Sun的JDK 1.5.0_09 (或更高版本)。
- IBM Java技术1.5.0 SR3开发人员套件 。
- Apache Ant构建工具的最新版本。
本教程中包含JiBX下载和安装说明。
介绍JiBX
JiBX是用于在Java数据结构和XML文档之间进行转换的众多工具之一(请参阅参考资料 )。 JiBX与众不同的是性能和灵活性功能。 JiBX的性能始终处于该范围的高端,比其他常用工具(例如JAXB 2.0)的性能高出一倍或两倍以上。 JiBX还比几乎所有其他Java-XML工具更灵活,它使用绑定定义将Java结构与XML表示分离,从而可以彼此独立地进行更改。
在1.2版本中,JiBX添加了支持XML模式定义的主要功能。 您可以使用JiBX发行版中包含的工具来生成与Java代码匹配的架构定义,或生成与您的架构定义匹配的Java代码。 无论哪种方式,您都将获得一个绑定定义,该绑定定义使您可以使用JiBX在与模式定义匹配的Java代码和XML文档之间进行转换。 在本教程中,您将看到如何应用第二种类型的生成:从模式定义到Java代码。
安装JiBX
在继续本教程之前,您需要安装JiBX。 下载最新的1.2.x发行版ZIP并将其扩展到系统上的方便位置。 最后,您将获得一个名为jibx的目录,其中包含所有JiBX JAR,文档,示例,甚至是源代码。
安装教程代码
现在下载教程示例代码 ,该示例代码也以ZIP文件的形式提供。 在系统上安装它的最简单方法是将ZIP扩展到JiBX发行版的根目录中(或在Windows®上,将dwcode2目录从ZIP文件内部复制到JiBX发行版的根目录中)。 这应该在jibx目录中创建一个dwcode2子目录,并在该dwcode2子目录内创建示例文件(包括build.xml,custom.xml等)。
该示例代码包括一个Ant生成文件,以自动运行JiBX工具并处理示例中涉及的其他步骤。 如果将示例代码直接安装到JiBX安装目录中,则该构建无需任何其他配置即可访问JiBX JAR。 如果将示例代码安装在其他位置,则仍然可以使用Ant构建。 在这种情况下,您只需要编辑示例代码目录中的build.properties文件,并将jibx-home属性的值更改为JiBX安装的路径。
从架构生成默认绑定和代码
从XML模式定义很容易生成JiBX绑定定义和相应的Java代码。 您将在本节中学习如何操作。
介绍简单的示例架构
作为一个简单的示例,我将从第1部分中生成的模式之一开始。 清单1显示了该模式的缩写版本,旨在表示来自在线商店的订单。 完整模式在示例代码的dwcode2目录中作为starter.xsd提供。
清单1.第一个示例模式
Supported shipment methods. The "INTERNATIONAL" shipment
methods can only be used for orders with shipping addresses outside the U.S., and
one of these methods is required in this case.
Order line item information.
Stock identifier. This is expected to be 12 characters in
length, with two leading alpha characters followed by ten decimal digits.
Number of units ordered.
Price per unit.
Address information.
First line of street information (required).
...
State abbreviation (required for the U.S. and Canada,
optional otherwise).
Postal code (required for the U.S. and Canada, optional
otherwise).
Customer information.
Order information.
Billing address information.
...
Date order was placed with server.
...
生成默认绑定和代码
要从XML模式生成JiBX绑定和Java类,您只需要运行JiBX发行版的jibx-tools.jar中包含的org.jibx.schema.codegen.CodeGen工具。 您可以直接从命令行运行该工具,也可以通过诸如Apache Ant之类的构建工具间接运行该工具。
本教程的下载部分包括了一个Ant build.xml脚本codegen目标运行产生。
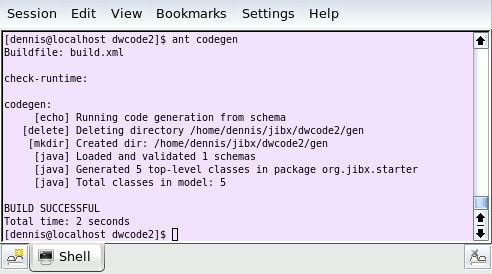
要尝试此操作,请在已安装的下载文件的dwcode2目录中打开一个控制台,然后键入ant codegen 。 如果您的系统上已安装Ant并已按照说明安装了下载代码,则应该看到类似于图1所示的输出:
图1.使用Ant构建
您也可以直接从控制台运行CodeGen。 为此,您需要:
- 在Java类路径中包含jibx-tools.jar。
- 指定
org.jibx.schema.codegen.CodeGen作为要运行的类。 - 列出要生成的架构定义。
所提供的Ant codegen目标使用几个附加参数告诉CodeGen将使用根/ src目录作为生成的数据模型包结构的根和运行产生前消灭该目录的所有现有文件。 这是Java命令行,用于从dwcode2目录中的控制台复制Ant codegen目标(假设您已遵循建议的安装说明):
java -cp ../lib/jibx-tools.jar org.jibx.schema.codegen.CodeGen -t gen/src -w starter.xsd在Windows上,命令为:
java -cp ..\lib\jibx-tools.jar org.jibx.schema.codegen.CodeGen -t gen\src -w starter.xsd您可以从命令行将许多其他选项传递给CodeGen。 您将在本教程的后面部分中进行研究。 现在,让我们看一下生成的Java代码。
生成的工件
生成的代码由五个类组成,分别对应于清单1模式中的五个全局类型定义。 清单2显示了一些生成的代码示例,其中摘录了org.jibx.starter.Order类和整个org.jibx.starter.Shipping类:
清单2.生成的代码
/**
* Order information.
*
* Schema fragment(s) for this class:
*
*
*
*
*
*
*/
public class Order
{
private long orderNumber;
private Customer customer;
private Address billTo;
private Shipping shipping;
private Address shipTo;
private List- itemList = new ArrayList
- ();
private Date orderDate;
private Date shipDate;
private Float total;
...
/**
* Get the 'shipTo' element value. Shipping address information. If missing, the
* billing address is also used as the shipping address.
*/
public Address getShipTo() {
return shipTo;
}
/**
* Set the 'shipTo' element value. Shipping address information. If missing, the
* billing address is also used as the shipping address.
*/
public void setShipTo(Address shipTo) {
this.shipTo = shipTo;
}
/**
* Get the list of 'item' element items.
*/
public List
- getItems() {
return itemList;
}
/**
* Set the list of 'item' element items.
*/
public void setItems(List
- list) {
itemList = list;
}
...
}
/**
* Supported shipment methods. The "INTERNATIONAL" shipment methods can only be used
for orders with shipping addresses outside the U.S., and one of these methods is
required in this case.
*
* Schema fragment(s) for this class:
*
*
*
*
*
*
*/
public enum Shipping {
STANDARD_MAIL, PRIORITY_MAIL, INTERNATIONAL_MAIL, DOMESTIC_EXPRESS,
INTERNATIONAL_EXPRESS
} 从清单2中可以看到,CodeGen自动将生成的代码中的模式文档转换为Javadocs(此处显示为每个Javadoc类中的前导注释,以及作为getShipTo()和setShipTo()方法的注释的一部分)。 默认情况下,CodeGen还将实际的模式定义合并到类Javadocs中,并且对于get / set属性访问方法,它描述了与该属性相对应的模式组件。
对于重复值,例如清单1订单complexType定义中的重复项元素,默认情况下,CodeGen生成Java 5类型列表。 对于simpleType限制枚举,例如清单1中的运送类型,默认情况下,CodeGen生成Java 5枚举类型。 清单2中显示了这两个实例的生成代码。
生成的JiBX绑定
除了生成的代码外,CodeGen还生成一个JiBX绑定定义(在本例中为binding.xml文件),该定义告诉JiBX绑定编译器如何在Java类和XML之间进行转换。 绑定定义包含由JiBX完成的转换的完整详细信息,因此它们必定很复杂。 幸运的是,您不需要了解绑定定义就可以使用CodeGen绑定和代码生成来与JiBX一起使用,因此本教程并不涵盖所有细节。
处理XML文档
在本部分中,您将学习如何运行JiBX绑定编译器以及在运行时使用JiBX来处理XML文档。
运行JiBX绑定编译器
要在处理XML文档时使用生成的绑定定义,首先需要运行JiBX绑定编译器。 绑定编译器将字节码添加到已编译的类文件中,该字节码实际上实现了由绑定定义指定的往返XML的转换。 每次重新编译Java类或修改绑定定义时,都必须运行绑定编译器,因此通常最好在项目标准构建过程中添加binding-compiler步骤。
绑定编译器作为jibx-bind.jar的一部分包含在JiBX发行版中。 JiBX文档提供了有关运行绑定编译器的不同方法的完整详细信息,包括在运行应用程序而不是构建的一部分时如何调用它。 JiBX还提供了用于Eclipse和IntelliJ IDEA的插件,当您在这些IDE中工作时,它们会自动运行绑定编译器。
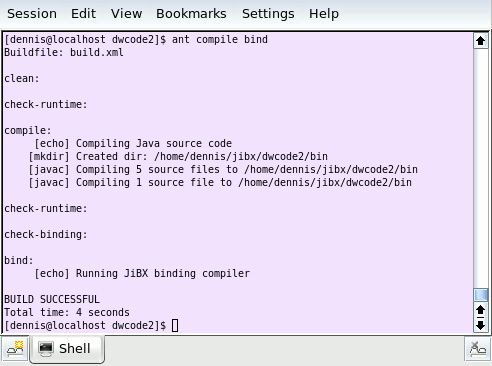
出于本教程的目的,您将使事情保持简单,只需通过Ant运行绑定编译器。 build.xml的compile目标通过编译生成的代码和提供的测试程序来为绑定做准备,而bind目标实际上是在运行绑定编译器。 图2显示了输出,你应该看到当您运行这些目标,假设你已经运行codegen目标。 (您还可以通过在命令行上按顺序列出所有三个目标来依次运行它们: ant codegen compile bind 。)
图2. Ant构建compile和bind任务
在运行时使用JiBX
清单3显示了一个与模式匹配的简单测试文档,该文档包含在本教程的代码下载中,名为starter.xml:
清单3.订单模式的测试文档
  12345678

    5678
    John
    Smith


    12345 Happy Lane
    Plunk
    USA

  PRIORITY_MAIL

    333 River Avenue
    Kirkland
下载包还包括一个简单的测试程序,如清单4所示,该程序演示了如何使用JiBX来解组和编组文档。 编组是为内存中的对象(可能包括从原始对象链接的对象)生成XML表示的过程。 取消编组是从XML表示形式在内存中建立对象(以及潜在的链接对象图)的编组的相反过程。 Ant run目标使用清单3文档作为输入并将该文档的编组副本复制到名为out.xml的文件中,以执行该测试程序。
清单4.测试程序
public class Test
{
/**
* Unmarshal the sample document from a file, compute and set order total, then
* marshal it back out to another file.
*
* @param args
*/
public static void main(String[] args) {
if (args.length < 2) {
System.out.println("Usage: java -cp ... " +
"org.jibx.starter.Test in-file out-file");
System.exit(0);
}
try {
// unmarshal customer information from file
IBindingFactory bfact = BindingDirectory.getFactory(Order.class);
IUnmarshallingContext uctx = bfact.createUnmarshallingContext();
FileInputStream in = new FileInputStream(args[0]);
Order order = (Order)uctx.unmarshalDocument(in, null);
// compute the total amount of the order
float total = 0.0f;
for (Iterator- iter = order.getItems().iterator(); iter.hasNext();) {
Item item = iter.next();
total += item.getPrice() * item.getQuantity();
}
order.setTotal(new Float(total));
// marshal object back out to file (with nice indentation, as UTF-8)
IMarshallingContext mctx = bfact.createMarshallingContext();
mctx.setIndent(2);
FileOutputStream out = new FileOutputStream(args[1]);
mctx.setOutput(out, null);
mctx.marshalDocument(order);
System.out.println("Processed order with " + order.getItems().size() +
" items and total value " + total);
} catch (FileNotFoundException e) {
e.printStackTrace();
System.exit(1);
} catch (JiBXException e) {
e.printStackTrace();
System.exit(1);
}
}
}
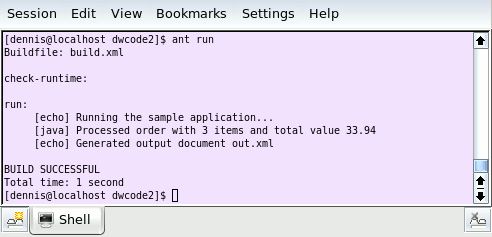
图3显示了运行run目标时应看到的输出:
图3. Ant构建run任务
这与第1部分中使用的测试程序相同,并且受到该教程中讨论的相同限制的约束。 就像在第1部分中一样,out.xml文件的输出是通过编组回通过解组原始文档获得的订单数据而生成的。
引入CodeGen定制
在本节中,您将学习自定义CodeGen以控制从简单模式生成的代码结构的基础。
一个简单的自定义示例
CodeGen支持对代码和绑定生成的许多方面进行广泛的自定义。 将要应用的定制集作为XML文档传递到CodeGen,其中带有与模式或模式组件相关的嵌套元素。 清单5给出了一个简单的示例:
清单5.简单的定制示例
清单5的定制包含一个未命名的模式元素,该元素具有几个不同的属性,这些属性提供了要应用的特定定制。 (到目前为止,您仅使用单个模式定义,因此可以使用这种非常简单的定制形式。在本教程的后面,您将看到用于处理多个模式的定制示例。)第一个定制属性- prefer-inline="true" —告诉CodeGen内联模式定义仅被引用一次,而不是使用将它们保留为单独类的默认行为。 第二个属性show-schema="false"阻止将模式定义嵌入到类Javadocs中。 enumeration-type="simple"生成简单的类型安全的枚举,而不是Java 5枚举。
最后一对属性一起工作。 默认情况下,CodeGen为指定为输入的模式中的每个全局类型定义生成一个单独的顶级类,并在为每个complexType生成的JiBX绑定中生成一个对应的抽象映射。 generate-all="false"属性更改了此默认行为,仅显式生成那些专门包含或从包含的类型引用的complexType 。 然后, includes="order item"属性给出要生成的名称,选择它们是为了与测试程序保持兼容性-需要complexType项因为测试程序在汇总订单的总金额时希望为其找到单独的顶级类。
您可以通过使用Ant尝试这些自定义custgen任务,而不是codegen任务(或者只使用full任务,运行目标的完整序列clean custgen compile bind run )。 清单6显示了生成的代码的摘录,您可以将其与清单2所示的默认生成的代码进行比较。 最大的区别(除了简化的Javadocs类之外)是现在内联了Customer类,而Shipping类现在是使用自定义类型安全枚举类的内部类。
清单6.用定制生成的代码
/**
* Order information.
*/
public class Order
{
private long orderNumber;
private long customerCustomerNumber;
private String customerFirstName;
private String customerLastName;
private Address billTo;
private Shipping shipping;
private Address shipTo;
private List- itemList = new ArrayList
- ();
private Date orderDate;
private Date shipDate;
private Float total;
...
/**
* Supported shipment methods. The "INTERNATIONAL" shipment methods can only be used
for orders with shipping addresses outside the U.S., and one of these methods is
required in this case.
*/
public static class Shipping
{
private final String value;
public static final Shipping STANDARD_MAIL = new Shipping(
"STANDARD_MAIL");
public static final Shipping PRIORITY_MAIL = new Shipping(
"PRIORITY_MAIL");
public static final Shipping INTERNATIONAL_MAIL = new Shipping(
"INTERNATIONAL_MAIL");
public static final Shipping DOMESTIC_EXPRESS = new Shipping(
"DOMESTIC_EXPRESS");
public static final Shipping INTERNATIONAL_EXPRESS = new Shipping(
"INTERNATIONAL_EXPRESS");
private static final String[] values = new String[]{"DOMESTIC_EXPRESS",
"INTERNATIONAL_EXPRESS", "INTERNATIONAL_MAIL", "PRIORITY_MAIL",
"STANDARD_MAIL"};
private static final Shipping[] instances = new Shipping[]{
DOMESTIC_EXPRESS, INTERNATIONAL_EXPRESS, INTERNATIONAL_MAIL,
PRIORITY_MAIL, STANDARD_MAIL};
private Shipping(String value) {
this.value = value;
}
public String toString() {
return value;
}
public static Shipping convert(String value) {
int index = java.util.Arrays.binarySearch(values, value);
if (index >= 0) {
return instances[index];
} else {
return null;
}
}
public static Shipping fromValue(String text) {
Shipping value = convert(text);
if (value == null) {
throw new IllegalArgumentException("Value \'" + text
+ "\' is not allowed");
} else {
return value;
}
}
}
}
许多其他自定义项可用于CodeGen。 您将在本教程的后面看到一些这些示例,但是为了更好地了解这些自定义的功能,有必要继续研究更复杂的模式。
尝试真实的模式
使用独立的模式定义进行简单的演示非常有用,但是当工具应用于企业应用程序中广泛使用的复杂模式定义时,并不能给工具带来什么感觉。 现在是时候以一种行业标准的HR-XML模式定义的形式继续介绍一个更现实的示例。
HR-XML TimeCard模式
HR-XML联盟是一个组织,旨在开发用于人力资源的XML表示的开放标准。 它代表着110多家公司成员,近50家技术公司已通过认证,符合其标准。
本教程使用的HR-XML模式由157个模式组成,包括顶级文档定义和通用组件的混合。 CodeGen可以轻松处理这种数量的模式,但是生成的类的数量以及相互关系的复杂性将使模式处理的更有趣的方面难以理解。 为了专注于这些细节,此处使用的HR-XML的子集由一个单一的顶级文档定义(用于TimeCard元素)以及作为TimeCard定义的一部分引用的公共组件(总共七个模式定义)组成。
您可以在hrxml / schemas目录下找到本教程中使用的HR-XML模式定义的子集。 清单7显示了TimeCard元素定义的主模式的编辑版本。 这给出了HR-XML模式样式的示例,该示例混合使用嵌套和全局类型定义,并且比第一个示例包含更广泛的模式结构,包括:
-
TimeCardType定义中的某些嵌入式complexType所示) -
AdditionalDataType定义) -
TimeCardDuration定义) - Nonnumeration
清单7. HR-XML TimeCard模式
...
...
...
...
...
...
...
...
...
...
...
...
...
为TimeCard生成的代码
hrxml目录中的Ant build.xml文件定义了用于测试TimeCard架构的基本代码生成的Ant目标,包括默认生成和几个自定义示例(稍后讨论)。 示例目录还包含一个测试程序org.jibx.hrxml.Test 。 它使用生成的数据模型类对样本文档进行解组,然后将其解组,并将结果与原始文档进行比较。 样本目录中有一组来自HR-XML分发的测试文档。 codegen目标使用默认值运行CodeGen, compile编译生成的代码和测试代码, bind编译JiBX绑定,并在样本文档上roundtrip运行测试程序。 您也可以使用full任务按顺序运行所有这些步骤。
从模式生成代码的大多数形式都会为每个complexType定义和枚举simpleType生成一个单独的类。 CodeGen通常能够通过检查引用和内联定义(如果可能)并忽略包含和导入的模式定义中未使用的定义,来减少生成类的数量。 就TimeCard模式而言,总共有10个全局(命名) complexType和另外23个本地(匿名) complexType以及8个枚举simpleType 。 生成的默认数据模型包含15个顶级类和23个内部类,仅比基于架构组件计数所希望看到的数量少一些。 稍后,在不需要所有模式组件的情况下,您将看到一些使用自定义方式进一步简化数据模型的方法。
清单8显示了CodeGen如何处理TimeCardType complexType定义中两个元素之间的选择。 默认情况下,CodeGen使用选择变量来跟踪当前处于活动状态的选择。 选择中包含的值的设置方法使您可以为当前选择写入新值,但不能直接更改选择(如果尝试,则抛出IllegalStateException )。 要在设置当前选择后更改它,您首先需要调用一个clear方法(此处为clearReportedResourceSelect() ),该方法将重置选择状态。
清单8. HR-XML TimeCard生成的代码示例
/**
* Schema fragment(s) for this class:
*
*
*
*
*
*
*
*
*
*
*
*
* ...
*/
public class TimeCardType
{
private EntityIdType id;
private int reportedResourceSelect = -1;
private final int REPORTED_RESOURCE_PERSON_CHOICE = 0;
private final int RESOURCE_CHOICE = 1;
private TimeCardPersonType reportedResourcePerson;
private Resource resource;
...
private void setReportedResourceSelect(int choice) {
if (reportedResourceSelect == -1) {
reportedResourceSelect = choice;
} else if (reportedResourceSelect != choice) {
throw new IllegalStateException(
"Need to call clearReportedResourceSelect() before changing existing choice");
}
}
/**
* Clear the choice selection.
*/
public void clearReportedResourceSelect() {
reportedResourceSelect = -1;
}
/**
* Check if ReportedResourcePerson is current selection for choice.
*
* @return true if selection, false if not
*/
public boolean ifReportedResourcePerson() {
return reportedResourceSelect == REPORTED_RESOURCE_PERSON_CHOICE;
}
/**
* Get the 'Person' element value.
*
* @return value
*/
public TimeCardPersonType getReportedResourcePerson() {
return reportedResourcePerson;
}
/**
* Set the 'Person' element value.
*
* @param reportedResourcePerson
*/
public void setReportedResourcePerson(
TimeCardPersonType reportedResourcePerson) {
setReportedResourceSelect(REPORTED_RESOURCE_PERSON_CHOICE);
this.reportedResourcePerson = reportedResourcePerson;
}
/**
* Check if Resource is current selection for choice.
*
* @return true if selection, false if not
*/
public boolean ifResource() {
return reportedResourceSelect == RESOURCE_CHOICE;
}
/**
* Get the 'Resource' element value.
*
* @return value
*/
public Resource getResource() {
return resource;
}
/**
* Set the 'Resource' element value.
*
* @param resource
*/
public void setResource(Resource resource) {
setReportedResourceSelect(RESOURCE_CHOICE);
this.resource = resource;
}
对于大多数应用程序,这种类型的选择处理效果很好,可以防止用户尝试在一个选项中设置多个选项。 不过,自定义可用于修改默认的选择处理,因此,如果您不喜欢这种形式的选择处理,则可以轻松进行更改。 choice-check属性控制如何在生成的代码中检查choice-check="disable"值禁用所有检查,并且不跟踪选择状态,由用户自行决定是否为每个选择设置一个值和一个值。 choice-check="checkset"匹配清单8所示的默认处理,其中只有set方法检查当前设置并抛出异常。 choice-check="checkboth"还会在调用get方法时检查选择状态,如果get方法与当前选择状态不匹配,则会引发异常。 最后, choice-check="override"会始终更改默认处理,以在设置选项中的任何值时更改当前状态,而不是在先前设置其他状态时引发异常。
choice-exposed自定义属性与choice-check设置结合使用,后者跟踪当前选择状态。 choice-exposed="false"将选择状态常量,状态变量值和状态更改方法全部保留为私有,与清单8中所示的默认代码生成匹配。 choice-exposed="true"使所有这些都可以公开访问,并为状态变量添加get方法。 这使您可以轻松地使用Java switch语句根据当前状态执行不同的代码,而不是多个if语句。
这两个属性都可以在任何级别的自定义中使用,从而使您可以轻松地在最外层的自定义中设置所有生成的代码的行为,同时仍保留根据情况进行不同操作的能力。
mixed="true"处理
像许多企业模式一样,HR-XML模式使用org.w3c.dom.Element对象(或Element列表,如果maxOccurs值大于1)来处理Element对象可用于表示任意XML元素(包括所有属性,名称空间声明和内容),因此它提供了与匹配模式定义的任何文档一起使用所需的所有灵活性。
清单9显示了与清单7模式示例中的maxOccurs="unbounded" ,所以生成的代码使用Element的列表。
清单9.
/**
* ...
* Schema fragment(s) for this class:
*
*
*
*
*
*
*/
public class AdditionalDataType
{
private List anyList = new ArrayList();
private String type;
/**
* Get the list of sequence items.
*
* @return list
*/
public List getAny() {
return anyList;
}
/**
* Set the list of sequence items.
*
* @param list
*/
public void setAny(List list) {
anyList = list;
}
...
} 清单9中模式定义的某些方面被CodeGen忽略或仅部分处理。 首先,封闭的mixed="true" ,这意味着允许将字符数据与processContents="strict" ,这意味着实例文档中存在的任何元素都需要具有自己的架构定义。 CodeGen会忽略此属性,尽管使用不同形式的namespace="##any" ,这意味着与namespace="##other" ,则结果将相同。
您可以在任何级别的定制中使用any-handling定制属性,以选择其他处理any-handling="discard"简单地忽略any-handling="dom"匹配默认处理,使用org.w3c.dom.Element表示与any-handling="mapped"生成的代码要求与processContents="strict"模式条件)。 在最后一种情况下,数据模型使用java.lang.Object表示元素,而对象的实际运行时类型与全局模式定义匹配。
与从模式生成代码的大多数形式一样,CodeGen忽略或仅部分处理simpleType限制(包括长度限制,值范围,甚至是正则表达式模式)中,目前在生成的数据模型中仅强制执行
CodeGen当前也忽略了TimeCardDuration类型和AnyDateTimeType )均在生成的代码中由一个简单的String值表示。
清单10.
/**
* Schema fragment(s) for this class:
*
*
*
*
*
*
*
*
* ...
*
*/
public static class TimeInterval
{
private EntityIdType id;
private String startDateTime;
private int choiceSelect = -1;
private final int END_DATE_TIME_CHOICE = 0;
private final int DURATION_CHOICE = 1;
private String endDateTime;
private String duration;
private String duration1;
...
...
...
模式修改
如果将清单10顶部的Javadoc中嵌入的模式片段与列表底部的实际模式片段进行比较,您将看到原始模式中的union simpleType引用已由xs:string引用替换。 Javadoc版本。 这是有意的,它代表了CodeGen对模式结构进行的几种类型的转换。 一些转换,例如消除simpleType限制方面,都被硬编码到CodeGen操作中。 其他转换由定制控制。 无论哪种方式,Javadocs中包含的模式片段始终显示转换后的模式,因为这实际上是用于生成代码的。
在本教程的以下各节中,您将看到更多由定制控制的转换类型。
自定义TimeCard数据模型
本教程前面的示例显示了一些简单的CodeGen定制。 既然您已经了解了CodeGen如何使用默认设置处理HR-XML TimeCard模式,现在该探讨一些更强大的自定义设置了。
自定义数据模型
CodeGen使用默认设置生成的数据模型代码有一些弱点。 一方面,模式类型名称全都以Type结尾,并且这会延续到相应的生成的类名称中,从而使名称长于必要的长度。 从模式名称空间org.hrxml.ns生成的程序包名称是合理的,但是最好有一个包名称来指示数据模型专门用于TimeCard文档。
清单11显示了生成的数据模型类的另一个尴尬的方面,其中java.math.BigInteger用于表示xs:integer类型。 这是使用标准Java类对xs:integer的最精确表示,但与简单的int原语或java.lang.Integer对象类型相比, BigInteger很难使用。 不幸的是,即使xs:int更合适,也常常使用xs:integer类型编写模式,因此开发人员可能会在生成的代码中陷入BigInteger值的困扰。 此处肯定是这种情况, GenderCode允许的实际值都是个位数(如清单底部的原始架构片段所示)。
清单11. xs:integer生成示例
/**
* Schema fragment(s) for this class:
*
*
*/
public class GenderCode
{
private BigInteger genderCode;
/**
* Get the 'GenderCode' element value.
*
* @return value
*/
public BigInteger getGenderCode() {
return genderCode;
}
/**
* Set the 'GenderCode' element value.
*
* @param genderCode
*/
public void setGenderCode(BigInteger genderCode) {
this.genderCode = genderCode;
}
}
Must conform to ISO 5218 - Representation of Human Sexes
(0 - Not Known; 1 - Male; 2 - Female; 9 - Not specified)
清单12显示了用于改进所生成数据模型的这些方面的定制。 package="org.hrxml.timecard"属性提供了用于生成的类的Java包。 type-substitutions="xs:integer xs:int"属性定义了CodeGen将应用的模式类型替换,在这种情况下,无论在模式中引用了xs:integer的位置,都使用xs:int类型。 您可以通过将更多类型名称添加到列表中来定义多个替换对,并在各对之间以及每对类型名称之间使用空格作为分隔符。
嵌套的name-converter元素配置将XML名称转换为Java名称的处理。 在这种情况下, strip-suffixes="Type"属性告诉CodeGen删除名称末尾出现的Type 。 您可以提供多个替换选项,用空格分隔列表。 您还可以使用strip-prefixes属性从名称中删除不必要的前导文本,以及其他几种自定义形式。 如果您想在名称转换中做一些特别的事情,甚至可以用您自己的实现替换默认的名称转换类。 有关这些name-converter选项的完整详细信息,请参见JiBX CodeGen文档。
最后,嵌套的class-decorator元素将装饰class-decorator添加到代码生成序列中。 在这种情况下,装饰器是作为CodeGen分发的一部分提供的预定义器,它为集合值添加了有用的支持方法。 CodeGen在构造数据模型类的源代码时会依次调用任何已配置的代码生成修饰符,并有机会修改或添加到CodeGen生成的字段,方法和类构造中。 这些构造中的每一个都使用Eclipse AST实现作为抽象语法树(AST)组件传递给装饰器。 提供的装饰器(包括用于添加方法的org.jibx.schema.codegen.extend.CollectionMethodsDecorator装饰器,以及用于添加java.io.Serializable接口的org.jibx.schema.codegen.extend.SerializableDecorator以及可选的版本ID到数据模型类)提供了使用Eclipse AST扩展CodeGen的示例,因此这些类的源代码是编写自己的装饰器的一个很好的起点。
清单12. TimeCard自定义示例
您可以使用custgen1 Ant目标尝试清单12的自定义,或者使用custom1目标运行生成,编译,绑定和测试的完整序列。 清单13显示了应用定制的结果。 TimeCardType类名称已更改为TimeCard ,除了List get和set方法之外,现在还添加了大小,添加,索引的get和clear方法。 在GenderCode类中,BigInteger引用已替换为简单的int基本类型。
清单13.定制的数据模型
/**
 * Schema fragment(s) for this class:
 *
 * ...
 *
 */
public class TimeCard
{
    ...
    private List reportedTimeList = new ArrayList();
    ...
    /**
     * Get the list of 'ReportedTime' element items.
     *
     * @return list
     */
    public List getReportedTimes() {
        return reportedTimeList;
    }

    /**
     * Set the list of 'ReportedTime' element items.
     *
     * @param list
     */
    public void setReportedTimes(List list) {
        reportedTimeList = list;
    }

    /**
     * Get the number of 'ReportedTime' element items.
     * @return count
     */
    public int sizeReportedTime() {
        return reportedTimeList.size();
    }

    /**
     * Add a 'ReportedTime' element item.
     * @param item
     */
    public void addReportedTime(ReportedTime item) {
        reportedTimeList.add(item);
    }

    /**
     * Get 'ReportedTime' element item by position.
     * @return item
     * @param index
     */
    public ReportedTime getReportedTime(int index) {
        return reportedTimeList.get(index);
    }

    /**
     * Remove all 'ReportedTime' element items.
     */
    public void clearReportedTime() {
        reportedTimeList.clear();
    }
    ...
}
/**
 * Schema fragment(s) for this class:
 *
 * <xs:element xmlns:xs="http://www.w3.org/2001/XMLSchema" type="xs:int"
 *   name="GenderCode"/>
 *
 */
public class GenderCode
{
    private int genderCode;

    /**
     * Get the 'GenderCode' element value.
     *
     * @return value
     */
    public int getGenderCode() {
        return genderCode;
    }

    /**
     * Set the 'GenderCode' element value.
     *
     * @param genderCode
     */
    public void setGenderCode(int genderCode) {
        this.genderCode = genderCode;
    }
}
消除未使用的定义
在第一个自定义示例中,使用原始的简单模式,您了解了如何通过使用generate-all="false"禁用生成每个全局定义以及includes列表以强制生成特定定义来控制包含在生成的数据模型中的类型定义。 。 清单14显示了对TimeCard模式的修改后的自定义,其中添加了这些属性,只有TimeCard元素要包含在生成的数据模型中(当然,还有TimeCard表示所使用的所有内容)。
清单14.仅使用TimeCard组件进行定制
您可以使用custgen2 Ant目标通过CodeGen尝试此自定义,也可以使用custom2目标运行生成,编译,绑定和测试的完整序列。 此更改将数据模型中的顶级类的数量从15个减少到了10个-在简化数据模型方面是一个不错的开始。
自定义单个组件
到目前为止,您仅看到了适用于整个模式集或单个模式的自定义示例。 您还可以自定义模式定义中的特定成分的CodeGen的处理,包括全球性的定义和嵌入全局定义范围内的物品。 可用的定制包括从数据模型中删除该组件,更改用于该组件的类或值名称以及更改该组件的模式类型。
如果您控制模式,则从数据模型中消除组件的自定义并不是很有用-在这种情况下,直接更改模式总是更简单。 但是企业数据交换架构通常包括专用组件,这些组件可能不适合使用这些架构的特定应用程序,并且这些架构通常不受您的控制。 在这种情况下,使用定制可以简化数据模型,而无需使用提供的模式。
组件自定义
模式组件的定制通过将定制元素与表示组件的schema-definition元素相关联来进行。 您可以使用几种不同的方法在定制和架构元素之间建立关联,因为在特定情况下,一种方法可能比另一种方法更方便。 但是,关联的一部分是固定的:自定义元素的名称必须始终与架构组件元素名称匹配。 因此,例如,要在模式中自定义
清单15显示了TimeCard引用的其他模式之一的定义,这是一个很好的示例来演示各个组件的定制。 PersonNameType由几个简单的xs:string元素以及一些其他具有复杂结构的元素组成。 碰巧的是,本教程代码中使用的测试文档不包含该类型的Affix或AlternateScript元素的任何实例,因此,为简化生成的数据模型,可以消除它们的最佳选择。
清单15. PersonName模式
        ...


        ...


        ...
清单16显示了一种定义自定义项以从数据模型中消除Affix和AlternateScript元素的方法。 此方法使用路径规范,该规范是用于导航模式定义结构的一组类似XPath的方向。 路径步骤由斜杠( / )字符分隔,并且与架构定义的命名组件(全局类型,组或attributeGroup定义,或元素或属性定义,无论是否全局)匹配的步骤可以使用[@name=...]谓词来指出组件类型的特定实例。
清单16.对不需要的组件的直接定制
在清单16中 ,从模式级别完全阐明了每个路径。 您也可以在路径中使用通配符。 *通配符作为路径步骤匹配模式定义中的任何单个元素,而**通配符匹配模式定义中的任意数量的嵌套元素。 因此,您可以使用complexType[@name=PersonNameType]/*/element[@name=Affix]或complexType[@name=PersonNameType]/**/element[@name=Affix] complexType[@name=PersonNameType]/*/element[@name=Affix]代替路径complexType[@name=PersonNameType]/sequence/element[@name=Affix] complexType[@name=PersonNameType]/**/element[@name=Affix] 。 但是,您不能使用**/element[@name=Affix] -CodeGen要求您明确标识任何自定义中涉及的全局定义组件,以防止不正确地应用自定义。
只要嵌套与架构定义结构匹配,就可以嵌套组件自定义项。 在这种情况下,每个定制只需要指定相对于包含的定制的目标即可。 您还可以在自定义项上使用name="..."属性,以替代路径最后一步中[@name=...]谓词,也可以在最后一步中跳过元素名称(因为它必须始终与定制元素的名称相同)。 You can even avoid using a path completely, instead using nesting combined with a name attribute. Listing 17 shows the same customizations as Listing 16 , restructured to use this alternative approach:
Listing 17. Nested customization for unneeded components
Simplifying the data model
Besides the PersonName components used as examples in the preceding subsection, the TimeCard schemas have a number of other complex components that are not used in the sample documents included in this tutorial. By using customizations to eliminate these unused components, you can considerably simplify the generated data model. There are also some cases where the Java value names used by CodeGen don't work well. In particular, cases where the same element name is used repeatedly can result in value names distinguished only by digit suffixes, making it difficult to understand the proper use of the values. See Listing 10 for an example, where a pair of fields named duration and duration1 are included in the generated code. You can use a customization to change one of these names to something more meaningful.
Listing 18 shows the custom3.xml file from the hrxml directory of the code, which includes all these customizations. This intentionally uses a variety of the component-identification approaches discussed in the preceding subsection, with nesting, paths, and paths mixed with names. The value-name customization is at the bottom, using a value-name="simpleDuration" attribute to change the name used for the second duration to a more descriptive form.
Listing 18. Simplifying and clarifying the TimeCard data model
You can use the custgen3 Ant target to try this customization with CodeGen, or use the custom3 target to run the complete sequence of generate, compile, bind, and test. The customizations reduce the generated class count to 9 top-level classes and 10 inner classes, for a total of 19. This count is exactly half the number of classes in the original data model generated without using customizations.
CodeGen command-line parameters
CodeGen supports several additional command line parameters beyond those used in the tutorial code. Table 1 lists the most important options:
Table 1. CodeGen command-line options
| 命令 | 目的 |
|---|---|
-c path |
Path to input customizations file |
-n package |
Default package for no-namespace schema definitions (default is the default package) |
-p package |
Default package for all schema definitions (default is to use package generated from each schema namespace) |
-s path |
Schema root directory path (default is current directory) |
-t path |
Target directory path for generated output (default is current directory) |
-v |
Verbose-output flag |
-w |
Wipe all files from target directory before generating output (ignored if the target directory is the same as the current directory) |
You can also pass global customizations to CodeGen as command-line parameters, without the need to create a customizations file, by using the special -- prefix before the customization attribute value. So to set the same global options as used in the Listing 5 customizations, you'd add --prefer-inline=true --show-schema=false --enumeration-type=simple --generate-all=false to the CodeGen command line. (You can't specify the list of schema components to be included in the generation this way, though, because these are specific to a particular schema.) No quotes are needed for attribute value when you use this technique. If you want to set a customization that takes a list of multiple values, use commas rather than spaces as separators between the individual values. (So to ignore the Type and Group schema name suffixes, for instance, you'd use the command-line --strip-suffixes=Type,Group parameter.)
Going further
In this tutorial, you've learned the basics of using JiBX to generate a Java data model from an XML schema definition first and then convert documents matching that schema to and from the data model. You have also seen examples of using customizations to control how the data model is generated. There are many other customizations you can use to control different aspects of the data model, beyond those I've covered in this tutorial. The JiBX documentation provides full details on all these customization options, along with more examples of code generation from schema.
Web service definitions are one of the main uses of XML schemas. JiBX can currently be used within the Apache Axis2, Apache CXF, XFire, and Spring-WS Web services stacks, and it also supports its own lightweight Web services engine in the form of JiBX/WS. You can use the code-generation-from-schema features discussed in this tutorial within any of these Web services stacks, though you'll currently need to extract the schema definition from the Web Services Description Language (WSDL) service definition before it can be generated. You also need to go through additional steps for each stack to get to a working Web service. Future releases of JiBX will simplify the process of creating Web services implementations, so check the documentation in your JiBX distribution to find out about any new features in this area.
翻译自: https://www.ibm.com/developerworks/java/tutorials/j-jibx2/index.html


