技术最佳实践-javassist字节码编程
| 作者 | 时间 | 邮箱 |
|---|---|---|
| 19778(潘顾昌) | 2020/05/30 | [email protected] |
javassist编程
概述
什么是动态编程?动态编程解决什么问题?Java中如何使用?什么原理?如何改进?
什么是动态编程
动态编程是相对于静态编程而言的,平时我们讨论比较多的就是静态编程语言,例如Java,与动态编程语言,例如JavaScript。那二者有什么明显的区别呢?简单的说就是在静态编程中,类型检查是在编译时完成的,而动态编程中类型检查是在运行时完成的。所谓动态编程就是绕过编译过程在运行时进行操作的技术在Java中有如下几种方式:
- 动态编译
动态编译是从Java 6开始支持的,主要是通过一个JavaCompiler接口来完成的。通过这种方式我们可以直接编译一个已经存在的java文件,也可以在内存中动态生成Java代码,动态编译执行
- 调用JavaScript引擎
Java 6加入了对Script(JSR223)的支持。这是一个脚本框架,提供了让脚本语言来访问Java内部的方法。你可以在运行的时候找到脚本引擎,然后调用这个引擎去执行脚本。这个脚本API允许你为脚本语言提供Java支持。
- 动态生成字节码
这种技术通过操作Java字节码的方式在JVM中生成新类或者对已经加载的类动态添加元素
动态编程解决什么问题
在静态语言中引入动态特性,主要是为了解决一些使用场景的痛点。其实完全使用静态编程也办得到,只是付出的代价比较高,没有动态编程来得优雅。例如依赖注入框架Spring使用了反射,而Dagger2 却使用了代码生成的方式(APT)例如 :
- 在那些依赖关系需要动态确认的场景:
- 需要在运行时动态插入代码的场景,比如动态代理的实现。
- 通过配置文件来实现相关功能的场景
Java中如何使用
此处我们主要说一下通过动态生成字节码的方式,其他方式可以自行查找资料。
操作java字节码的工具有两个比较流行,一个是ASM,一个是Javassit。
- ASM
直接操作字节码指令,执行效率高,使用者需要掌握Java类字节码文件格式及指令,对使用者的要求比较高。
- Javassit
提供了更高级的API,执行效率相对较差,但无需掌握字节码指令的知识,对使用者要求较低。
应用层面来讲一般使用建议优先选择Javassit,如果后续发现Javassit 成为了整个应用的效率瓶颈的话可以再考虑ASM.当然如果开发的是一个基础类库,或者基础平台,还是直接使用ASM吧,相信从事这方面工作的开发者能力应该比较高。
[外链图片转存失败,源站可能有防盗链机制,建议将图片保存下来直接上传(img-7k48vxA2-1594309760248)(…/Image/20180729123218350.png)]
Javassit使用方法
Javassist是一个开源的分析、编辑和创建Java字节码的类库。是由东京工业大学的数学和计算机科学系的 Shigeru Chiba (千叶 滋)所创建的。它已加入了开放源代码JBoss 应用服务器项目,通过使用Javassist对字节码操作为JBoss实现动态AOP框架。javassist是jboss的一个子项目,其主要的优点,在于简单,而且快速。直接使用java编码的形式,而不需要了解虚拟机指令,就能动态改变类的结构,或者动态生成类。
Javassist中最为重要的是ClassPool,CtClass ,CtMethod 以及 CtField这几个类。
- ClassPool
一个基于HashMap实现的CtClass对象容器,其中键是类名称,值是表示该类的CtClass对象。默认的ClassPool使用与底层JVM相同的类路径,因此在某些情况下,可能需要向ClassPool添加类路径或类字节
- CtClass
表示一个类,这些CtClass对象可以从ClassPool获得
- CtMethods
表示类中的方法
- CtFields
表示类中的字段
动态生成一个类
下面的代码会生成一个实现了Cloneable接口的类GenerateClass
public class Main{
    public void generate(){
        ClassPool pool = ClassPool.getDefault();
        CtClass ct = pool.makeClass("top.ss007.GenerateClass");//创建类
        ct.setInterfaces(new CtClass[]{pool.makeInterface("java.lang.Cloneable")});//让类实现Cloneable接口
        CtField f = new CtField(CtClass.intType, "id", ct);//获得一个类型为int,名称为id的字段
        f.setModifiers(AccessFlag.PUBLIC);//将字段设置为public
        ct.addField(f);//将字段设置到类上
        //添加构造函数
        CtConstructor constructor = CtNewConstructor.make("public GeneratedClass(int pId){this.id=pId;}", ct);
        ct.addConstructor(constructor);
        //添加方法
        CtMethod helloM = CtNewMethod.make("public void hello(String des){ System.out.println(des);}", ct);
        ct.addMethod(helloM);

        ct.writeFile();//将生成的.class文件保存到磁盘
        ct.toClass();//获取class实例

        //下面的代码为验证代码
        Field[] fields = ct.toClass().getFields();
        System.out.println("属性名称:" + fields[0].getName() + "  属性类型:" + fields[0].getType());
 }
}
@Test
    @SneakyThrows
    public void test21() {
        ClassPool classPool = ClassPool.getDefault();
        CtClass ct = classPool.makeClass("com.pigic.GenerateClass");//创建类
        ct.setInterfaces(new CtClass[]{classPool.get("java.lang.Cloneable")});
        CtMethod method = CtNewMethod.make("public void test22() {\n" +
                "        System.out.println(\"11111\");\n" +
                "        System.out.println(\"11111\");\n" +
                "        System.out.println(\"11111\");\n" +
                "    }", ct);
        ct.addMethod(method);
        ct.writeFile("src\\main\\resources");
        ct.toClass();
        ReflectUtil.invoke(ReflectUtil.newInstance("com.pigic.GenerateClass"),"test22");
    }
    public void test21() {
        ClassPool classPool = ClassPool.getDefault();
        CtClass ct = classPool.makeClass("com.pigic.GenerateClass");//创建类
        ct.setInterfaces(new CtClass[]{classPool.get("java.lang.Cloneable")});
        //为cTclass对象添加一个属性start
        ct.addField(CtField.make("public Integer start = new Integer(15);", ct));
        ct.addMethod(CtMethod.make("public void setStart(Integer start){this.start = start;}", ct));
        ct.addMethod(CtMethod.make("public Integer getStart(){return this.start;}", ct));
        CtMethod method = CtNewMethod.make("public void test22() {\n" +
                "        System.out.println(\"11111\");\n" +
                "        System.out.println(getStart());\n" +
                "        System.out.println(\"11111\");\n" +
                "    }", ct);
        ct.addMethod(method);
        ct.writeFile("src\\main\\resources");
        ct.toClass();
        ReflectUtil.invoke(ReflectUtil.newInstance("com.pigic.GenerateClass"),"test22");
    }
创建属性
//为cTclass对象添加一个属性start
        CtField ctField = CtField.make("public Integer start = new Integer(15);", ct);
创建方法
ct.addMethod(CtMethod.make("public void setStart(Integer start){this.start = start;}", ct));
属性上添加注解
public void test21() {
        ClassPool classPool = ClassPool.getDefault();
        CtClass ct = classPool.makeClass("com.pigic.GenerateClass");//创建类
        ClassFile classFile = ct.getClassFile();
        ConstPool constPool = classFile.getConstPool();

        ct.setInterfaces(new CtClass[]{classPool.get("java.lang.Cloneable")});
        //为cTclass对象添加一个属性start
        CtField ctField = CtField.make("public Integer start = new Integer(15);", ct);
        FieldInfo fieldInfo = ctField.getFieldInfo();
        AnnotationsAttribute annotationsAttribute = new AnnotationsAttribute(constPool,AnnotationsAttribute.visibleTag);
        Annotation autowired = new Annotation("org.springframework.beans.factory.annotation.Autowired",constPool);
        annotationsAttribute.addAnnotation(autowired);
        fieldInfo.addAttribute(annotationsAttribute);
        ct.addField(ctField);
        ct.addMethod(CtMethod.make("public void setStart(Integer start){this.start = start;}", ct));
        ct.addMethod(CtMethod.make("public Integer getStart(){return this.start;}", ct));
        CtMethod method = CtNewMethod.make("public void test22() {\n" +
                "        System.out.println(\"11111\");\n" +
                "        System.out.println(getStart());\n" +
                "        System.out.println(\"11111\");\n" +
                "    }", ct);
        ct.addMethod(method);
        ct.writeFile("src\\main\\resources");
        ct.toClass();
        ReflectUtil.invoke(ReflectUtil.newInstance("com.pigic.GenerateClass"),"test22");
    }
动态修改方法体
动态的修改一个方法的内容才是我们关注的重点,例如在AOP编程方面,我们就会用到这种技术,动态的在一个方法中插入代码。 例如我们有下面这样一个类
public class Point {
    private int x;
    private int y;

    public Point(){}
    public Point(int x, int y) {
        this.x = x;
        this.y = y;
    }

    public void move(int dx, int dy) {
        this.x += dx;
        this.y += dy;
    }
}
我们要动态的在内存中在move()方法体的前后插入一些代码
public void modifyMethod()
    {
        ClassPool pool=ClassPool.getDefault();
        try {
            CtClass ct=pool.getCtClass("top.ss007.Point");
            CtMethod m=ct.getDeclaredMethod("move");
           //$1,$2   表示获取方法的入参值
            m.insertBefore("{ System.out.print(\"dx:\"+$1); System.out.println(\"dy:\"+$2);}");
            m.insertAfter("{System.out.println(this.x); System.out.println(this.y);}");

            ct.writeFile();
            //通过反射调用方法,查看结果
            Class pc=ct.toClass();
            Method move= pc.getMethod("move",new Class[]{int.class,int.class});
            Constructor<?> con=pc.getConstructor(new Class[]{int.class,int.class});
            move.invoke(con.newInstance(1,2),1,2);
        }
        ...
    }
使用反编译工具查看修改后的move方法结果:
public void move(int dx, int dy) {
    System.out.print("dx:" + dx);System.out.println("dy:" + dy);
    this.x += dx;
    this.y += dy;
    Object localObject = null;//方法返回值
    System.out.println(this.x);System.out.println(this.y);
  }
重写方法
@Test
    @SneakyThrows
    public void test23() {
        ClassPool classPool = ClassPool.getDefault();
        CtClass ctClass = classPool.get("com.alibaba.fastjson.JSON");
        CtMethod ctMethod = ctClass.getDeclaredMethod("parseObject",classPool.get(new String[]{"java.lang.String"}));
        ctMethod.setBody("{\n" +
                "        System.out.println(com.pigic.hzeropigic.domain.dto.PIGIC.PIGIC);\n" +
                "        System.out.println(\"111\");\n" +
                "        System.out.println($1);\n" +
                "        cn.pigicutils.core.lang.Console.log(new Object[]{\"222\"});\n" +
                "        return new com.alibaba.fastjson.JSONObject();\n" +
                "    }");
        ctClass.writeFile("src\\main\\resources");
        ctClass.toClass();
        JSONObject jsonObject = JSON.parseObject("{xx:11,aa:15}");
    }
类附上注解
// 类附上注解
        AnnotationsAttribute classAttr = new AnnotationsAttribute(constpool, AnnotationsAttribute.visibleTag);
        Annotation controller = new Annotation("org.springframework.stereotype.Controller",constpool);
        Annotation requestMapping = new Annotation("org.springframework.web.bind.annotation.RequestMapping.RequestMapping",constpool);
        String visitPath = "/api/department";
        requestMapping.addMemberValue("value",new StringMemberValue(visitPath,constpool));
        classAttr.addAnnotation(controller);
        classAttr.addAnnotation(requestMapping);
        ccFile.addAttribute(classAttr);
方法上附上注解
AnnotationsAttribute methodAttr = new AnnotationsAttribute(constpool, AnnotationsAttribute.visibleTag);
        //Annotation annotation3 = new Annotation("org.springframework.web.bind.annotation.RequestMapping.RequestMapping",constpool);
        requestMapping.addMemberValue("value",new StringMemberValue("/register",constpool));

        Annotation responseBody = new Annotation("org.springframework.web.bind.annotation.RequestMapping.ResponseBody",constpool);
        methodAttr.addAnnotation(requestMapping);
        methodAttr.addAnnotation(responseBody);
        MethodInfo info = method.getMethodInfo();
        info.addAttribute(methodAttr);
        clazz.addMethod(method);
        clazz.writeFile();
综合使用
public void makeclass(String className,String methodName, CONSTANTS.INVOKETYPE invoketype,String interfaceCode) throws NotFoundException, CannotCompileException, IOException {
        ClassPool pool = ClassPool.getDefault();
        CtClass clazz = pool.makeClass(className);
        ClassFile ccFile = clazz.getClassFile();
        ConstPool constpool = ccFile.getConstPool();

        CtClass executor = pool.get("com.javassist.test.Executor");
        CtClass requst = pool.get("javax.servlet.http.HttpServletRequest");
        CtClass response = pool.get("javax.servlet.http.HttpServletResponse");

        String fieldName = invoketype.getValue());
        // 增加字段
        CtField field = new CtField(executor,fieldName,clazz);
        field.setModifiers(Modifier.PUBLIC);
        FieldInfo fieldInfo = field.getFieldInfo();

        // 属性附上注解
        AnnotationsAttribute fieldAttr = new AnnotationsAttribute(constpool, AnnotationsAttribute.visibleTag);
        Annotation autowired = new Annotation("org.springframework.beans.factory.annotation.Autowired",constpool);
        fieldAttr.addAnnotation(autowired);
        fieldInfo.addAttribute(fieldAttr);
        clazz.addField(field);

        // 增加方法,javassist可以直接将字符串set到方法体中,所以使用时非常方便
        CtMethod method = new CtMethod(new CtClassType(CtClass.javaLangObject,pool),methodName,new CtClass[]{requst,response},clazz);
        method.setModifiers(java.lang.reflect.Modifier.PUBLIC);
        StringBuffer methodBody = new StringBuffer();
        methodBody.append("{return "+fieldName+".execute(\""+interfaceCode+"\",(com.javassist.test.RequestVo)$1.getAttribute(\"request\"));}");
        method.setBody(methodBody.toString());


        // 类附上注解
        AnnotationsAttribute classAttr = new AnnotationsAttribute(constpool, AnnotationsAttribute.visibleTag);
        Annotation controller = new Annotation("org.springframework.stereotype.Controller",constpool);
        Annotation requestMapping = new Annotation("org.springframework.web.bind.annotation.RequestMapping.RequestMapping",constpool);
        String visitPath = "/api/department";
        requestMapping.addMemberValue("value",new StringMemberValue(visitPath,constpool));
        classAttr.addAnnotation(controller);
        classAttr.addAnnotation(requestMapping);
        ccFile.addAttribute(classAttr);

        //方法附上注解
        AnnotationsAttribute methodAttr = new AnnotationsAttribute(constpool, AnnotationsAttribute.visibleTag);
        //Annotation annotation3 = new Annotation("org.springframework.web.bind.annotation.RequestMapping.RequestMapping",constpool);
        requestMapping.addMemberValue("value",new StringMemberValue("/register",constpool));

        Annotation responseBody = new Annotation("org.springframework.web.bind.annotation.RequestMapping.ResponseBody",constpool);
        methodAttr.addAnnotation(requestMapping);
        methodAttr.addAnnotation(responseBody);
        MethodInfo info = method.getMethodInfo();
        info.addAttribute(methodAttr);
        clazz.addMethod(method);
        clazz.writeFile();

    }
案例:使用 javassist 修改字节码实现 eureka-client 监听服务启动
- 查看eureka里源码,有个com.netflix.discovery.shared.Application类,addInstance方法在服务上线或更新,removeInstance方法在服务下线时调用,因此修改这俩方法,实现监听服务上、下线。
- 由于spring-boot自己实现的类加载机制,以spring-boot的jar形式运行javassist会扫描不到包,要通过insertClassPath添加扫描路径。
- 通过setBody修改方法体,分别添加me.flyleft.eureka.client.event.EurekaEventHandler.getInstance().eurekaAddInstance([外链图片转存失败,源站可能有防盗链机制,建议将图片保存下来直接上传(img-tDVvj80i-1594309760249)(https://math.jianshu.com/math?formula=1)]%3B%E5%92%8Cme.flyleft.eureka.client.event.EurekaEventHandler.getInstance().eurekaRemoveInstance()1);
- 通过toClass覆盖原有类后,通过类加载器重新加载。
public void init() {
        try {
            ClassPool classPool = new ClassPool(true);
            //添加com.netflix.discovery包的扫描路径
            ClassClassPath classPath = new ClassClassPath(Applications.class);
            classPool.insertClassPath(classPath);
            //获取要修改Application类
            CtClass ctClass = classPool.get(APPLICATION_PATH);
            //获取addInstance方法
            CtMethod addInstanceMethod = ctClass.getDeclaredMethod("addInstance");
            //修改addInstance方法
            addInstanceMethod.setBody("{instancesMap.put($1.getId(), $1);"
                    + "synchronized (instances) {me.flyleft.eureka.client.event.EurekaEventHandler.getInstance().eurekaAddInstance($1);" +
                    "instances.remove($1);instances.add($1);isDirty = true;}}");
            //获取removeInstance方法
            CtMethod removeInstanceMethod = ctClass.getDeclaredMethod("removeInstance");
            //修改removeInstance方法
            removeInstanceMethod.setBody("{me.flyleft.eureka.client.event.EurekaEventHandler.getInstance().eurekaRemoveInstance($1);this.removeInstance($1, true);}");
            //覆盖原有的Application类
            ctClass.toClass();
            //使用类加载器重新加载Application类
            classPool.getClassLoader().loadClass(APPLICATION_PATH);
            Class.forName(APPLICATION_PATH);
        } catch (Exception e) {
            throw new EurekaEventException(e);
        }
    }
- 放入main函数,在spring boot启动前执行或者使用spring boot的事件,在spring bean初始化之前执行。(确保在eureka第一次执行之前执行即可)
@SpringBootApplication
@EnableEurekaClient
public class EurekaClientApplication {

    public static void main(String[] args) {
        //先执行修改字节码代码
        EurekaEventHandler.getInstance().init();
        new SpringApplicationBuilder(EurekaClientApplication.class).web(true).run(args);
    }
}
使用JDK中Observable和Observer实现观察者,订阅者模式
- 发送事件使用java.util.Observable的setChanged和notifyObservers
public class EurekaEventObservable extends Observable {
    public void sendEvent(EurekaEventPayload payload) {
        setChanged();
        notifyObservers(payload);
    }
}
- 接收事件使用使用java.util.Observer的update
public abstract class AbstractEurekaEventObserver implements Observer, EurekaEventService {
      @Override
        public void update(Observable o, Object arg) {
            if (arg instanceof EurekaEventPayload) {
                EurekaEventPayload payload = (EurekaEventPayload) arg;
                if (InstanceInfo.InstanceStatus.UP.name().equals(payload.getStatus())) {
                    LOGGER.info("Receive UP event, payload: {}", payload);
                } else {
                    LOGGER.info("Receive DOWN event, payload: {}", payload);
                }
                putPayloadInCache(payload);
                consumerEventWithAutoRetry(payload);
            }
        }
}
使用RxJava实现自动重试。
接收到服务启动去执行一些操作,如果执行失败有异常则自动重试指定次数,每个一段事件重试一次,执行成功则不再执行
private void consumerEventWithAutoRetry(final EurekaEventPayload payload) {
    rx.Observable.just(payload)
            .map(t -> {
                // 此处为接收到服务启动去执行的一些操作
                consumerEvent(payload);
                return payload;
            }).retryWhen(x -> x.zipWith(rx.Observable.range(1, retryTime),
            (t, retryCount) -> {
               //异常处理
                if (retryCount >= retryTime) {
                    if (t instanceof RemoteAccessException || t instanceof RestClientException) {
                        LOGGER.warn("error.eurekaEventObserver.fetchError, payload {}", payload, t);
                    } else {
                        LOGGER.warn("error.eurekaEventObserver.consumerError, payload {}", payload, t);
                    }
                }
                return retryCount;
            }).flatMap(y -> rx.Observable.timer(retryInterval, TimeUnit.SECONDS)))
            .subscribeOn(Schedulers.io())
            .subscribe((EurekaEventPayload payload1) -> {
            });
}
添加手动重试失败接口
自动重试失败,可以手动重试,添加手动重试接口
@RestController
@RequestMapping(value = "/v1/eureka/events")
public class EurekaEventEndpoint {

    private EurekaEventService eurekaEventService;

    public EurekaEventEndpoint(EurekaEventService eurekaEventService) {
        this.eurekaEventService = eurekaEventService;
    }

    @Permission(permissionLogin = true)
    @ApiOperation(value = "获取未消费的事件列表")
    @GetMapping
    public List<EurekaEventPayload> list(@RequestParam(value = "service", required = false) String service) {
        return eurekaEventService.unfinishedEvents(service);
    }

    @Permission(permissionLogin = true)
    @ApiOperation(value = "手动重试未消费成功的事件")
    @PostMapping("retry")
    public List<EurekaEventPayload> retry(@RequestParam(value = "id", required = false) String id,
                                          @RequestParam(value = "service", required = false) String service) {
        return eurekaEventService.retryEvents(id, service);
    }

}
案例:修改方法,统计方法的执行时间
@Test
	public void updateGetUserInfoMethod() throws Exception {
		ClassPool pool = new ClassPool();
		pool.appendSystemPath();
		// 定义类
		CtClass userServiceClass = pool.get("com.ty.javaagent.UserServiceImpl");
		// 需要修改的方法
		CtMethod method = userServiceClass.getDeclaredMethod("getUserInfo");
		// 修改原有的方法
		method.setName("getUserInfo$agent");
		// 创建新的方法,复制原来的方法
		CtMethod newMethod = CtNewMethod.copy(method, "getUserInfo", userServiceClass, null);
		// 注入的代码
		StringBuffer body = new StringBuffer();

		body.append("{\nlong start = System.currentTimeMillis();\n");
		// 调用原有代码,类似于method();($$)表示所有的参数
		body.append("getUserInfo$agent($$);\n");
		body.append("System.out.println(\" take \" +\n (System.currentTimeMillis()-start) + " + "\" ms.\");\n");

		body.append("}");
		newMethod.setBody(body.toString());
		// 增加新方法
		userServiceClass.addMethod(newMethod);

		UserServiceImpl userServiceImpl = (UserServiceImpl) userServiceClass.toClass().newInstance();
		userServiceImpl.getUserInfo();
	}
javaAgent编程
一、写一个Agent
1、编写一个Java类,并包含如下两个方法中的任一个:
public static void premain(String agentArgs, Instrumentation inst); //【1】
public static void premain(String agentArgs); //【2】
其中,【1】和【2】同时存在时,【1】会优先被执行,而【2】则会被忽略。
具体使用如下代码:
import java.lang.instrument.Instrumentation;
public class MyAgent {
    public static void premain(String agentArgs, Instrumentation inst) {
        System.out.println("this is an agent.");
        System.out.println("args:" + agentArgs + "\n");
    }
}
2、jar打包
在代码的resources目录下添加META-INF/MANIFEST.MF文件。其目的是指定Premain-Class的类。
Manifest-Version: 1.0
Premain-Class: com.zl.unit1.MyAgent
Can-Redefine-Classes: true
3、在pom.xml中配置打包的相关配置。
    <packaging>jar</packaging>
    <build>
        <finalName>my-agent</finalName>
        <plugins>
            <plugin>
                <groupId>org.apache.maven.plugins</groupId>
                <artifactId>maven-jar-plugin</artifactId>
                <version>2.3.2</version>
                <configuration>
                    <archive>
                        <index>true</index>
                        <manifestFile>
                            src/main/resources/META-INF/MANIFEST.MF
                        </manifestFile>
                        <manifest>
                            <addDefaultImplementationEntries/>
                        </manifest>
                    </archive>
                </configuration>
            </plugin>
            <plugin>
                <groupId>org.apache.maven.plugins</groupId>
                <artifactId>maven-compiler-plugin</artifactId>
                <configuration>
                    <source>1.7</source>
                    <target>1.7</target>
                </configuration>
            </plugin>
    </plugins>
    </build>
最后,执行mvn clean package,就能生成一个my-agent.jar。
[外链图片转存失败,源站可能有防盗链机制,建议将图片保存下来直接上传(img-i8w7Ksr2-1594309760251)(…/Image/20171215235403154.png)]
二、运行Agent
新建一个测试类。如下:
public class AgentTest {
    public static void main(String[] args) {
        System.out.println("this is main");
    }
}
命令行运行:java -javaagent: 文件位置 [=参数]
idea运行:如果是Idea中,按如下配置。
[外链图片转存失败,源站可能有防盗链机制,建议将图片保存下来直接上传(img-2NIkzeBp-1594309760253)(…/Image/20171215235106701.png)]
运行结果如下:我这里重复加载了两次Agent,但是传入的参数不同。
this is an agent.
args:first

this is an agent.
args:second

this is main
三、调试Agent
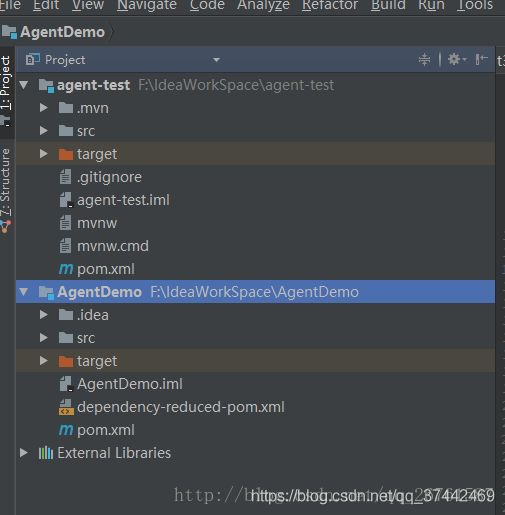
1、使用 Spring Boot 创建一个简单的 Web 项目。AgentDemo用户创建Agent类,agent-test用于外部启动执行Agent类,如下图 :
[外链图片转存失败,源站可能有防盗链机制,建议将图片保存下来直接上传(img-6uiVE7zx-1594309760254)(…/Image/20171215235549388.png)]
友情提示 :这里一定要注意下。创建的 Web 项目,使用 IntelliJ IDEA 的菜单 File / New / Module 或 File / New / Module from Existing Sources ,保证 Web 项目和 Agent 项目平级。这样,才可以使用 IntelliJ IDEA 调试 Agent 。
2、设置线程模式下的断点
[外链图片转存失败,源站可能有防盗链机制,建议将图片保存下来直接上传(img-pxgitKwF-1594309760256)(…/Image/20171215235733414.png)]
3、执行
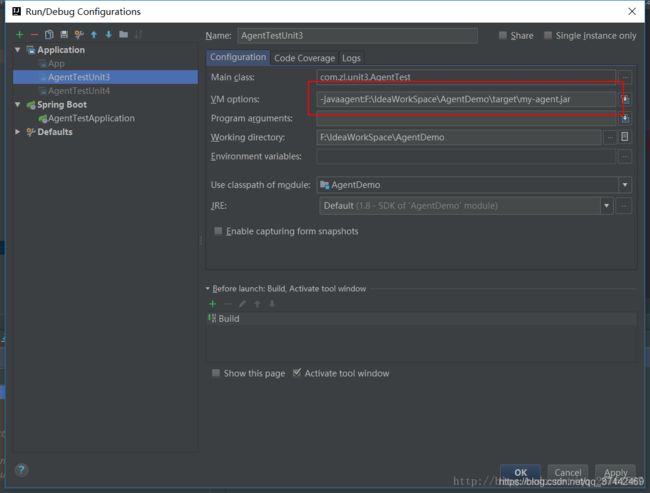
运行 Web 项目的 Application 的 #main(args) 方法,并增加 JVM 启动参数,-javaagent:F:\IdeaWorkSpace\AgentDemo\target\my-agent.jar。如下图 :
[外链图片转存失败,源站可能有防盗链机制,建议将图片保存下来直接上传(img-Ec9Byz6x-1594309760259)(…/Image/20171216000036143.png)]
nt,但是传入的参数不同。
this is an agent.
args:first

this is an agent.
args:second

this is main
三、调试Agent
1、使用 Spring Boot 创建一个简单的 Web 项目。AgentDemo用户创建Agent类,agent-test用于外部启动执行Agent类,如下图 :
友情提示 :这里一定要注意下。创建的 Web 项目,使用 IntelliJ IDEA 的菜单 File / New / Module 或 File / New / Module from Existing Sources ,保证 Web 项目和 Agent 项目平级。这样,才可以使用 IntelliJ IDEA 调试 Agent 。
2、设置线程模式下的断点
3、执行
运行 Web 项目的 Application 的 #main(args) 方法,并增加 JVM 启动参数,-javaagent:F:\IdeaWorkSpace\AgentDemo\target\my-agent.jar。如下图 :


