Vue基础技术|vue-loader+webpack项目配置
项目初始化
首先需要创建一个空目录vue-demo,然后通过命令行进入该目录后,执行npm init指令来初始化为一个npm的项目,基本选项都可以选择默认值即可,初始化完成后会在当前目录下生成一个package.json文件,该文件是项目的配置文件。
➜  ~ cd Documents/workspace/vue-demo
➜  vue-demo pwd
/Users/a1/Documents/workspace/vue-demo
➜  vue-demo npm init
This utility will walk you through creating a package.json file.
It only covers the most common items, and tries to guess sensible defaults.

See `npm help json` for definitive documentation on these fields
and exactly what they do.

Use `npm install ` afterwards to install a package and
save it as a dependency in the package.json file.

Press ^C at any time to quit.
package name: (vue-demo)
version: (1.0.0)
description: vue demo
entry point: (index.js)
test command:
git repository:
keywords:
author: mj
license: (ISC)
About to write to /Users/a1/Documents/workspace/vue-demo/package.json:

{
  "name": "vue-demo",
  "version": "1.0.0",
  "description": "vue demo",
  "main": "index.js",
  "scripts": {
    "test": "echo \"Error: no test specified\" && exit 1"
  },
  "author": "mj",
  "license": "ISC"
}


Is this OK? (yes) yes
安装项目依赖包
首先,我们需要安装的依赖包是vue和webpack,我们可以通过npm install指令来安装我们需要的依赖包,并且可以一次安装多个包,多个包之间需要使用空格分隔即可,此处使用的webpack3.10.0版本,因此需要在安装的时候通过[email protected]指定版本即可。
➜  vue-demo npm install [email protected] [email protected] [email protected]

> [email protected] install /Users/a1/Documents/workspace/vue-demo/node_modules/fsevents
> node install

node-pre-gyp WARN Using needle for node-pre-gyp https download
[fsevents] Success: "/Users/a1/Documents/workspace/vue-demo/node_modules/fsevents/lib/binding/Release/node-v64-darwin-x64/fse.node" is installed via remote

> [email protected] postinstall /Users/a1/Documents/workspace/vue-demo/node_modules/uglifyjs-webpack-plugin
> node lib/post_install.js

npm notice created a lockfile as package-lock.json. You should commit this file.
npm WARN [email protected] requires a peer of css-loader@* but none is installed. You must install peer dependencies yourself.
npm WARN [email protected] requires a peer of vue-template-compiler@^2.0.0 but none is installed. You must install peer dependencies yourself.
npm WARN [email protected] No repository field.

+ [email protected]
+ [email protected]
+ [email protected]
added 433 packages from 330 contributors and audited 3217 packages in 13.8s
found 0 vulnerabilities

➜  vue-demo
注意:从上面安装的过程信息可以看到几处warn警告,其中提到vue-loader需要依赖于css-loader和vue-template-compiler,因此我们需要安装css-loader和vue-template-compiler依赖包
➜  vue-demo npm install [email protected] [email protected]
npm WARN deprecated [email protected]: Browserslist 2 could fail on reading Browserslist >3.0 config used in other tools.
npm WARN [email protected] No repository field.

+ [email protected]
+ [email protected]
added 298 packages from 217 contributors in 17.715s
在vue-demo项目文件夹下,新建文件夹src,作为我们的源码存放目录
在src文件夹下创建一个app.vue文件,编写一个基本的vue组件,用来展示一个红色的标题显示
此时,我们虽然编写好了自己的vue组件,但此时我们的组件是没办法在浏览器中运行的,我们需要想办法让该组件可以在浏览器中运行,那么我们需要怎么做呢?我们需要在我们的根目录下创建一个webpack.config.js文件,这个文件是我们的webpack配置文件。webpack是用来帮助我们打包我们的前端资源的工具,然后我们的前端资源有很多不同的类型,比如说:javascript、css、图片及字体等,这些东西作为我们前端资源都是需要通过http请求去加载的内容,那么在我们开发webapp的时候,我们都是一整个js加载到浏览器端之后,然后去把所有的内容渲染出来,所以很多时候我们都可以简单的以js文件作为我们的入口,所以我们需要首先在配置文件中声明我们的入口。
新建我们的入口文件index.js,因为我们不能将app.vue组件直接挂载到我们的html文件中,因此我们需要通过我们的入口js文件来挂载我们的组件。
在webpack.config.js配置文件中配置入口
这就是我们的输入和输出配置,也就是说我们输入一个入口文件,最终我们的webpack会把我们的入口文件及它里面所依赖的组件(如:Vue和App)都帮助我们打包成一个完整的bundle.js,并且打包出来的是我们直接可以在浏览器中运行的js代码。
我们在package.json文件中添加一个脚本,用来配置我们的打包指令,为打包指令指定配置文件,为什么要在package.json文件中编写呢?因为只有在这里面调用webpack指令,它才会调用我们安装在项目中的webpack,如果在外面的命令行直接执行webpack指令则调用的是安装在全局的webpack,有时候全局的webpack可能跟我们项目使用的webpack版本不一致,所以使用这种方式会好一些,强烈推荐!!!
打开命令行,进入项目根目录,运行我们配置好的打包指令,执行npm run build
➜  vue-demo npm run build

> [email protected] build /Users/a1/Documents/workspace/vue-demo
> webpack --config webpack.config.js

Hash: 56f73ec7aef513e68477
Version: webpack 3.10.0
Time: 269ms
    Asset    Size  Chunks             Chunk Names
bundle.js  228 kB       0  [emitted]  main
   [0] (webpack)/buildin/global.js 509 bytes {0} [built]
   [2] ./src/index.js 178 bytes {0} [built]
   [6] ./src/app.vue 195 bytes {0} [built] [failed] [1 error]
    + 4 hidden modules

ERROR in ./src/app.vue
Module parse failed: Unexpected token (1:0)
You may need an appropriate loader to handle this file type.
|
|     {{title}}
|
 @ ./src/index.js 2:0-27
npm ERR! code ELIFECYCLE
npm ERR! errno 2
npm ERR! [email protected] build: `webpack --config webpack.config.js`
npm ERR! Exit status 2
npm ERR!
npm ERR! Failed at the [email protected] build script.
npm ERR! This is probably not a problem with npm. There is likely additional logging output above.

npm ERR! A complete log of this run can be found in:
npm ERR!     /Users/a1/.npm/_logs/2019-07-13T00_33_59_466Z-debug.log
➜  vue-demo
我们发现在执行打包的过程中报错了,错误信息提示:需要为.vue的文件类型去声明一个loader,因为webpack原生是只支持js文件类型的,并且它支持的语法只是ES5的语法,所以我们在使用超出它理解范围的语法的时候,我们需要一些帮助它去处理这些语法的工具,去为我们处理这个文件,所以我们需要做如下配置:
配置完成后再次执行我们的打包指令
➜  vue-demo npm run build

> [email protected] build /Users/a1/Documents/workspace/vue-demo
> webpack --config webpack.config.js

No parser and no filepath given, using 'babel' the parser now but this will throw an error in the future. Please specify a parser or a filepath so one can be inferred.
Hash: 231a2f0430cb3afe3fdf
Version: webpack 3.10.0
Time: 910ms
    Asset    Size  Chunks             Chunk Names
bundle.js  244 kB       0  [emitted]  main
   [0] (webpack)/buildin/global.js 509 bytes {0} [built]
   [2] ./node_modules/vue-loader/lib/selector.js?type=script&index=0&bustCache!./src/app.vue 104 bytes {0} [built]
   [3] ./src/index.js 178 bytes {0} [built]
   [7] ./src/app.vue 1.81 kB {0} [built]
   [8] ./node_modules/vue-style-loader!./node_modules/css-loader!./node_modules/vue-loader/lib/style-compiler?{"vue":true,"id":"data-v-5ef48958","scoped":false,"hasInlineConfig":false}!./node_modules/vue-loader/lib/selector.js?type=styles&index=0&bustCache!./src/app.vue 1.57 kB {0} [built]
   [9] ./node_modules/css-loader!./node_modules/vue-loader/lib/style-compiler?{"vue":true,"id":"data-v-5ef48958","scoped":false,"hasInlineConfig":false}!./node_modules/vue-loader/lib/selector.js?type=styles&index=0&bustCache!./src/app.vue 196 bytes {0} [built]
  [14] ./node_modules/vue-loader/lib/template-compiler?{"id":"data-v-5ef48958","hasScoped":false,"buble":{"transforms":{}}}!./node_modules/vue-loader/lib/selector.js?type=template&index=0&bustCache!./src/app.vue 477 bytes {0} [built]
    + 8 hidden modules
➜  vue-demo
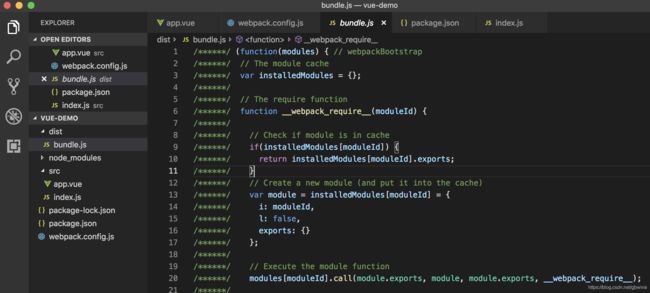
看到上面的信息,说明我们打包成功了,此时会在项目的根目录下生成一个dist目录,下面会生成我们打包后的bundle.js文件,如果看到下面的信息,就说明此次打包大功告成了~
我们来看下打包后的bundle.js文件的内容,首先上面是webpack固有的代码,这个代码是用来处理我们的模块依赖的,因为我们有很多的js相互依赖,那么这个依赖关系我们需要去处理。
接下来非常多的代码,它实际上是Vue的源码,因为我们要依赖于Vue这个包所以它把Vue的整个包都打包到同一个js文件里面来了,当然我们也有办法去把它分离出去,那么具体如何做呢?我们后面再讲。
接下去我们会看到我们编写的那部分代码
webpack做的事情就是把我们不同资源类型的文件打包成一个js文件,那么我们在html文件中去引用这个js的时候,我们html里面的js就可以正常的去运行,去执行我们的操作,因为大家知道,做前端项目的时候,我们希望把很多零碎的js打包到一起,因为这样可以减少http请求,同样的我们希望使用模块依赖,因为我们会做很多可复用的代码,把它写到一个模块里面去,这样我们在下一次有个新项目的时候,我们可以再去使用原来的模块,而不需要再去把原来的代码重新写一遍,或者是去拷贝一份,拷贝一份的意思就是如果两个项目使用同一份代码去修改两边,如果你的项目有很多个,那么每个地方都需要改,这样非常不利于代码的维护,所以这就是模块化的意义,其实webpack就是帮我们做了这些事情,当然webpack还可以做很多的事情,这部分今天就到这里了,其余部分且听下回分解!


