Webpack基本配置及常用插件
作为一位菜鸟前端,在学习的路上不能停下来,第一次学webpack的时候是一脸蒙蔽的,特别是在没有看网上的文字教程时直接看官方文档,根本无从下手,所以看了一些前辈们的教程之后自己写了个最基本的配置。
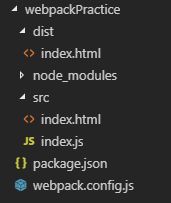
创建一个文件夹,叫webpackPratice

进入文件夹,打卡git,cnpm init,之后文件夹会自动生成package.json文件

创建两个文件夹,src和dist
进入src创建两个文件,index.html和index.js
进入dist创建一个文件,index.html
在根目录下创建一个配置文件,webpack.config.js
全局安装webpack
cnpm install webpack -g
![]()
在index.html和index.js随便写点东西,src和dist里的index.html都写一样的代码
index.html
<html lang="en">
<head>
    <meta charset="UTF-8">
    <meta name="viewport" content="width=device-width, initial-scale=1.0">
    <meta http-equiv="X-UA-Compatible" content="ie=edge">
    <title>Documenttitle>
head>
<body>
    <div class="gunner">div>
body>
html>
index.js
var gunner = document.getElementsByClassName('gunner')[0]
gunner.textContent = 'COME ON YOU GUNNER'
在webpack.config.js中添加如下配置
const path = require('path')

module.exports = {
    //设置模式
    mode: 'development',
    enrty: {
        //入口文件,设置为src文件夹下的index.js
        main: './src/inedx.js'
    },
    output: {
        //出口文件,将打包出来的文件放在dist文件夹下
        path: path.resolve(__dirname, './dist'),
        filename: 'bundle.js'
    }
}
在package.json文件的scripts里面添加一行配置"build" :“webpack”
{
  "name": "webpackpractice",
  "version": "1.0.0",
  "description": "",
  "main": "index.js",
  "scripts": {
    "build": "webpack"
  },
  "author": "",
  "license": "ISC"
}
然后在项目目录中运行cnpm run build

会自动在dist中生成一个打包文件bundle.js

在dist的index.html中引入bundle.js
由于每次修改了代码之后需要重新打包未免太麻烦,这里使用webpack-dev-server
在项目目录中cnpm install webpack-dev-server -D

安装完后会提示 requires a peer of webpack@^4.0.0 but none was installed,虽然之前已经全局安装了webpack,但这里要求要在本地再安装一次webpack,所以这里本地再安装一次webpack

安装完后,添加如下配置
第一种配置,在webpack.config.js中添加配置
//配置webpack开发服务器功能
devServer: {
	 //基本目录结构
	 contentBase: path.resolve(__dirname, './dist'),
	 //服务器IP地址,可以使用IP也可以使用localhost
	 host: 'localhost',
	 //服务端压缩是否开启
	 compress: true,
	 //配置服务端口号
	 port: 8888,
	 open: true
}
然后在package.json的scripts里添加一条配置
"server": "webpack-dev-server"
第二种配置,直接在package.json中配置(推荐)
在package.json的scripts里添加
"server": "webpack-dev-server --open --contentBase dist --port 3000"
–open表示立刻打开浏览器预览,则不需要手动打开
–contentBase dist表示加载dist目录下的页面,为dist目录下的文件提供本地服务器
–port 3000设置端口号为3000
设置完成后打开git,运行cnpm run server,运行这条命令后会提示需要安装webpack-cli,这里只要按照指示安装一下webpack-cli就行,cnpm install webpack-cli -D,安装完后再次执行cnpm run server命令

浏览器会自动打开

注意:
这里有一句 webpack output is served from / ,
意思是打包好的bundle.js文件,被托管到了项目的根目录下,但是你打开项目根目录是看不到 bundle.js文件的。在我运行cnpm run server之前,dist目录下还存在我之前用cnpm run build命令打包好的bundle.js文件,dist目录下的bundle.js和此次产生的bundle.js文件不是同一个文件,细心的话会发现这次浏览器打开的比上次打开的多了几个感叹号,是我特意为了好区分加上之后才打包的,可以看到dist目录下的bundle.js里是没有感叹号的,而根目录下的bundle.js里是有感叹号的。
想要查看根目录下的bundle.js文件可以通过浏览器输入 localhost:3000/bundle.js文件来查看
另外,dist目录下index.html文件通过script标签引入的bundle.js文件也是此次打包产生的bundle.js文件,并非dist目录下的bundle.js文件,因为contentBase已经将dist当做根目录来提供服务器,故dist下的index.html可以看做和此次产生的bundle.js同级,直接引用即可。
以上是最基本的配置,接下来讲几个比较常用第三方模块
- css-loader、style-loader
webpack默认只能打包js代码,但一个项目不可能只有js文件,还有各种样式及其他类型的文件,这里先介绍处理样式文件的css-loader和style-loader,一般处理后缀为.css的文件时,这两种loader要一起安装
cnpm css-loader style-loader -D

在src文件夹下创建一个样式文件style.css,随便写点样式,并在index.js中引入css
进入webpack.config.js添加配置
module: {
  rules: [
       {
           test: /\.css$/,
           use: [ 'style-loader', 'css-loader' ]
       }
   ]
}
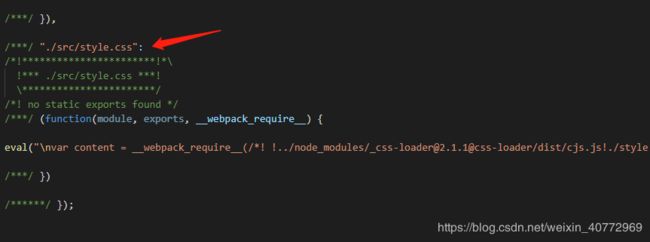
最后在项目目录 cnpm run build
可以看到 css 样式已经被写进dist文件夹下面的bundle.js了
- postcss-loader 自动添加css样式前缀,解决浏览器兼容的烦恼
cnpm install postcss-loader autoprefixer -D

在之前配置css-loader的地方,添加postcss-loader
module: {
    rules: [
        {
            test: /\.css$/,
            use: [ 'style-loader', 'css-loader', 'postcss-loader' ]
        }
    ]
}
注意,要添加到css-loader后面,因为调用顺序是从右到左
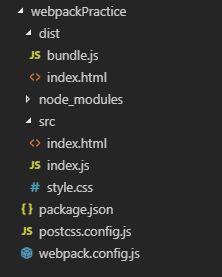
在根目录创建另一个配置文件,postcss.config.js 和 webpack.config.js同级
写入
module.exports = {
    plugins:[
        require('autoprefixer')({
        browsers: ['last 10 versions','Firefox >= 20','Android >= 4.0','iOS >= 8']
        })
    ]
}
在style.css中添加样式
display: flex
打包 cnpm run build

打开dist中的index.html,可以到看自动添加了前缀

3. url-loader、file-loader
这里插入网上看到的对url-loader和file-loader的解释:
file-loader:解决引用路径的问题,拿background样式用url引入背景图来说,我们都知道,webpack最终会将各个模块打包成一个文件,因此我们样式中的url路径是相对入口html页面的,而不是相对于原始css文件所在的路径的。这就会导致图片引入失败。这个问题是用file-loader解决的,file-loader可以解析项目中的url引入(不仅限于css),根据我们的配置,将图片拷贝到相应的路径,再根据我们的配置,修改打包后文件引用路径,使之指向正确的文件。
url-loader:如果图片较多,会发很多http请求,会降低页面性能。这个问题可以通过url-loader解决。url-loader会将引入的图片编码,生成dataURl。相当于把图片数据翻译成一串字符。再把这串字符打包到文件中,最终只需要引入这个文件就能访问图片了。当然,如果图片较大,编码会消耗性能。因此url-loader提供了一个limit参数,小于limit字节的文件会被转为DataURl,大于limit的还会使用file-loader进行copy。
在src中创建一个文件夹images,随便放一张图片进去,然后在src下面的index.html中创建一个div,加入class并放一张背景图片进去
在dist下面的index.html中也创建一个div,加入相同的class即可
![]()

cnpm install url-loader file-loader -D

webpack.config.js中添加配置
{
   test: /\.(png|jpg|gif|jpeg)/, //是匹配图片文件后缀名称
   use: [
       {
           loader: 'url-loader',  //指定使用的loader和loader的配置参数
           options: {
               limit: 500, //把小于500b的文件打成base64格式,写入JS
               name : './images/[hash:8].[name].[ext]' //将图片打包到images文件夹中
           }
       }
   ]
}
打包
cnpm run build
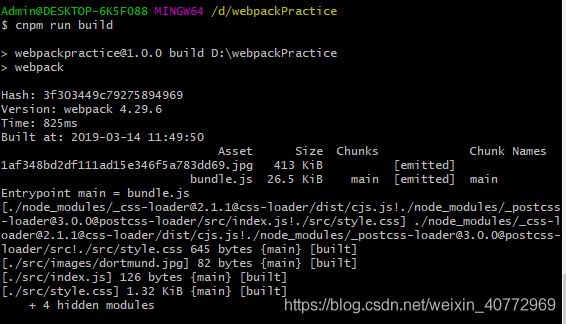
打包后dist文件夹里自动生成了一张图片

图片已经显示出来了

- html-webpack-plugin
这是打包html文件的插件,在没有这个插件之前,我们都要将dist中的index.html进行手动引入script标签。
现在,将dist文件夹下面的index.html文件删除,并将src文件夹里的index.html的script标签去掉
cnpm install html-webpack-plugin -D

webpack.config.js中声明引入html-webpack-plugin
const htmlPlugins = require('html-webpack-plugin')
并添加插件模块
plugins: [
    new htmlPlugins({
        minify: {
            removeAttributeQuotes: true   //去掉属性双引号
        },
        hash: true,   //为了开发中js有缓存效果,所以加入hash,这样可以有效避免缓存js
        template: './src/index.html'  //以src文件夹下面的index.html为模板
    })
]
打包
cnpm run build

可以看到dist中自动生成了index.html文件

而且自动引入了打包好的js
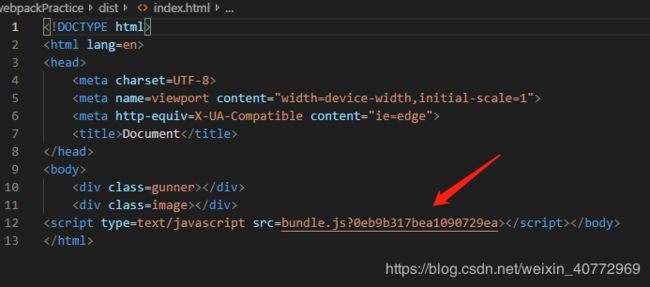
用浏览器打开index.html,一切显示正常
- html-withimg-loader
前端喜欢用img标签引入各种图片,webpack默认是不会处理的,所以又需要一种模块来处理
cnpm install html-withimg-loader -D

同样道理,在webpack.config.js中加入该模块
{
    test: /\.(htm|html)$/i,
    use:[ 'html-withimg-loader']
}
在src中创建images文件夹,里面放一张图片

在src里的index.html中引入该图片,打包
cnpm run build

用浏览器打开dist中的index.html 显示正常,此时应有两张图片,一张是css背景中的图片,一张是用img引入的图片

两张图片都被打包好并重命名放到了dist下面
- mini-css-extract-plugin
这个插件用来分离CSS文件。上面的例子打包好之后都是没有单独的CSS文件生成,全部都被打包到了bundle.js中,这个插件则用来将CSS分离出来为一个单独的文件
cnpm install mini-css-extract-plugin -D

在webpack.config.js中引入声明
const MiniCssExtractPlugin = require('mini-css-extract-plugin')
添加插件配置代码
plugins: [
    new htmlPlugins({
        minify: {
            removeAttributeQuotes: true
        },
        hash: true,
        template: './src/index.html'
    }),

    new MiniCssExtractPlugin({
        filename: "[name].[chunkhash:8].css",
        chunkFilename: '[id].css'
    })
]
[chunkhash:8] 意思是hash一共有32位,取前8位
然后在css-loader那条rule中,在css-loader和style-loader中间加上一条MiniCssExtractPlugin.loader
(至于为什么是在style之后css之前我不清楚,所以就先照着做了。之前试过放在其他的位置都会报错,直到放在了style之后和css之前就成功了)

打包
cnpm run build

dist文件夹下面自动生成了css文件

浏览器打开index.html,运行成功
- babel
webpack默认会识别javasript内容,所以其他类型的文件都要安装第三方模块来转换,但并不是所有的js文件webpack都能打包,比如ES6,目前webpack只能识别少部分ES6的代码,所以这里还需要安装一种模块来使webpack能够将ES6代码转化为能识别的js代码。
这里需要注意一点,安装babel模块网上有很多资料,但有时候安装完后按照流程写下来却发现会报错,比如下面的错误
Error: Cannot find module '@babel/core'
babel-loader@8 requires Babel 7.x (the package '@babel/core'). If you'd like to use Babel 6.x ('babel-core'), you should install 'babel-loader@7'.
    at Function.Module._resolveFilename (module.js:547:15)
    at Function.Module._load (module.js:474:25)
    at Module.require (module.js:596:17)
    at require (internal/module.js:11:18)
    ....
这是由于版本的问题,现在babel-loader已经是8.x版本了,安装babel-core的时候需要安装这种 @babel/core,babel-preset-env同理
cnpm install babel-loader -D
cnpm install @babel/core -D
cnpm install @babel/preset-env -D
安装完后看一下这babel-loader和babel/core的版本
 "@babel/core": "^7.4.0",
 "babel-loader": "^8.0.5",
 "@babel/preset-env": "^7.4.1"
webpack.config.js里添加配置
{
    test: /\.js$/,
    use: {
        loader: "babel-loader"
    },
    exclude: /node_modules/
}
exclude: /node_modules/,排除node_modules这个文件,因为这个配置是用来处理js文件的,而node_modules里面有很多的js文件并不是我们需要处理的对象,如果不排除,就会导致打包速度变慢,占用电脑资源,就算最后打包成功了,也有可能得出我们不想要的结果
在根目录创建一个.babelrc文件
添加如下配置
{
    "presets": [
        "@babel/preset-env"
    ]
}
到src下的js文件里添加一些ES6的语法
打包,cnpm run build

8.sass处理
配置sass很简单,首先安装两个包
cnpm install sass-loader -D
cnpm install node-loader -D
//因为sass-loader依赖于node-loader
在webpack.config.js的module的rules中添加如下配置
{
    test: /\.scss$/,
    use: [ "style-loader", "css-loader", "sass-loader" ]
}
9.webpack结合Vue
首先,安装vue包
cnpm install vue -S
然后在src文件夹下创建一个index.vue文件
![]()
在index.vue文件中插入如下代码:
 //这是vue文件的基本代码结构
 <template>
    <div>
        <h3>COME ON YOU GUNNER</h3>
    </div>
</template>

<script>
export default {

}
</script>

<style lang="scss">

</style>
为了和之前做的东西区别开来,这里可以在根目录创建一个indexVue.html文件,文件中写入
<html lang="en">
<head>
    <meta charset="UTF-8">
    <meta name="viewport" content="width=device-width, initial-scale=1.0">
    <meta http-equiv="X-UA-Compatible" content="ie=edge">
    <title>Documenttitle>
head>
<body>
    <div id="app">

    div>
body>
html>
可以在根目录中再创建一个index2.js,写入
import './style.css'

import Vue from 'vue'
import indexVue from './index.vue'

var vm = new Vue({
    el: '#app',
    data: {
        msg: 'I LOVE ARSENAL'
    },
    render: function(createElement){
        return createElement(indexVue)
    }
})
注意,上面代码中使用import Vue from vue里引入vue包,其实引入的是运行时的包。而且这里使用render来注册组件而不是使用components来注册。如果要使用components来注册,则需要用import Vue from '../node_modules/vue/dist/vue.js的方式才能正常运行。
接下来再安装两个包
cnpm install vue-loader -D
cnpm install vue-template-complier -D
在 webpack.config.js 中添加配置
//在头部添加声明
const VueLoaderPlugin = require('vue-loader/lib/plugin')
//在module的rules中添加
{
    test : /\.vue$/,
    use : "vue-loader"
}
//在plugins中添加
new VueLoaderPlugin()
运行打包
cnpm run build
以上一些基本配置和插件是我目前学到的,以后再慢慢补充,也欢迎各位大神指点批评
