邮政编码的验证
下面我们做一个邮政编码的验证
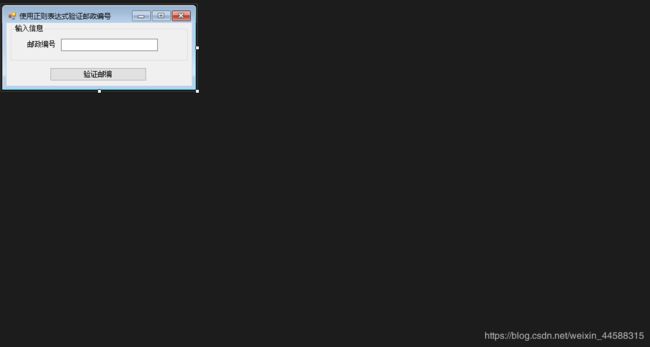
首先我们先设计好一个界面,如下图:

需要写一个设计器支持所需的代码方法:
public Frm_Main()
{
InitializeComponent();
}
namespace ValidateCode
{
partial class Frm_Main
{
///
/// 必需的设计器变量。
///
private System.ComponentModel.IContainer components = null;
    ///
    /// 清理所有正在使用的资源。
    ///
    /// 如果应释放托管资源,为 true;否则为 false。
    protected override void Dispose(bool disposing)
    {
        if (disposing && (components != null))
        {
            components.Dispose();
        }
        base.Dispose(disposing);
    }

    #region Windows 窗体设计器生成的代码

    ///
    /// 设计器支持所需的方法 - 不要
    /// 使用代码编辑器修改此方法的内容。
    ///
    private void InitializeComponent()
    {
        this.label1 = new System.Windows.Forms.Label();
        this.textBox1 = new System.Windows.Forms.TextBox();
        this.button1 = new System.Windows.Forms.Button();
        this.groupBox1 = new System.Windows.Forms.GroupBox();
        this.groupBox1.SuspendLayout();
        this.SuspendLayout();
        //
        // label1
        //
        this.label1.AutoSize = true;
        this.label1.Location = new System.Drawing.Point(27, 27);
        this.label1.Name = "label1";
        this.label1.Size = new System.Drawing.Size(53, 12);
        this.label1.TabIndex = 0;
        this.label1.Text = "邮政编号";
        //
        // textBox1
        //
        this.textBox1.Location = new System.Drawing.Point(86, 24);
        this.textBox1.Name = "textBox1";
        this.textBox1.Size = new System.Drawing.Size(165, 21);
        this.textBox1.TabIndex = 1;
        //
        // button1
        //
        this.button1.Location = new System.Drawing.Point(74, 76);
        this.button1.Name = "button1";
        this.button1.Size = new System.Drawing.Size(165, 23);
        this.button1.TabIndex = 2;
        this.button1.Text = "验证邮编";
        this.button1.UseVisualStyleBackColor = true;
        this.button1.Click += new System.EventHandler(this.button1_Click);
        //
        // groupBox1
        //
        this.groupBox1.Controls.Add(this.label1);
        this.groupBox1.Controls.Add(this.textBox1);
        this.groupBox1.Location = new System.Drawing.Point(7, 3);
        this.groupBox1.Name = "groupBox1";
        this.groupBox1.Size = new System.Drawing.Size(302, 62);
        this.groupBox1.TabIndex = 3;
        this.groupBox1.TabStop = false;
        this.groupBox1.Text = "输入信息";
        //
        // Frm_Main
        //
        this.AutoScaleDimensions = new System.Drawing.SizeF(6F, 12F);
        this.AutoScaleMode = System.Windows.Forms.AutoScaleMode.Font;
        this.ClientSize = new System.Drawing.Size(316, 107);
        this.Controls.Add(this.groupBox1);
        this.Controls.Add(this.button1);
        this.Name = "Frm_Main";
        this.StartPosition = System.Windows.Forms.FormStartPosition.CenterScreen;
        this.Text = "使用正则表达式验证邮政编号";
        this.groupBox1.ResumeLayout(false);
        this.groupBox1.PerformLayout();
        this.ResumeLayout(false);

    }

    #endregion

    private System.Windows.Forms.Label label1;
    private System.Windows.Forms.TextBox textBox1;
    private System.Windows.Forms.Button button1;
    private System.Windows.Forms.GroupBox groupBox1;
}
}
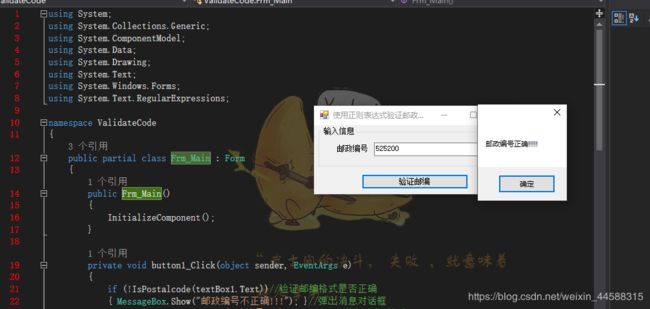
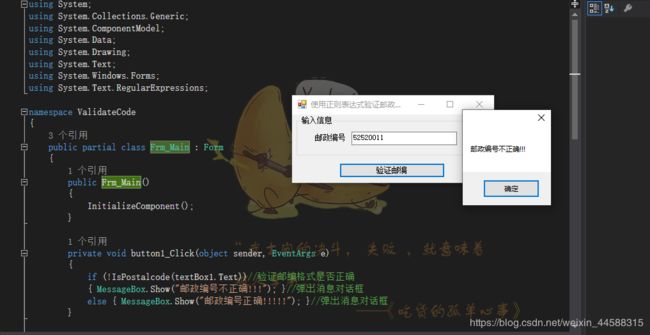
接下来双击“验证邮编”button 会进入到它的点击事件
private void button1_Click(object sender, EventArgs e)
{
if (!IsPostalcode(textBox1.Text))//验证邮编格式是否正确
{ MessageBox.Show(“邮政编号不正确!!!”); }//弹出消息对话框
else { MessageBox.Show(“邮政编号正确!!!”); }//弹出消息对话框
}
再写一个验证的方法给点击事件调用
///
/// 验证邮编格式是否正确
///
/// 邮编字符串
/// 返回布尔值
public bool IsPostalcode(string str_postalcode)
{
return Regex.IsMatch(str_postalcode, @"^\d{6}$");
}
最后把程序的主入口设置好就可以运行了
using System;
using System.Collections.Generic;
using System.Windows.Forms;
namespace ValidateCode
{
static class Program
{
///
/// 应用程序的主入口点。
///
[STAThread]
static void Main()
{
Application.EnableVisualStyles();
Application.SetCompatibleTextRenderingDefault(false);
Application.Run(new Frm_Main());
}
}
}
这里写自定义目录标题
- 欢迎使用Markdown编辑器
- 新的改变
- 功能快捷键
- 合理的创建标题,有助于目录的生成
- 如何改变文本的样式
- 插入链接与图片
- 如何插入一段漂亮的代码片
- 生成一个适合你的列表
- 创建一个表格
- 设定内容居中、居左、居右
- SmartyPants
- 创建一个自定义列表
- 如何创建一个注脚
- 注释也是必不可少的
- KaTeX数学公式
- 新的甘特图功能,丰富你的文章
- UML 图表
- FLowchart流程图
- 导出与导入
- 导出
- 导入
欢迎使用Markdown编辑器
你好! 这是你第一次使用 Markdown编辑器 所展示的欢迎页。如果你想学习如何使用Markdown编辑器, 可以仔细阅读这篇文章,了解一下Markdown的基本语法知识。
新的改变
我们对Markdown编辑器进行了一些功能拓展与语法支持,除了标准的Markdown编辑器功能,我们增加了如下几点新功能,帮助你用它写博客:
- 全新的界面设计 ,将会带来全新的写作体验;
- 在创作中心设置你喜爱的代码高亮样式,Markdown 将代码片显示选择的高亮样式 进行展示;
- 增加了 图片拖拽 功能,你可以将本地的图片直接拖拽到编辑区域直接展示;
- 全新的 KaTeX数学公式 语法;
- 增加了支持甘特图的mermaid语法1 功能;
- 增加了 多屏幕编辑 Markdown文章功能;
- 增加了 焦点写作模式、预览模式、简洁写作模式、左右区域同步滚轮设置 等功能,功能按钮位于编辑区域与预览区域中间;
- 增加了 检查列表 功能。
功能快捷键
撤销:Ctrl/Command + Z
重做:Ctrl/Command + Y
加粗:Ctrl/Command + B
斜体:Ctrl/Command + I
标题:Ctrl/Command + Shift + H
无序列表:Ctrl/Command + Shift + U
有序列表:Ctrl/Command + Shift + O
检查列表:Ctrl/Command + Shift + C
插入代码:Ctrl/Command + Shift + K
插入链接:Ctrl/Command + Shift + L
插入图片:Ctrl/Command + Shift + G
合理的创建标题,有助于目录的生成
直接输入1次#,并按下space后,将生成1级标题。
输入2次#,并按下space后,将生成2级标题。
以此类推,我们支持6级标题。有助于使用TOC语法后生成一个完美的目录。
如何改变文本的样式
强调文本 强调文本
加粗文本 加粗文本
标记文本
删除文本
引用文本
H2O is是液体。
210 运算结果是 1024.
插入链接与图片
链接: link.
图片: ![]()
带尺寸的图片: ![]()
居中的图片: ![]()
居中并且带尺寸的图片: ![]()
当然,我们为了让用户更加便捷,我们增加了图片拖拽功能。
如何插入一段漂亮的代码片
去博客设置页面,选择一款你喜欢的代码片高亮样式,下面展示同样高亮的 代码片.
// An highlighted block
var foo = 'bar';
生成一个适合你的列表
- 项目
- 项目
- 项目
- 项目
- 项目1
- 项目2
- 项目3
- 计划任务
- 完成任务
创建一个表格
一个简单的表格是这么创建的:
| 项目 | Value |
|---|---|
| 电脑 | $1600 |
| 手机 | $12 |
| 导管 | $1 |
设定内容居中、居左、居右
使用:---------:居中
使用:----------居左
使用----------:居右
| 第一列 | 第二列 | 第三列 |
|---|---|---|
| 第一列文本居中 | 第二列文本居右 | 第三列文本居左 |
SmartyPants
SmartyPants将ASCII标点字符转换为“智能”印刷标点HTML实体。例如:
| TYPE | ASCII | HTML |
|---|---|---|
| Single backticks | 'Isn't this fun?' |
‘Isn’t this fun?’ |
| Quotes | "Isn't this fun?" |
“Isn’t this fun?” |
| Dashes | -- is en-dash, --- is em-dash |
– is en-dash, — is em-dash |
创建一个自定义列表
- Markdown
- Text-to- HTML conversion tool
- Authors
- John
- Luke
如何创建一个注脚
一个具有注脚的文本。2
注释也是必不可少的
Markdown将文本转换为 HTML。
KaTeX数学公式
您可以使用渲染LaTeX数学表达式 KaTeX:
Gamma公式展示 Γ ( n ) = ( n − 1 ) ! ∀ n ∈ N \Gamma(n) = (n-1)!\quad\forall n\in\mathbb N Γ(n)=(n−1)!∀n∈N 是通过欧拉积分
Γ ( z ) = ∫ 0 ∞ t z − 1 e − t d t . \Gamma(z) = \int_0^\infty t^{z-1}e^{-t}dt\,. Γ(z)=∫0∞tz−1e−tdt.
你可以找到更多关于的信息 LaTeX 数学表达式here.
新的甘特图功能,丰富你的文章
- 关于 甘特图 语法,参考 这儿,
UML 图表
可以使用UML图表进行渲染。 Mermaid. 例如下面产生的一个序列图::
这将产生一个流程图。:
- 关于 Mermaid 语法,参考 这儿,
FLowchart流程图
我们依旧会支持flowchart的流程图:
- 关于 Flowchart流程图 语法,参考 这儿.
导出与导入
导出
如果你想尝试使用此编辑器, 你可以在此篇文章任意编辑。当你完成了一篇文章的写作, 在上方工具栏找到 文章导出 ,生成一个.md文件或者.html文件进行本地保存。
导入
如果你想加载一篇你写过的.md文件或者.html文件,在上方工具栏可以选择导入功能进行对应扩展名的文件导入,
继续你的创作。
mermaid语法说明 ↩︎
注脚的解释 ↩︎

