STM32F030F4P6 IIC HAL库驱动CH455G
STM32F0系列单片机IO口没有位带操作,仿位带比较浪费资源,不太想用模拟IIC。
HAL库的IIC操作做还是很方便的,是24C02之类的EEPROM很好用,本文主要介绍使用HAL库的IIC驱动沁恒的CH455G数码管驱动器。
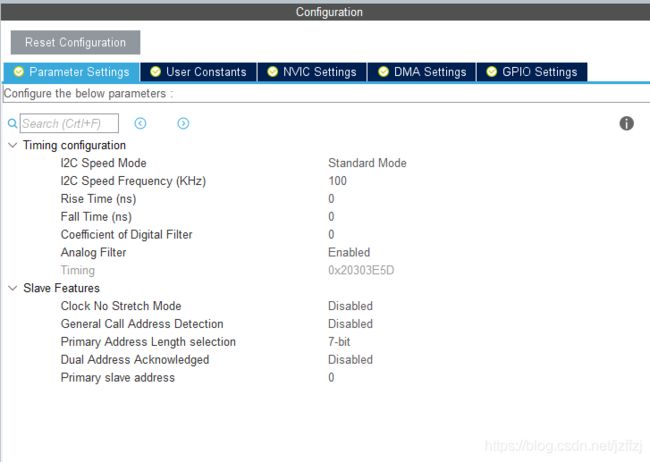
1.STM32CubeMX部分配置
这部分没有特别的地方,常规设就行
2. CH455G驱动代码
这一部分h文件引用了沁恒提供的代码
CH455G.h
#ifndef __CH455G_H
#define __CH455G_H
#include "main.h"
#include "stdint.h"
// 设置系统参数命令
#define CH455_BIT_ENABLE 0x01 // 开启/关闭位
#define CH455_BIT_SLEEP 0x04 // 睡眠控制位
#define CH455_BIT_7SEG 0x08 // 7段控制位
#define CH455_BIT_INTENS1 0x10 // 1级亮度
#define CH455_BIT_INTENS2 0x20 // 2级亮度
#define CH455_BIT_INTENS3 0x30 // 3级亮度
#define CH455_BIT_INTENS4 0x40 // 4级亮度
#define CH455_BIT_INTENS5 0x50 // 5级亮度
#define CH455_BIT_INTENS6 0x60 // 6级亮度
#define CH455_BIT_INTENS7 0x70 // 7级亮度
#define CH455_BIT_INTENS8 0x00 // 8级亮度
#define CH455_SYSOFF 0x0400 // 关闭显示、关闭键盘
#define CH455_SYSON ( CH455_SYSOFF | CH455_BIT_ENABLE ) // 开启显示、键盘
#define CH455_SLEEPOFF CH455_SYSOFF // 关闭睡眠
#define CH455_SLEEPON ( CH455_SYSOFF | CH455_BIT_SLEEP ) // 开启睡眠
#define CH455_7SEG_ON ( CH455_SYSON | CH455_BIT_7SEG ) // 开启七段模式
#define CH455_8SEG_ON ( CH455_SYSON | 0x00 ) // 开启八段模式
#define CH455_SYSON_4 ( CH455_SYSON | CH455_BIT_INTENS4 ) // 开启显示、键盘、4级亮度
#define CH455_SYSON_8 ( CH455_SYSON | CH455_BIT_INTENS8 ) // 开启显示、键盘、8级亮度
// 加载字数据命令
#define CH455_DIG0 0x1400 // 数码管位0显示,需另加8位数据
#define CH455_DIG1 0x1500 // 数码管位1显示,需另加8位数据
#define CH455_DIG2 0x1600 // 数码管位2显示,需另加8位数据
#define CH455_DIG3 0x1700 // 数码管位3显示,需另加8位数据
// CH455接口定义
#define CH455_I2C_ADDR 0x40 // CH455的地址
#define CH455_I2C_MASK 0x3E // CH455的高字节命令掩码
#define BCD_decode_DP 0x0080
#define BCD_decode_NG 0x0040
//extern const uint8_t BCD_decode_tab[0x10];
void CH455G_Write(uint16_t cmd);
void CH455G_Init(void);
void CH455G_Display(short data);
#endif
CH455.C
#include "CH455G.h"
#include "math.h"
volatile const uint8_t BCD_decode_tab[0x10] = { 0X3F, 0X06, 0X5B, 0X4F, 0X66, 0X6D, 0X7D, 0X07, 0X7F, 0X6F,
0X77, 0X7C, 0X58, 0X5E, 0X79, 0X71 };//BCD
void CH455G_Write(uint16_t cmd)
{
uint8_t data1=0;
uint8_t data2=0;
data1 = ((uint8_t)(cmd>>7)&CH455_I2C_MASK)|CH455_I2C_ADDR;
data2 = (uint8_t)(cmd & 0x00ff);
HAL_I2C_Master_Transmit(&hi2c1,data1,&data2,1,1000);
__NOP();
}
void CH455G_Init(void)
{
CH455G_Write( CH455_SYSON );// 开启显示和键盘,8段显示方式
delay_ms(10);
CH455G_Write( CH455_SYSON_8 ); // 8级亮度显示
}
void CH455G_Display(short data)
{
uint8_t encode[4]={0};
if(data<0)
{
//data = 0-data;
data = ~(data-1);
encode[1] = (data % 1000) / 100;
encode[2] = (data % 100) / 10;
encode[3] = data % 10;
//发显示数据
CH455G_Write( CH455_DIG0 | BCD_decode_NG );
// CH455G_Write( CH455_DIG1 | BCD_decode_tab[encode[1]] );
// CH455G_Write( CH455_DIG2 | BCD_decode_tab[encode[2]] | BCD_decode_DP);
// CH455G_Write( CH455_DIG3 | BCD_decode_tab[encode[3]] );
}
else
{
encode[0] = data / 1000;
encode[1] = (data % 1000) / 100;
encode[2] = (data % 100) / 10;
encode[3] = data % 10;
//发显示数据
CH455G_Write( CH455_DIG0 | BCD_decode_tab[encode[0]] );
// CH455G_Write( CH455_DIG1 | BCD_decode_tab[encode[1]] );
// CH455G_Write( CH455_DIG2 | BCD_decode_tab[encode[2]] | BCD_decode_DP);
// CH455G_Write( CH455_DIG3 | BCD_decode_tab[encode[3]] );
}
CH455G_Write( CH455_DIG1 | BCD_decode_tab[encode[1]] );
CH455G_Write( CH455_DIG2 | BCD_decode_tab[encode[2]] | BCD_decode_DP);
CH455G_Write( CH455_DIG3 | BCD_decode_tab[encode[3]] );
}
3. 特别说明
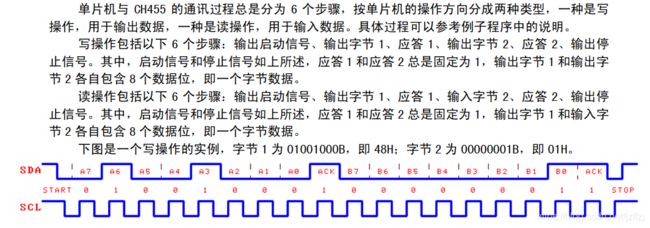
CH455G也有一个设备地址,但是这个地址与24C02不一样,如果用模拟IIC写可以16位依次写入,但是使用HAL库使用
HAL_I2C_Master_Transmit(I2C_HandleTypeDef *hi2c, uint16_t DevAddress, uint8_t *pData, uint16_t Size, uint32_t Timeout)
就需要将指令拆分,16位指令部分拆分为高8为与低八位,
data1 = ((uint8_t)(cmd>>7)&CH455_I2C_MASK)|CH455_I2C_ADDR;
data2 = (uint8_t)(cmd & 0x00ff);
HAL_I2C_Master_Transmit(&hi2c1,data1,&data2,1,1000);
将data1作为DevAddress,data2作为数据部分,长度size设为1。
至此就能往CH455G写数据了


