densepose吐血安装之路
×××××××××××××××××××××××××××××××××××××××××
××××××××× 交代一下本机的环境××××××××××××××××
×××××××× RTX 2070 ××××××××××××××××
×××××××× CUDA 10.1 ××××××××××××××××
×××××××× CUDNN 7 ××××××××××××××××
×××××××××××××××××××××××××××××××××××××××××
作为一个计算机渣渣,连“动态链接库”等概念都不太清晰的小白,经历了二天一夜的折磨,总算把这磨人的小妖精densepose给装好了。无比感谢前人的探索,在每个bug遇到的时候都能有google大神的指引,推荐一位大神的安装教程,希望有朝一日我也能像这位大神一样,不用谷歌也能解决bug。话不多说,直接开干。
1. 首先,先安装cuda。
虽然caffe2(densepose用的是caffe2框架)官网只明确提供了cuda9和cuda8版本的caffe2安装教程,但本人还是傲娇地安装了cuda10。(还不是因为网太烂,不想重新装)这里我用的驱动版本是418。
2. 安装caffe2。
(caffe2居然已经被pytorch保养了)。本人选择的是用conda安装
|
如果测试第一句有问题,可以进入python,然后import caffe2.python具体看一下是什么bug
我的是
ImportError: No module named google.protobuf.internal解决方案
conda install -c conda-forge protobuf这一步安装还是相当顺利,在验证这一块,我也比较顺利地通过了。
3. 安装coco API
这一步依然挺顺利的
# COCOAPI=/path/to/clone/cocoapi
git clone https://github.com/cocodataset/cocoapi.git $COCOAPI
cd $COCOAPI/PythonAPI
# Install into global site-packages
make install
# Alternatively, if you do not have permissions or prefer
# not to install the COCO API into global site-packages
python2 setup.py install --user
4. 下载densepose源码并安装python依赖包
git clone https://github.com/facebookresearch/densepose

pip install -r $DENSEPOSE/requirements.txt
5. 编译make
cd $DENSEPOSE && make
make的过程还是很顺利的,一部就过,我还想着我天神附体,上帝都眷顾我了。然而
心碎的事情来了,运行测试脚本:
python2 $DENSEPOSE/detectron/tests/test_spatial_narrow_as_op.py
BUG:
No handlers could be found for logger "caffe2.python.net_drawer"
net_drawer will not run correctly. Please install the correct dependencies.
[E init_intrinsics_check.cc:43] CPU feature avx is present on your machine, but the Caffe2 binary is not compiled with it. It means you may not get the full speed of your CPU.
[E init_intrinsics_check.cc:43] CPU feature avx2 is present on your machine, but the Caffe2 binary is not compiled with it. It means you may not get the full speed of your CPU.
[E init_intrinsics_check.cc:43] CPU feature fma is present on your machine, but the Caffe2 binary is not compiled with it. It means you may not get the full speed of your CPU.
Traceback (most recent call last):
  File "detectron/tests/test_spatial_narrow_as_op.py", line 80, in
    c2_utils.import_detectron_ops()
  File "/home/chenriquan/projects/densepose/detectron/utils/c2.py", line 33, in import_detectron_ops
    detectron_ops_lib = envu.get_detectron_ops_lib()
  File "/home/chenriquan/projects/densepose/detectron/utils/env.py", line 63, in get_detectron_ops_lib
    ('Detectron ops lib not found; make sure that your Caffe2 '
AssertionError: Detectron ops lib not found; make sure that your Caffe2 version includes Detectron module
解决方法:
网上很多说把pytorch的build加到python环境变量(PYTHONPATH),然后我是用anaconda安装的,!!完全!!没有找到所说的build,然后我尝试了打开报错的文件
vim $DENSEPOSE/detectron/utils/env.py
他报错的原因原来是说没有找到libcaffe2_detectron_ops_gpu.so这个小仙女文件 ,但是按道理make都已经顺利通过了,这个文件应该有的,只是有点害羞藏起来了。于是乎,我就把她扒出来
sudo find / -name libcaffe2_detectron_ops_gpu.so原来我的乖乖在这里
/MY/PATH/.conda/envs/dense2/lib/python2.7/site-packages/torch/
然后我尝试将这个路径加入到环境变量PYTHONPATH,但是发生了不可描述的bug,于是乎,我进入到上述的env.py文件中进行了这样的修改
prefixes = [_CMAKE_INSTALL_PREFIX, sys.prefix, sys.exec_prefix] + sys.path + ['/home/mychocer/anaconda2/lib/python2.7/site-packages/torch/']
ok,过了。
6. make ooooooooooops
还以为我的春天要来了,没想到make个ops才是最大的boss啊!!!!!!!!
平静平静
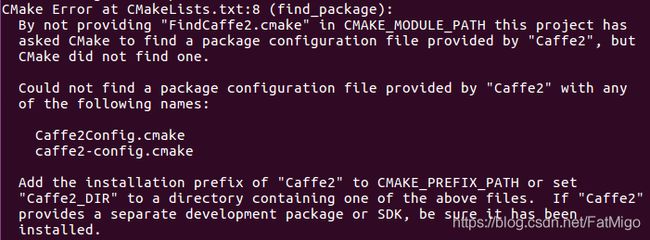
首先一来我就遇到了一个bug
BUG:
解决方法:
根据这篇博客 的提示,但是我并没有找到对应的文件,于是我采用了下面方式
sudo find / -name Caffe2 | grep cmake

export CMAKE_PREFIX_PATH=/home/mychocer/anaconda2/envs/caffe2/share/cmake/Caffe2
find大法就是牛逼,还是帮我找到了
!!!!危机警告!!!!危机警告!!!!!!
接下来遇到的bug折腾了我最久最久了
BUG:
/path/to/pytorch/torch/lib/include/caffe2/proto/caffe2.pb.h:12:2: error: #error This file was generated by a newer version of protoc which is
#error This file was generated by a newer version of protoc which is
^
/path/to/pytorch/torch/lib/include/caffe2/proto/caffe2.pb.h:13:2: error: #error incompatible with your Protocol Buffer headers. Please update
#error incompatible with your Protocol Buffer headers. Please update
^
/path/to/pytorch/torch/lib/include/caffe2/proto/caffe2.pb.h:14:2: error: #error your headers.
#error your headers.
^
解决方法:
按照很多博客的说法,都是说protobuf版本太久,但是我装了好多版本都提示说不行。于是乎,我打算放弃conda安装,采取源码安装。用源码安装过程中,我发现会自己编译protobuf。然后灵机一动,我把安装的protobuf,转移到/usr/local/include/google这个目录下,神奇地,他work了!
虽然有点碰巧,anyway,总之他就是过了。
(后续我对protobuf的安装进行了更深层次地研究,如果上述“侥幸”的手段无法解决你的问题,可以参照博客,或许可以带来启发)
BUG:
In file included from /home/chenriquan/anaconda2/lib/python2.7/site-packages/torch/include/caffe2/utils/math.h:9:0,
                 from /home/chenriquan/anaconda2/lib/python2.7/site-packages/torch/include/caffe2/utils/filler.h:8,
                 from /home/chenriquan/anaconda2/lib/python2.7/site-packages/torch/include/caffe2/core/operator_schema.h:16,
                 from /home/chenriquan/anaconda2/lib/python2.7/site-packages/torch/include/caffe2/core/net.h:17,
                 from /home/chenriquan/anaconda2/lib/python2.7/site-packages/torch/include/caffe2/core/operator.h:16,
                 from /home/chenriquan/projects/densepose/detectron/ops/zero_even_op.h:13,
                 from /home/chenriquan/projects/densepose/detectron/ops/zero_even_op.cc:9:
/home/chenriquan/anaconda2/lib/python2.7/site-packages/torch/include/caffe2/utils/cblas.h:8:23: fatal error: mkl_cblas.h: No such file or directory
 #include
                       ^
解决方法:
下载mkl,然后加入到环境变量CPATH中
export CPATH=/opt/intel/compilers_and_libraries_2019.2.187/linux/mkl/include/:$CPATHBUG:
In file included from /home/chenriquan/anaconda2/lib/python2.7/site-packages/torch/include/caffe2/utils/filler.h:8:0,
                 from /home/chenriquan/anaconda2/lib/python2.7/site-packages/torch/include/caffe2/core/operator_schema.h:16,
                 from /home/chenriquan/anaconda2/lib/python2.7/site-packages/torch/include/caffe2/core/net.h:17,
                 from /home/chenriquan/anaconda2/lib/python2.7/site-packages/torch/include/caffe2/core/operator.h:16,
                 from /home/chenriquan/projects/densepose/detectron/ops/pool_points_interp.h:15,
                 from /home/chenriquan/projects/densepose/detectron/ops/pool_points_interp.cc:10:
/home/chenriquan/anaconda2/lib/python2.7/site-packages/torch/include/caffe2/utils/math.h:18:41: fatal error: caffe2/utils/math/broadcast.h: No such file or directory
 #include "caffe2/utils/math/broadcast.h"
                                         ^
compilation terminated.
解决方法:
我进去路径看了一下,发现真没有这个broadcast.h文件,但是github上的pytorch/caffe2/utils里是有这些文件的。我的天!尼玛!conda是下载的caffe2居然说没找到自己的文件,尼玛,你这种行为跟那种把丈母娘落在服务区自己和媳妇高速私奔的行为有什么区别!
于是乎,神奇的ctrl-c-ctrl-v大法拍上用场,我把源码下下来,然后把这些文件copy到conda对应的路径上,他就work了。
ok。
In file included from /home/chenriquan/anaconda2/lib/python2.7/site-packages/torch/include/caffe2/core/net.h:19:0,
                 from /home/chenriquan/anaconda2/lib/python2.7/site-packages/torch/include/caffe2/core/operator.h:16,
                 from /home/chenriquan/projects/densepose/detectron/ops/pool_points_interp.h:15,
                 from /home/chenriquan/projects/densepose/detectron/ops/pool_points_interp.cc:10:
/home/chenriquan/anaconda2/lib/python2.7/site-packages/torch/include/caffe2/core/workspace.h:19:48: fatal error: caffe2/utils/threadpool/ThreadPool.h: No such file or directory
 #include "caffe2/utils/threadpool/ThreadPool.h"
                                                ^
compilation terminated.
之后再make就成功了。
7. 测试
python $DENSEPOSE/detectron/tests/test_zero_even_op.py
BUG:
OSError: /path/to/densepose/build/libcaffe2_detectron_custom_ops_gpu.so: undefined symbol: _ZN6google8protobuf8internal9ArenaImpl28AllocateAlignedAndAddCleanupEmPFvPvE解决方法:
修改CMakeLists.txt
参照博客
8. 运行densepose脚本
python tools/infer_simple.py --cfg configs/DensePose_ResNet50_FPN_s1x-e2e.yaml --output-dir DensePoseData/infer_out/ --image-ext jpg --wts DensePose_ResNet50_FPN_s1x-e2e.pkl DensePoseData/demo_data/demo_im.jpgBUG:
Traceback (most recent call last):
  File "tools/infer_simple.py", line 140, in
    main(args)
  File "tools/infer_simple.py", line 91, in main
    model = infer_engine.initialize_model_from_cfg(args.weights)
  File "/home/dm/chenriquan/DensePose/detectron/core/test_engine.py", line 336, in initialize_model_from_cfg
    model, weights_file, gpu_id=gpu_id,
  File "/home/dm/chenriquan/DensePose/detectron/utils/net.py", line 56, in initialize_gpu_from_weights_file
    saved_cfg = load_cfg(src_blobs['cfg'])
  File "/home/dm/chenriquan/DensePose/detectron/core/config.py", line 1167, in load_cfg
    return yaml.load(cfg_to_load)
  File "/home/dm/anaconda3/envs/densepose/lib/python2.7/site-packages/yaml/__init__.py", line 114, in load
    return loader.get_single_data()
  File "/home/dm/anaconda3/envs/densepose/lib/python2.7/site-packages/yaml/constructor.py", line 45, in get_single_data
    return self.construct_document(node)
  File "/home/dm/anaconda3/envs/densepose/lib/python2.7/site-packages/yaml/constructor.py", line 49, in construct_document
    data = self.construct_object(node)
  File "/home/dm/anaconda3/envs/densepose/lib/python2.7/site-packages/yaml/constructor.py", line 96, in construct_object
    data = constructor(self, tag_suffix, node)
  File "/home/dm/anaconda3/envs/densepose/lib/python2.7/site-packages/yaml/constructor.py", line 628, in construct_python_object_new
    return self.construct_python_object_apply(suffix, node, newobj=True)
  File "/home/dm/anaconda3/envs/densepose/lib/python2.7/site-packages/yaml/constructor.py", line 611, in construct_python_object_apply
    value = self.construct_mapping(node, deep=True)
  File "/home/dm/anaconda3/envs/densepose/lib/python2.7/site-packages/yaml/constructor.py", line 214, in construct_mapping
    return BaseConstructor.construct_mapping(self, node, deep=deep)
  File "/home/dm/anaconda3/envs/densepose/lib/python2.7/site-packages/yaml/constructor.py", line 139, in construct_mapping
    value = self.construct_object(value_node, deep=deep)
  File "/home/dm/anaconda3/envs/densepose/lib/python2.7/site-packages/yaml/constructor.py", line 101, in construct_object
    for dummy in generator:
  File "/home/dm/anaconda3/envs/densepose/lib/python2.7/site-packages/yaml/constructor.py", line 404, in construct_yaml_map
    value = self.construct_mapping(node)
  File "/home/dm/anaconda3/envs/densepose/lib/python2.7/site-packages/yaml/constructor.py", line 214, in construct_mapping
    return BaseConstructor.construct_mapping(self, node, deep=deep)
  File "/home/dm/anaconda3/envs/densepose/lib/python2.7/site-packages/yaml/constructor.py", line 139, in construct_mapping
    value = self.construct_object(value_node, deep=deep)
  File "/home/dm/anaconda3/envs/densepose/lib/python2.7/site-packages/yaml/constructor.py", line 96, in construct_object
    data = constructor(self, tag_suffix, node)
  File "/home/dm/anaconda3/envs/densepose/lib/python2.7/site-packages/yaml/constructor.py", line 617, in construct_python_object_apply
    instance = self.make_python_instance(suffix, node, args, kwds, newobj)
  File "/home/dm/anaconda3/envs/densepose/lib/python2.7/site-packages/yaml/constructor.py", line 558, in make_python_instance
    node.start_mark)
yaml.constructor.ConstructorError: while constructing a Python instance
expected a class, but found
  in "", line 3, column 20:
      BBOX_XFORM_CLIP: !!python/object/apply:numpy.core ...
解决方法:
将python的pyyaml包降到3.12版本
pip install pyyaml==3.129. 大功告成!尽情happy!
不过protobuf的安装依然有点问题,这种做法比较侥幸,我之后会继续摸索一个比较可靠的方法。
10. 心得
以前呢,遇到很多bug,第一时间是找google,然后都希望能找到一步到位的方法,最好是一句代码就能解决。但是这次安装遇到很多问题,都没有办法直接解决。但是如果耐心一点,分析一下别人是怎么去分析这些bug的,然后可以适当地阅读源码,不一定说肯定能解决某个bug,但是对Linux这个操作系统、很多编译的门道(cmake、make)都能有更深的认识。
================================================================================================
上述是我在本地机器安装densepose过程遇到的bug,我尝试在新的机器装densepose,也发现了一些新的bug
BUG:
解决方法:
这个问题仿佛是因为cmake的语法不支持,所以可能是cmake版本的问题,于是我下载了3.5版本的cmake,下下来直接解压即可,然后给PATH环境变量加一个/MY/PATH/TO/CMAKE/bin路径即可
ok
================================================================================================

