redis缓存服务器(nginx+tomcat+redis+mysql实现session会话共享)
redis缓存服务器(nginx+tomcat+redis+mysql实现session会话共享)
环境:
192.168.24.128 Nginx
192.168.24.129 Tomcat1
192.168.24.130 Tomcat2
192.168.24.131 redis
192.168.24.132 MySQL
nginx安装配置
安装zlib-devel、pcre-devel等依赖包
[root@nginx ~]# yum -y install gcc gcc-c++ make libtool zlib zlib-devel pcre pcre-devel openssl openssl-devel
[root@nginx ~]# useradd -s /sbin/nologin www
[root@nginx src]# wget http://nginx.org/download/nginx-1.14.0.tar.gz
[root@nginx src]# tar zxf nginx-1.14.0.tar.gz
[root@nginx src]# cd nginx-1.14.0/
[root@nginx nginx-1.14.0]# ./configure --prefix=/usr/local/nginx1.10 --user=www --group=www --with-http_stub_status_module --with-http_realip_module --with-http_ssl_module --with-http_gzip_static_module --with-pcre --with-http_flv_module && make && make install

优化nginx程序的执行路径
[root@nginx nginx-1.14.0]# ln -s /usr/local/nginx1.10/sbin/nginx /usr/local/sbin/
[root@nginx nginx-1.14.0]# nginx -t
nginx: the configuration file /usr/local/nginx1.10/conf/nginx.conf syntax is ok
nginx: configuration file /usr/local/nginx1.10/conf/nginx.conf test is successful

配置nginx反向代理:反向代理+负载均衡+健康探测,nginx.conf文件内容:

[root@nginx conf]# cat nginx.conf
user www www;
worker_processes 4;
worker_cpu_affinity 0001 0010 0100 1000;
error_log logs/error.log;
#error_log logs/error.log notice;
#error_log logs/error.log info;
worker_rlimit_nofile 10240;
pid logs/nginx.pid;
events {
use epoll;
worker_connections 4096;
}
http {
include mime.types;
default_type application/octet-stream;
log_format main '$remote_addr - $remote_user [$time_local] "$request" '
'$status $body_bytes_sent "$http_referer" '
'"$http_user_agent" "$http_x_forwarded_for"';
access_log logs/access.log main;
server_tokens off;
sendfile on;
tcp_nopush on;
#keepalive_timeout 0;
keepalive_timeout 65;
#Compression Settings
gzip on;
gzip_comp_level 6;
gzip_http_version 1.1;
gzip_proxied any;
gzip_min_length 1k;
gzip_buffers 16 8k;
gzip_types text/plain text/css text/javascript application/json application/javascript
application/x-javascript application/xml;
gzip_vary on;
#end gzip
# http_proxy Settings
client_max_body_size 10m;
client_body_buffer_size 128k;
proxy_connect_timeout 75;
proxy_send_timeout 75;
proxy_read_timeout 75;
proxy_buffer_size 4k;
proxy_buffers 4 32k;
proxy_busy_buffers_size 64k;
proxy_temp_file_write_size 64k;
#load balance Settings
upstream backend_tomcat {
server 192.168.24.129:8080 weight=1 max_fails=2 fail_timeout=10s;
server 192.168.24.130:8080 weight=1 max_fails=2 fail_timeout=10s;
}
#virtual host Settings
server {
listen 80;
server_name www.benet.com;
charset utf-8;
location / {
root html;
index index.jsp index.html index.htm;
}
location ~* \.(jsp|do)$ {
proxy_pass http://backend_tomcat;
proxy_redirect off;
proxy_set_header Host $host;
proxy_set_header X-Real-IP $remote_addr;
proxy_set_header X-Forwarded-For $proxy_add_x_forwarded_for;
proxy_next_upstream error timeout invalid_header http_500 http_502 http_503 http_504;
}
location /nginx_status {
stub_status on;
access_log off;
allow 192.168.24.0/24;
deny all;
}
}
[root@nginx conf]# nginx -t
nginx: the configuration file /usr/local/nginx1.10/conf/nginx.conf syntax is ok
nginx: configuration file /usr/local/nginx1.10/conf/nginx.conf test is successful
[root@nginx conf]# nginx安装部署tomcat应用程序服务器
在tomcat-1和tomcat-2节点上安装JDK
[root@tomcat1 src]# tar zxf jdk-8u171-linux-x64.tar.gz
[root@tomcat1 src]# mv jdk1.8.0_171/ /usr/local/java
在/etc/profile文件中添加内容如下:
export JAVA_HOME=/usr/local/java
export PATH=$JAVA_HOME/bin:$PATH
通过source命令执行profile文件,使其生效。
[root@tomcat1 src]# source /etc/profile
[root@tomcat1 src]# echo $PATH
/usr/local/java/bin:/usr/local/sbin:/usr/local/bin:/usr/sbin:/usr/bin:/root/bin
按照相同方法在tomcat-2也安装JDK
分别在 在tomcat-1和tomcat-2节点 运行java -version命令查看java版本是否和之前安装的一致。
[root@tomcat1 src]# java -version
java version "1.8.0_171"
Java(TM) SE Runtime Environment (build 1.8.0_171-b11)
Java HotSpot(TM) 64-Bit Server VM (build 25.171-b11, mixed mode)
至此java环境已经配置完成在tomcat-1和tomcat-2节点 安装配置tomcat
[root@tomcat1 src]# tar zxf apache-tomcat-7.0.86.tar.gz
[root@tomcat1 src]# mv apache-tomcat-7.0.86 /usr/local/tomcat7
配置tomcat环境变量
[root@tomcat1 src]# vim /etc/profile
export JAVA_HOME=/usr/local/java
export CATALINA_HOME=/usr/local/tomcat7
export PATH=$JAVA_HOME/bin:$CATALINA_HOME/bin:$PATH
[root@tomcat1 src]# source /etc/profile
[root@tomcat1 src]# echo $PATH
/usr/local/java/bin:/usr/local/tomcat7/bin:/usr/local/java/bin:/usr/local/sbin:/usr/local/bin:/usr/sbin:/usr/bin:/root/bin
查看tomcat的版本信息
[root@tomcat1 src]# catalina.sh version
Using CATALINA_BASE:   /usr/local/tomcat7
Using CATALINA_HOME:   /usr/local/tomcat7
Using CATALINA_TMPDIR: /usr/local/tomcat7/temp
Using JRE_HOME:        /usr/local/java
Using CLASSPATH:       /usr/local/tomcat7/bin/bootstrap.jar:/usr/local/tomcat7/bin/tomcat-juli.jar
Server version: Apache Tomcat/7.0.86
Server built:   Apr 9 2018 20:16:54 UTC
Server number:  7.0.86.0
OS Name:        Linux
OS Version:     3.10.0-327.el7.x86_64
Architecture:   amd64
JVM Version:    1.8.0_171-b11
JVM Vendor:     Oracle Corporation

启动tomcat
[root@tomcat1 src]# startup.sh
Using CATALINA_BASE:   /usr/local/tomcat7
Using CATALINA_HOME:   /usr/local/tomcat7
Using CATALINA_TMPDIR: /usr/local/tomcat7/temp
Using JRE_HOME:        /usr/local/java
Using CLASSPATH:       /usr/local/tomcat7/bin/bootstrap.jar:/usr/local/tomcat7/bin/tomcat-juli.jar
Tomcat started.

Tomcat默认运行在8080端口,运行netstat命令查看8080端口监听的信息
[root@tomcat1 src]# ss -anpt | grep java
LISTEN     0      100         :::8009                    :::*                   users:(("java",pid=4016,fd=46))
LISTEN 0 100 :::8080 :::* users:(("java",pid=4016,fd=45))按照相同方法在tomcat-2也安装
打开浏览器分别对tomcat-1和tomcat-2访问测试
如果想关闭tomcat则运行/usr/local/tomcat7/bin/shutdown.sh命令
好了,大家可以看到访成功。说明我们的tomcat安装完成,下面我们来 修改配置文件
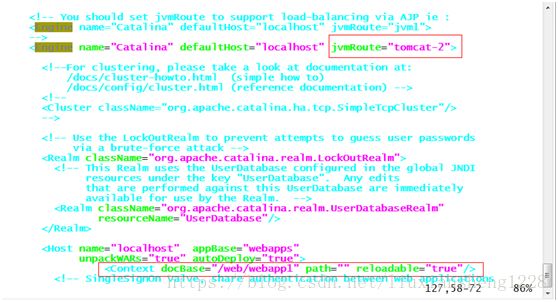
[root@tomcat1 src]# vim /usr/local/tomcat7/conf/server.xml
设置默认虚拟主机,并增加jvmRoute
加上括号内的
增加文档目录与测试文件
[root@tomcat1 src]# mkdir -p /web/webapp1
[root@tomcat1 src]# cd /web/webapp1
[root@tomcat1 webapp1]# vim index.jsp
<%@page language="java" import="java.util.*" pageEncoding="UTF-8"%>


tomcat-1	#标红的地方在Tomcat2上改一下不然后面看不出效果


Session serviced by tomcat


Session ID
<%=session.getId() %>
<% session.setAttribute("abc","abc");%>


Created on
<%= session.getCreationTime() %>
停止tomcat运行,检查配置文件并启动tomcat
[root@tomcat1 conf]# shutdown.sh
[root@tomcat1 conf]# ss -anpt | grep java
[root@tomcat2 webapp1]# catalina.sh configtest
Using CATALINA_BASE:   /usr/local/tomcat7
Using CATALINA_HOME:   /usr/local/tomcat7
Using CATALINA_TMPDIR: /usr/local/tomcat7/temp
Using JRE_HOME:        /usr/local/java
Using CLASSPATH:       /usr/local/tomcat7/bin/bootstrap.jar:/usr/local/tomcat7/bin/tomcat-juli.jar
May 14, 2018 7:21:47 PM org.apache.catalina.startup.VersionLoggerListener log
INFO: Server version:        Apache Tomcat/7.0.86
May 14, 2018 7:21:47 PM org.apache.catalina.startup.VersionLoggerListener log
INFO: Server built:          Apr 9 2018 20:16:54 UTC
May 14, 2018 7:21:47 PM org.apache.catalina.startup.VersionLoggerListener log
INFO: Server number:         7.0.86.0
May 14, 2018 7:21:47 PM org.apache.catalina.startup.VersionLoggerListener log
INFO: OS Name:               Linux
May 14, 2018 7:21:47 PM org.apache.catalina.startup.VersionLoggerListener log
INFO: OS Version:            3.10.0-327.el7.x86_64
May 14, 2018 7:21:47 PM org.apache.catalina.startup.VersionLoggerListener log
INFO: Architecture:          amd64
May 14, 2018 7:21:47 PM org.apache.catalina.startup.VersionLoggerListener log
INFO: Java Home:             /usr/local/java/jre
May 14, 2018 7:21:47 PM org.apache.catalina.startup.VersionLoggerListener log
INFO: JVM Version:           1.8.0_171-b11
May 14, 2018 7:21:47 PM org.apache.catalina.startup.VersionLoggerListener log
INFO: JVM Vendor:            Oracle Corporation
May 14, 2018 7:21:47 PM org.apache.catalina.startup.VersionLoggerListener log
INFO: CATALINA_BASE:         /usr/local/tomcat7
May 14, 2018 7:21:47 PM org.apache.catalina.startup.VersionLoggerListener log
INFO: CATALINA_HOME:         /usr/local/tomcat7
May 14, 2018 7:21:47 PM org.apache.catalina.startup.VersionLoggerListener log
INFO: Command line argument: -Djava.util.logging.manager=org.apache.juli.ClassLoaderLogManager
May 14, 2018 7:21:47 PM org.apache.catalina.startup.VersionLoggerListener log
INFO: Command line argument: -Djdk.tls.ephemeralDHKeySize=2048
May 14, 2018 7:21:47 PM org.apache.catalina.startup.VersionLoggerListener log
INFO: Command line argument: -Dignore.endorsed.dirs=
May 14, 2018 7:21:47 PM org.apache.catalina.startup.VersionLoggerListener log
INFO: Command line argument: -Dcatalina.base=/usr/local/tomcat7
May 14, 2018 7:21:47 PM org.apache.catalina.startup.VersionLoggerListener log
INFO: Command line argument: -Dcatalina.home=/usr/local/tomcat7
May 14, 2018 7:21:47 PM org.apache.catalina.startup.VersionLoggerListener log
INFO: Command line argument: -Djava.io.tmpdir=/usr/local/tomcat7/temp
May 14, 2018 7:21:47 PM org.apache.catalina.core.AprLifecycleListener lifecycleEvent
INFO: The APR based Apache Tomcat Native library which allows optimal performance in production environments was not found on the java.library.path: /usr/java/packages/lib/amd64:/usr/lib64:/lib64:/lib:/usr/lib
May 14, 2018 7:21:47 PM org.apache.coyote.AbstractProtocol init
INFO: Initializing ProtocolHandler ["http-bio-8080"]
May 14, 2018 7:21:47 PM org.apache.coyote.AbstractProtocol init
INFO: Initializing ProtocolHandler ["ajp-bio-8009"]
May 14, 2018 7:21:47 PM org.apache.catalina.startup.Catalina load
INFO: Initialization processed in 680 ms
[root@tomcat1 conf]# startup.sh
Using CATALINA_BASE:   /usr/local/tomcat7
Using CATALINA_HOME:   /usr/local/tomcat7
Using CATALINA_TMPDIR: /usr/local/tomcat7/temp
Using JRE_HOME:        /usr/local/java
Using CLASSPATH:       /usr/local/tomcat7/bin/bootstrap.jar:/usr/local/tomcat7/bin/tomcat-juli.jar
Tomcat started.
[root@tomcat1 conf]# ss -anpt | grep java
LISTEN     0      100         :::8009                    :::*                   users:(("java",pid=5169,fd=46))
LISTEN     0      100         :::8080                    :::*                   users:(("java",pid=5169,fd=45))
LISTEN 0 1 ::ffff:127.0.0.1:8005 :::* users:(("java",pid=4926,fd=49))Tomcat-2节点与tomcat-1节点配置基本类似,只是jvmRoute不同,另外为了区分由哪个节点提供访问,测试页标题也不同(生产环境两个tomcat服务器提供的网页内容是相同的)。其他的配置都相同。
这个是Tomcat2的server.xml文件
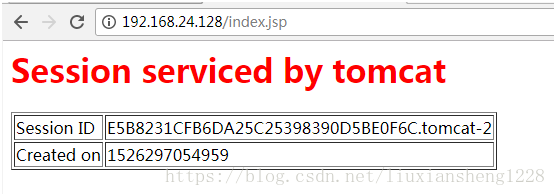
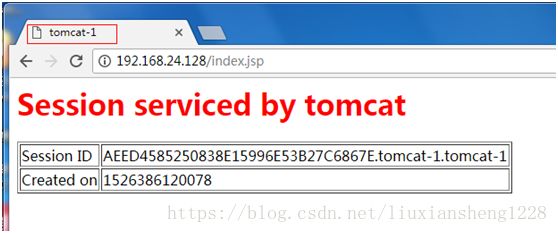
用浏览器访问nginx主机,验证负载均衡
第一次访问的结果
验证健康检查的方法可以关掉一台tomcat主机,用客户端浏览器测试访问。
从上面的结果能看出两次访问,nginx把访问请求分别分发给了后端的tomcat-1和tomcat-2,客户端的访问请求实现了负载均衡,但sessionid并不一样。 所以,到这里我们准备工作就全部完成了,下面我们来配置tomcat通过redis实现会话保持。
安装redis
下载redis源码,并进行相关操作,如下:
[root@redis src]# tar zxf redis-3.2.3.tar.gz
[root@redis src]# cd redis-3.2.3/
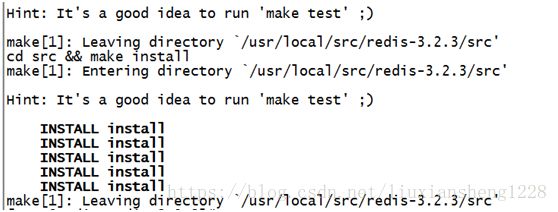
[root@redis redis-3.2.3]# make && make install通过上图,我们可以很容易的看出,redis安装到
/usr/local,/usr/local/bin,/usr/local/share,/usr/local/include,/usr/local/lib,/usr/local/share/man目录下。
然后再切换到utils目录下,执行redis初始化本install_server.sh,如下:
[root@redis redis-3.2.3]# cd utils/
[root@redis utils]# ./install_server.sh
Welcome to the redis service installer
This script will help you easily set up a running redis server

Please select the redis port for this instance: [6379]
Selecting default: 6379
Please select the redis config file name [/etc/redis/6379.conf]
Selected default - /etc/redis/6379.conf
Please select the redis log file name [/var/log/redis_6379.log]
Selected default - /var/log/redis_6379.log
Please select the data directory for this instance [/var/lib/redis/6379]
Selected default - /var/lib/redis/6379
Please select the redis executable path [/usr/local/bin/redis-server]
Selected config:
Port           : 6379
Config file    : /etc/redis/6379.conf
Log file       : /var/log/redis_6379.log
Data dir       : /var/lib/redis/6379
Executable     : /usr/local/bin/redis-server
Cli Executable : /usr/local/bin/redis-cli
Is this ok? Then press ENTER to go on or Ctrl-C to abort.
Copied /tmp/6379.conf => /etc/init.d/redis_6379
Installing service...
Successfully added to chkconfig!
Successfully added to runlevels 345!
Starting Redis server...
Installation successful!通过上面的安装过程,我们可以看出redis初始化后redis配置文件为/etc/redis/6379.conf,日志文件为/var/log/redis_6379.log,数据文件dump.rdb存放到/var/lib/redis/6379目录下,启动脚本为/etc/init.d/redis_6379。
现在来查看redis版本使用redis-cli –version命令,如下:
[root@redis utils]# redis-cli --version
redis-cli 3.2.3
通过显示结果,我们可以看到redis版本是3.2.3。
到此源码方式安装redis就介绍完毕。
redis安装完毕之后,我们再来配置redis
设置redis监听的地址,添加监听redis主机的ip
考虑到安全性,我们需要启用redis的密码验证功能requirepass参数
最终redis配置文件如下:
[root@redis utils]# grep -Ev '^#|^$' /etc/redis/6379.conf  (红色为修改部分)
bind 127.0.0.1 192.168.24.131
protected-mode yes
port 6379
tcp-backlog 511
timeout 0
tcp-keepalive 300
daemonize yes
supervised no
pidfile /var/run/redis_6379.pid
loglevel notice
logfile /var/log/redis_6379.log
databases 16
save 900 1
save 300 10
save 60 10000
stop-writes-on-bgsave-error yes
rdbcompression yes
rdbchecksum yes
dbfilename dump.rdb
dir /var/lib/redis/6379
slave-serve-stale-data yes
slave-read-only yes
repl-diskless-sync no
repl-diskless-sync-delay 5
repl-disable-tcp-nodelay no
slave-priority 100
requirepass pwd@123
appendonly no
appendfilename "appendonly.aof"
appendfsync everysec
no-appendfsync-on-rewrite no
auto-aof-rewrite-percentage 100
auto-aof-rewrite-min-size 64mb
aof-load-truncated yes
lua-time-limit 5000
slowlog-log-slower-than 10000
slowlog-max-len 128
latency-monitor-threshold 0
notify-keyspace-events ""
hash-max-ziplist-entries 512
hash-max-ziplist-value 64
list-max-ziplist-size -2
list-compress-depth 0
set-max-intset-entries 512
zset-max-ziplist-entries 128
zset-max-ziplist-value 64
hll-sparse-max-bytes 3000
activerehashing yes
client-output-buffer-limit normal 0 0 0
client-output-buffer-limit slave 256mb 64mb 60
client-output-buffer-limit pubsub 32mb 8mb 60
hz 10
aof-rewrite-incremental-fsync yes

[root@redis utils]# service redis_6379 start
Starting Redis server...
[root@redis utils]# ss -anpt | grep redis
LISTEN 0 128 127.0.0.1:6379 *:* users:(("redis-server",pid=42857,fd=4))redis配置文件配置完毕后,我们来启动redis并进行简单的操作。如下:
[root@redis utils]# redis-cli -h 192.168.24.131 -p 6379 -a pwd@123
192.168.24.131:6379> set name list
OK
192.168.24.131:6379> get name
"list"
192.168.24.131:6379>
说明:
关于redis-cli -h 192.168.24.131 -p 6379 -a pwd@123的参数解释
这条命令是说要连接redis服务器,IP是192.168.24.131,端口是6379,密码是pwd@123。
keys *是查看redis所有的键值对。
set namelisi添加一个键值name,内容为lisi。
get name查看name这个键值的内容。
redis的命令使用暂时我们就介绍这么多
配置tomcatsession redis同步
下载tomcat-redis-session-manager相应的jar包,主要有三个:
tomcat-redis-session-manage-tomcat7.jar
jedis-2.5.2.jar
commons-pool2-2.2.jar
下载完成后拷贝到$TOMCAT_HOME/lib中
cp tomcat-redis-session-manage-tomcat7.jar jedis-2.5.2.jarcommons-pool2-2.2.jar /usr/local/tomcat7/lib/
修改tomcat的context.xml:
[root@tomcat1 src]# cat /usr/local/tomcat7/conf/context.xml


    WEB-INF/web.xml
重启tomcat服务
说明:
maxInactiveInterval="60" : session的失效时间
[root@tomcat1 src]# shutdown.sh
Using CATALINA_BASE:   /usr/local/tomcat7
Using CATALINA_HOME:   /usr/local/tomcat7
Using CATALINA_TMPDIR: /usr/local/tomcat7/temp
Using JRE_HOME:        /usr/local/java
Using CLASSPATH:       /usr/local/tomcat7/bin/bootstrap.jar:/usr/local/tomcat7/bin/tomcat-juli.jar

[root@tomcat1 src]# startup.sh
Using CATALINA_BASE:   /usr/local/tomcat7
Using CATALINA_HOME:   /usr/local/tomcat7
Using CATALINA_TMPDIR: /usr/local/tomcat7/temp
Using JRE_HOME:        /usr/local/java
Using CLASSPATH:       /usr/local/tomcat7/bin/bootstrap.jar:/usr/local/tomcat7/bin/tomcat-juli.jar
Tomcat started.tomcat-2执行和tomcat-1相同的操作
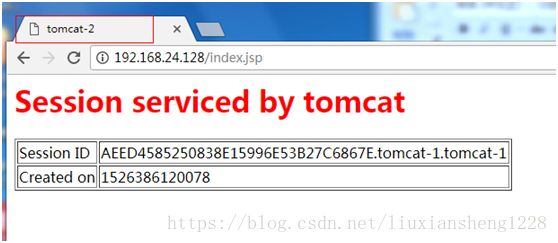
通过浏览器访问http://192.168.24.128/index.jsp测试页
刷新页面
可以看出,分别访问了不同的tomcat,但是得到的session却是相同的,说明达到了集群的目的。
注:从Tomcat6开始默认开启了Session持久化设置,测试时可以关闭本地Session持久化,其实也很简单,在Tomcat的conf目录下的context.xml文件中,取消注释下面那段配置即可:
修改后:
重启tomcat服务
查看redis:
[root@redis utils]# redis-cli -h 192.168.24.131 -p 6379 -a pwd@123
192.168.24.131:6379> keys *
1) "E436F8342FE0C1059D2B870946372B15.tomcat-2.tomcat-2"
2) "AEED4585250838E15996E53B27C6867E.tomcat-1.tomcat-1"
3) "name"tomcat连接数据库
192.168.24.132 作为mysql数据库服务器
[root@mysql src]# mysql -uroot -p123
mysql> grant all on *.* to javauser@'192.168.24.%' identified by 'javapasswd';
Query OK, 0 rows affected, 1 warning (0.00 sec)

mysql> create database javatest;
Query OK, 1 row affected (0.00 sec)

mysql> use javatest;
Database changed
mysql> create table testdata(id int not null auto_increment primary key,foo varchar(25),bar int);
Query OK, 0 rows affected (0.01 sec)

插入些数据
mysql> insert into testdata(foo,bar) values ('hello','123456'),('ok','654321');
Query OK, 2 rows affected (0.01 sec)
Records: 2  Duplicates: 0  Warnings: 0

mysql> select * from testdata;
+----+-------+--------+
| id | foo   | bar    |
+----+-------+--------+
|  1 | hello | 123456 |
|  2 | ok    | 654321 |
+----+-------+--------+
2 rows in set (0.00 sec)配置tomcat服务器连接mysql数据库
下载mysql-connector-java-5.1.22-bin.jar并复制到$CATALINA_HOME/lib目录下
[root@tomcat1 src]# cp mysql-connector-java-5.1.22-bin.jar /usr/local/tomcat7/lib/
[root@tomcat1 src]# ls /usr/local/tomcat7/lib/mysql-connector-java-5.1.22-bin.jar
/usr/local/tomcat7/lib/mysql-connector-java-5.1.22-bin.jar

[root@tomcat1 src]# vim /usr/local/tomcat7/conf/context.xml
在中添加如下内容:
    javauser" password="javapass" driverClassName="com.mysql.jdbc.Driver"
    url="jdbc:mysql://192.168.24.132:3306/javatest"/>

[root@tomcat1 src]# mkdir /web/webapp1/WEB-INF
[root@tomcat1 src]# vim /web/webapp1/WEB-INF/web.xml


MySQL Test App

DB Connection
jdbc/TestDB
javax.sql.DataSource
Container


[root@tomcat1 src]# shutdown.sh
[root@tomcat1 src]# startup.sh tomcat-2进行和tomcat-1相同的操用
[root@tomcat1 src]# vim /web/webapp1/test.jsp
<%@ page language="java" import="java.sql.*" pageEncoding="GB2312"%>


MySQL


connect MySQL

<%
String driverClass="com.mysql.jdbc.Driver";
String url="jdbc:mysql://192.168.24.132:3306/javatest";
String username = "javauser";
String password = "javapasswd";
Class.forName(driverClass);
Connection conn=DriverManager.getConnection(url, username, password);
Statement stmt=conn.createStatement();
ResultSet rs = stmt.executeQuery("select * from testdata");
while(rs.next()){
out.println("
foo:"+rs.getString(2)+"bar:"+rs.getString(3));
}
rs.close();
stmt.close();
conn.close();
%>
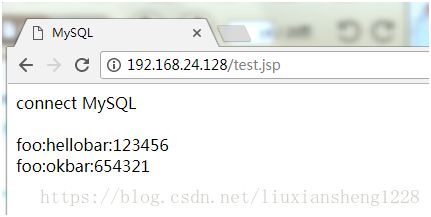
通过浏览器访问http://192.168.24.128/test.jsp测试页


