Android简单笔记本解析
Android简单笔记本解析(期中作业)
1.成品展示
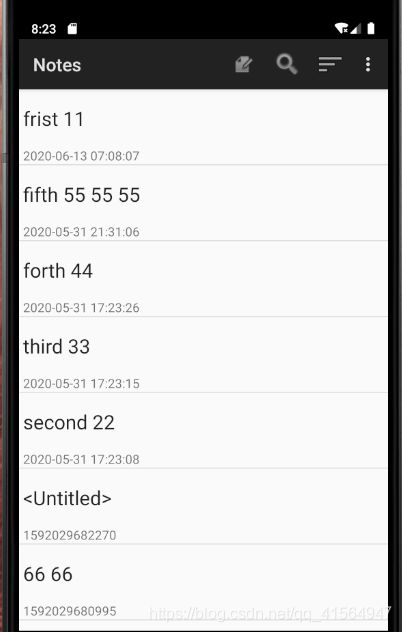
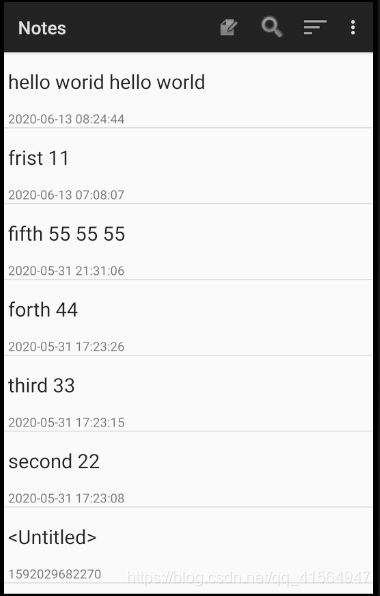
1.1初始界面展示
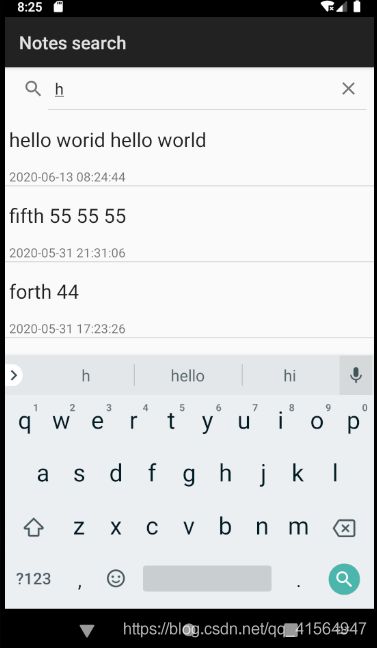
2.搜索功能(根据标题查询)
搜索图标(list_options_menu.xml)
-
搜索的声明(AndroidManifest.xml)
添加搜索(NoteList–onOptionsItemSelected方法)
case R.id.menu_search:
       Intent intent = new Intent();
       intent.setClass(NotesList.this,NoteSearch.class);
       NotesList.this.startActivity(intent);
       return true;
布局搜索页面(note_search_list.xml)
SearchView和ListView分别用来实现搜索功能和显示搜索出来的条目
查询按钮的监听器、查询列表的监听器以及查询界面的初始化(NoteSearch)
public class NoteSearch extends ListActivity implements
SearchView.OnQueryTextListener {

    private static final String[] PROJECTION = new String[] {

            NotePad.Notes._ID, // 0

            NotePad.Notes.COLUMN_NAME_TITLE, // 1

            //扩展 显示时间 颜色

            NotePad.Notes.COLUMN_NAME_MODIFICATION_DATE // 2

            //NotePad.Notes.COLUMN_NAME_BACK_COLOR

    };

    @Override

    protected void onCreate(Bundle savedInstanceState) {

        super.onCreate(savedInstanceState);

        setContentView(R.layout.note_search_list);

        Intent intent = getIntent();

        if (intent.getData()
== null) {

            intent.setData(NotePad.Notes.CONTENT_URI);

        }

        SearchView searchview =
(SearchView)findViewById(R.id.search_view);

        //为查询文本框注册监听器

        searchview.setOnQueryTextListener(NoteSearch.this);

    }

    @Override

    public boolean onQueryTextSubmit(String query) {

        return false;

    }

    @Override

    public boolean onQueryTextChange(String newText) {

        String selection = NotePad.Notes.COLUMN_NAME_TITLE + " Like ? ";

        String[] selectionArgs = { "%"+newText+"%" };

        Cursor cursor = managedQuery(


getIntent().getData(),                                         PROJECTION,


 selection,                                        selectionArgs,                                    NotePad.Notes.DEFAULT_SORT_ORDER
        );

        String[] dataColumns = {
NotePad.Notes.COLUMN_NAME_TITLE
,  NotePad.Notes.COLUMN_NAME_MODIFICATION_DATE };

        int[]
viewIDs = { android.R.id.text1
, R.id.text1_time };

        SimpleCursorAdapter adapter = new SimpleCursorAdapter(

                this,

                R.layout.noteslist_item,

                cursor,

                dataColumns,

                viewIDs

        );

        setListAdapter(adapter);

        return true;

    }

    @Override

    protected void onListItemClick(ListView l, View v, int position, long
id) {

               Uri uri = ContentUris.withAppendedId(getIntent().getData(),
id);

              String action = getIntent().getAction();

             if (Intent.ACTION_PICK.equals(action)
|| Intent.ACTION_GET_CONTENT.equals(action)) {

                        setResult(RESULT_OK, new Intent().setData(uri));

        } else {

                                  startActivity(new Intent(Intent.ACTION_EDIT, uri));

        }

    }

}
3.时间戳的实现
在文本下方显示时间
文本标题(noteslist_item.xml)
我们要在标题下方添加时间,那么可以再写一个时间的TextView,把标题和时间的TextView放入垂直线性布局内就好了
在数据库中存放时间(NotePadProvider)
public void onCreate(SQLiteDatabase db) {
    db.execSQL("CREATE TABLE " + NotePad.Notes.TABLE_NAME + " ("
            + NotePad.Notes._ID + " INTEGER PRIMARY KEY,"
            + NotePad.Notes.COLUMN_NAME_TITLE + " TEXT,"
            + NotePad.Notes.COLUMN_NAME_NOTE + " TEXT,"
            + NotePad.Notes.COLUMN_NAME_CREATE_DATE + " INTEGER,"
            + NotePad.Notes.COLUMN_NAME_MODIFICATION_DATE + " INTEGER"
            + ");");
}
通过Cursor从数据库中读取出
Cursor cursor = managedQuery(
            getIntent().getData(),            // Use the default content URI for the provider.
            PROJECTION,                       // Return the note ID and title for each note.
            null,                             // No where clause, return all records.
            null,                             // No where clause, therefore no where column values.
            NotePad.Notes.DEFAULT_SORT_ORDER  // Use the default sort order.
        );
通过SimpleCursorAdapter装填
String[] dataColumns = { NotePad.Notes.COLUMN_NAME_TITLE } ;
int[] viewIDs = { android.R.id.text1 };
SimpleCursorAdapter adapter
    = new SimpleCursorAdapter(
            this, // The Context for the ListView
            R.layout.noteslist_item, // Points to the XML for a list item
            cursor,   // The cursor to get items from
            dataColumns,
            viewIDs
    );
// Sets the ListView's adapter to be the cursor adapter that was just created.
setListAdapter(adapter);
写到这里差不多就完成了时间戳和查询功能的实现。
作者姓名:游嘉豪
原文链接


