多线程: synchronized 和 Lock 入门
synchronized 锁的三类对象
- Class锁, 常见有
synchronized(this.getClass()), 以及静态方法加锁 - 对象锁, 常见有
synchronized(this), 以及实例方法加锁 - 属性锁
八锁现象
两个线程持有同一把锁, 后抢到锁的线程需要等待锁的释放:
public class Test1 {
    public static void main(String[] args){
        Phone phone = new Phone();
        new Thread(()->{
            phone.sendSms();
        }, "A").start();

        try {
            TimeUnit.SECONDS.sleep(1);
        } catch (InterruptedException e) {
            e.printStackTrace();
        }

        new Thread(()->{
            phone.call();
        }, "B").start();
    }
}

class Phone {
    private Integer num =0;

// 锁当前的 Phone对象实例
    public synchronized void sendSms(){
        try {
            TimeUnit.SECONDS.sleep(2);
        } catch (InterruptedException e) {
            e.printStackTrace();
        }
        System.out.println("发短信");
    }

    public void call(){
    	// this 也表示当前对象实例, 所以两个线程共用锁
        synchronized (this) {
            System.out.println("打电话");
        }
    }
}
一个线程持有锁, 另一个线程不持有, 无需等待锁释放
上例中, 去掉 call() 方法中的 synchronized 块, 则 “打电话” 先于 “发短信”
两个线程持有不同种类的锁, 无需彼此等待锁释放
public class Test1 {
    public static void main(String[] args) {
        Phone phone = new Phone();
        new Thread(() -> {
            phone.sendSms();
        }, "A").start();

        try {
            TimeUnit.SECONDS.sleep(1);
        } catch (InterruptedException e) {
            e.printStackTrace();
        }

        new Thread(() -> {
            phone.call();
        }, "B").start();
    }
}

class Phone {
    private Integer num = 0;

	// 锁对象
    public synchronized void sendSms() {
        try {
            TimeUnit.SECONDS.sleep(2);
        } catch (InterruptedException e) {
            e.printStackTrace();
        }
        System.out.println("发短信");
    }

    public void call() {
    // 锁属性
        synchronized (num) {
            System.out.println("打电话");
        }
    }
}
同一种锁, 锁不同的对象, 无需彼此等待
public class Test1 {
    public static void main(String[] args) {
        Phone phone1 = new Phone();
        Phone phone2 = new Phone();
        new Thread(() -> {
            phone1.sendSms();
        }, "A").start();

        try {
            TimeUnit.SECONDS.sleep(1);
        } catch (InterruptedException e) {
            e.printStackTrace();
        }

        new Thread(() -> {
            phone2.call();
        }, "B").start();
    }
}

class Phone {
    private Integer num = 0;

// 虽然都是锁 Phone的实例, 但是一个是 phone1, 一个是phone2, 不是同一把锁
    public synchronized void sendSms() {
        try {
            TimeUnit.SECONDS.sleep(2);
        } catch (InterruptedException e) {
            e.printStackTrace();
        }
        System.out.println("发短信");
    }

    public synchronized void call() {
        System.out.println("打电话");
    }
}
static 修饰的方法上加锁, 等于锁类的Class对象
public class Test1 {
    public static void main(String[] args) {
        Phone phone1 = new Phone();
        Phone phone2 = new Phone();
        new Thread(() -> {
            phone1.sendSms();
        }, "A").start();

        try {
            TimeUnit.SECONDS.sleep(1);
        } catch (InterruptedException e) {
            e.printStackTrace();
        }

        new Thread(() -> {
            phone2.call();
        }, "B").start();
    }
}

class Phone {
    private Integer num = 0;

    public static synchronized void sendSms() {
        try {
            TimeUnit.SECONDS.sleep(2);
        } catch (InterruptedException e) {
            e.printStackTrace();
        }
        System.out.println("发短信");
    }

    public static synchronized void call() {
        System.out.println("打电话");
    }
}
上例中, 两个线程锁的都是 Phone.Class 对象, 共用同一把锁, 所以先 “发短信”, 再"打电话"
下面例子, 线程仍共用一把锁, 能证明锁 static 方法就是锁 Class对象
public class Test1 {
    public static void main(String[] args) {
        Phone phone1 = new Phone();
        Phone phone2 = new Phone();
        new Thread(() -> {
            phone1.sendSms();
        }, "A").start();

        try {
            TimeUnit.SECONDS.sleep(1);
        } catch (InterruptedException e) {
            e.printStackTrace();
        }

        new Thread(() -> {
            phone2.call();
        }, "B").start();
    }
}

class Phone {
    private Integer num = 0;

    public static synchronized void sendSms() {
        try {
            TimeUnit.SECONDS.sleep(2);
        } catch (InterruptedException e) {
            e.printStackTrace();
        }
        System.out.println("发短信");
    }

    public void call() {
        synchronized (Phone.class) {
            System.out.println("打电话");
        }
    }
}
线程的状态
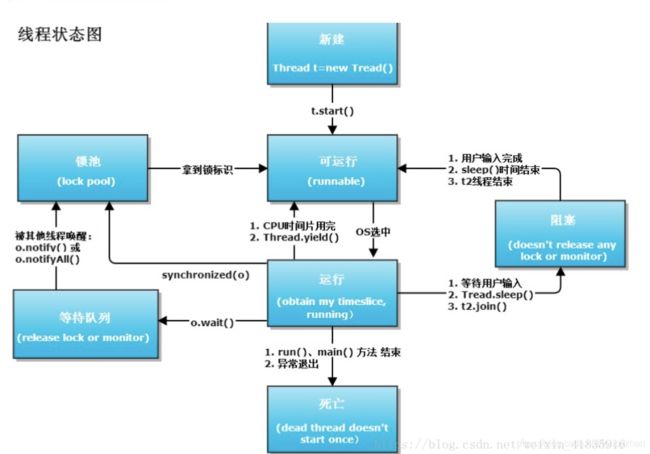
wait() 和 sleep() 的区别
wait() 使得线程释放锁, 进入等待队列, 只有被 notify() 或 notifyAll () 唤醒, 进入锁池; sleep() 的线程不会释放锁
wait() 和 notify() 必须在同步块内出现, 而 sleep() 不一定
生产者消费者模式
核心: 利用wait() 和 notify() 控制线程之间通信, 比如, 如何控制两个线程, 使他们交替工作?
/**
 * 线程操作资源类
 */
public class Data {
    private int num = 0;

    public synchronized void increment() throws InterruptedException {
        if (num > 0) {
            wait();
        }
        System.out.println(Thread.currentThread().getName() + " =>" + (++num));
        notifyAll();
    }

    public synchronized void decrement() throws InterruptedException {
        if (num <= 0) {
            wait();
        }
        System.out.println(Thread.currentThread().getName() + " =>" + (--num));
        notifyAll();
    }
}

/**
 * 生产者- 消费者模式 线程通信
 */
public class Test {
    public static void main(String[] args) {
        Data data = new Data();
        new Thread(() -> {
            for(int i=1;i<=100;i++) {
                try {
                    data.increment();
                } catch (InterruptedException e) {
                    e.printStackTrace();
                }
            }
        }, "A").start();

        new Thread(() -> {
            for(int i=1;i<=100;i++) {
                try {
                    data.decrement();
                } catch (InterruptedException e) {
                    e.printStackTrace();
                }
            }
        }, "B").start();
    }
}
可以看到, num>0时, A等待B将num变为0再唤醒自己; num<=0 时, B等待A将num变为1, 再唤醒自己; 两个线程交替输出0和1
虚假唤醒问题
如果, 在上例的Test 类中, 启动如下四个线程:
/**
 * 生产者- 消费者模式 线程通信
 */
public class Test {
    public static void main(String[] args) {
        Data data = new Data();
        new Thread(() -> {
            for(int i=1;i<=100;i++) {
                try {
                    data.increment();
                } catch (InterruptedException e) {
                    e.printStackTrace();
                }
            }
        }, "A").start();

        new Thread(() -> {
            for(int i=1;i<=100;i++) {
                try {
                    data.decrement();
                } catch (InterruptedException e) {
                    e.printStackTrace();
                }
            }
        }, "B").start();

        new Thread(() -> {
            for(int i=1;i<=100;i++) {
                try {
                    data.increment();
                } catch (InterruptedException e) {
                    e.printStackTrace();
                }
            }
        }, "C").start();

        new Thread(() -> {
            for(int i=1;i<=100;i++) {
                try {
                    data.decrement();
                } catch (InterruptedException e) {
                    e.printStackTrace();
                }
            }
        }, "D").start();
    }
}
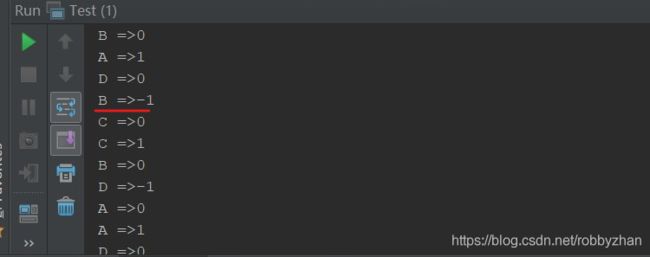
<=0 则BD线程 等待, >0则AC 线程等待, 那 B =>-1从何而来呢? 这就涉及 虚假唤醒问题
某一时刻, 当 num==0 时, D抢到锁, 进入等待队列, B再抢到锁, 进入等待队列, 四个线程状态如下:
等待队列: B,D
锁池: A,C
假设 A获得锁, 执行 ++num, 并用 notifyAll() 唤醒所有等待队列中的线程, 则 BD都进入锁池, 如果下一时刻, D抢到锁, 执行 --num, num为0
下一时刻, 如果B抢到锁, 继续执行B线程, 由于B之前停在 wait(), 此时无需做 if判断, 可以直接 --num, 造成了 num为负数
 public synchronized void decrement() throws InterruptedException {
      if (num <= 0) {
          wait();		// 线程被唤醒时, 从这里往后走
      }
      System.out.println(Thread.currentThread().getName() + " =>" + (--num));
      notifyAll();
  }
解决虚假唤醒的方法
虚假唤醒的原因: wait() 在 if 代码块中, 唤醒时不再经过 if 的判断
解决方法: if 替换为 while; 或者加 else{}
Lock 锁的基本 API
我们用 Lock 锁的写法, 替换上面例子的 Data 资源类
/**
 * 多线程操作资源类
 */
public class Data {
    private int num =0;
    Lock lock = new ReentrantLock();
    Condition condition = lock.newCondition();  // 将 Condition 和 Lock绑定

    public void increment(){
        lock.lock();		// 手动锁代码
        try {
            while (num > 0) {
                condition.await();
            }
            System.out.println(Thread.currentThread().getName() + " =>" + (++num));
            condition.signalAll();
        } catch (Exception e) {
            e.printStackTrace();
        } finally {
            lock.unlock();		// 手动释放锁
        }
    }

    public void decrement(){
        lock.lock();
        try {
            while (num <= 0) {
                condition.await();
            }
            System.out.println(Thread.currentThread().getName() + " =>" + (--num));
            condition.signalAll();
        } catch (Exception e) {
            e.printStackTrace();
        } finally {
            lock.unlock();
        }
    }
}
使用 Condition 监控类, 精确唤醒线程
Lock 锁和 synchronized 锁的最大区别, 就在于 Lock 结合 Condition 可以精确唤醒线程
/**
 * A,B,C,A,B,C 顺序执行
 */
public class Data {
    private volatile int num = 0;
    private Lock lock = new ReentrantLock();
    private Condition condition1 = lock.newCondition();
    private Condition condition2 = lock.newCondition();
    private Condition condition3 = lock.newCondition();

    public int getNum() {
        return num;
    }

    public void printA() {
        lock.lock();
        try {
            if (num < 100 && num % 3 != 0) {
                condition1.await();
            } else{
                System.out.println(Thread.currentThread().getName() + " =>" + (++num));
                condition2.signal();
            }
        } catch (Exception e) {
            e.printStackTrace();
        } finally {
            lock.unlock();
        }
    }

    public void printB() {
        lock.lock();
        try {
            if (num < 100 && num % 3 != 1) {
                condition2.await();
            } else{
                System.out.println(Thread.currentThread().getName() + " =>" + (++num));
                condition3.signal();
            }

        } catch (Exception e) {
            e.printStackTrace();
        } finally {
            lock.unlock();
        }
    }

    public void printC() {
        lock.lock();
        try {
            if (num < 100 && num % 3 != 2) {
                condition3.await();
            } else{
                System.out.println(Thread.currentThread().getName() + " =>" + (++num));
                condition1.signal();
            }
        } catch (Exception e) {
            e.printStackTrace();
        } finally {
            lock.unlock();
        }
    }
}

public class Test {
    public static void main(String[] args) {
        Data data = new Data();
        new Thread(() -> {
            while (data.getNum()<100) {
                data.printA();
            }
        }, "A").start();

        new Thread(() -> {
            while (data.getNum()<100) {
                data.printB();
            }
        }, "B").start();

        new Thread(() -> {
            while (data.getNum()<100) {
                data.printC();
            }
        }, "C").start();
    }
}